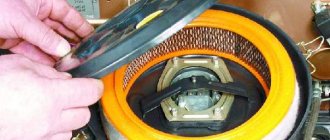
What are valve stem seals and where are they located?
Oil seals for the VAZ 2109 car
These caps are located directly on the engine valves, in the cylinder head. Another name for these caps is valve seals. Their main task is to prevent excess oil from entering the engine. These caps are made of special rubber. And rubber, even special ones, deteriorate over time and oil begins to flow directly into the combustion chamber of the engine. In this case, it is worth changing these parts.
Let's start replacing the valve stem seals
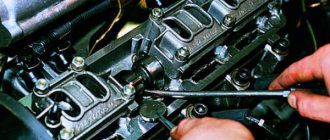
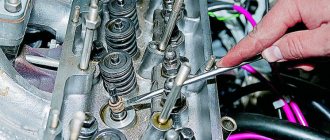
Installation of a device for removing crackers
- set the piston of the first cylinder to top dead center (pos. 9);
- unscrew the spark plug (pos. 26) and insert a tin rod into the hole, bring the rod under the valve that you are going to dry out;
- install a device for shooting crackers;
- screw the nut onto the nearest stud that secures the valve cover;
- install the device for removing crackers so that one end is put under the nut on the stud, and the other rests against the valve spring plate;
- squeezing the valve springs with a lever, remove the crackers with tweezers, and then remove the device;
How to know when it's time to change
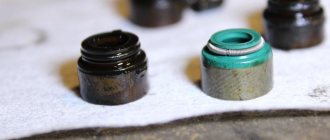
Worn caps of a VAZ 2109 car
It’s simple: if thick bluish smoke comes from the exhaust pipe of the car, then it’s time to change the caps . As a rule, this smoke appears only when the engine starts and when it stops. But if the caps are very worn, thick smoke constantly comes out of the chimney. However, smoke is not the only sign that the caps need to be urgently replaced. Sometimes smoke is practically not visible, but oil consumption in the car increases several times, while no external oil leaks (through various oil seals and gaskets) are observed. All this also suggests that it’s time to change the caps.
replacing valve stem seals
Around February, oil consumption appeared, from 0.7 l to 1.2 l per 5000 km, I tried another company - the effect was the same, 0.6-0.8 l was still gone. At the same time, the compression was from 13.2 to 14, i.e. . about the same as it was last year before decoking and with an oil consumption of about a glass per 7000 km. It’s dry in the pan, not even a single drop has hung on the lid lately. It’s running well. I decided to change the valve stem seals, and I noticed that in cylinders 1 and 3, the part of the thread closest to the combustion chamber is slightly damp, but the spark plug itself is dry. The caps have already been changed on a mileage of 85tkm, now 212tkm, they were in Reserve. I opened it up and, in general, I can’t call the caps stiff, but still a little less elastic than the new Corteco ones. The existing caps were very reluctant to come off, and I spent a long time fiddling around with removal. The valves were wobbly: 1 and 5 have increased play. I asked a repairman neighbor to evaluate it and said that it was better not to tighten it too much, but it was still far from something terrible. The 4th also has increased play, but not like 1 and 5. The other five are barely noticeable. In general, as I understand it, I’ll most likely do it in the fall, but not myself. If I would decide to change the valves and grind them in now, then I definitely need good experience and the same cutters and reamers. And, as far as I understand, this turns out to be a major overhaul of the cylinder head ?those. replacement of guides, most likely valves, possibly seats (but I hope without this), MSK, lapping. Are cast iron guides preferable or bronze/brass? I looked at the bed of the RV, there was no rubbing, I didn’t find any marks, the neighbors were also surprised at this condition for my mileage.
The condition on the covers is the same, I didn’t take a photo. More precisely, I forgot) the pushers have slight rubbing
but from looking at various photos on the Internet, everything seems to be fine. They fit quite tightly in the cylinder head.
But the cams of the RV cause mixed feelings. It seems that it can be worse, but you can’t call it ideal. Although the gaps were always within the tolerance of 0.05, only 1-2 times a couple ran away by 0.07-0.1, and I often climb in to adjust , so I definitely haven’t driven much with the non-factory gap.
Korteko took the caps, was choosing between them and the Reserve, but decided to try these this time.
At the same time, I adjusted the valves, took measurements before removing the valve (only 3 were missing), changed the washers while everything was disassembled, after reassembling I checked - it fit perfectly)
A couple of general photos under the valve cover (photo in the garage with flash):
After assembly, I changed the fuel and air filters, the latter again Mann, fits well to the pan. I also liked the standing Kolbenshmidt, it fits just as well, all the garbage is only on the outside, but I have a supply of 5 pieces of Mann)
Of course, I changed the rubber seals on the housing of the auxiliary units, the distributor, and checked the NUOS. There is also a question about this: if all 3 nuts of the distributor fastening are not tightened, then the mark jumps somewhere from 0 to +4 degrees, when I tighten it well, it stays at +1, sometimes it twitches a little. Is it normal that it jumps like that when it’s not tightened? Or are these questions for the bearing?
I won’t say anything about oil consumption yet, I didn’t drive much, and it usually started after 1500-2000 km. But most likely it will be, the condition of the guides will affect it.
And a small observation of behavior with a full load: On the weekend with friends we went to the river with an overnight stay (there was also a sailing regatta there), the car was crammed under the very roof. 5 people, what didn’t fit up to the roof, lay on the hands of the back ones, stood by them in the legs and feet of the front passenger. In the photo without the driver (me).
I often hit the mudguards, mainly in the waves and when waddling across the field. Surprisingly, the wheel did not seem to reach the protection (I inspected it upon arrival). I liked the performance of the suspension, it never came to a breakdown, although there were more potholes on that road than on Samara) I raced in this form with Shniva, she beat me only when there were obvious gullies, but she was empty) And all sorts of puzoterki and SUVs were overtaken as if they were standing. It’s just a little hard to get under way, the excess grinds.
Also, in my spare time, I measured the height of the rear part to the plastic arch guard, to make it clear whether the Acomi rear supports raise this part or not, and this is what happened (the springs (Kayaba) and shock absorbers (Demfi Premium) are the same, the only difference is the Acomi supports -black bagels SS-20) 1) Acomi, left 29.7 cm, right 30 cm 2) bagels SS-20, left 28.5 cm, right 29.5 cm Gasoline in the tank is the same amount, +- 2 liters, in the first case in the trunk closer to the right There was a bag of about 10 kg on the side, there was no way to put it out.
Prices: Korteko caps-220r air filter Mann-200r fuel filter with sump-35r
Sequencing
- There is a striker on the collet. You need to hit it accurately with a hammer. This will cause the cap to crumple and it will be possible to remove it from the collet with pliers.
The oil seal is removed from the guide bushing using a collet - Once the crackers are removed, the valve plate and its spring are removed.
When the spring is fixed, the valve nuts are removed using medical tweezers - After this, a tool is installed to decompress the valves and, with its help, the valve spring is pressed.
- After the piston reaches the dead center, the spark plug is unscrewed from the cylinder, and a tin rod with a diameter of 8 mm is inserted into the opened hole. The tip of the rod should be between the valve and the bottom of the piston.
- Now the crankshaft must be turned so that the piston in the cylinder where the caps are planned to be replaced reaches top dead center.
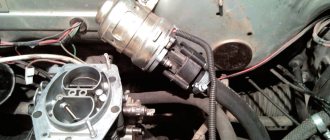
The camshaft is removed, then the oil seal is removed - First of all, you need to remove the wires from the battery.
- The timing belt is removed.
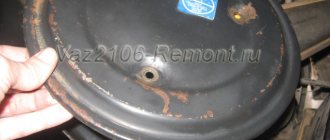
- The pulley with teeth is removed from the camshaft.
- The wires are removed from the first fastening, and the nuts are unscrewed from the third fastening.
- Four nuts are unscrewed from the front cover, then the nuts from the rear cover are unscrewed (there are six of them).
- Both covers are removed.
- The camshaft is removed.
- The oil seal is removed from the camshaft.
The valve spring is pressed firmly using a collet - After pressing the valve spring, the crackers can be removed using tweezers.
First, the valve plate is removed, and then the spring underneath it is removed. - Now, using a collet, you need to remove the oil seal from the guide sleeve.
By hitting the handle with a hammer, the cap is compressed in the collet and removed - The new cap is pressed into the valve plate, then a spring is installed on it.
- Similar operations are performed with all caps that need replacement.
- After replacement, the cylinder head is reassembled.
DIY video on replacing valve seals on a VAZ 2109
Important points
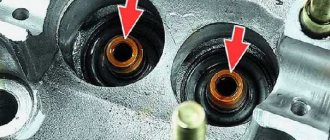
- After removing the worn cap, you should carefully inspect the walls of the guide sleeve, since any scratch on this wall left by the collet can lead to renewed oil leakage into the combustion chamber and will negate all efforts to replace the cap.
- Before installing new caps, you must remember to remove the springs from them.
- Before pressing in the new cap, the installation site is generously lubricated with oil. This helps to place the cap in place more accurately, without putting extra effort into it.
This is interesting: Test of the GAZ-33081 all-terrain vehicle
As can be seen from the article, it is quite possible to replace valve stem seals on a VAZ 2109 with your own hands. The main thing is to be patient, follow the sequence of operations and not make much effort when pressing the new caps into place.
Copywriter with five years of experience.
How to make a replacement
Replacing oil seals in a VAZ 2109 engine is a relatively labor-intensive procedure that requires special skills and certain tools. It is advisable to carry it out in a garage or workshop. Allow enough time for work so as not to rush. Replacing oil seals in a VAZ 2109 engine requires care, precision, and attentiveness.
Prepare everything you need
Successful replacement of valve stem seals can be done with your own hands. But this will require more than just a simple set of keys. You will have to take care of preparing special devices. Before starting work, you must equip:
- tin (or soft metal) rod with a diameter of no more than 8 mm;
- desiccant;
- tweezers;
- hammer;
- set of keys, socket heads;
- pliers;
- collet (puller) for removing oil seals;
- flat screwdrivers;
- press-fit frame.
VAZ 2108 and VAZ 2109: replacement of valve seals. DIY Repair Guide
Replacing valve seals for VAZ 2109
Replacing valve seals on a VAZ 2109 and replacing valve seals on a VAZ 2108 is, in fact, the same work process and completely identical, since the engines on these VAZ models are the same. As a rule, blue smoke is not a good sign, the appearance of which means that engine repair is necessary. The job of valve seals, in general, is to remove excess oil that gets onto the valve stem. They remove excess oil, not all of it; the remaining small amount of oil should lubricate the valve with the bushing. You can study the operation of valve seals in more detail using special videos and photos.
What are the caps made of?
Let's look at what they are made of:
- On early VAZ cars, valve stem seals were made without reinforcement, the material for them was fluoroplastic
- Now the caps are made of rubber; its edge is pressed against the valve stem by a steel bushing. This reduces the risk of misalignment in the assembly during engine operation.
- The use of fluorine rubber and acrylate as materials in modern conditions increases the vehicle mileage to 150 thousand kilometers
Injection engine
The next step is to rotate the crankshaft to match the marks on the gears and remove the timing belt. The crankshaft can, of course, be turned through the camshaft gear mounting bolt, but I advise turning it by the generator pulley mounting bolt, so as not to grind off the edges on the camshaft bolt. When the marks are set, use a 17 key to loosen the tension roller and remove the belt. To unscrew the camshaft gear, to the left of it you can see a pin on which we put a small tube through the holes in the gear so that it does not turn. And with the same key we unscrew the bolt and carefully remove the gear so that the key is not lost. Although it often fits well in place, it still happens when it falls out, so it is better to remove it and put it separately.
In the place where the tube was put to stop the gear, there is a bolt that needs to be unscrewed and the metal timing protection slightly bent so that the camshaft can be pulled out.
Using a 10mm socket or open-end wrench, unscrew the bolts securing the camshaft bearing caps, and then remove the camshaft itself. When removing the camshaft, try not to damage the oil seal, but the best thing to do is simply replace it with a new one.
Using a regular syringe, you should pump out the remaining oil and unscrew the spark plugs. Since the crankshaft is aligned according to the marks, the pistons in the first and fourth cylinders are at top dead center, so you need to start replacing the oil seals from the first cylinder, and then from the fourth, so as not to get confused. And then it will be possible to make another revolution of the crankshaft, during which the pistons in the second and third cylinders will simultaneously be at TDC and replace the seals in them. To begin with, the pushers are removed from the intake and exhaust valves and, using a special device for depressuring the valves, the intake and exhaust valves of the first cylinder are decompressed.
To do this, the device is installed on the cylinder head, a special heel rests against the spring, using a handle, the spring is pressed and the crackers are removed with tweezers. The springs with crackers are removed, and most importantly, during assembly, do not confuse the springs, crackers and pushers; for convenience, arrange them on the table in the order of disassembly.
When you get to the oil seal itself, use a puller to press it out, or if there is no puller, you can do this with suitable pliers. Just do this carefully so as not to leave burrs on the valve stem, otherwise even with a new oil seal, oil will leak.
All that remains is to put on the new oil seal and, using a mandrel in the form of a metal tube suitable for the diameter of the oil seal, press it into place with a hammer. By tapping the mandrel with a hammer, the oil seal will shrink and the sound will become duller, as evidenced by the fact that the oil seal is pressed in completely. The main thing is not to overdo it, so as not to spoil it, and during pressing, make sure that the oil seal is not distorted.
Next, rotate the crankshaft so that the pistons in the second and third cylinders are at TDC and replace the seals in the same way. Before assembly, screw the spark plugs into place to prevent debris from getting into the cylinders, and clean the seat of the valve cover and accessory drive housing from any remaining old sealant. I recommend replacing the camshaft oil seal and gaskets under the valve cover and the housing of auxiliary units with new ones, after first applying sealant to their seats. Upon completion of work, assembly is carried out in the reverse order of removal.
Symptoms of a problem
If the valves have not been adjusted properly, a characteristic clattering sound appears when the engine starts. This rather loud noise comes from under the block cover. You can hear it especially well when the speed increases.
If the valve clearance is significantly larger than specified, the loud clatter becomes more distinct, and noise appears even at low engine speeds.
Adjustment
To adjust the gap, you must use the appropriate shims. They are installed on top of the valve tappets.
If you choose the right shim using trial and error, you can return the clearance to optimal values, thereby restoring normal engine operation.
There are certain standards regarding clearance sizes depending on the valve.
Valve type
Normal clearance
Tolerance
Adjustment process
Adjusting the gaps yourself is not difficult. Just follow the instructions provided, as well as video tips and visual demonstrations of the process.
- Remove the unit cover and clean the surfaces with a clean rag. You need to remove traces of engine oil.
- Place a device for recessing the valve tappets on the cover fastener studs. This is the most common lever with a handle.
- Set the piston of the first cylinder to the TDC position - top dead center. To do this, remove the camshaft drive belt cover and rotate the crankshaft as it rotates. The marks on the camshaft drive gear and the rear gear cover must match. If you remove a couple of spark plugs, it will be easier to turn the crankshaft.
- After aligning the marks, the crankshaft rotates about another 50 degrees, no more. This will allow you to unscrew the camshaft cam from the valve lifters.
- Using a feeler gauge, check the condition of the gaps on valves 1-3 and 5. If the gap differs from the required one, return the required parameters by replacing the adjusting washers.
- To adjust the clearances, the pushrods are recessed a little so that you can release the shims. The pushers are recessed by pressing the lever. Do not let go and lock it in the desired position. Be sure to place the clamp so that it is between the edge of the pusher and the camshaft.
Fixing the pusher
- Pry the adjusting washer off the pusher by prying it with a flat-head screwdriver. On the back of the washers there is usually a mark with the size. If not, you will have to measure it manually. Write down somewhere how thick the washer you are using is, and using the dimensions as a guide, select a new washer.
- New shims must be installed with the numbers down. By recessing the device for compressing the valve pusher, the retainer can be removed.
- Check the gap. If necessary, perform the operation again, taking a washer larger or smaller than the previous one.
- Having completed the adjustment, the crankshaft rotates 360 degrees, which provides access to valves 4, 6, 7 and 8. They are adjusted in the same way.
Types and purpose of devices
The main task of the VAZ 2109 valve stem seals is to create a seal at the point of contact between the timing valves and bushings. This prevents engine oil from entering the cylinders (combustion chambers). Progress in the automotive industry has come a long way, but some parts still wear out greatly during the operation of the car. Therefore, such parts began to be called consumables. Consumables also include valve stem seals. But with only a stretch, because their location is difficult to access.
Operating principle of valve stem seals
These parts are included in the gas distribution mechanism, as they function in close contact with the valves, which are an important part of the timing belt. Valves are divided into exhaust and inlet. Their upper part is always in the zone of oil mist, which is created by the rotation of the camshaft. Their lower part is in the area of the fuel-air mixture (for the intake valve) or in the area of the exhaust gases (for exhaust valves). For the camshaft to function properly, it urgently needs constant lubrication, but oil getting into the combustion chambers negatively affects the operation of the power plant.
When a valve is raised or lowered, oil is removed from its stem each time. This work is performed by valve stem seals. These small parts prevent the poppets and valve stems from becoming coked.
Carbon deposits appear when the fuel-air mixture ignites. In this case, excess oil burns, which leads to coking. Engine wear increases, the fuel-air mixture becomes leaner, and the engine begins to operate unstably. The good condition of the seals is very important, and they are subject to serious quality requirements.
Device
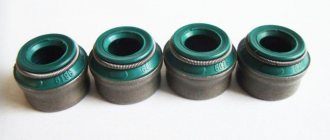
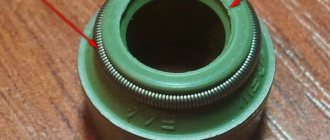
Oil seals are a modern version of valve seals, which are equipped with a powerful steel sleeve inside and an expander spring. Springs are used to secure the edges of the caps and valve stems.
Actual size of the caps
Gaskets are made primarily of rubber, which becomes harder over time and wear occurs, so the element ceases to properly perform its functions. As a result, oil ends up inside the combustion chamber.
There is only one sign of wear on the valve stem seals - thick blue smoke begins to actively pour out of the exhaust pipe, plus oil consumption increases.
There is only one solution to this situation - replacement.