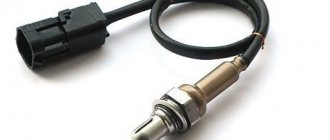
On VAZ-2109 vehicles with a carburetor fuel injection system, an exclusively non-contact ignition system was installed. It is much more reliable than contact, as it has a number of advantages. And the most important thing is the absence of friction between the active elements of the system. All work is done by semiconductor elements. The result is a long service life of the ignition system and stable operation under any conditions. And the most important thing is that you do not need to frequently adjust the ignition. The Hall sensor on the VAZ-2109 does not need constant monitoring; it is enough to install it correctly once.
Design and principle of operation
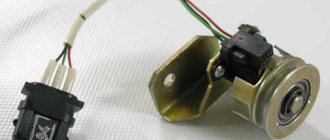
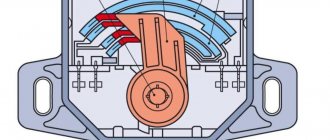
The controller design consists of the following parts:
- magnet;
- rotor;
- chip;
- plastic housing;
- conclusions;
- magnetic circuits.
The sensor operates based on the Hall effect. The principle of operation of the element is as follows:
- The rotor has four teeth that rotate while the engine is running.
- Pulses are constantly read.
- The received information in the form of a signal is sent to the switch.
- The pulse arrives at the installed coil.
- An increased voltage of 22–25 kV is supplied to the spark plugs.
The type of functioning is not complicated.
Another diagnostic method
Before checking the Hall sensor on the VAZ-2109, you will need to make preparations.
But at the same time you will certainly determine the integrity of the device. Execution procedure:
- Connect the central terminal of the ignition coil to the spark plug.
- Connect the spark plug body to the power supply negative (ground).
- Remove the Hall sensor.
- Turn on the ignition. The block with wires must be connected to the sensor.
- Use a screwdriver or any metal (magnetic) object near the active part of the device. If a spark appears, then the sensor is working. If not, it needs to be replaced.
However, if the operation of the sensor is unstable, this method may not help - try installing a known good one.
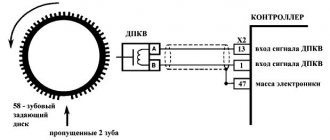
Connection diagram
The figure shows a basic electrical drawing for the VAZ 2108 and 2109 with pinout of contacts.
The ignition system operates as follows:
- The wire transmits voltage to the sensor from the switch through the red wire.
- A magnet creates a field.
- An impulse is supplied to the switch through the green wire.
Using a Hall element, the voltage directed to the high-voltage coil is regulated.
Where is?
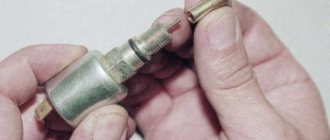
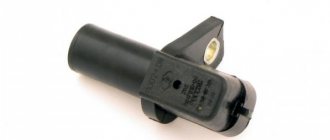
On VAZ-2109 cars with a carburetor, the Hall sensor is mounted in the ignition distributor housing. It works due to the fact that the distributor has a half-cylinder-shaped screen in its design. Its side surface has windows - slots. When the metal part of this half-cylinder passes near the active part of the sensor, an impulse is sent to the electronic switch. As soon as a window appears on the device, the pulse is interrupted.
The Hall sensor of the VAZ-2109 is supplied with a voltage of 12 V, but the current consumption is extremely low. It is only enough to open the semiconductor located in the switch. The latter amplifies the signal and feeds it to a coil, which is a step-up transformer. As a result, more than 20 kV is obtained from 12 Volts. True, the current decreases significantly. Therefore, a spark does not pose a danger to human life. But if you get such an electric shock, then it’s still not very pleasant.
Symptoms of a problem
Over time, the device becomes unusable. This can be recognized by the following signs:
- the engine runs poorly or stalls;
- the engine does not idle;
- car detonation is observed;
- While driving, the engine turns itself off.
Problems are not always serious. Sometimes the cause is simple oxidation of the contacts. It is enough to move them to restore engine operation. Such symptoms appear due to weakening of the sensor fasteners. To do this, it needs to be tightened. It happens that the reason lies in a short circuit in the wiring.
Setting the ignition timing
After we have studied the distributor device on the VAZ 2109, we move on to adjusting the ignition timing. To complete this job you will need:
- Crooked starter or ratchet wrench
- The slotted (flat) screwdriver is durable and has a powerful, wide blade
- Set of probes
- Open-end wrench “12x13”
- Conical rubber plug
- A spark plug wrench or a suitable socket with a wrench instead
Preparing for adjustment
In order for the engine of your car to work as expected, it is necessary that the spark plug spark jumps at the right time, which would ignite the mixture by the time the piston passes TDC and the gas, having completed the work of expansion, pushes the piston down. To ensure that the spark occurs on time, the ignition system uses a distributor, the main components of which are a contact group and a slider. The most important adjustments for cam ignition are: the gaps between the cams, the angles of the closed state of the contacts (UZSK) and the ignition timing. Before you start setting the ignition timing with your own hands, you need to make sure that:
- The spark plugs are in good condition and suitable for further use.
- If they have oil deposits on them, then it is recommended to calcinate them.
- It is not recommended to use sandpaper for cleaning, even fine sandpaper; fine abrasive from it may remain on the ceramic insulator and, as a result, the spark plug will begin to pierce
- It is not at all necessary to ignite the candles red hot, the main thing is to burn off the oil deposits
- Then we will adjust the gaps of all spark plugs in accordance with the manual
- To do this, use a wire probe
- We definitely check the condition of the contacts of our breaker
- If there are signs of metal burnout or signs of corrosion, replace the contacts
- It is not recommended to repair them, for one simple reason: after repair, the contacts will not last long! It’s easier to replace them and forget them for a long time
- We check the capacitor using a tester for charge and discharge
- The current should flow smoothly and slowly
- To do this, it is better to use a pointer tester, it can be seen more clearly
- You need to make sure there is good contact in the main wire coming from the ignition coil.
- By the way, it doesn’t hurt to check it either
- You can also check with a tester, megger, or the easiest way and completely free of charge at a good auto parts store on the stand
- We remove dirt from the ignition coil, distributor cap and distributor
- If carbon deposits have formed on the distributor cap, it must be replaced.
- Don’t save money, take a branded factory cover, the price will be paid off by the quality
- We carefully assess the condition of the carburetor
- If the carburetor does not respond to adjustment, it is time for repair. But this is a separate article
- Checking the operation of the vacuum ignition timing
- So that its drive runs without jamming, and the tube is thick-walled without cracks or breaks
We insert the breaker-distributor itself
Having made sure that all elements of the system are in good working order, we proceed to the adjustment, first consider the situation when the distributor was removed entirely:
- Now, in order to insert it into place, you need to select one of the 1st or 4th cylinders in which the piston moves in the compression stroke at TDC when the marks of the crankshaft pulley and the front cover are aligned
- This is done simply. We take a rubber cone plug, unscrew the spark plug of the first cylinder, insert the plug into the spark plug hole, tighten it
- Smoothly rotate the crankshaft with a crooked starter or ratchet wrench
- As soon as the desired (the first in our case) cylinder comes to TDC, a rubber plug comes out of it
- I advise you to immediately tie the cork so that you can look for it for a long time later
- Now we combine the marks on the pulley and the front cover (with the longest one)
- Then we insert the distributor strictly along the slots so that the slider stands evenly and perpendicular to the plane of the engine head and looks at it
- Then we raise the distributor a little bit to make it possible to rotate the shaft and not catch the splines, and rearrange it clockwise by one tooth
- We do this to give the distributor the fullest possible stroke for adjustment.
Direct adjustment
Adjustment instructions when the distributor is in place:
- It is necessary to set the gap between the contacts, strictly according to the car manual
- For classics this gap is 0.45
- Angles of the closed state are set only on special testers, so you don’t need to set them yourself, it just won’t work
- We connect all the wires as expected and set the torque adjustment in the middle of the stroke
- Then insert the spark plug of the 1st cylinder into the spark plug wire corresponding to the first cylinder and turn on the ignition
- Rotate the pulley counterclockwise about 45 degrees
- Then we create ground contact for the spark plug and smoothly rotate the pulley in a clockwise direction
- As soon as a spark jumps between the electrodes, stop rotating the crankshaft
- Checking the marks (on the cover and pulley)
- If there is a run-up between them, you need to turn the distributor one to two degrees in the required direction
- When the pulley mark runs forward from the front cover mark in the direction of rotation, it means that the ignition is late and the distributor should be turned counterclockwise
- When the mark, on the contrary, does not reach the mark on the cover, it means that the ignition is early and the distributor should be turned clockwise
- Next, we repeat the previous procedure with rotating the pulley back and again catch the moment the spark jumps, compare the marks and adjust
- With some experience everything will turn out quickly and easily
Advice: the more carefully and slowly you rotate the pulley, the more accurately you will be able to set the ignition
- When we have reached an exact match of the marks, tighten the distributor and turn the crankshaft two full turns, then check the adjustment again
- When a run-up appears, eliminate it; if everything matches, start the engine and warm up
- Next, we accelerate the car to a speed of 40-50 kilometers per hour, and engage fourth gear, then sharply press the gas
- If you suddenly hear the sound of valves busting, then the ignition should be set later
- Typically, fine adjustments do not require further adjustments.
Quick method
A faster method is suitable for starting the engine for the first time after repair:
- Install the distributor in place according to the principle described above
- It’s easier to set the advance torque
- Having found the TDC of the piston of the 4th cylinder, we combine the crankshaft mark with the middle mark on the cover
- Then we turn the distributor slowly clockwise and counterclockwise, as soon as a spark jumps, we stop and fix the distributor
- Ignition set
How to check
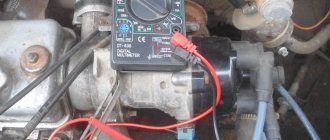
If you suspect a sensor malfunction, you can diagnose it as follows:
- Using a working element. The power is disconnected from the main sensor and connected to a new device. Then the central ignition wire is removed and placed on a metal surface. This is done to visually record the spark. The ignition turns on. To simulate the operation of the screen, a thin metal object is moved near the magnet. If a spark appears noticeably, it means that the original sensor was faulty.
- Using a multimeter. First, it is switched to voltmeter operating mode. The meter wires are connected to the element. When you move a metal object inside the sensor, the operation of the screen will be simulated. If the device shows a voltage change ranging from 0.4 V to 11 V, then the element is working.
- By creating a simulation of a new sensor. Power is disconnected from the element. The central wire of the distributor is removed and placed on ground to observe the spark. At the next stage, contacts “3” and “6” are closed and a spark is observed. A sensor malfunction is confirmed if it slips.
If such a check indicates a breakdown, then the element must be discarded and a new one installed.
How can you tell if the sensor is broken?
Before checking the Hall sensor on the VAZ-2109, you need to determine whether it is to blame for all the troubles? The problem is that many of the symptoms of ignition system failures are similar to those that occur when the carburetor or timing drive malfunctions. Here are the main symptoms of a Hall sensor malfunction on the VAZ-2109:
- The engine refuses to start.
- There are interruptions in engine operation. Moreover, they occur in all modes. The smoothness of the ride is disrupted and jerking is felt.
- The idle speed is broken - the speed is unstable or the engine simply stops.
- Unexpected engine stops.
- Significant reduction in power.
If you notice one or more symptoms, you should check the ignition system. It is much easier to disassemble than a carburetor. Therefore, when troubleshooting, it is worth moving from the lesser “evil” to the greater.
Replacement
When the check shows a malfunction of the sensor, then for removal you need to prepare a 10 mm wrench and a screwdriver. Procedure steps:
- Power is turned off from the device.
- The distributor is removed from the car.
- The device is placed on a workbench and the cover is removed.
- Carefully remove the boot with the slider.
- The plug screw is unscrewed.
- Remove the support plate screws.
- The vacuum corrector is dismantled. To do this, unscrew 2 screws.
- All wires are available.
- The sensor is removed along with the support plate.
- A new element is installed and installation is carried out in the reverse order.
During the replacement process, the entire internal space of the distributor must be thoroughly cleaned of dirt. As with flushing the carburetor, acetone is used for this.
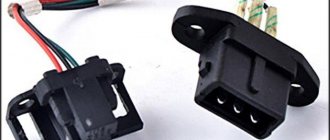
Functions and location
On carburetor VAZ 2109, the Hall sensor (HL) is responsible for opening and closing the contact group. When the screen with windows is rotated, a signal is sent to the device, which transforms into an electrical one. Through the switch, the signal goes to the ignition coil, and there it turns into an electric charge - a spark.
The DH is located at number nine on the ignition distributor. You need to look for the device under the dust shield. The sensor is secured to the base plate using rivets or a pair of screws. This already depends on the type of distributor used.
On injection VAZ 2109 there is no Hall sensor. Its functions are performed by the crankshaft position sensor.
Prices
For VAZ 2108–2109, the original number of the Hall device is product with article number 21080-3706800-00. If it is not available, pay attention to analogues. Possible options are presented in the table.
| vendor code | Manufacturer organization | Price in rubles |
| 21080-3706800-00 (original) | LADA | 590 |
| 21080370680082 (analog) | AVTOVAZ | 240 |
| GLSS133 (analog) | GALLANT | 230 |
| 21080370680000 (analog) | AUTO ELECTRONICS | 195 |
| 21080370680001 (analog) | AVTOVAZ | 190 |
| RK02008 (analog) | REMCOM | 150 |
The presented analogues are high-quality products that can be installed on a car.
Replacing the hall sensor on a VAZ 2108, VAZ 2109, VAZ 21099
Welcome! Hall sensor - present exclusively in distributors of contactless ignition systems on carburetor cars, it works on the Hall principle, that is, it sends a signal and can understand to what level it is sent, if when the signal is sent it returns, then its resistance increases (At this moment there is still a shutter slips in the distributor, which is opposite the sensor) due to this increase, the switch of the contactless ignition system begins to send a signal to the coil and it generates a current that is sent to the distributor and a spark occurs in one of the cylinders, thus this sensor works.
Note! To replace this sensor, you will need: Various types of keys, a screwdriver and a new sensor itself, in addition, stock up on chalk so that you don’t have to turn the ignition on, and immediately put the distributor according to the marks and you can drive the car further!
Summary:
Where is the hall sensor located? It is located in the distributor, we will not be able to show it in detail, since during its replacement you will become more familiar with its location, so for clarity and a little presentation, in the photo below the arrow indicated the connector of this sensor, approximately in this place ( A little lower), the sensor is located.
When do you need to change the hall sensor? A sensor is just a sensor, it is an electronic part and over time it becomes clogged and starts to work incorrectly or simply wears out; if it fails, the car will immediately stall (If you are driving it) or will no longer start (If you had it parked on one place), as soon as this happens to you, disconnect the high-voltage wire from the spark plug and unscrew it, then connect the wire to its place and try to start the car again, while placing the spark plug as close to ground as possible, while the engine starts spin, look at the spark plug and if you find a spark on it, then the sensor is working and does not need to be replaced, besides this there is another way by which the sensor can also be checked for functionality, this method is performed using a thin metal object (a knife is best use), but only the sensor will have to be removed, as soon as it is removed, connect a block of wires to one end and at the other end create an imitation of the operation of the distributor, to create this imitation you need a knife, you will need to carry it a couple of times in that place of the sensor where the curtains go, see this place in more detail in the photo below, everything is clear there and by the way, you need to carry the knife quickly, that is, insert it into the groove and sharply jerk your hand so that the knife comes out immediately from the groove, during this operation do not forget to turn on the ignition and look for a spark on the spark plug; if there is none, then the sensor is faulty or the spark plug or wire is faulty (In this case, you can unscrew the other spark plug and see if there is a spark on it or not).