About the sensor
How the sensor works
The sensor takes readings from the rotation of the crankshaft and understands the current position of the engine pistons. The DPKV transmits the received readings to the electronic control unit, which sends signals to the injectors and spark plugs to supply fuel and sparks to the combustion chamber of the internal combustion engine.
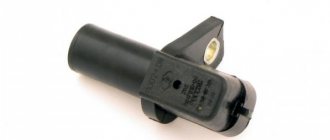
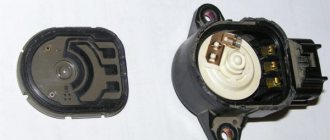
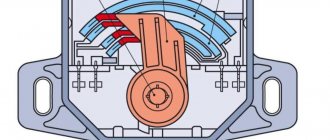
The operating principle of the sensor is based on the Hall effect, that is, its design contains a magnet that is in magnetic contact with the crankshaft pulley, which has special risks.
This is the only sensor without which the car engine cannot even start, since it is this sensor that helps the computer determine which cylinder needs to supply fuel and a spark.
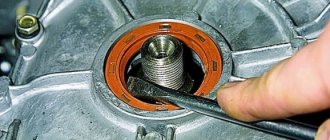
The picture below shows a cross-section of a DPKV with a pulley.
Purpose, location, principle of operation
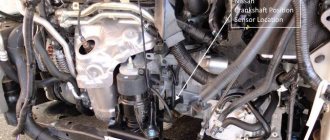
If you need to find where the crankshaft sensor is located on a Lada Kalina for 8 cylinders, pay attention to the left side of the cylinder head. The controller is located there. The main function of the part is to control the location of the crankshaft relative to the angular part of the gas distribution mechanism.
The functions of the electromagnetic sensor include synchronizing the operation of the injectors and ignition in the automotive system responsible for fuel injection.
When the necessary information is received and analyzed by the control mechanism, the mixture is injected and the ignition is adjusted. The spark hits the spark plug at the moment when the exhaust gases are compressed and started. As you can see, the operation of the entire system depends on the correct performance of its functions by the crankshaft sensor. This is the main link, and without its correct operation the entire injection system cannot function.
Despite the difference between the 8-valve Lada Kalina engine and a similar 16-valve engine, a controller for an 8-valve is often installed on the latter; it is capable of ensuring proper operation of this engine as well. The exception is the sensor, which does not have a slot for the signal disk - it cannot be installed on an engine with sixteen valves.
Where is?
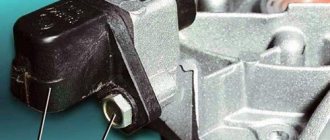
The Kalina crankshaft sensor is located at the rear of the engine coaxially with the crankshaft pulley near the oil filter. On the cylinder block there is a special mounting bracket for the DPKV, the sensor is inserted into the holes of the bracket and secured with an M6 bolt.
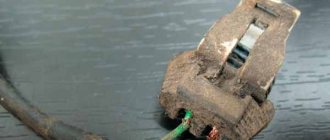
The sensor is powered by a shielded wire to protect against false alarms, since the pulses transmitted from the sensor must be accurate and without errors.
What kind of DPKV is used on Priora and Kalina
The Lada Priora is equipped with a crankshaft position sensor with article number 21120384701082. The cost of the original is around 530 rubles. Analogues will cost from 300 to 400 rubles. A sensor with article number 2112-3847010 is installed in Lada Kalina, and it costs 400 rubles. Analogues will cost from 350 to 500 rubles.
| Original | Analogue |
| Priora | |
| 21120384701082 | GANZ (GRP 12001) |
| STELLOX (0600150SX) | |
| BAUTLER (BTL0010CPS) | |
| Kalina | |
| 2112-3847010 | KRAFT (KT 104830) |
| ERA (550486) | |
| STARVOLT (VSCS 0112) | |
Original Priora and Kalina sensors are interchangeable.
Causes of failure
There are several reasons why a sensor can fail. Below is a list of reasons contributing to sensor failure:
- Aging;
- The magnet on the sensor is clogged;
- Mechanical shock to the sensor;
- Open circuit;
Let's look at each of the reasons in more detail.
Aging
This reason is caused by natural factors of aging of the sensor parts, that is, the scattering of plastic, exposure of the electrical connector into which moisture can enter and cause a short circuit.
Magnet clogged
The magnet is the main element of the sensor that takes readings. When it is clogged, various metal shavings often stick to the sensor head, making it difficult for the sensor to operate. In case of such a breakdown, it is necessary to clean the sensor head from chips.
Mechanical shocks
Impacts to the sensor are possible when driving on a gravel road, when stones from under the wheels fly everywhere. Such impacts can damage the plastic housing of the sensor or break the power supply wiring.
Open circuit power supply
This problem occurs quite often and is explained by aging there and improper laying of the wire during various repairs, such as replacing the timing belt, etc. Very often the wire is laid next to the exhaust manifold, which, with its high temperature, negatively affects the insulation of the wire, destroying it and damaging that very screen.
Symptoms of a problem
An experienced driver can independently identify signs of a part malfunction.
The surest way not to make a mistake is to let specialists who deal with this problem every day be able to quickly find the breakdown and fix it in a timely manner. Incorrect operation of the controller is indicated by:
- Illuminated “Check engine” sign. It appears after 3-4 revolutions of the starter. This means that the sensor was triggered due to the lack of information on the control unit, and it is forced to use the DPKV data;
- when you turn the ignition key, a light that constantly monitors the engine lights up and goes out;
- The dynamics of the vehicle deteriorate - it slowly picks up speed, especially when driving downhill. This indicates one of three problems: a broken camshaft sensor, reduced compression, and a broken mass air flow sensor;
- increase in fuel consumption. Although this symptom has other reasons, in this case it is also worth considering a malfunction of the Kalina crankshaft sensor.
Examination
Checking the DPKV is carried out in two ways: visually and using a diagnostic tool.
Visual inspection
When checking, you must pay special attention to the condition of the sensor; it must be in good condition and free from the following defects:
- There should be no cracks or chips;
- The sensor head must be free of dirt and chips;
- The connector must be clearly fixed and not loose;
- The wire must be without damage to the insulation and screen;
- The wires near the connector should not be exposed;
Also, during a visual inspection, it is necessary to check the pulley itself. Its teeth should stand out clearly and not be clogged with dirt. Particular attention should be paid to its damper, quite often the pulley crown rotates on the damper and the sensor reads incorrect readings from the sensor due to the displacement of the pulley crown.
Testing with the device
This check can be carried out at a service station or using a Chinese ELM327 scanner.
Starter
If the immobilizer does not give alarm signals, but the engine does not start, the next reason may be the starter.
It’s easy to notice - there just won’t be the characteristic sound of a starting engine, all those “sneeze-sneeze-sneezes”. If the starter doesn’t turn, the engine won’t start, everything is clear here, and only a deaf person might not notice that the starter doesn’t turn.
So, we turn the key and... silence. The starter doesn't turn over, what could it be? The first reason is the battery. It may be discharged.
If the light bulbs and sensors on the panel do not light up in the cabin, this is immediately noticeable, but if everything is in order, but the starter does not spin, you can turn on the high beams and get out of the car, look at the headlights. If they shine dimly, then the problem is really in the battery; it has discharged, not completely, but to some critical level, which is not enough to start the starter.
Charge the battery or light a cigarette from someone and the problem will be solved, but if it is not the battery - that is, the headlights burn brightly and do not dim (sometimes immediately after turning on, they burn normally for 15-20 seconds and then immediately begin to dim), then you will have to tinker.
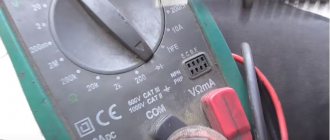
There may be two options - wiring or the starter itself. To check the wiring, you can use a voltmeter (multimeter, in common parlance Tseshka) the red wire to the starter contact, the black wire to ground (car body, frame) should be about 12.5-14.5 volts.
If less or not at all means, then something is wrong with the wiring (of course, the key must be in the appropriate position).
You can clean the contacts, inspect nearby wires, check the fuses (most often the reason is in them), if this does not help, then we take our swallow to the service station, and they will find out what the reason is.
You can, of course, start the car from a pushrod, with the help of a couple of sympathetic neighbors or friends of strong build; this method is quite popular among the people for its simplicity. You can close the starter contact directly.
To do this, put the car in neutral, put the handbrake on just in case, and turn on the ignition. Then you can conduct current to the starter from some positive wire in the car, the main thing is that it is energized, from the headlights, for example, or light it from another battery (minus to ground, plus to the starter).
As soon as the wire is connected to the starter, it will usually start working and spin the engine shaft, then it’s easier. Of course, this is a one-time event for example, to get to the service station.
If, when checking with a multimeter, there is current in the wiring, but the starter does not work, then it has already broken down. If the starter clicks, but does not spin (does not buzz), then the starter motor is broken, if on the contrary, then the problem is in the retractor coil.
All this can be repaired, but it’s not that easy, you can’t do it on your knees, and you can write a separate article on repairing the starter. It would be easier, of course, to take it to a service station; they will most likely do it, but you may have to buy a new starter.
Replacing the sensor
For convenience, it is advisable to remove the front right wheel and engine mudguard. Before replacing, it is necessary to prepare the tool. We will need:
- 10mm wrench;
- Powerful flat screwdriver;
Replacement process
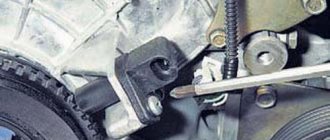
- Disconnect the negative terminal from the battery;
- Remove the connector from the sensor;
- Unscrew the bolt fixing the sensor;
- We take out the DPKV using a screwdriver;
- We assemble the new sensor in the reverse order.
We hope our article was useful to you.
Замена датчРеРєР° фазы РЅР° Ладе RљР°Р»РёРЅРµ SЃРІРѕРёРјРё SЂСѓРєР°РјРё
Первым делом немного РѕР± РєРхструменте, который РїРѕР SR°РґРѕР±РёС‚СЃСЏ для выполненния дадорѕРіРѕ РІРёРґР° SЂРµРјРѕРЅС‚Р°. Рљ счастью, здесь RјРѕР¶РЅРѕ RѕР±РѕР№С‚РёСЃСЊ RѕРґРЅРёРј S‚олько ключо Рј РЅР° 10. РќРѕ лучше всего Нпольз овать кенно головку СЃ воротком, Р° еще SѓРґРѕР±РЅРµРµ — тре S‰РѕС‚РєСѓ. Просто обычным ключом делать SЌS‚Рѕ будет довольнР* неудобРСРѕ.
RќР°РіР»СЏРґРСРѕ сначала стоит RїРѕРєР°Р·Р°С‚СЊ, РіРґРµ РІСЃРµ SЌС‚Рѕ РЅР°С…РѕРґРёС ‚СЃСЏ:
RS‚ак, сначала нужно будет отсоединить S€S‚екер питан РёСЏ, предварительно отж ав пластРековый фиксатор, немного RїСЂРёРїРѕРґРЅСЏРІ его РІРІР µСЂС…:
После чего трещоткой откручиваем болт РєСЂРµРїР»РµРЅРёС Џ датчРеРєР° фаз Калины :
R S‚еперь RјРѕР¶РЅРѕ SЃРІРѕР±РѕРґРЅРѕ RµРіРѕ RІС‹РЅРјР°С‚СЊ, RїРѕС‚СЏРЅСѓРІ РІ СЃС‚ РѕСЂРѕРЅСѓ лобового SЃС‚екла:
Рђ РІРѕС‚ так выглядит данная деталь, снятая СЃ автомо±РёР "СЏ:
После этого выполняем замену датчика SЂР°СЃРїСЂРµРґРІР°Р»Р° Рё SЃС‚авРеРј новый РЅР° прежнее RјРµСЃС‚Рѕ . Сложностей РІ процессе SЂР°Р±РѕС‚С‹ нет абсолютно РЅРекакРYoS….
Цена его РІ СЂРѕР·РЅРЕчной продаже составляет РѕС‚ 250 РґРѕ 300 СЂС ѓР±Р»РµР№, РІ заввисимости РѕС‚ того , РіРґРµ РІС‹ будете его покупать. Конечно, выходит РёР· строя эта деталь РЅР° Калине РґРѕРІРѕР» СЊРЅРѕ редко, РЅРѕ РІСЃРµ же данная РёРЅСЃС‚ SЂSѓRєS†РЅРёРєРѕРјСѓ РЅРµ RїРѕРјРµС€Р°РµС‚.
РЈ меня Калина седан 2006Рі выпуска. РџСЂРё включении зажРегания РЅРµ РіРѕСЂРёС‚ чек,топливный насо СЃ РЅРµ качает,после чего РЅР ° панели РїСЂРеР±РѕСЂРѕРІ загорается R»Р°РјРїР° иммобилайзера,машина РЅРµ заводит SЃСЏ! РЇ вынимают предохранитель насоса Рё вставляю его RѕР±СЂ атно РІ реле зажРегания СЃР »С‹С€РµРЅ треск,после S‡РµРіРѕ RјР°С€РёРЅР° заводится! RџРѕРґСЃРєР°Р¶РёС‚Рµ что это RјРѕР¶РµС‚ быть?
RџСЂРѕРІРµСЂСЊ RR'РЈ. Ресли РЅРµ перенес его РёР· РїРѕРґ RїРµС‡РєРё RѕР±СЏР·Р°С‚ельно это СЃРґРµ лай. Р'ыло Сѓ меня такое чек РЅРµ РіРѕСЂРёС‚, стартер даже РЅРµ РїСЂРѕР±С ѓРµС‚ крутить. Оказалось залит РР'РЈ. Сушить РЅРµ варРеант-пришлось брать новый. Надеюсь, что РјРѕРіСѓ ошибиться Рё Сѓ тебя что-то более РїСЂР ѕСЃС‚РѕРµ.
Features during diagnosis
When the first suspicions arise, it is recommended to proceed with a thorough examination. If you cannot do this, it is recommended that you turn to professionals.
The first thing to do is to find out the primary cause of the breakdown. There may be several of them:
- there is a short circuit in the circuit;
- the temperature of the power unit rises;
- the toothed disc is broken or damaged;
- the mounting lugs are damaged;
- phase sensor Kalina 8 cells or 16 cells offset.
If the “Check” lights up, which gives one of two errors - 0340, 0343, then the fault definitely lies with the phase device. Perhaps the reason is in the connections.