Can you tell me what kind of sensor this is and where it is located? Primera p12 messages 37 crankshaft sensor. If you cannot turn the sector, then you need to reinstall the TPS. To do this, remove it and turn it 90 degrees relative to the damper axis and install it again. No additional manual adjustment after sensor installation throttle valve does not require.
You can check its performance by measuring the voltage with a tester so that it matches the specified one. And also use an ohmmeter to check the smoothness of the resistance change when changing the throttle .
If the driver is attentive to the behavior of his car and constantly monitors the performance of the car’s electronics and engine, then he can be confident that no surprises await him on the road. You must constantly remember that your car will serve you for a long time and faithfully only if you take care of it and its insides. Where is the Nissan Premiere crankshaft sensor located? (Solved. Any car loves care, even after leaving the car wash you can feel how much softer the engine starts running and how much smoother the car drives on the road.
We recommend
Crankshaft sensor in Nissan Primera P12 where is the photo located
symptoms
The most common symptoms of a bad crankshaft position sensor on a Nissan are that the car hesitates to start or the car stalls after starting. In some cases, you may need to crank the car for a long time to start it.
- Engine starts but won't start
- The engine hesitates to start
- P0335 Crankshaft position sensor
- Engine may start normally when cold, refuses to start when warmed up
- Check engine light
- Engine stalls when warmed up
- Intermittent startup problem
- The difficulty of the beginning
Below you will find instructions for replacing the crankshaft position sensor on a Nissan 3.5L V6 engine.
This is interesting: The car will not start. The check light is on, the diagnostics does not see any errors
Serena. Gasoline engine ⇒ Replacing the crankshaft sensor QR-20 conclusions
Post by dvd77 » April 27, 2012, 09:29
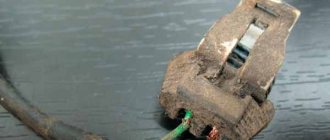
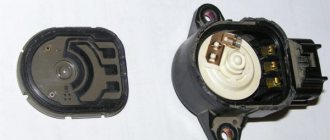
It turns out that at one point my bus wouldn’t start from the auto station. When starting from the key, a check light on the dashboard lights up, but after turning for a long time, the engine still starts, my cartoon says, the position sensor is an abbreviated abbreviation, fortunately, I have a built-in netbook and online adapter, as well as the TECU program from the rscar forum Those who are in the know will understand. So he definitely writes to me in black and white that it is the crankshaft position sensor that has died. What to do. But the car works, but the tidy does not show the engine speed, but the cartoon shows the speed, I conclude that the data is taken from some kind of backup sensor. I decide to go home and we’ll figure it out there. I start driving, everything seems to be fine, but the valve keeps the speed as on a cold engine, that is, after acceleration the speed does not drop to 1200, but stays around 2000. Upon arrival, after looking at the ABC book in the minibus for about five minutes, I decide to start the engine, and lo and behold, The tachometer worked. I go home and start stirring up nearby showdowns in nearby cities, since we don’t have any, about the cost of this sensor, I asked around here, and the existentialist too. Thanks to existentialism, I conclude that the camshaft and crankshaft sensors are absolutely the same, but the problem is that to get to the camshaft sensor, unscrew the bolt, but for the crankshaft, this is a whole epic, which will be discussed later. So, the next day we decided to check what we had, but nothing, again an error, and a dead tachometer. So to the garage. Calling the showdown gave a disastrous result, either there is no sensor, or the price tag is ridiculous, exceeding the existential price of 800 rubles. and higher, well, these are our prices. Or the people at the showdown are not good. What has been decided, the order is urgent, and for now we will replace the sensor with a working one from the camshaft, since then it will be much easier to install a new one. Garage. I don’t have a hole, but the jack lifts it quite well to carry out repair work while lying under the car from the front of the car. Checked when the heater was installed and the starter was changed. An inspection showed that it is impossible to get to the crankshaft sensor from above, the starter is in the way, and even if it is removed, it will most likely not be easy to reach with your hand, even though my arms are quite long. We will solve this problem from below, but here the Nissan designer probably listened to a lot of flattering words about this, fucking Pokemon, they took and shoved in a rear airbag, which spoiled the whole picture. In general, if you have a thick brush, don’t even bother, and if you succeed, then you’re very lucky. What we have: the sensor itself is visible, or rather only its connector, and the edge of the bolt. It was decided: do not remove the connector, use a small ratchet with a head of 10. So: we find the optimal position of the body, stick one hand closer to the beam, between it and the exhaust in order to somehow reach the sensor, take the ratchet with the right hand and give it to the left hand, sticking it into more or less free space on the other side of the exhaust tract, and put the ratchet head on the bolt with the left one. Don’t try to do it only with your left hand, you’ll waste time like me, but whoever can do it is definitely VirtuoZZZ. Using a ratchet, the bolt is easily torn off and unscrewed a couple of turns, but then it turns so easily that the ratchet doesn’t help, and damn, another treatise was sent to Pokemon. You can’t reach the bolt with your left hand, but with your right hand you can only reach it with the tip of one finger, which can’t be used to unscrew this bolt and that’s it, even if you stand on your head. In the end, I took the same head from the ratchet, put it on the bolt, and lo and behold, now I can unscrew it, which was done. By pulling the wires, the sensor was easily pulled out, replaced with a working one from the camshaft and installed. In general, something like this. When I tried to start the engine, after swapping the sensors, the car refused to do so, it was clear that the tachometer showed revolutions, but did not start, another error was also displayed, the camshaft position sensor. After the sensor arrived from the existential and was installed, the car started up the first time. By the way, the sensors have now changed a little, they were put on an aluminum cylinder, there was no camera, I didn’t take a photo, but the old one in the photo below, as they say in the primer, one of the windings between contacts 1 and 2 = 0, which indicates its malfunction.
Conclusions: the sensors are interchangeable, you can drive for some distance with a faulty crankshaft sensor, but the engine will not start with a faulty camshaft sensor. PS: Well, as they say, there is no good without a silver lining, after the engine starts, I get an error, an open circuit in the knock sensor circuit, but the check does not light up. Well, I think the cartoon may have caught some glitch, warmed up the engine, changed the oil, the time has come, I start it, again the knock sensor. I start nervously smoking on the sidelines and wondering what it could be. And I remember that I wanted to unscrew the oil pressure sensor, I started to snot, by the way, who can tell me how long the key is needed, in general, nothing worked for me, and I climbed there with a large key of 27. I look with my hands towards the starter, it is so, 2 wires are dangling, but the machine works and the check doesn’t work, so keep in mind that some errors don’t show up on the valiant Jackie Chan. In general, I already have the protection installed on the bottom, and on it there are 8 bolts of 10 and one nut of 17. It would be better if I went straight through it, but we are Russian people and we are not looking for easy, or maybe long, ways, and I am trying to remove the connector from sensor from under the hood, Ohhhh, don’t try to do this, you won’t succeed, no matter how I distorted it, and screwdrivers and fingers, etc. and so on. As a result, these attempts took 1.5-2 hours, and all without success. As a result, when the protection was removed, the connector came off like 2*2. So, what we have, the wires are torn out by the roots, the chip is dismountable. Using an awl, we squeeze out the white core, inserting the awl where the locking protrusion is, pull out colored silicone-rubber plugs from the input side of the wires, one of them is purple, the second is light closer to white, on the other side with an awl we bend the stopper and squeeze the terminals towards the plugs one by one. We solder the wires of the required length due to the fact that the wires from the harness are VERY short, and only twisting can be done under the hood. We assemble the chip, or connector, and twist it a little higher. pendri. vayas. If you have a similar situation, here is a diagram: the purple plug is a thick wire, the white plug is thinner, otherwise the error will appear again, as it happened to me, I had to disassemble the connector again and swap the terminals. Good luck to all.
I apologize for another topic, please move the moderators here, although there is no solution that I did QR20, the check engine light came on, the tachometer was at zero.
Source: mikrob.ru
Main reasons for failure
The main reasons for failure of the crankshaft sensor include:
- Natural wear and tear. The sensor is installed on the engine in the flywheel area. During the operation of a car, it is exposed to high temperature changes, as a result of which its structure can receive microcracks into which liquids and oils enter, which leads to corrosion.
- Contamination of the working surface with metal shavings. This process significantly reduces the sensitivity of the sensor and can lead to signal loss. As a rule, this reason occurs on “older” cars. In most cases, cleaning the working surface of the sensor is not successful.
- Mechanical damage. Such a malfunction is most likely the result of incorrect installation, replacement with a sensor from another engine modification, or a traffic accident.
- Broken electrical wiring or destruction (corrosion) of the sensor connector.
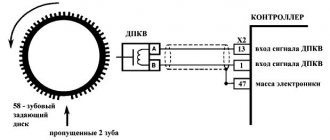
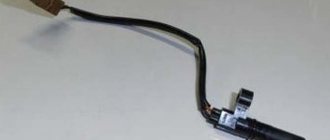
The true reason for the failure of most crankshaft sensors is the destruction of the electromagnetic sensor. It represents an inductor wound around a core of magnetic material. The winding is made of a very thin copper conductor in varnish insulation.
As a result of repeated heating and cooling of the sensor, the thinnest conductor can receive a micro-rupture. As the sensor heats up, the coil breaks, the sensor stops working, the car stalls, then cools down, the coils close again and the engine can start again. In such a situation, experienced car enthusiasts place a rag soaked in cold water on the sensor.
Signs of a failed DPKV
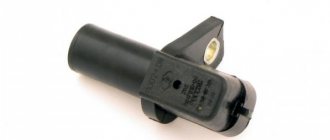
Crankshaft position sensor
Here are some of the common symptoms that will help determine if the QG18DE engine crankshaft sensor is damaged:
The check engine indicator lights up. The check engine light comes on for many reasons, including a malfunction of the DPKV. When the motor is running for a long time, the sensors stop working due to increased heat levels, causing the indicator to light up. Perform diagnostics to determine the cause of the check engine light.
Loss in acceleration. If you notice a loss of acceleration at high speed, this is due to a malfunction of the DPKV. The control unit does not receive the correct information due to a faulty sensor, which causes problems when synchronizing the systems. The fuel injection adjustment is disrupted, which leads to loss of acceleration.
Engine vibration. If the DPKV fails, the position of the crankshaft is not determined. This leads to strong engine vibration, reduced power and increased fuel consumption.
Increased gasoline consumption. Ignition timing and fuel injection are not performed efficiently, which leads to engine malfunction and increased gasoline consumption.
Difficulty starting the car. Difficulties in starting arise due to incorrect timing and adjustment of fuel injection; the engine will not start. However, the problem may be an electrical fault.
QG18DE engine misfires. The on-board computer does not receive information about the position of the piston, which leads to the cylinder misfiring. This is caused by a faulty DPCV or a damaged spark plug.
The engine stalls. In addition to problems with acceleration at high speed, if you notice that the engine stalls at low speed, then the problem is related to the crankshaft sensor, since the ignition timing is disrupted.
Methods for checking the crankshaft sensor
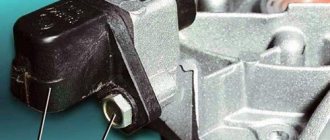
If you suspect a malfunction of the crankshaft position sensor, you need to check its functionality. You should start with a visual inspection. Damage to the sensor housing is unacceptable. Next you should inspect the contacts. They must be clean and free of oxidation.
The crankshaft and camshaft position sensors are interchangeable. In this case, DPKV has a more significant effect on the performance of the power plant. Therefore, many car owners change their places to check and test start the engine. The disadvantage of this method is the risk of damaging the camshaft sensor during its removal.
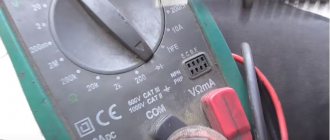
You can check the crankshaft position sensor using a multimeter or ohmmeter. To do this, you need to measure the resistance of its winding. It should be in the range from 550 to 750 Ohms.
If the crankshaft sensor fails, an error is recorded in the ECU memory. It needs to be counted. The resulting code, after decoding, will indicate the presence of one or another problem with the DPKV.
FAQ
Where is the crankshaft position sensor located on a Nissan?
Nissan crankshaft position sensor location.
Location of the crankshaft position sensor on the Nissan 3.5L V6 engine Photo: YOUCANIC
How to check the serviceability of the Nissan crankshaft position sensor?
One of the most common ways to check the health of the crankshaft position sensor on a Nissan is to read fault codes from the ECU. This is a very simple procedure and requires reading the OBD2 code.
- Connect the scanner to the OBD2 port under the dashboard.
- Turn the ignition.
- Read codes from the ECU.
- Check for a code related to the crankshaft position sensor circuit.
Where to buy a cheap Nissan crankshaft position sensor?
Nissan crankshaft position sensors vary depending on the year of manufacture. To find a cheap Nissan crankshaft position sensor, check prices here and here. Filter results by year and model to find the right crankshaft position sensor for your Nissan.
Nissan Crankshaft Position Sensor Part Numbers
- 2.5L 4 Cylinder Engine Part Number: 235-91203
- Applications: 2002-2006 Nissan Frontier, Altima, Sentra
- Part Number: CKP2085 PC165 714958 SS1013911B1 SS10139 J5T10271 5S1782 2373135U11 2373135U10 2373135U00 2132395 1800319
- Part Number: 23731-31U11 PC89 2373131U10 23731-31U10 373131U11 S10113 SU4315
- Part Number: 12799167
- Part Number: 23731-AL60A 23731AL60C/23731 AL60C PC499 23731 SU6482 23731-AL60C, 1236545
- Part Number: 23731EA20C 23731-EA20A 23731-EA20C 23731AE20C 23731EA20A 23731EA20C 23731EA220 23731EA221 3322082Z30 SU7825 5S6314 PC715
Nissan Crankshaft Position Sensor
This is interesting: Replacing the trunk lid lock Nissan Note 2004 - 2012
Where is the QG18DE DPKV located?
Obviously this should be close to HF. Note that the DPKV is often confused with the camshaft rotation sensor. They are similar in appearance, but not interchangeable (they have different firmware). The first has the article number 237314M500, and the DPRV has the article number 0815662033. Here is how they are located in the diagram.
DPKV location
The diagram shows that the DPVR is located on the cylinder block under the valve cover. The DPVC is located on the cylinder block at the bottom, on the driver's side, near the mounting bracket. It is impossible to see it from above without a mirror. If you disassemble the air duct along with the air filter cover, then you can see it through the mirror, feel it with your hand and, with some skill, even replace it. But the best way is to do it from below, using an inspection hole, a lift or an overpass.
InjectorService.com.ua
Car diagnostics using USB Autoscope
- Unanswered topics
- Active topics
- Search
Nissan Primera 2003 P12 1.6 - synchronization of DPKV and DPRV
Nissan Primera 2003 P12 1.6 - synchronization of DPKV and DPRV
Post by Jura » 03 Mar 2015, 20:58
Re: Synchronization Nissan Primera P12
Post by Alexander » 03 Mar 2015, 21:37
Re: Synchronization Nissan Primera P12
Post by Jura » 03 Mar 2015, 23:34
Re: Nissan Primera 2003 P12 1.6 - synchronization of DPKV and DPRV
Post by Jura » 08 Mar 2015, 11:11
Re: Nissan Primera 2003 P12 1.6 - synchronization of DPKV and DPRV
Post by zmey » 08 Mar 2015, 18:40
Re: Nissan Primera 2003 P12 1.6 - synchronization of DPKV and DPRV
Post by Jura » 09 Mar 2015, 10:00
Re: Nissan Primera 2003 P12 1.6 - synchronization of DPKV and DPRV
Post by zmey » 09 Mar 2015, 19:58
Re: Nissan Primera 2003 P12 1.6 - synchronization of DPKV and DPRV
Post by Jura » Mar 10, 2015 02:47 pm
Re: Nissan Primera 2003 P12 1.6 - synchronization of DPKV and DPRV
Post by zmey » Mar 11, 2015, 11:20 am
Re: Nissan Primera 2003 P12 1.6 - synchronization of DPKV and DPRV
Post by Jura » Mar 11, 2015 04:26 pm
Re: Nissan Primera 2003 P12 1.6 - synchronization of DPKV and DPRV
Post by Vijar » March 11, 2015, 5:20 pm
Re: Nissan Primera 2003 P12 1.6 - synchronization of DPKV and DPRV
Post by zmey » Mar 11, 2015, 05:56 pm
So I asked which DC I replaced from VAZ? We are talking about the reference voltage for the new ones - 3.5 V, for the old ones - 0.45 V - that's all, no dispute. Jura yes, as I understand it, is supplied at the new 3.5 volts, but the system still works within the range from 0.1 to 0.9 volts. for example, on VW Sharan ADY engines, 1.5 or 2.5 volts are supplied, if I’m not mistaken, but the system still works from 0.1 to 0.9 volts, and many early Opels from 1997-2000 generally have 4.5 volts saw served . what to argue? I wanted to know which sensor I could install on a Nissan example in 2003 - is the “native” one more expensive anyway?
Yes, I described myself a little in the picture. Sorry
Re: Nissan Primera 2003 P12 1.6 - synchronization of DPKV and DPRV
Post by Jura » Mar 11, 2015 06:39 pm
So I asked which DC I replaced from VAZ? We are talking about the reference voltage for the new ones - 3.5 V, for the old ones - 0.45 V - that's all, no dispute. Jura yes, as I understand it, is supplied at the new 3.5 volts, but the system still works within the range from 0.1 to 0.9 volts. for example, on VW Sharan ADY engines, 1.5 or 2.5 volts are supplied, if I’m not mistaken, but the system still works from 0.1 to 0.9 volts, and many early Opels from 1997-2000 generally have 4.5 volts saw served . what to argue? I wanted to know which sensor I could install on a Nissan example in 2003 - is the “native” one more expensive anyway?
Source
Part numbers
The article number of the original DPKV is 23731-6N21A; 237316N20C
Manufacturer numbers of non-original spare parts
| ASHUKI | N440-15O, N440-15, N390-05 |
| BLUE PRINT | ADN17215C |
| ERA | 550539 |
| FAE | 79380 |
| FISPA | 83.512 |
| HERTH+BUSS JAKOPARTS | J5661008 |
| HOFFER | 7517610 |
| HÜCO | 138104, 2508104 |
| LUCAS ELECTRICAL | SEB1858 |
| MAGNETI MARELLI | 064847152010 |
| MEAT & DORIA | 87610 |
| MOTAQUIP | LVCP202 |
| OPTIMAL | 07-S025 |
| QUATTRO FRENI | QF00T00476 |
| QUINTON HAZELL | XREV311 |
| SIDAT | 83.512 |
| STANDARD | LCS441, CS1615, 19215, EPS405 |
| VEMO | V38-72-0127 |
| WAI | CAM464 |
| WILMINK GROUP | WG1013660 |
One morning my tricky one stopped starting, they were able to start it only when they lit a cigarette from another car. After about 20 minutes I turned off the car and tried to start it again - no result. I arrived at the service center and it turned out to be a crankshaft sensor.
Video
Recommendation
Since the crankshaft sensor is one of the main sensors in the Chevrolet Cruze engine control system, some car enthusiasts purchase this sensor for future use, especially if they travel long distances to sparsely populated areas.
Damage to the crankshaft sensor is a critical problem in the Chevrolet Cruze. The sensor has a limited resource. You start having problems with it after 7 - 10 years of using the car.
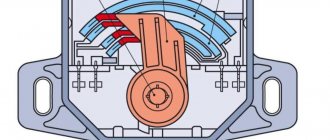
The sensor is one of the main sensors of a set of engine management accounting programs. Designed for general synchronization of the operation of a complex of accounting programs for vehicle ignition and fuel injection. The main task of the sensor is to monitor the angular position of the vehicle's crankshaft. In most cars, like the Chevrolet Cruz, this task is solved with the help of special teeth (teeth) attached to the flywheel. At one time the teeth of the crankshaft rotate, the flywheel rotates synchronously with it. Passing in the area of the electrical sensor, they induce electronic impulses.
Nissan Primera p11 CD20T died! HELP!
sigmawm
- 10 Apr 2012
- #81
- 11 Apr 2012
dr.ZeRo
And yes and no, depending on what the problem is with it, the DCV is used to determine the camshaft phase—>needed to calculate the injection moment, injection duration, the moment of ignition of the mixture (for gasoline)
It happens that when warming up the engine starts to sputter and stalls. This also suggests that kabzda dkv. When the sensor is cold, its winding insulation resistance is normal; as soon as it warms up to 70 degrees or higher, the insulation resistance of the turns drops and the turns begin to short-circuit with each other.
When the sensor cranks, the engine will not start, even with a quick start. No, it will pick up, but it will immediately stall, or it will shoot
sigmawm
- 2 May 2012
Hello everyone, everyone who is interested in knowing how my epic ended. Let me remind you that the car started only off air, self-diagnosis produced three errors (34-sensor/needle lift sensor circuit, 15-sensor/control clutch position sensor circuit and 95-which I did not find in the description for my CD20T machine), and not one of them did not show the true reason for the engine not starting. There were the following assumptions that needed to be paid attention to: - candles; — Injection pump (piston pair, air intake, positioner and up to replacement of the entire injection pump); — nozzles.
But the main thought did not leave my head. I was once told that the whole issue could be related to electrical issues, they say that a sensor has gone wrong somewhere and because of this the brain is not giving the command to inject fuel. I started reading the book and mentally went through the sensors that could affect the start, namely the crankshaft sensor. I measured the resistance of the DPKV, instead of the 1.2 indicated in the book. 1.5 kOhm, it gave out 45 kOhm and the resistance grew while you were holding the multimeter probes. I held it up to 140 kOhm, but didn’t go any further. I removed the DPKV, brought it home, and wanted to try to restore it, as one person had already done https://www.club-nissan.ru/forums/showthread.php?t=146012
I disassembled the sensor (the plastic came off like plaster, it just crumbled), began to wind up the wire, and somewhere around 200-250 turns the wire ran out (it didn’t break.). And there are so many wires in the original coil that it’s as if it didn’t even unwind. I looked for the end of the wire, but couldn't find it. I asked a TV technician I know for a similar reel, but unfortunately he didn’t have one. Today I went to the car market and bought a new sensor for $93 (original 23731-2J615). (if anyone is interested, I can tell you that the same used sensor costs 90-100 dollars, probably this is due to the sudden warming of up to +27 degrees, I don’t see any other explanation for such prices)
In short, I immediately rushed to the car from the car market, installed the sensor, started it up, and alas, the car finally started without ether. I let it run, turned it off, did a self-diagnosis and again the same errors: 15, 34, 95. 34 - the error is clear to me, but what are errors 15 and 95 responsible for? 15 is a control clutch position sensor, what does this mean? please explain in your fingers.
People! Does anyone have any information about this?
Removing and installing the coolant temperature sensor
The sensor is screwed into the hole in the front water jacket pipe of the cylinder head.
You will need a key "19".
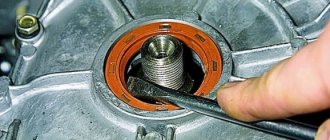
1. Use a screwdriver or finger to press out the plastic latch securing the wiring harness block and disconnect the block from the sensor.
2. Loosen the sensor and...
3. ... unscrew it from the pipe hole along with the sealing ring.
4. Check the sensor resistance. At 20°C, a working sensor should have a resistance of 2.2–2.4 kOhm.
The sensor resistance varies with temperature over a wide range.
At high temperatures, the sensor resistance is low (70 ohms at 130 °C), and at low temperatures it is high (100.7 kOhms at –40 °C).
5. Install the sensor in the reverse order of removal.
Self-replacement of the sensor on Nissan Primera P12
To replace the Primera P12 crankshaft position sensor, you must follow the step-by-step algorithm presented in the instructions below.
- Disconnect the on-board power supply by disconnecting the negative terminal of the battery.
- Gain access from the underbody of the Primera P12.
- Remove the power unit protection
- Remove the subframe cross member.
- Disconnect the terminal block from the crankshaft position sensor connector.
- Unscrew the bolt that secures the DPKV.
- Slightly wobble and remove the crankshaft position sensor from its seat.
- Check the O-ring. When replacing the old sensor, it may be hardened. In this case, the ring will need to be replaced. It is also worth considering that many analogues come without a seal. You need to install the ring on them yourself.
- Reinstall the crankshaft position sensor.
- Fix the DPKV and connect the connector.
- Reassemble everything in reverse order.
- Check engine operation by starting the power plant.
Purpose of the crankshaft sensor
The Nissan Primera P12 crankshaft sensor is used to collect information about the rotation of the crankshaft. Based on the data received, the ECU calculates the position of the pistons. Thanks to the information coming from the sensor, control commands are generated in the main module.
The entire power plant critically depends on the performance of the sensor. Even a short-term lack of data on the position of the crankshaft leads to the inability of the ECU to operate. Without receiving commands, the speed begins to fluctuate and the diesel engine stalls.
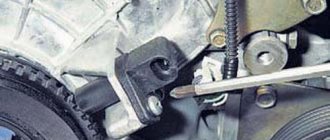
Location of the crankshaft sensor on Nissan Primera P12
The crankshaft position sensor is installed at the rear of the cylinder block. To see where the DPKV is located, you need to crawl under the car and remove the engine protection. You can also look at the sensor from the top. To do this, you will need to remove a number of components in the engine compartment.
Required Tools
To replace the crankshaft position sensor on a Nissan Primera P12, you need the list of tools from the table below.
Table - Tools required to replace the crankshaft sensor
| Name | Note |
| Socket wrench | Set |
| Head | "on 10" |
| Vorotok | With ratchet, universal joint and extension |
| Penetrating lubricant | To combat rusted threaded connections |
| Wire brush and rags | To clear your workspace |
Replacing the crankshaft position sensor is possible both through the bottom and through the top of the engine compartment. The first method is more preferable. Access from the bottom will require an inspection hole, overpass or lift.