Nowadays, any modern car is packed with electronics and various additional functions that make driving comfortable and safe for people. However, not all devices are installed by manufacturers. Drivers already add a lot of interesting and useful things to their cars. For example, a video recorder.
A recording camera is actually an excellent assistant that will help out in difficult times - a car accident, an accident, set-ups and other incidents that may occur on the roads. Let's say there was an accident with victims, in which the driver was completely innocent. It will be very difficult to prove this to law enforcement agencies, and often no one will listen to you. After all, it is much easier to punish a person than to find out the truth. It is for such cases that a video recorder exists. The entry is the driver's argument. And not only in case of an accident, but also in other important situations. Sometimes very interesting shots are captured on camera.
Based on all that has been said, you simply need to install such a device for yourself. But only a few know how this is done and what connection methods exist. Most often, the DVR is connected to the cigarette lighter circuit, but this is not the most convenient option. There are plenty of others worth learning about.
Typical recorder installation locations
The installation location of the device is important for laying power wires and choosing where to connect the DVR.
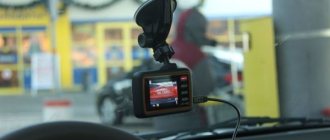
The main places for installing DVRs were the top panel of the dashboard and the windshield of the car. The advantages of mounting the device on the dashboard are the stable position of the recorder and the ability to remove it when parked in the yard. The disadvantage of this arrangement is that the lower view of the video camera is limited by the hood of the car.
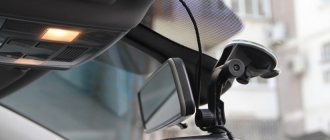
When installing the DVR on the windshield, the hanging power cord interferes with the view, which often manifests itself during sudden maneuvers of the car. Otherwise, the location of the camera behind the interior rearview mirror is quite convenient.
Why might you need to connect a recorder without a cigarette lighter?
Today, a DVR is not a luxury, but a necessary and useful gadget that should be in the cabin of every car. The ability to record on video the situation that occurs while the car is moving or parked, as well as what is happening in the cabin, helps in many controversial situations that arise, for example, during an accident. Also, the video from the recorder is a confirmation of insurance claims for the insurance company.
The DVR allows you to record the situation that occurs while the car is moving or parked, as well as what is happening in the cabin
A special feature of the recorder is that it must be able to work not only while the car is moving, but also in the parking lot, as well as when the engine is not running.
The easiest way to connect such a device is through the cigarette lighter, but there are often situations when this is impossible to do:
- the cigarette lighter is occupied by another device;
- The cigarette lighter socket does not work;
- There is no cigarette lighter in the car.
Fastening the wires
Before connecting the recorder, you need to decide how the wires will be attached. There are two installation options:
- hidden installation. The wires are hidden under decorative trim or the dashboard. It is necessary that there is a little wire left near the recorder, which will allow it to be rotated freely;
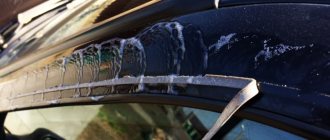
With hidden wiring, the wires are hidden under decorative trim or the dashboard - open installation. In this case, the wire is not hidden, but is fixed to the ceiling and side pillar using plastic brackets. Since these brackets have Velcro, over time the reliability of the fastener weakens and the wire may fall. The wire is in plain sight, which is not very convenient and ugly
DVR placement
Before you think about how to connect a recording device to your car's network, you must first place it correctly. At this point, it is important that the camera angle captures the entire road and preferably the edge of the curb. By the way, this is done individually with each recorder, since the viewing angle of all cameras is different and they also need to be positioned in a special way.
For example, if the equipment is designed for 120 degrees (fisheye effect), then it can be attached closer to the windshield. Accordingly, the lower this degree is, the further the device will have to be installed.
How to connect a DVR in a car without a cigarette lighter?
Drivers who prefer to use several electronic gadgets at the same time are especially interested in the question of how to connect a DVR in a car without a cigarette lighter. The only open power supply socket often serves for an air ionizer, an FM transmitter, a navigator, and a mobile phone charger; therefore, the cigarette lighter is never free.
Owners of the latest generation of imported premium cars are also aware of this problem, since European manufacturers are now focused on producing cars where the “smoker’s package” is only available as an additional option. Connecting the DVR in an unconventional way is the solution to this predicament. All that remains is to find out how to do it.
The DVR is presented in the form of a device that records what is happening inside and around the car during a trip. The latter, in turn, becomes safer, and the driver also has the opportunity to present undeniable evidence in the event of an accident.
The wire of the device in question is its main drawback, since it goes to the gadget from the cigarette lighter, thereby not only spoiling the appearance of the interior and annoying during the trip, but can also block the view.
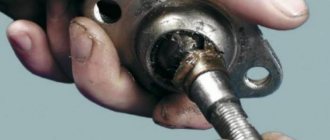
Among other things, there is a problem with the operation of the cigarette lighter socket. The situation can be corrected by using a splitter, but the vehicle’s on-board network will be subject to excessive load. The question arises about how to connect a DVR in a car without a cigarette lighter and how reasonable is this?
- You can find information about why the cigarette lighter in your car does not work and how to fix it in our author’s material.
- We also recommend reading our expert’s article, in which he talks about how to properly buy wires for lighting a car.
Where to install the DVR
Choosing a place to install the DVR is impossible without taking into account the following requirements:
- maintaining visibility of the road surface;
- The windshield is considered the traditional place to install the device in question, but another option is the torpedo.
- Be sure to read our expert's very useful article in which he talks in detail about how to set up a DVR.
- Another useful gadget is a memory card for the DVR. How to choose and install it correctly, read our author’s material.
- We also recommend that you read an interesting review of the best 3-in-1 DVRs and a description of the principle of their operation.
So, here are the two best options for installing the device.
- The windshield behind the rearview mirror is ideal if the recorder is compact and lightweight. The camera's view is maximum, and nothing interferes with the driver. The disadvantage is the difficulty of quickly deploying the camera if necessary, for example, to film a conversation with a traffic police inspector. The view can be spoiled by a dangling wire, especially when the car performs sharp maneuvers.
If the recorder's power supply is 5 volts, there is no need to disassemble the plug. The voltage of the car battery is reduced to the required level due to the electrical circuit of the plug.
Connecting to the power supply of the car radio
In this case, the process is even simpler, since the power supply of this device also corresponds to 5 V. There is no need to use adapters and adapters. It is enough to fix the gadget and power it to the orange wire that leads to the car radio. The wire can be found under the front panel.
You may be interested in interesting material that tells in detail how to connect your phone to the radio.
Connection to ignition
The method under consideration is considered the least used, since the recorder will only be able to operate after turning the key.
For this method you will need to do the following:
- fix the gadget and connect it using the adapter;
How to secure the wires
After choosing a location and installing the holder, you should think about the issue of wiring. In many cases, DVRs are powered from the cigarette lighter, since the power cords have a plug for this connector. This option is simple, but has a significant drawback: it may interfere with the view and distract the driver. In this case, it is recommended to hide the wire under the ceiling:
- the wire is tucked under the ceiling panel, moving it a little;
- leave some reserve of wire to change the position of the camera if necessary;
- The side stand is removed and the wire is secured to the standard wiring with plastic clamps.
Depending on the specific brand of car, the fastening of the side decorative elements is done differently. The wire can be laid in a simpler way using special plastic fasteners that are located under the ceiling. Then power is supplied under the carpet or through the glove compartment, which depends only on the wishes of the car owner. If preference is given to the “under the rug” option, then you need to make sure that the wire does not interfere with anything and does not get tangled anywhere. Attention should also be paid to ensure that the wires supplying power are not located in the area of moving elements, for example, heater dampers, etc. You can supply power directly through the cigarette lighter connector or by connecting the wires from the inside. Since not all cars have more than one cigarette lighter in the cabin, the second option is preferable.
Hidden installation
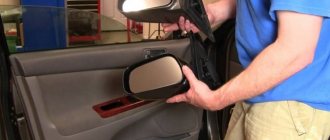
Many car owners think about hidden installation of a DVR and, as a rule, after the device has been stolen by criminals. For hidden installation, you will need to purchase a recorder with a separate camera, which will be mounted in the rear view mirror.
The DVR can be installed in the rearview mirror so that it is invisible
Two holes of the appropriate size are made in the mirror body: for the camera and for the wire. The diameter of the hole can be selected so that the video device fits tightly into it without the need for additional fastening. All that remains is to assemble the housing, install the mirror in place and lay the wire.
After installing the camera in the mirror housing, all that remains is to hide the wire and connect the device
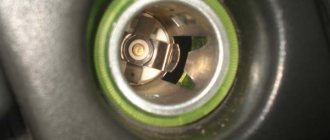
To the lampshade
Power for the DVR can be taken from the ceiling lamp. After attaching the device, you need to stretch the wires to the lampshade. To prevent them from dangling, the best option would be to hide them under the interior trim. Then you need to remove the lampshade by disconnecting the power wires. The mounting of the lamp differs depending on the vehicle. Once the ceiling light is removed, you should deal with the wires. In our case, we need those with constant power supply, and a multimeter will help us find out. Don't forget to also determine the polarity of the wires. After we have figured out where the plus and minus are, we solder wires to them.
It is worth considering that the car’s on-board network is powered by +12V, and the DVR by +5V, so you will need an adapter (included with many devices). We connect the soldered wires to the adapter by soldering, and wrap the joints with electrical tape. We check the functionality of the recorder, and if everything works, then all that remains is to hide the wires and assemble the lamp. You can do without a soldering iron: cut the insulation on the necessary wires and connect the wires from the adapter to them. Then we isolate the connection points and put everything back together.
The DVR can be connected to the interior lamp, which requires removing the light and finding the power wires
To battery
To power the device directly, you will need an adapter and a long wire, as well as a 15A fuse. Having installed the recorder in the desired location, we connect it with a wire, strictly observing the polarity, and install a fuse. We place the wire under the trim and lead it out into the engine compartment; it is also possible to bring it out under the hood through the mounting block, which has space for spare fuses. In the engine compartment, we connect the wires observing polarity: plus to the battery, minus to the body in any convenient place. The main thing is that the connections are reliable.
Connection to ignition
In this case, the camera will turn on when the key is turned in the ignition switch.
Step-by-step instruction:
- Fix the camera and connect via the adapter.
- Route the cables along the top or bottom of the windshield.
- Make a connection.
- Connect plus with plus, and minus with minus.
In order not to confuse the purpose of the cables, use a tester to ring the contacts.
@drive2.ru
Using a radio
In this particular case, the wires from the camera and the player are connected and the junction points are isolated. If the car radio operates on a voltage of 5V, then the cable is attached directly to the plug. The block or transformer is hidden under the instrument panel. The wires are pulled through the installed chamber.
Modern car radios are usually equipped with USB connectors. In this case, the process of connecting the DVR is greatly simplified.
Connection to the lampshade
The closest power source to the DVR located at the top is a lamp that illuminates the interior from above. For the connection to be successful, you need to purchase an additional power module and a female cigarette lighter socket.
@drive2.ru
Stages of work:
- Disassemble the lamp by removing two screws and one latch.
- Turn off the power to the light source.
- Solder the “mother” by connecting the end of the red wire to the red, and the black to the black.
- Plug in the power supply of the recorder.
- Reassemble the lampshade in reverse order.
Dangers of non-standard DVR connection
Most independent connections are dangerous if done incorrectly. Car manufacturers, aware of the methods of non-standard connection of electronic devices to the cigarette lighter, do not recommend such methods. The electrical circuit and fuses of the standard device are designed for short-term use. With constant use, the wires are subject to thermal aging, which is not responded to by a fuse designed to turn off at limiting inrush currents.
When connecting the DVR to the battery, you need to provide a button to break the circuit. With a direct connection, the device will work constantly, discharging the battery when the ignition is turned off.
If connected correctly, the DVR will not lose its functionality and the quality of video recording will not deteriorate.
Should I use an alternative connection?
Experts do not recommend connecting the DVR to your car bypassing the cigarette lighter. It is recommended to use such electrical circuits exclusively as a temporary option, but in no case permanently, since the cables will very quickly succumb to thermal aging.
It is possible to install and connect the DVR bypassing the cigarette lighter, although you will have to tinker a little. If you have never done anything like this before, then it is better not to take on such work so as not to damage the gadget.
Remember that a DVR in our time is not a luxury or an indulgence, but a reliable way to protect yourself from unfounded claims or accusations in the event of an emergency.
Helpful Tips and Precautions
Be sure to turn off the power to the on-board network before starting work on connecting the DVR - just remove the terminal from the battery. You should also follow the recommendations for installation and further operation.
- Securely insulate connections.
- Supply power via fuse.
- First check that all connections are made correctly, and only then attach the terminal to the battery.
- Strictly observe polarity when connecting the gadget.
- Make sure that no moisture gets inside the case, otherwise the power must be turned off.
- Make sure to purchase a memory card with sufficient capacity.
- Always take the device with you if the car is not in use for a long time. It’s also better not to leave the fastener, otherwise the thief will notice it and decide that it’s worth looking for the rest in the glove box.
- Immediately turn off the DVR if you notice smoke or a strange smell in the cabin, otherwise a sudden fire may occur.
- Turn on the recording immediately after you get behind the wheel, because it’s not for nothing that unforeseen circumstances are called that way. An accident on the road can happen at any time.
- If the recorder fails, you can save yourself from trying to repair the gadget, since there is nothing inside it that the average user could fix on their own. Contact service.
You can read about how to connect an LED strip to a car in a detailed article by our specialist.
Additionally, we recommend reading the article, which describes how to install a rear view camera.
Security measures
There are several mandatory operating conditions for the DVR that the driver will have to strictly comply with.
- When installing the recorder and during its operation, you should carefully avoid getting moisture inside the case (this advice is especially relevant in winter, when condensation forms in the cabin). If water does get into the device, turn off the power immediately;
- If, after connecting the recorder, a strange smell or smoke appears in the cabin, the device must be turned off immediately, since further operation may lead to a fire;
- If the recorder fails due to incorrect connection or as a result of a fall, you should not try to repair it yourself. There are simply no parts that the average user can fix. All the owner can do is take the device for service to qualified specialists.
So, connecting the DVR is easy. This does not require complex circuits or deep knowledge of electrical engineering. All that is required is patience and the ability to use a soldering iron.
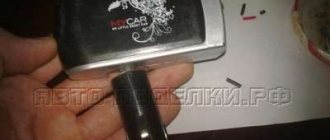
Features and installation
When choosing a mount for the recorder, it is worth checking the possibilities of quickly reorienting the shooting directions on the door without rearranging the fasteners and removing the recorder from the bracket. It has recently become popular among drivers to record conversations with a traffic police inspector or all kinds of road events. There are many complaints floating around the Internet that the DVR mount does not allow recording such video.
In order to check the functionality, you need to install the complete bracket for the recorder with fastening to the glass, check the possibility of turning it left and right (the suction cup must remain stationary) and determine the ease of such manipulations.
In addition, it is worth assessing another important parameter - the rigidity of the “bracket + recorder” design. After all, the recording device should not shake when moving, as this directly affects the quality of the recording. Before purchasing, checking the rigidity of the fastening is carried out as follows: fix the recorder in the bracket, and then, holding the suction cup, you need to shake the entire structure. Of course, such a “test” will not give 100% results, but it can identify the most obvious cases of unreliable fasteners.
Let's look at several popular mounts for car video devices.
To power the car radio
The speaker connector has several pins on which there is a positive signal with a voltage of 12 V. The connection location is determined by a multimeter operating in voltmeter mode. A number of standard audio systems are equipped with a remote power supply, which provides a voltage of 5 V. In this case, the use of a transformer for the recorder is not necessary; the device is connected directly (with the obligatory installation of a fusible protective link).
Before starting work, you should make sure that the radio is not equipped with code protection. Standard audio systems equipped with such protection should be turned off only after checking the presence of the code. The information is provided by the manufacturer as part of the operating instructions or service book. If the code is missing, then it is requested through an official dealer.
The power supply is equipped with patch cables that are connected to the radio plug.
The transformer is located inside the instrument panel; it is advisable to secure it with 2-sided tape or a plastic clamp.
The installation location should not be flooded with condensate and should not be located near the air conditioner ducts. After connection, it is necessary to check the operation of the equipment, and then install the dismantled parts in their original places.
Instead of a radio, you can use an external lighting switch. Voltage is supplied after turning on the side lights or headlights in manual or automatic mode.
How to update the DVR software and database
Some recorders, in addition to the video recording function, have built-in maps and databases about roads - speed limits, dangerous areas and the location of traffic cameras. Over time, this data becomes outdated. We will explain how you can update the software and database of the DVR.
- You need to find out what the registrar is called and go to the manufacturer’s website.
- You should find the device model in the catalog - there will be links to update files nearby.
- You need to place them on the recorder's memory card, following the instructions (without this, the device may not see the files).
- When turned on with such a memory card, the update will start automatically.
- After this, the drive can be formatted to standard settings.
If your recorder has Wi-Fi, then the device can be updated via your phone. To do this, you need to download the application from the manufacturer and connect to the device. If the recorder supports updating, the program itself will offer to do this.
Firmware update of the recorder is required in emergency cases. Photo: globallookpress
Extra options
When choosing a DVR that can be connected to a car radio, pay attention to the presence of an ADAS auxiliary system that can simplify driving. It will help you recognize:
- dangerous approach to an object or another participant in the movement;
- leaving your lane on a marked road;
- display the location on the player display.
In case of a threat, the system sounds an audible signal and displays a warning on the display.
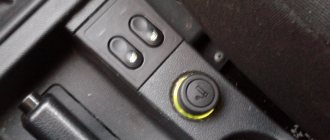
Through the ceiling lamp
To connect to the lampshade, you need to connect the inputs of the power supply to the wires connected to the device. Passenger cars are equipped with a front lamp with individual lighting points or a central lamp. Both nodes are suitable for switching; it is important to connect the cables correctly without reversing the polarity. When using the front lamp, there is no need to lay long power lines, which simplifies the connection procedure. All work is carried out on a de-energized machine.
Before starting work, you need to find the location of the car recorder on the glass. The installation point determines the method of laying the harnesses that pass under the plastic trim of the front pillars and the ceiling panel. To ensure cable entry, it is possible to make a hole or groove. Since when the machine moves, the insulation of the harness will rub against the material of the linings, it is recommended to wrap the surface of the wire with soft insulating tape or a foam tube. It is possible to route the cable along the edge of the parts; staples are used for fastening.
After this, you need to carefully dismantle the lamp diffuser and remove the housing from the seat. The part is secured with plastic latches or screws; when dismantling, it is recommended to use a special spatula made of soft material. Then a cable is identified that has a constant positive pole; some of the wires are energized only when the doors are open. The negative signal is taken from the car body (it is recommended to use standard ground bolts); switching to the plugs on the lampshade is allowed.
Some cars use a lamp that turns on the interior lighting when the standard security system is turned off. In this case, it is recommended to use this plug, which allows you to start recording even before turning on the ignition. An additional advantage will be to disconnect the power supply to the recorder from the on-board network, since the voltage at the plug disappears 5-10 seconds after the alarm turns on. A number of vehicles use an auto-dimming mirror, the element's wiring harness can be used to connect the recorder.
The standard power supply is modified, the outer casing is removed from it or the wires with connecting terminals are soldered. All cables are carefully insulated to avoid short circuits. A plug or solder is used to connect to the vehicle wiring; a crimp tube can also be used. A prerequisite is to maintain the standard fuse or introduce an additional one, designed for a current of 1.5-2.0 A.
On sale there are power supplies adapted for installation on cars. The products are equipped with plug connectors; soldering of wiring is not required. It is possible to install an additional cigarette lighter socket, which is located under the ceiling or leads outside. The standard transformer of the recorder is inserted into the socket, ensuring the operation of the equipment.