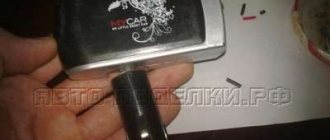
I haven’t written anything here for a long time, I haven’t posted articles for a long time, now the time has come! I’ll start with the fact that I’ve been traveling with this problem for almost a year now, the fact is that the standard socket for the cigarette lighter burned out, if you connect the pump, you need to catch a certain position so that there is contact and this comes to an end, it was decided to replace it.
And so, let's get started, we will need: 1. The socket itself, I ordered it here ru.aliexpress.com/item/Ne...W-Car-Vehicle-Motorcycle-Motorbike-Power-Plug-Cigarette-Lighter-Socket-Drop-Shipping /1497193805.html?recommendVersion=1 2. Terminals to connect to the standard connector. 3. Well, little things, heat shrink or electrical tape and pliers, thin-nose pliers, who has what tool!
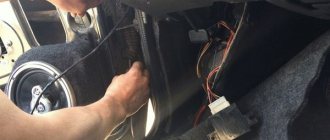
We remove the side panel, disconnect the chip, take out the standard socket, at first I wanted to do it without backlighting, just plug in a new socket, but it turned out that it was simply flopping around in the hole, I didn’t want to wrap up a bunch of electrical tape, and so I move on to the second stage.
We disassemble the standard socket into all its components, take the green part and grind it inside in a circle so that our new socket fits in there without problems, after we grind it, we put the whole structure back together and rejoice! Because I don’t smoke and I don’t advise you to, I don’t use the cigarette lighter itself and I don’t even know whether it fits into the new socket or not!
Even non-smoking car owners use this device. After all, the functionality of the VAZ 2114 cigarette lighter is much broader than the name might suggest. A lot of additional devices can be connected to the device socket:
- charger for phone, tablet, laptop or other devices;
- navigation;
- motion recorder;
- compressor with wheel inflation.
However, over time, the cigarette lighter on the VAZ 2114 may fail, which will lead to a lot of inconvenience. It is not difficult to repair an element or replace a spare part with a new one yourself. Detailed information on how to identify a fault on a VAZ 2114, remove the cigarette lighter yourself, diagnose an element, change a part is described below. Photos and videos are provided to help you understand the instructions.
How to remove the cigarette lighter of a VAZ 2114
Even non-smoking car owners use this device. After all, the functionality of the VAZ 2114 cigarette lighter is much broader than the name might suggest. A lot of additional devices can be connected to the device socket:
- charger for phone, tablet, laptop or other devices;
- navigation;
- motion recorder;
- compressor with wheel inflation.
However, over time, the cigarette lighter on the VAZ 2114 may fail, which will lead to a lot of inconvenience. It is not difficult to repair an element or replace a spare part with a new one yourself. Detailed information on how to identify a fault on a VAZ 2114, remove the cigarette lighter yourself, diagnose an element, change a part is described below. Photos and videos are provided to help you understand the instructions.
Connecting the cigarette lighter
Never connect the cigarette lighter to the ignition switch. The ignition system will not withstand such a load. Having laid the wire in the engine compartment, bring it to the positive terminal of the battery, connect the fuse and then attach it to the terminal. If for some reason you cannot do this, run a wire with a fuse to the starter and attach it to the positive terminal of the relay. Strip the end of the wire at a distance of 1 cm, place it on the terminal, then crimp it using pliers. Be sure to secure the wire so that it does not dangle anywhere. To attach the wire to the cigarette lighter, use a soldering iron or an appropriate terminal, depending on the device model. Install a fuse and a switch next to the cigarette lighter, this will increase the safety of using this device.
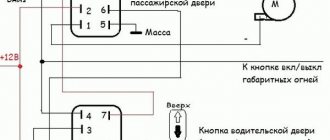
Do not confuse the arrangement of parts of the diagram:
- Battery.
- Fuse.
- Switch.
- Relay.
- Cigarette lighter.
The switch must be designed for a current of 1.5 times the maximum load. If there is no such switch, attach a relay next to it that is suitable for the current. Some drivers place a switch and relay next to the ignition switch. Connect the switch to the control contact of the relay, and the cigarette lighter to the power one. To do this, place heat-shrink tubing on the exposed ends of the wire, then push and crimp the terminals. Adjust the tube so that it completely covers the junction of the terminal and the wire, then heat it with a match or lighter. You can also install a regular cable splitter (220 volts), which is sold in hardware stores. Find the nearest ground connection location (the wire is bolted directly to the body). Unscrew the bolt, clean the contact pads of the terminal and body. Route a piece of wire from the relay and cigarette lighter to the ground hole to determine the length, then cut and strip the ends.
Make a splitter - take a piece of wire of a suitable length, strip both ends. Then solder the ends of the long and short wires to each other so that they both point in the same direction. Protect the connection with heat shrink tubing, then attach the connection terminal to the negative of the cigarette lighter. Position the tube so that it completely covers the contact point. Place heat shrink tubing on the other end of the short wire and attach the terminal. Or use a regular cable splitter, which must be rigidly attached to the body.
Installation check
Check all connections carefully. The relay and splitter must be securely attached to the housing. After making sure that everything is in order, check that the ignition switch is turned to the off position and connect the battery. Using a tester, measure the voltage on the unconnected battery. Place the negative terminal on the corresponding battery terminal and measure the voltage again. If it hasn't changed, then everything is fine. If it drops by at least 0.5 volts, turn all electrical appliances on and off, including the ignition system. If the voltage does not rise, disconnect the battery and look for a short circuit. If everything is fine, turn on the switch and measure the voltage on the battery again. After making sure that everything is correct, measure the voltage at the cigarette lighter contacts. If everything is in order, you have successfully completed the job.
Initially, the device was developed for smoking drivers. It allowed me to light a cigarette without being distracted by other matters. However, modern car owners practically do not use the cigarette lighter for its intended purpose. Additional electrical equipment is connected to the socket.
Due to age or improper use, the device may break, which will lead to a lot of inconvenience. You can find out why the cigarette lighter on a VAZ breaks down and how to replace it with your own hands on a VAZ 2114 in the article.
Reasons for replacing the cigarette lighter
The device may fail for a number of reasons. Sometimes replacing the VAZ 2114 cigarette lighter is not even necessary. The most common breakdowns include:
- Broken wiring. If the car is old or due to illiterate manipulations with the electrical system, the wires may shorten and burn out, or a break may occur in the circuit itself. This failure should be diagnosed using a multitester. The wires coming to the cigarette lighter are tested for resistance.
- Fuse failure. If one or more powerful devices are launched into the cigarette lighter socket of a VAZ 2114, the circuit current may exceed the critical value of 20 Amperes. This will cause the safety element to burn out. Additionally, the clock and radio will stop working. Repair is simple - you need to remove the front panel to get to the mounting block, where you can change the blown fuse.
- Bad connection. Over time, the contacts oxidize, which is why the cigarette lighter on a VAZ stops working. The reason for the appearance may be the connection of a fuse with a high resistance, for example, a 25-amp one. If the cigarette lighter does not work, you must first remove the metal cartridge and check its contacts for the presence of oxides. It is recommended to clean the contact areas. Before carrying out the procedure, remove the negative terminal from the battery. This will eliminate the possibility of a short circuit.
- Burnt out cigarette lighter element. Inside the cartridge is a nichrome spiral, which can burn out due to age. Such a malfunction can be treated by replacing and installing a new element.
- Failure of the backlight lamp in the VAZ cigarette lighter. There is additional lighting around the device itself to help you find the device in the dark. Over time, the light bulb may also stop lighting. You will need to remove the burnt element and then replace it with a working one.
Burnt out track in the mounting block
The track in the mounting block may burn out due to a short circuit resulting from the overlap of plus and minus. In this case, damage to the path may be accompanied by the appearance of a characteristic burnt smell and a slight haze. To troubleshoot the problem, you can try to re-solder the burnt track yourself - after clearing the old place, or replace the car's mounting block.
Burnt track
Restored track
How to change a broken cigarette lighter on a VAZ 2114
Before you start work, you should acquire the necessary tools. To remove the cigarette lighter of the VAZ 2114 model you will need:
- protective gloves;
- screwdriver;
- multitester;
- pliers;
- small flashlight;
- soldering iron with solder;
- insulating tape.
It is advisable to study the connection diagram of the device on the VAZ. It is important to ensure correct polarity when installing a new cigarette lighter. The device comes with three wires - black, red and yellow.
- Black is a minus or mass that comes to the car body.
- Red – is responsible for the voltage of the heating element. Connected to the positive terminal of the battery via a 20 amp fuse.
- Yellow – backlight wire.
Next, you can remove the VAZ cigarette lighter. The work is performed as follows.
- Open the hood, and then disconnect the negative terminal from the battery. This will prevent short circuit.
- Using a screwdriver, unscrew the fasteners that attach the left side plastic near the driver’s feet. We remove it and then get access to the connection wires.
- We disconnect the three-pin block responsible for powering the cigarette lighter.
- We remove the backlight bulb to illuminate the ashtray. We take it out together with the cartridge and several wires.
- We hook the metal rim of the cigarette lighter with a screwdriver, and then continue to pull out the element. You need to push it out of the center console.
- We remove the filter together with the cartridge itself.
- Now you can change the element. We take out the metal rod and then install a new spare part.
- Installation is carried out in the reverse order of removal and is shown below in the pictures.
Which cigarette lighter should I replace with?
The market sells different versions of parts for the VAZ 2114 from the original manufacturer or Chinese concerns. Therefore, many drivers are interested in what spare part to replace the old one with. When purchasing, you must choose original parts. Additionally, you need to pay attention to the packaging - it should be neat, and inside there should be a GOST certificate of conformity.
Cheap Chinese analogues for the VAZ 2115 are made of low-quality materials and can burn out in the first weeks after replacing the cigarette lighter. Especially when connecting a splitter to use several devices at the same time. The price of high-quality spare parts for a VAZ 2114 ranges between 300 – 900 rubles. The cost depends on the manufacturer and additional features.
How to install a cigarette lighter
Before starting work, be sure to disconnect the negative terminal of the battery, and also make sure that the ignition switch is in the “off” position.
There is no single method for inserting this device, because cigarette lighters vary in length, size and shape of the case, as well as the method of fastening. The easiest way is to insert this device into a standard hole of a suitable size. If there is no such place and you could not find a suitable crown, mark the contours of the opening, then very densely drill holes with a diameter of 2–3 mm around the perimeter. After this, use side cutters to carefully cut the jumpers between the holes, and then level the seat with a file. Insert the cigarette lighter to ensure the area is prepared correctly. If necessary, correct the hole.
Do not install the plug on curved or corrugated surfaces because you will not be able to secure it properly. Remember, the distance from the bottom of the cigarette lighter body to any body part must be at least 2 cm.
Having prepared the seat, proceed to selecting the wire and fuse. A plug directly connected to the battery can easily transmit current up to 30–40 amperes, so the load power limitation depends on the thickness of the wire and the fuse rating. Each millimeter of cross-section of a stranded wire is capable of transmitting 5–10 amperes of current to the plug. If you are going to connect a load with a power of 300-500 watts, then the current will be 25-40 amperes. The cross-section of the wire for such a current will be 4–6 mm. An attempt to pass such current through a wire of a smaller cross-section will lead to its melting or fire. Consider a path for the wire that will directly connect the plug and battery. It is advisable to lay it through the technological holes of the body next to the standard wiring.
Remove the interior floor and trunk trim, then carefully inspect the selected path for the wire. If you can get it through the finished holes, then do it. If not, drill new ones. At your local auto store, purchase rubber seals that will protect the wires from the sharp edges of the hole in the body. Drill holes, focusing on the diameter of the seal, and process their edges first with a file, then with anti-corrosion materials. Attach the wire to the body or standard wiring bus using plastic clamps.
How to remove the cigarette lighter of a VAZ 2115 yourself
The design of the device on later AvtoVAZ models is not fundamentally different from its predecessor. Therefore, you can remove the cigarette lighter for modification 2115 in the same way as for 2114.
- After removing the negative terminal, remove the left plastic cover near the driver’s feet.
- Disconnect the cigarette lighter contact blocks.
- Remove the ashtray light bulb.
- Disconnect the light filter.
- We remove the old element from the center console by prying it off with a screwdriver.
- We install the new part and begin assembly.
- We mount the backlight ring.
- We install the new car cigarette lighter in the seat.
- We install the ashtray light bulb.
- We connect power via a three-pin connector.
- We tighten the screws that hold the facing plastic near the legs.
- Connect the power and check that the device is working correctly.
Detailed instructions are given in the video below.
How to install a cigarette lighter
Before starting work, be sure to disconnect the negative terminal of the battery, and also make sure that the ignition switch is in the “off” position.
There is no single method for inserting this device, because cigarette lighters vary in length, size and shape of the case, as well as the method of fastening. The easiest way is to insert this device into a standard hole of a suitable size. If there is no such place and you could not find a suitable crown, mark the contours of the opening, then very densely drill holes with a diameter of 2–3 mm around the perimeter. After this, use side cutters to carefully cut the jumpers between the holes, and then level the seat with a file. Insert the cigarette lighter to ensure the area is prepared correctly. If necessary, correct the hole.
Do not install the plug on curved or corrugated surfaces because you will not be able to secure it properly. Remember, the distance from the bottom of the cigarette lighter body to any body part must be at least 2 cm.
Having prepared the seat, proceed to selecting the wire and fuse. A plug directly connected to the battery can easily transmit current up to 30–40 amperes, so the load power limitation depends on the thickness of the wire and the fuse rating. Each millimeter of cross-section of a stranded wire is capable of transmitting 5–10 amperes of current to the plug. If you are going to connect a load with a power of 300-500 watts, then the current will be 25-40 amperes. The cross-section of the wire for such a current will be 4–6 mm. An attempt to pass such current through a wire of a smaller cross-section will lead to its melting or fire. Consider a path for the wire that will directly connect the plug and battery. It is advisable to lay it through the technological holes of the body next to the standard wiring.
Remove the interior floor and trunk trim, then carefully inspect the selected path for the wire. If you can get it through the finished holes, then do it. If not, drill new ones. At your local auto store, purchase rubber seals that will protect the wires from the sharp edges of the hole in the body. Drill holes, focusing on the diameter of the seal, and process their edges first with a file, then with anti-corrosion materials. Attach the wire to the body or standard wiring bus using plastic clamps.
Replacing the cigarette lighter light bulb of a VAZ 2114
Failure of this element is also on the list of common faults. If the lamp on a VAZ 2114 refuses to work, then it must be replaced with a working element.
The procedure will be as follows.
- De-energize the wiring by disconnecting the battery.
- We unscrew the screws securing the left lower cover of the decorative plastic and remove it.
- Disconnect the car cigarette lighter power connector.
- Pry up the metal part with a screwdriver and remove it.
- We take out the green edging of the car cigarette lighter. To do this, you will have to bend it at an angle to remove the plastic clips.
- We remove the backlight bulb and install a new part.
The assembly procedure is carried out in reverse order. We install the backlight ring, then mount the metal part of the device. It is advisable to slightly bend the antennae on the base during installation - this will help during subsequent disassembly. Then we connect the chip, screw on the decorative plastic of the center console and connect the power.
Fuse burned out
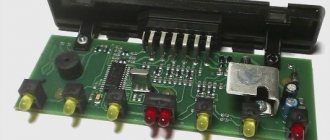
One of the most common breakdowns due to which the device does not work is the burnout of the protective element of the VAZ 2114 cigarette lighter. The car circuit in this area is protected by fuse F7 with a rating of 30 amperes. If the maximum value is exceeded, the metal jumper burns out and does not work. This is protection of wires from melting. If the fuse does not work, repair will require removing the blown element and replacing it with a new one.
The mounting block of the VAZ 2114 model is located in the engine compartment, on the left side along the direction of the car. The relays are located here, and on the back of the cover there is a diagram of the arrangement of the protective elements. The fuse with number F7 (30 A) must be replaced. After work, it is important not to violate the established rules, then the device will work for a long time:
- do not connect several powerful devices at the same time (via a splitter), otherwise the fuse may burn out;
- do not install an element designed for a higher current strength than that recommended by the manufacturer;
- Avoid loosening the socket or poor contact with the cartridge - this can lead to a short circuit in the system and tripping the fuse.
We find out how to remove the cigarette lighter on a VAZ 2114
Before we look at the main topic - how to remove the cigarette lighter of a VAZ 2114, you should first find out - what is a cigarette lighter, where is it located and how to use it?
A car cigarette lighter is a special electrical device, usually located on the front panel of the car and used for lighting cigarettes (hence, as you might guess, the name), as well as connecting various electrical appliances and tools (more precisely, they are connected to the cigarette lighter socket, and not into the cigarette lighter itself, which is only a removable part. However, in most cases, both parts of this device are called the same...)
Inside the connector of this device there are two contacts, which, in turn, are connected by wires to the on-board network.
The removable part, which serves for lighting the cigarette, is also designed quite simply - it contains bimetallic contacts and a conductive spiral, which heats up when connected to the network (the vast majority of cigarette lighters also have a button that turns the heating process on and off, which protects the device from quickly burning out (in case the heating was constant...)
It should be noted right away that in addition to its main purpose, a huge number of different equipment can be connected to the cigarette lighter socket (for this it must have a suitable connector).
- chargers for mobile phones;
- compressors for tire inflation;
- car vacuum cleaners;
- mini refrigerators;
- audio recorders;
- measuring instruments, and much more.
Thus, the cigarette lighter is a fairly universal and necessary device inside the car, which is why it is so important that it is in good condition.
Connecting the cigarette lighter
Never connect the cigarette lighter to the ignition switch. The ignition system will not withstand such a load. Having laid the wire in the engine compartment, bring it to the positive terminal of the battery, connect the fuse and then attach it to the terminal. If for some reason you cannot do this, run a wire with a fuse to the starter and attach it to the positive terminal of the relay. Strip the end of the wire at a distance of 1 cm, place it on the terminal, then crimp it using pliers. Be sure to secure the wire so that it does not dangle anywhere. To attach the wire to the cigarette lighter, use a soldering iron or an appropriate terminal, depending on the device model. Install a fuse and a switch next to the cigarette lighter, this will increase the safety of using this device.
Do not confuse the arrangement of parts of the diagram:
- Battery.
- Fuse.
- Switch.
- Relay.
- Cigarette lighter.
The switch must be designed for a current of 1.5 times the maximum load. If there is no such switch, attach a relay next to it that is suitable for the current. Some drivers place a switch and relay next to the ignition switch. Connect the switch to the control contact of the relay, and the cigarette lighter to the power one. To do this, place heat-shrink tubing on the exposed ends of the wire, then push and crimp the terminals. Adjust the tube so that it completely covers the junction of the terminal and the wire, then heat it with a match or lighter. You can also install a regular cable splitter (220 volts), which is sold in hardware stores. Find the nearest ground connection location (the wire is bolted directly to the body). Unscrew the bolt, clean the contact pads of the terminal and body. Route a piece of wire from the relay and cigarette lighter to the ground hole to determine the length, then cut and strip the ends.
Make a splitter - take a piece of wire of a suitable length, strip both ends. Then solder the ends of the long and short wires to each other so that they both point in the same direction. Protect the connection with heat shrink tubing, then attach the connection terminal to the negative of the cigarette lighter. Position the tube so that it completely covers the contact point. Place heat shrink tubing on the other end of the short wire and attach the terminal. Or use a regular cable splitter, which must be rigidly attached to the body.
Installation check
Check all connections carefully. The relay and splitter must be securely attached to the housing. After making sure that everything is in order, check that the ignition switch is turned to the off position and connect the battery. Using a tester, measure the voltage on the unconnected battery. Place the negative terminal on the corresponding battery terminal and measure the voltage again. If it hasn't changed, then everything is fine. If it drops by at least 0.5 volts, turn all electrical appliances on and off, including the ignition system. If the voltage does not rise, disconnect the battery and look for a short circuit. If everything is fine, turn on the switch and measure the voltage on the battery again. After making sure that everything is correct, measure the voltage at the cigarette lighter contacts. If everything is in order, you have successfully completed the job.
The cigarette lighter is an essential attribute of any car. Often there is a need for an additional cigarette lighter, located in the trunk or on the panel, next to the main one. Through a splitter you can connect up to 3 different devices to one cigarette lighter. The additional cigarette lighter is connected directly to the battery. After reading the article, you will learn how to connect the cigarette lighter in your car correctly without harming your car.
How does a cigarette lighter work?
A car cigarette lighter is two devices - a heating element and a connector (plug) in a convenient housing. It can be directly connected to the battery, so the device works even if the ignition switch is turned off. In addition to its main purpose, the plug is often used as a 12/24 volt outlet to which a splitter is connected to provide power to a laptop, phone or other devices. A splitter is also connected to it, so you can simultaneously charge a laptop, phone, or use a DVR. The power splitter or power supplies of these devices are inserted into a plug that provides a reliable connection to the cigarette lighter socket contacts.
What you need to insert a cigarette lighter
If you decide to install an additional cigarette lighter, you will need the following tools:
- drill;
- set of metal drills;
- metal crown, the diameter of which corresponds to the selected cigarette lighter;
- round and flat files;
- soldering iron;
- solder;
- rosin;
- pliers;
- side cutters;
- Screwdriver Set;
- heat-shrink tubing;
- switch;
- fuse;
- the wire;
- a regular cable splitter (220 volts) from a hardware store
Problems with the cigarette lighter and their elimination
Very often, especially in cases of constant operation or increased loads on the connector, the device fails. In some of these cases, the only solution will be to replace the VAZ 2114 cigarette lighter, while in others, you can try to fix this problem by repairing it.
Before you begin dismantling the cigarette lighter or starting to repair it, you should check the reliability of the connection of the wiring harness suitable for it. This can be done by checking the tightness of the fasteners in the block (it is designated as X1).
Among the main breakdowns that occur with a device such as a cigarette lighter are the following:
- poor contact in the connector;
- oxidation of connector contacts;
- fuse blown;
- burning or melting of connector contacts;
- backlight bulb burnout;
- a short circuit in the system that occurs when third-party devices are connected;
- mechanical destruction of the connector.
In the first three cases, you can still try to correct the situation, in the rest you will have to dismantle the device and, except in the case of a burnt-out light bulb, purchase and install a new one in its place (it should be immediately recalled that before changing the cigarette lighter on a VAZ 2114, you should disconnect the battery ).
As for poor contact inside the connector or the presence of oxides, you can try to solve this problem by slightly bending the contacts themselves and cleaning them. If a fuse blows, you just need to replace it with a new, similar one (the fuse you are looking for is designated in the row of fuses as F4 and is designed for a maximum current of 20 amperes).
Cigarette lighter repair
Fuse
The fuse we need can be designated F4 or F7. Its current strength is 20 amperes. To find it, open the hood of the four and find the black box, where the part we need is located. We extract it and test it using a tester. If it gives a signal that the fuse is working, we put it back. Otherwise, you will only have to change it (you can only change it with the same voltage, otherwise it simply will not cope with its role).
Bulb
Once a light bulb burns out, it will no longer be possible to repair it. All that remains is to change.
Radio tape recorder
To make the task easier, car enthusiasts often connect the power of the radio to the cigarette lighter contacts. By their actions, they lead to the inoperability of the radio and blown fuse. In this case, you will have to call a specialist, since it will be difficult to solve the problem on your own.
Button stuck
Sometimes the key stops working and nothing happens when pressed. There are three solutions. Try removing the non-functioning part, restoring the contacts, or replacing the button completely.
Open circuit
Each cigarette lighter has its own fuse, that is, a tin wire. If the cigarette lighter overheats, it may break the contacts and melt. To understand whether the AP is working or not, use a tester and find the location of the wire break. It will be extremely difficult for an inexperienced car enthusiast to find a break and troubleshoot problems, so it is better to call a specialist or a more experienced driver.
Semiconductor
Often the cigarette lighter semiconductor fails. There are times when, if a part malfunctions, it will be enough to repair it. We simply remove the semiconductor and reassemble the device. We check the functionality of the cigarette lighter.
Oxidation contacts
With prolonged use, oxidation and rust appear on the contacts. This can be seen with the naked eye. Due to the lack of a tight connection, connected electrical appliances may burn out. Remove the cigarette lighter and clean the contacts with a file.
Wiring short circuit
Short circuits in the wiring can be prevented, but only by replacing the wiring itself.
There is one SKODA RAPID car for everyone
SKODA RAPID is a car that can safely be called unique. Why? The answer is obvious - it will suit absolutely everyone! The dynamic character of the model and precise, refined handling combined with an interesting and stylish design will not leave the younger generation indifferent.
Older drivers will appreciate the nobility of the “crystalline” design, which is partly reminiscent of the traditions of the best crystal manufactories in the Czech Republic and the cubist architecture so beloved by all residents of Prague.
Typical faults
Where to look for the reason if the VAZ 2114 cigarette lighter does not work? It is necessary to take into account that the failure of the AP, as well as the sockets directly for connecting it, are two different things. Moreover, the AP is not used as often as a socket, since this socket is often used to connect various electronic devices. The device may stop working when using low-quality chargers for equipment made in China. Especially when it comes to using an AP splitter, this can, in principle, cause its breakdown (the author of the video is the Expert R channel).
The AP circuit is designed to power various gadgets, but its maximum load capacity is 20 Amps. The corresponding 20 A fuse element is located in the block and is marked with the symbols F4. If you use a splitter, the load on the circuit will be simply catastrophic and over time the fuse will fail, but this is not so bad. It is much worse if the wiring fails, since this can cause not only a short circuit, but also a fire.
It often happens that if the cigarette lighter stops working, the radio does not work. In this case, the problem most likely lies in the circuit or functionality of the safety element. The radio can be connected directly to the battery or to the AC cable, so you shouldn’t be surprised at its inoperability if the latter breaks down.
Before carrying out repair work, it is necessary to prepare a place near the vehicle, ensuring that the door opens freely. Next you should stick to the following scenarios:
- The fuse has failed. To fix the breakdown, you need to find the location of the part by opening the hatch with the block. An important part is located to the left of the steering column and is a 20-amp fuse marked F4. Using a tester, you should evaluate its performance. If there is no voltage, you will need to purchase a new part.
- Connector burnout. If traces of burning are found, you should not buy a new fuse without understanding what caused the problem. At the diagnostic stage, it is important to check the condition of the contacts on the blocks when leaving the mounting compartment.
- Errors during operation. Some problems with the safety assembly are due to improper operation. Make sure the fuse plug is not pulled out or damaged.
- Bulb burnout. Replacing the element is quite simple. Before doing this, remove the device from the socket.
- Damage to the cigarette lighter core. Upon visual inspection, a number of damage to the core can be found. This part is not sold separately in auto stores, so the only option is to find it on the market from car enthusiasts.
SKODA RAPID – any trip is a pleasure
Skoda Rapid is the most affordable car of the entire SKODA line presented in Russia, but it is equipped with the most modern options usually offered for cars of a higher class. The appearance of an expensive European car, the design of which has no random details, combined with convenience and functionality, will exceed all your wildest expectations. Everything is thought out - down to the smallest detail.
And it’s not just about the pleasure that you will get when going through a bunch of turns at high speed - although the SKODA RAPID will easily provide this for you. Many details that can make every trip as convenient and comfortable as possible - this is what SKODA cars are valued for in more than a hundred countries around the world.
In general, it can be called a “city dweller” of the compact class. At the same time, the Skoda Rapid is a family car; its spacious interior and spacious luggage compartment are perfect for traveling with the whole family. Fits almost everything and even more! And if there is still not enough space, the luggage rack can be easily removed and the second row seats can be folded down.
Under the hood there is also something to be impressed with. SKODA RAPID engines are the embodiment of all the engineering power of the Volkswagen automaker. Their cost-effectiveness and time-tested reliability guarantee you years of trouble-free operation under the most demanding schedules and in the most challenging road conditions.
A family car should be truly comfortable, not only in the first row, but also in the second. After all, in a real family everyone should be equally comfortable. SKODA RAPID fully meets these requirements, because it is a car in which everyone will find a convenient and comfortable place for themselves. Even on the longest trip.
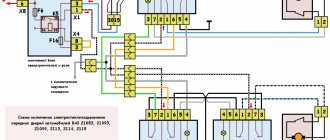
Electrical diagram of VAZ 2115 - 20 cars (left half):
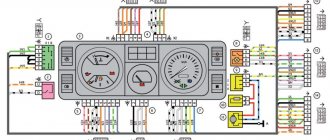
1 – headlights; 2 – fog lights; 3 – air temperature sensor; 4 – electric motor of the engine cooling system fan; 5 – blocks connected to the wiring harness of the ignition system; 6 – engine compartment lamp switch; 7 – block for connection to a single-wire type audio signal; 8 – sound signal; 9 – washer fluid level sensor; 10 – front brake pad wear sensors; 11 – oil level sensor; 12 – generator; 13 – engine compartment lamp; 14 – coolant temperature indicator sensor; 15 – starter; 16 – battery; 17 – relay for turning on fog lights; 18 – coolant level sensor; 19 – brake fluid level sensor; 20 – reverse light switch; 21 – windshield wiper gearmotor; 22 – oil pressure warning lamp sensor; 23 – block for connecting to the rear window washer electric motor; 24 – windshield washer electric motor; 25 – instrument cluster; 26 – mounting block. Conventional numbering of plugs in blocks: A - block headlights; B — electric fuel pump block; C — blocks of the mounting block, ignition switch, windshield wiper gearmotor; D — interior lamp
Correct removal of the cigarette lighter on a modern VAZ
Just ten years ago, no one would have thought that the cigarette lighter would become an important part of the car. Then even smokers gradually stopped using it because of the fire hazard: ash could stick to the heating element and get on the plastic; if you drop a hot metal part onto the casing, it will burn through it; if it’s on yourself, you’ll certainly get burned... In general, few people lit a cigarette from it. But at a certain point in the development of technology, almost all external electronics in the car began to work from it. Compressors, vacuum cleaners, radar detectors and navigators, mobile phones and refrigerators... Yes, even coffee makers and kettles began to be made into automobile ones, that is, with a plug for the cigarette lighter. Of course, we don’t recommend mindlessly stuffing everything into it. This leads to very unpleasant consequences. But the fact that today without a 12-volt outlet in a car is like having no hands, this is absolutely certain.
So if it breaks, it's very annoying. It’s like leaving the house without a mobile phone or discovering that there is razor foam left near your ear. It's a ridiculous feeling. It’s good that engineers provide a fairly easy way to repair this spare part. Let's see how AvtoVAZ designers took care of this.
Causes of cigarette lighter failure
Reasons for failure:
- Fuse blown; Most often this happens due to devices with a high charge. The fuse is not able to cope with the load, because it also has its own voltage limit. Every motorist, if he uses larger devices, must have a battery with him.
- Use of the socket for purposes other than its intended purpose; Gadgets that are not intended for the cigarette lighter are used. It can only charge phones, tablets and navigators. Heavier devices are beyond his strength.
- Burnout of the socket. Non-standard plugs are inserted into its connector, or they dangle freely.
- Burnt out backlight; If the device is used frequently, its spiral burns out; you can replace the cigarette lighter head. However, if this scheme does not work, you should look for a problem in the electrical network. Most often, the spiral burns out due to the driver’s dishonesty and its use for other purposes, since not all types of gadgets are suitable for the cigarette lighter.
Checking for damage
To check for a cigarette lighter malfunction, we will need:
- Two screwdrivers (one Phillips, one slotted);
- Soldering iron;
- Two tweezers (one curved, the other straight);
- Toaster for cars;
- Pliers.
Repair work
Before removing the cigarette lighter on a Priora, Kalina or VAZ-2110, VAZ-2114 (the process is almost identical), you need to disassemble the tunnel. It may seem difficult, but it's actually not that bad. Take a Phillips screwdriver and remove the plastic trim around the handbrake. First, just in case, disconnect the negative terminal from the battery. There are only three screws on the cover. After you unscrew them, look at the base of the lever. The plank that secures it to the floor hides the self-tapping screw. So, we will have to remove this bar, because this screw is used to fasten the tunnel, which we need to remove. Having freed the lower part, let's move on to the upper. Pull the tunnel towards you until it pops out of the latches in the area of the floor mats. Just without fanaticism, so as not to break them; you will see two more screws, one on each side. All that remains is to unscrew the cover of the gear shift knob, and the tunnel can be raised.
Actually, access to the cigarette lighter is now open. Squeeze it out, having first disconnected the wiring chip. It will pop out of the clips; Insert a new one in its place, insert the wiring into it and assemble the tunnel in the reverse order.
As you can see, there is nothing particularly difficult about removing the cigarette lighter on Kalina or Priora. This also applies to models 2110 and 2114. So if it breaks, don’t rush to go to the service center. Better replace it yourself. This will give you a good experience.
Useful video
The only thing that should be advised to those who decide to install a completely new device to replace a damaged one is that when buying a cigarette lighter in a car store, be sure to check it for open circuits using a multimeter. This is due to the fact that recently cases when a newly purchased device turns out to be completely faulty have become very frequent.
Published January 17, 2018
REMOVAL AND INSTALLATION OF CIGARET LIGHTER
You will need a screwdriver.
1. Disconnect the wire from the negative terminal of the battery.
2. Unscrew the screws and remove the left trim of the center console of the instrument panel.
3. Disconnect the wiring harness block from the cigarette lighter.
4. Remove the ashtray illumination lamp along with the socket and wiring harness block.
5. Overcoming the resistance of the clamps, push the cigarette lighter out...
6. ...and remove it from the center console.
7. Then remove the light filter assembly with the backlight lamp socket.
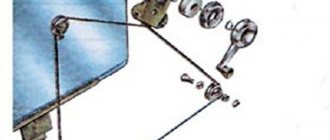
8. To replace the cigarette lighter lamp, remove the reflector...
10. ...and remove the backlight lamp from the filter socket.
11. Install the cigarette lighter in the reverse order of removal.
After work
The cigarette lighter itself is not difficult to choose. It is typical and there are simply no bells and whistles in it, since it has a very highly specialized purpose. Therefore, the only thing that should guide your choice is the price. A suspiciously low price should alert you: this means that low-quality materials were used in the production of this cigarette lighter. Since it is under constant voltage, heating is inevitable. In addition, the on-board network of the VAZ-2110 and VAZ-2114, like Kalina and Priora, does not remove voltage from the cigarette lighter when it is not in use. So a low-quality part can lead to a fire: the material will heat up above the specified temperature, the plastic of the panel will deform and may catch fire. Therefore, you should not install a cigarette lighter that is too cheap.
At the same time, you shouldn’t overpay for unknown functions and a titanium alloy body. The manufacturer can be a nightingale, but, in fact, the cigarette lighter solves only one question: how to charge a mobile phone in Kalina, Priora or VAZ-2110? So don't chase the impossible, just choose quality spare parts.
What kind of cigarette lighter is on the fourteenth Samara model?
Early VAZ models (2101-2109) have an old-style device with a long tip. This cigarette lighter has a number of disadvantages:
- over time it begins to wobble in the nest and may stop working;
- does not provide reliable fixation of the plugs of connected devices.
The VAZ 2114 car has a different modification of the cigarette lighter - a short body modeled on the European standard. The original part has article number 212337251113725, and its price is 300 - 600 rubles. There are cheaper analogues of cigarette lighters, but such modifications should be abandoned - their performance does not last long. It is important that the part is carefully packaged, and the product is completed with certificates of conformity and quality passports.
There is one SKODA RAPID car for everyone
SKODA RAPID is a car that can safely be called unique. Why? The answer is obvious - it will suit absolutely everyone! The dynamic character of the model and precise, refined handling combined with an interesting and stylish design will not leave the younger generation indifferent.
Older drivers will appreciate the nobility of the “crystalline” design, which is partly reminiscent of the traditions of the best crystal manufactories in the Czech Republic and the cubist architecture so beloved by all residents of Prague.
Reasons why the cigarette lighter does not work in a VAZ-2110 car
Any malfunction must have some explanation. In other words, in order to eliminate a problem, you must first find the cause that provoked its occurrence. In the case of a cigarette lighter, this should not cause any difficulties. Its design is quite simple, so understanding it will not be difficult for the driver. In other words, to identify the problem and fix it, you don’t need to go to a service center - everything can be done on your own.
The electrical circuit of the cigarette lighter is also quite simple. In fact, it connects directly to the battery, or more precisely, through the mounting block.
This design is completely justified, and it takes into account the operating features of this device. The thing is that when the cigarette lighter is turned on, a fairly high current flows through it. Here it is appropriate to give an analogy with a starter.
If the cigarette lighter stops working, there may be several reasons for this:
- fuse;
- wires;
- malfunction of the device itself.
Let's look at them in a little more detail. The first step if the cigarette lighter malfunctions is to check the integrity of the fuse. In general, when looking for reasons, it is best to follow the path from simple to complex. The fuse we need in this case is located in the mounting block. You can recognize it by the marking - the corresponding image of F18. By the way, on the electrical diagram of the “tens” it is marked exactly the same. The current that passes through this fuse should not exceed 25 amperes.
However, there is an even simpler way. In this case, you don’t even need to open the mounting block and inspect the fuse. It will usually be enough to try to turn on the ignition and start the heating system fan. This is truly the simplest verification option. The thing is that the fan and the cigarette lighter are connected to the same fuse - the aforementioned F18. Accordingly, if it fails, none of these devices will work.
The problem is easily solved. Open the mounting block and change the faulty fuse. To make this operation more convenient, the designers provided tweezers. It is located inside the mounting block, and with its help it is really much more convenient to manipulate such a thin object as a fuse. All that remains is to check the operation of the cigarette lighter, and, if everything is in order, close the mounting block.
However, the fuse is not always the cause of the malfunction. If it is in perfect order, then the problem should be looked for in the wires that connect the mounting block and the cigarette lighter. Perhaps there was a break somewhere. There is probably no need to explain how to fix this problem. Just remember to carefully insulate the restored wire afterwards.
However, the reason may be even more serious - we are talking about a breakdown of the cigarette lighter itself. However, before you start disassembling the device, also inspect fuse F6. The thing is that if it burns out, it can also cause the cigarette lighter to malfunction. If the fuse is in order, then there will be no other way out except disassembling the cigarette lighter.
One point worth noting. In the vast majority of cases, the cigarette lighter fails due to the fault of the car enthusiasts themselves, who connect devices into its socket that consume a fairly powerful current. One example here is a powerful car electric pump. If you use the cigarette lighter socket carefully and strictly in accordance with the manufacturer’s requirements, then you are unlikely to have any problems with this device.
Often the cigarette lighter is used as a socket, so its failure entails the disconnection of additional devices connected through it. In the article you will find a number of reasons why the VAZ 2110 cigarette lighter stopped working.
>VAZ 2110 cigarette lighter connection diagram
Dismantling the tunnel on a VAZ-2110
To remove the tunnel you will need:
- Remove the facings by unscrewing two bolts on each.
Use a Phillips screwdriver to unscrew the screws and remove the tunnel lining.
On the right side we find and disconnect the pads.
Remove the cover under the handbrake.
Remove the cover by prying it with a flat screwdriver in four places.
Removing the cigarette lighter
To remove the cigarette lighter itself you will need:
- Pull the cigarette lighter out of the socket by squeezing the connectors.
Remove the lamp screen by squeezing its claws.
When installing a new cigarette lighter, observe the polarity of the terminals.
Quick method
If you look at this procedure as it is described in the User's Guide, the work will seem complicated. That is why for many it is a problem how to remove the cigarette lighter from its socket without removing the tunnel itself. There is little space for such manipulation and there is no access to the cigarette lighter from different sides. But there are certain points that will help you cope with the task.
If the cigarette lighter socket is hanging into the hole, you may be able to remove it without dismantling the tunnel.
Also, when removing the tunnel, you can make a small hole in it, which will help you remove the cigarette lighter easily next time.