The functioning of the rear lights of any car is necessary for road safety reasons. These devices at the rear of the car perform a lighting and information function (warn road users about the movement of the car).
On VAZ 21099 and other models, the lights turn on automatically when changing gears and moving the car backwards.
Structurally, the lights at the rear of the car combine the following components of the lighting system:
- reversing lighting;
- side lighting;
- brake lights;
- turn signals;
- emergency alarm.
Rear view lights for VAZ 21099
The structure of the lighting devices is as follows:
- body made primarily of plastic (in some cases glass);
- lamp holder;
- latch for holding wires;
- diffuser of light rays for uniform illumination of the road surface. It is glued to the back of the product body, so if it breaks, it needs to be replaced along with the body.
The device of the rear light on VAZ 2109-2108 and 21099
The following types of rear lights can be installed at the rear of a VAZ 2108 or 2109:
- incandescent lamps. Inexpensive, but they break down relatively quickly and are not bright enough. Such lamps burn with a yellow light, which is not very visible in unfavorable weather conditions;
- halogen light bulbs . They are considered more modern and durable, since air is pumped out of their flask and inert gas is pumped in. There are models with H1 and H3 sockets on sale;
- LEDs . They burn with a cool white light and last several times longer than incandescent lamps. They are sold in strips and today often replace obsolete incandescent lamps.
LED tail lights for VAZ 2108
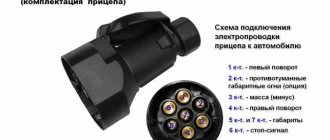
Wiring diagram for rear lights of VAZ 2109 of all modifications
The VAZ 2109 car was produced at the Volzhsky Automobile Plant from 1987 to 2004 (in Ukraine it was assembled from ready-made VAZ 21093 car kits from 2004 to the end of 2011).
During production, it received five main modifications regarding electrical equipment. In fact, there are more varieties, but we are interested in changes in electrical circuits.
- Classic hatchback VAZ 2109, produced since 1997 (low panel). Hatchback body with mounting block 17.3722.
- Updated hatchback and sedan VAZ 2109, 21093, 21099 (high panel, produced 1988 - 1999). The mounting block is the same, but with knife-type fuses - 17.3722.
- The same updated hatchback and sedan VAZ 21093, 21099, but in the “luxury” configuration (manufactured 1988 – 1998). Mounting block – 17.3722 with knife-type fuses.
- Hatchback and sedan VAZ 21093 and 21099 produced since 1998. A new mounting block 2114-3722010-60 has appeared.
- Sedan 21099 (manufactured since the same 1998) received an instrument panel 2114 and a mounting block 2114-3722010-10 or 2114-3722010-18.
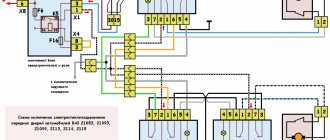
During all this time, the electrical circuit was, of course, significantly improved, but the changes practically did not affect the connection circuit for the rear lights. Even the color of the wires in their power supply harnesses remained unchanged. But since the mounting blocks in these modifications are different (and the rear lights of the VAZ 2109 are powered through the mounting block), it makes sense to provide electrical wiring diagrams for all modifications. Here they are:
Electrical installation diagram for VAZ 2109 since 1997
Electrical installation diagram for VAZ 2109, 21093, 21099 (1988 - 1999 production)
Electrical installation diagram for VAZ 21093, 21099 “lux” (1988 - 1999 production)
Electrical installation diagram for VAZ 21093, 21099 with mounting block 2114-3722010-60 (from 1998)
Electrical installation diagram for VAZ 21099 with mounting block 2114-3722010-10 or 2114-3722010-18 (from 1998)
Well, at the same time, let’s get acquainted with the appearance of mounting blocks of various modifications.
Mounting block 17.3722
Mounting block 2114-3722010-18
Mounting block 2114-3722010-10
Mounting block 17.3722 with blade fuses
Pinout of connectors and design of lamps
Now about the rear lights. Structurally, this is a single block in which there are five light bulbs. The location and purpose of the lamps in it is as follows:
Location and purpose of lamps in the rear left lamp of the VAZ 2109
In the photo the numbers indicate:
- Turn indicator.
- Side light.
- Fog light.
- Reverse indicator.
- Brake indicator (brake light).
- Retroreflectors (“reflectors”).
All lamps are placed on the back wall of the device, and are powered using a flexible board with metallized tracks.
External view of the rear wall of the flashlight from the side of the lamps (top) and the printed circuit board
The purpose and numbering of the lamps is the same as in the photo above. As shown in the bottom photo, the power connector for the lamps is etched directly onto the rear light PCB. Let's look at its pinout.
Pinout of the power connector for the rear light of the VAZ 2109
Here the numbers indicate:
- Side light (yellow-black).
- Fog light (orange-black).
- Direction indicator (blue-black or blue).
- Fog light (green).
- Minus power supply for all lamps (black).
- Stop light (red).
Injection engine
The VAZ 2111 engine is built, one might say, on the basis of the VAZ 21083 - the block and cylinder head remain the same. Only the parts of the connecting rod and piston group have undergone minor changes - on the VAZ 21083 engine the piston pin is pressed into the connecting rod head, on the VAZ 2111 it has a loose fit. The connecting rod, pin and piston assembly are interchangeable.
The engine power supply and ignition systems have radically changed - instead of a carburetor, a ramp with injectors is installed on the intake manifold, injecting fuel into the inlet channels of the cylinders. The fuel pump is electric, installed in the fuel tank. Changing the quality of the fuel mixture and ignition timing is carried out by an electronic control unit.
The change in the power system did not affect the rated engine power (70 hp), but improved its traction characteristics - the maximum torque on the injection VAZ 21099 is achieved at 2800 rpm, on the carburetor - at 3400 rpm.
For car enthusiasts, in terms of operation and maintenance of the injection VAZ 21099, the changes affected the identification of problems in the engine control system. The same work as changing the oil, timing belt or even a blown cylinder head gasket is carried out in the same way for both engines.
What kind of lamps are there?
Now a few words about the lamps used in the rear light of the VAZ 2109. The A12-5 (T5W) bulb with a power of 5 W is responsible for the side lights.
T5W bulb, responsible for the side light of the VAZ 2109
All steel lamps - direction indicator, fog light, reverse indicator and brake light - are of type A12-21-3 (P21W). Their power is 21 W.
Lamp P21W
Instructions for replacing light bulbs
It's time to learn how to change lamps yourself so as not to waste extra money and your time on trips to a car service center. Open the trunk lid and find the rear part of the lights. Disconnect the power supply.
Removing the power supply from the rear light of a VAZ 2109
Press the side latch that secures the light fixture. The latch is located on the side of the light device, which is closer to the central axis of the car.
The back of the lamp is secured using side latches
We take out the back part of the flashlight along with the circuit board and bulbs.
Removing the rear part of the right lamp VAZ 2109
Place the module with the lamps facing up.
Removed module with lamps
We find the burnt-out light bulb, guided by the photo in the section “Pinout of connectors and design of lamps”, turn it counterclockwise, and remove it. Fix the new lamp by turning it clockwise. We install the module in place, connect the power supply.
Cover covering the rear part of the lamp VAZ 2109 (left) and VAZ 21099
Causes and actions in case of breakdown
Among the reasons for the breakdown of the rear parts of the lighting system on a VAZ 21099, 2108 or 2109, the most common are:
- Bulb burnout. It happens due to wear or power surges and is almost the most popular reason for replacing rear headlights.
- Oxidation of contacts. Occurs due to poor quality of terminal contact, electrolyte leakage, or cracks in the battery case.
- Fuse failure. This cause of failure is due to voltage surges.
- The reverse sensor is broken or its wiring is broken.
- Burnt out contacts on the headlight film.
- Lack of ground on the board.
The most common and easiest fault to solve is a lamp burnout. The product must be replaced with a new one by turning off the light sources, opening the trunk and disconnecting the column of wires.
To do this, you will most likely have to remove the trunk trim of the VAZ 2108 or 21099, which is located behind the lamp. After this, squeezing the latches (they are located on the sides), you need to take out the panel and unscrew the lamp, after pressing on it. To install a new rear lamp, reverse the process.
Dismantling and replacing rear lights on a VAZ 2109
Now let's talk about replacing tail lights, since they often break and break. Remove the protective cover or trim (see section “Instructions for replacing light bulbs”). We disconnect the power supply; the board does not need to be removed. We find four nuts that secure the lamp to the body. They are marked with arrows in the photo below.
The lamp is attached to the body using four 8mm nuts.
Unscrew the nuts and take the lamp out.
Removing the rear light of a VAZ 2109
We install the new light fixture in the reverse order and connect the power supply.
Ideas for tuning and modifying taillights
Tuning has always been popular among car enthusiasts, and with the advent of super-bright semiconductors, it also affected lighting devices. Today we will not study step-by-step modification instructions, but will consider the most interesting options for tuning the rear lights of the VAZ 2109.
The simplest, but quite effective method of transforming a car is to install ready-made tuned lighting devices. There are a lot of them on sale, for every taste. As an example, let's take a look at the semiconductor taillights for the VAZ 2109. They cost around 3,500 rubles. Not the cheapest, but practically no labor costs, no invention.
LED rear lights “Osvar” for VAZ 2109
A smaller amount may be enough if you don’t take the entire lanterns, but only the tuned glass. For such tinted windows you will need about 500 rubles, but the appearance of the car will not be worse.
Tinted glass for rear lights of VAZ 2109
Healthy. It is not necessary to buy ready-made tinted windows; it is enough to purchase a tint film and stick it on the standard glass. Then you won’t even need to remove the lighting devices.
You can use tint film to tint both windows and lights.
If you want to modify the standard lighting fixtures, you can use LED strip. This modification will cost a maximum of a hundred rubles.
Tuning the rear lights of a VAZ 2109 using scraps of LED strip
The next tuning option looks original, but the taste and color...
Tuning option with LED strip
Instead of an LED strip, you can also use individual LEDs. It’s like it’s not a lantern, but a New Year’s decoration for the Christmas tree.
This tail light is assembled using individual high-power LEDs.
If desired, you can find modular LED lights with complex control circuits, multi-color LEDs and dimming.
Important. Such lights may be beautiful, but they may not be liked by other road users, and certainly not by the traffic police.