Relay and fuse box diagram 2109
Fuse block 2114-3722010-18
K1-relay for turning on headlight cleaners; K2-relay-breaker for direction indicators and hazard warning lights; K3 - windshield wiper relay; K4-relay for monitoring the health of lamps; K5-power window relay; K6 - relay for turning on sound signals; K7-relay for turning on the electric heating of the rear window; K8-relay for high beam headlights; K9-relay for low beam headlights; F1-F16 - fuses.
Fuse block 2114-3722010-60
K1 - Headlight wiper relay, K2 - Turn signal and hazard warning relay, K3 - Windshield wiper relay, K4 - Brake light and parking light relay, K5 - Power window relay, K6 - Horn relay , K7 - Rear window heating relay, K8 - Headlight high beam relay, K9 - Headlight low beam relay, F1 - F16 - Fuses, F1 - F20 - Spare fuses.
Source
Installation and testing of rear lights of VAZ 2109
The rear lights (headlights) of the VAZ 2108, VAZ 2109, VAZ 21099 have the following bulbs: 1) Brake lights. 2) Dimensions. 3) Reverse. 4) Turns. 5) Fog lamp.
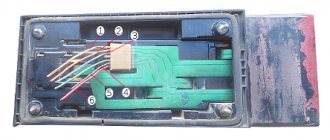
Tail light board
A wiring harness goes from the mounting block to the rear lights. The purpose of each individual wire in the harness can be understood by its color: 1) Brake lights - red 2) Dimensions - yellow 3) Reverse - green. 4) Turns - blue. 5) Fog light - orange-black.
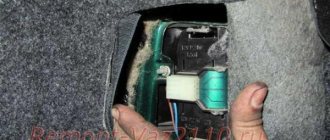
Remove the connector from the rear light board
Naturally, you need to understand that if the car is old and a lot of people have done the wiring, then the color match of the wire to its purpose may be disrupted. That is, the red wire can be converted not to brake lights, but, for example, to dimensions. But in general, this is a very important point: AvtoVAZ developers specifically marked the functional purpose of the wire with a certain color to make it easier to use.
Flashlight board
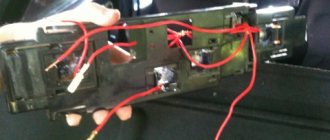
If some light signal in the rear headlight of a VAZ 2109 does not work, then before climbing into the mounting block and opening the electrical circuit, we check the following: 1) The reliability of fastening the rear light mass to the body. 2) Check the reliability of fastening the wire connector to the headlight. 3) Integrity of the light bulb 4) Quality of contact between the light bulb and the flashlight board. It often happens that everything is intact, the light bulb and the mass are good, and 12 Volts come to the light bulb, but it does not light. The reason is poor contact between the light bulb and the board. In this case, you need to clean both the light bulb base and the area on the lantern with fine sandpaper. As one smart person said: “Electrics is the science of contacts.” To disassemble the rear light of the nine, first remove the protective plastic cover. Then disconnect the black wire of the flashlight from ground. Then we remove the connector from the flashlight board and remove the board itself with the bulbs from the headlight housing. If it is necessary to replace the headlight itself, then unscrew the remaining bolts securing the headlight to the car frame and remove it.
Lantern body
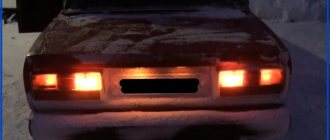
There is one important point that many owners of the ninth model Zhiguli do not know. This is the rear fog light. It is turned on by a button between the hazard warning button and the heated rear window. The rear fog light will only work if: 1) The ignition is turned on. 2) Low beam headlights are on. 3) The flashlight power button is pressed. The fog light bulb is the only one that has a reflector inside the headlight. Thanks to this reflector, the glow of the lantern becomes brighter.
Enabled clearance
Rear fog light on
Rear light bulb power: Dimensions 5 Watt Fog light 21 Watt Reverse 21 Watt Stop light 21 Watt Turn signal 21 Watt
The electrical circuit of the brake lights is faulty
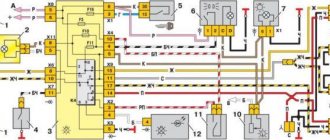
It is necessary to identify an oxidized contact, a burnt-out wire or a failed connection in the mounting block. To do this quickly and efficiently, you need to know the electrical diagram for connecting brake lights and its features: “VAZ 21083 (21093, 21099) stops, connection diagram.”
Stops (brake lights) of the VAZ 21083 (21093, 21099), connection diagram
Plus, the brake lights come from output 30 of the generator to block X8 (Ш8) (far left in the engine compartment, pink wires) to the mounting block. Next, through the fuse (No. 6, F3) in the block to block X4 (Ш4) inside the passenger compartment to the white wire going to the brake light sensor. That is, current is supplied to the sensor through the white wire. Next, from the sensor along the red wire to block Ш2 (Х2) (second from the right inside the cabin) and through the mounting block to block Ш9 (Х9) (the large transverse one in the cabin) to the red wire going through the entire cabin to the rear left block, and then to the rear right headlight.
Minus - black wires coming out of the blocks to the headlights. Mounts to the body next to the rear lights.
"Ground" of the rear light of VAZ 2108, 2109, 21099 cars - if the bad foot contacts do not work
You can check the presence of current in the circuit elements using a test lamp - connecting one end to the terminals and the other end to ground. Or by supplying current with a separate wire from the battery positive to the elements of the electrical circuit.
Video “Refinement of rear lights”
You can learn more about modifying the rear lights on the VAZ 2109 from the author of the video, Dmitry Sergeevich.
The rear lights (headlights) of the VAZ 2108, VAZ 2109, VAZ 21099 have the following bulbs: 1) Brake lights. 2) Dimensions. 3) Reverse. 4) Turns. 5) Fog lamp.
Rear light board for VAZ 2108, VAZ 2109, VAZ 21099
A wiring harness goes from the mounting block to the rear lights. The purpose of each individual wire in the harness can be understood by its color: 1) Brake lights - red 2) Dimensions - yellow 3) Reverse - green. 4) Turns - blue. 5) Fog light - orange-black.
We remove the connector from the rear light board of VAZ 2108, VAZ 2109, VAZ 21099
Naturally, you need to understand that if the car VAZ 2108, VAZ 2109, VAZ 21099 is old and there are a lot of people doing the wiring, then the color match of the wire to its purpose may be violated. That is, the red wire can be converted not to brake lights, but, for example, to dimensions. But in general this is a very important point: the developers of the VAZ 2108, VAZ 2109, VAZ 21099 specifically marked the functional purpose of the wires with a certain color to make it easier to use.
Flashlight board VAZ 2108, VAZ 2109, VAZ 21099
If some light signal in the taillight of a VAZ 2108, VAZ 2109, VAZ 21099 does not work, then before climbing into the mounting block and opening the electrical circuit, we check the following: 1) The reliability of fastening the mass of the taillight to the body of the VAZ 2108, VAZ 2109, VAZ 21099. 2) Check the reliability of fastening the wire connector to the headlight. 3) Integrity of the light bulb 4) Quality of contact between the light bulb and the flashlight board. It often happens that everything is intact, the light bulb and the mass are good, and 12 Volts come to the light bulb, but it does not light. The reason is poor contact between the light bulb and the board. In this case, you need to clean both the light bulb base and the area on the lantern with fine sandpaper. As one smart person said: “Electrics is the science of contacts.” To disassemble the rear light of a VAZ 2108, VAZ 2109, VAZ 21099, first remove the protective plastic cover. Then disconnect the black wire of the flashlight from ground. Then we remove the connector from the flashlight board and remove the board itself with the bulbs from the headlight housing. If it is necessary to replace the headlight itself, then unscrew the remaining bolts securing the headlight to the car frame and remove it.
Taillight tuning ideas
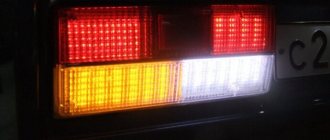
To highlight the car and make it unique and unique, that is, tuned, you can use several tips. You can use alternative optics.
These lights are much more reliable and beautiful than regular headlights. Among other things, tuning the rear lights can protect the VAZ 21099 from some problems. You can resort to modernization, and then the glass will not fog up and the contacts will not oxidize.
In addition, the rear lights on a VAZ can be painted from the inside. Of course, you need to use a special mixture, because the usual one becomes deformed when heated. In order for it to last as long as possible, the headlights must be disassembled and the additional turn signal reflector removed. Then, using sandpaper, remove the chrome from the lamp and then apply a primer to the surface.
The primer should dry for about 1 hour, in addition, the mixture must be applied in several layers. The dye must also be applied in several layers, and wait about an hour until it dries completely. After completing the work, you can assemble the lantern. When applying sealant of an identical color, the old one must be removed and then the surface of the lantern must be degreased. If the procedure is carried out incorrectly, it will create new problems.
In addition, you can resort to the following methods of independent tuning:
- LED headlight covers. This element looks quite beautiful and unusual. In addition, overlays can be used to decorate not only the rear headlights, but also the fog lights and turn signals. Some even decorate the rims on wheels or the inside of the interior with them, if working with the headlights is no longer possible.
- Diode rings. Also a very popular option. When designing such a decoration, it is best to use high-quality materials and not slack in the work, then the effect will be excellent. Ready-made rings or tape are used for the product.
VAZ 2109 generator circuit
If you lose charge, this is most often due to a failure of the generator, and most often it is the generator brushes, but it happens that there are winding breaks and a short circuit in the circuit or an open circuit. In this case, I recommend that you familiarize yourself with this generator circuit for the VAZ 2109.
Numerical designations on the diagram
| 1. Generator. | 2. Negative valve. | 3. Additional diode. |
| 4. Positive valve. | 5. Battery discharge warning lamp. | 6. Instrument cluster. |
| 7. Voltmeter. | 8. Mounting block. | 9. Additional resistors of 100 Ohm, 2 W. |
| 10. Ignition relay. | 11. Ignition switch. | 12. Rechargeable battery. |
| 13. Capacitor. | 14. Rotor winding. | 15. Voltage regulator. |
Repair and tuning of rear lights on the legendary Nines - VAZ 2109
The rear lights of the VAZ 2109 can not only cause inconvenience with their breakdowns and malfunctions. If, of course, this happens, below you can find out how to eliminate some of them
It is also important that the lights can be tuned
Causes of failure of the rear parts of the lighting system and driver actions
You can find out what the breakdown may be and how to solve the problem below. We will talk about modified nines.
Possible malfunctions of brake lights and their elimination
- Due to a voltage drop, a short circuit may occur and the paws will burn out.
- If it's time to strip the wires because the contacts have oxidized and the terminals do not conduct current well enough.
- Often, in the event of a voltage drop, it may be necessary to remove and replace fuses.
- If the reverse sensor contacts are broken or damaged.
Removing the brake light switch sensor
In case of the problems listed above, the easiest way, of course, is to install a new lamp. This happens without any difficulty: you just need to turn off the lights, open the trunk and remove the wiring block. After this, holding the fixing elements that are installed on the sides, remove the panel and unscrew the lamp. In its place, install a new light device and assemble the assembly in the reverse order. If we talk about stops, both lamps and one of them may not work, that is, only in one headlamp.
If such a problem occurs, it is necessary to immediately diagnose:
- Check the fuse and, if necessary, replace it with a new one. Fixing a breakdown is not enough, because, as in the case of human diseases, a burnout may be a fault in the system that needs to be corrected. If this is not done, you can change the device until the end of the life of the VAZ 21099. One of the reasons may be a short circuit.
- If the wiring in the signal lamp sockets has oxidized, the lamp needs to be twisted a little in the socket to scrape off the damaged layer. To make the work done more effective, you can clean the contacts with sandpaper.
- If the lamps in the stops burn out, you need to replace it with a new one and check whether the system will work. And if the contacts are bad, they need to be cleaned both on the board and on the wire block.
- If the tracks in the headlight circuit board are burnt out, then you can remove the board and visually diagnose its integrity. If there are burnt tracks, they can be modified by replacing the wiring.
- The sensor is faulty or the electrical circuit is broken. First, you need to remove the red and white wires from the sensor and connect them with a piece of wire. If the brake lights come on, then the sensor needs to be replaced; if not, you need to check the electrical circuit. It needs to be checked for broken contacts.
Removing and replacing rear lights
- It is best to make the replacement before wiring problems begin.
- To work you need to remove the lights. On the VAZ 21099 it is hidden by a plastic decorative trim in the trunk.
- Now unscrew the fixing screws on the trim and remove them.
- Disconnect the block with wires and carefully remove it, being careful not to damage the board, because it sits tightly in place.
- Now, using a 10mm wrench, unscrew the 4 nuts securing the headlight housing. Remove the part from the machine. Now you can install the new part and calmly begin the replacement.
- The collection is done in reverse order (the author of the video is Automaniac1994).
The most common reason why the brake light on a VAZ 2109 does not work
Hello everyone, today I would like to look at the main reasons why brake lights on a VAZ 2109 (nine) car do not work. In order to find out the reason, the first thing you need to do is check whether there is power to the rear lights. To do this, you need to ring the end of the brake light wire.
If there is voltage, but the brake light on the VAZ 2109 does not light, you need to check the ground on the rear lights. Also, are the light bulbs ok? If only one of the number nine lights is off, then you need to check the board and the condition of its tracks. Sometimes the following happens on a VAZ 2109: the light bulb is fine, and there is voltage, but the brake light still does not light up. Then you need to check the contacts of the light bulbs with the base.
If the power supply to the rear lights of the nine is not suitable at all, then you need to check the brake light switch or the Frog, which is located under the brake pedal. If there is voltage on the frog, but the brake light does not light up, then most likely there is a break in the wires that go to the rear lights, or there may also be a bad contact somewhere. In order to eliminate it you need to find a break.
Next, we look for the cause in the fuses; we need to check the serviceability of the interior lighting; if the interior lighting does not work, then the sixth fuse in the mounting block is to blame. The mounting block on the VAZ 2109 is located under the hood on the driver's side.
We check the brake light fuse and, if necessary, replace it with a new one, observing the amperage. If even after the above manipulations the stop signals do not work, then you need to check the mounting block itself by ringing it or replacing it with a new one.
Fuse box of the new VAZ 2109 model
1. 8A Backup fuse2. 8A Backup fuse3. 8A Backup fuse4. 16A Coil of the radiator fan relay, electrical circuit of the switch and heater motor5. 3A Hazard warning switch in turn signal mode, turn signal breaker, turn signal switch, turn signal indicator light, turn signal indicator light, reverse optics switch, reverse lights, tachometer, voltmeter, gasoline level indicator, gasoline level sensor, gasoline level indicator light, coolant temperature indicator, temperature sensor, warning lamp and emergency oil pressure sensor, brake emergency lamp, brake system hydraulic switch, handbrake switch6. 8A Switch and brake light bulbs, interior lighting7. 8A Room lighting lamps, indicator lamp for turning on the parking lights, illumination lamp for the heater and cigarette lighter handles, glove box illumination lamp, switch and instrument panel illumination lamp8. 16A Horn, horn switch, radiator fan motor9. 8A Left side lamp, left rear side lamp 10. 8A Right side lamp, right rear side lamp, fog light switch, fog light indicator lamp 11. 8A Turn signal switch and breaker, turn signal lamps, warning lamp in emergency mode12. 16A Cigarette lighter, socket for carrying lamp13. 8A High beam of the right headlight14. 8A Main beam of the left headlight, high-range optics warning lamp 15. 8A Low beam of the right headlight16. 8A Low beam left headlight
Wiring diagram for power windows on a VAZ 2109
Tired of lifting windows with ordinary “oars”? Then install electric windows using the wiring diagram for electric windows on a VAZ 2109.
Numerical designations on the diagram
| 1. Mounting block. | 2. Ignition relay. | 3. Ignition switch. |
| 4. Right door electric window motor. | 5. Left door electric window motor. | 6. Right door power window switch. |
| 7. Left door power window switch. | K7. Power window power relay. | A. To terminal “30” of the generator. |
| B. To the wiring harness block connected to the heater lever illumination display. |
The brake light on the VAZ 2109 does not work
- A fairly common problem is that the brake lights on the VAZ 2109 do not light up. And it is difficult to call it insignificant: they send a signal to drivers driving behind that your car is braking. Thus, road users are warned, and they themselves, accordingly, reduce their speed.
- I didn’t warn you, they drove you into the appropriate place - it’s your own fault. Moreover, you will have to pay not only for your car, but also for the restoration of the car that carried out the collision, since it is its owner who will be considered the injured party. And such a development of the situation in a city with heavy traffic is very likely.
- Heavy traffic does not contribute to maintaining a distance of 5 m, as provided for in the traffic rules. Cars move one after another during rush hours: any carelessness can lead to an accident. Moreover, both warning lights may not work, or only one may fail - and in this case, you can consider yourself lucky, there is still a partial warning of the threat from behind.
- The brake lights on the VAZ 2109 do not light up for various reasons, from the most trivial to those requiring a thoughtful and more serious examination. Methods for identifying such a malfunction and ways to eliminate it are described in our article.
Equipment diagram for VAZ-2109 injector
The VAZ 2109 wiring for the injector has many connectors for connecting sensors to the computer.
- TPS (throttle position sensor);
- DPKV (crankshaft position sensor);
- DT (temperature sensor);
- DSA (vehicle speed sensor);
- Canister purge valve;
- MAF (mass air flow sensor);
- DD (knock sensor) and others.
Since the mid-90s, VAZ 2109 began to use engines with an injection system, which greatly changed the electrical layout of the engine compartment and instrument panel. Below is an electrical diagram of a 1999 car with an ECM type GM ISFI-2S and January 4/4.1.
- 1 - nozzle system;
- 2 - candles;
- 3 — ignition control module;
- 4 — diagnostic connector;
- 5 — General Motors or January controller;
- 6 — connector for connecting the instrument cluster;
- 7 — main relay of the system;
- 8 — fuse for power supply wiring of the controller and ignition system module;
- 9 — protection of the speed sensor and air flow meter circuits;
- 10 — fuel supply pump power protection;
- 11 — fuel pump controller;
- 12 — engine temperature meter;
- 13 — idle system;
- 14 — detonation meter;
- 15 — tank purge system for collecting fuel vapors;
- 16 — crankshaft position meter;
- 17 — speed meter;
- 18 — air flow meter;
- 19 — lambda probe;
- 20 — throttle position angle meter;
- 21 — electric fuel pump complete with fuel level sensor;
- 22 — connection of the ignition system;
- 23 — control lamp;
- 24 — ignition switch;
- 25 - switching block;
- 26 — radiator cooling fan.
Injection engine
The VAZ 2111 engine is built, one might say, on the basis of the VAZ 21083 - the block and cylinder head remain the same. Only the parts of the connecting rod and piston group have undergone minor changes - on the VAZ 21083 engine the piston pin is pressed into the connecting rod head, on the VAZ 2111 it has a loose fit. The connecting rod, pin and piston assembly are interchangeable.
The engine power supply and ignition systems have radically changed - instead of a carburetor, a ramp with injectors is installed on the intake manifold, injecting fuel into the inlet channels of the cylinders. The fuel pump is electric, installed in the fuel tank. Changing the quality of the fuel mixture and ignition timing is carried out by an electronic control unit.
The change in the power system did not affect the rated engine power (70 hp), but improved its traction characteristics - the maximum torque on the injection VAZ 21099 is achieved at 2800 rpm, on the carburetor - at 3400 rpm.
For car enthusiasts, in terms of operation and maintenance of the injection VAZ 21099, the changes affected the identification of problems in the engine control system. The same work as changing the oil, timing belt or even a blown cylinder head gasket is carried out in the same way for both engines.
VAZ 2109 fuse diagram
Has the fuse blown again? Because you loaded your VAZ 2109 with a powerful light or installed a sub for which the wiring and fuse box were not designed? Then this fuse diagram will come in handy!
| № | Ampere | Purpose |
| 1 | 8 | Right fog lamp |
| 2 | 8 | Left fog lamp |
| 3 | 8 | Headlight cleaners (at the moment of switching on) Headlight cleaner switching relay (contacts) Headlight washer switching valve |
| 4 | 16 | Headlight wiper motor Headlight wiper relay (winding) Heater motor Window washer motor Rear window wiper motor Rear window washer timing relay Windshield and rear window washer activation valve Cooling system electric fan relay relay coil Coil of the rear window heating relay coil Rear window heating control lamp Wardrobe lighting lamp box |
| 5 | 8 | Turn indicators in turn signal mode and the corresponding indicator lamp Rear lights (reversing lamps) Indicator lamp for fuel reserve, oil pressure, parking brake, brake fluid level, carburetor choke Voltmeter and indicator lamp for charging the battery Gearmotor and windshield wiper switch relay Generator excitation winding (at start-up) “STOP” indicator lamp Coolant temperature and fuel level indicators |
| 6 | 8 | Rear lights (brake lights) Body interior light Power windows and power window relay |
| 7 | 8 | License plate lights Engine compartment lamp Indicator lamp for turning on side lighting Instrument lighting lamp and cigarette lighter lamp Heater lever illumination panel |
| 8 | 16 | Engine cooling fan electric motor and its activation relay (contacts) Sound signal and its activation relay |
| 9 | 8 | Left headlight (side light) Left rear light (side light) |
| 10 | 8 | Right headlight (side light) Right rear light (side light) |
| 11 | 8 | Direction indicators and hazard warning relay (in hazard mode) Hazard warning lamp |
| 12 | 16 | Heated rear window element and heating relay Cigarette lighter Socket for portable lamp |
| 13 | 8 | Right headlight (high beam) |
| 14 | 8 | Left headlight (high beam) High beam indicator lamp |
| 15 | 8 | Left headlight (low beam) |
| 16 | 8 | Right headlight (low beam) |
| Relay | ||
| K1 | Rear window washer time relay (451.3747 / 2108-3747110, 2108-3747110-06) | |
| K2 | Relay-breaker for direction indicators and hazard warning lights (493.3747 / 2108-3747010-02) | |
| K3 | Windshield wiper relay breaker (522.3747 / 2108-3747710) | |
| K4 | Contact jumpers in place of the lamp integrity monitoring relay. Lamp integrity monitoring relay (4402.3747 / 21083-3747410, 21083-3747410-06) | |
| K5 | Headlight high beam relay (113.3747 / 2105-3747210-10, 2105-3747210-12) | |
| K6 | Headlight cleaner relay (112.3747 / 2105-3747210, 2105-3747210-02) | |
| K7 | Power window relay (13.3747 / 2105-3747210-10, 2105-3747210-12) | |
| K8 | Relay for turning on sound signals (13.3747 / 2105-3747210-10, 2105-3747210-12) | |
| K9 | Relay for turning on the electric cooling fan (13.3747 / 2105-3747210-10, 2105-3747210-12) | |
| K10 | Relay for turning on the heated rear window (13.3747 / 2105-3747210-10, 2105-3747210-12) | |
| K11 | Relay for low beam headlights (13.3747 / 2105-3747210-10, 2105-3747210-12) |
Simple cases
The main thing is to notice in time that the feet have failed, before an accident occurs. The most likely and, one might say, common reasons will be the following.
- Bulb burnout. A simple inspection will not give results; outwardly it may seem functional. Take a new lamp that works exactly and screw it in instead of the problematic one. If it lights up, the cause has been found; Oxidation of contacts directly in cartridges. Detected visually. To clean, the light bulb rotates in the socket several times - the layer gets knocked down and the stops light up. To guarantee, you can unscrew the lamps and go over the contacts with fine sandpaper. In some cases, hopeless damage to contacts is detected; in this case, the cartridge itself will need to be replaced;
- Oxidation of contacts in the wire block, which is placed on the terminals of the board (track) of the headlamp. The actions are similar to point 2, only they are done with the block: it is removed and put on again 3-4 times. Or the contacts are cleaned manually;
- Burnt out tracks. Visible upon visual examination. There are 2 options: buy a new board and replace the damaged one or restore the existing one by soldering wiring of the appropriate thickness onto the damaged track;
- The brake light sensor (the so-called “frog”) has failed. In the VAZ 2109 it is located under the brake pedal.
To check, both wires are removed from the DSS and short-circuited directly with a piece of wire. If the stops work, then we go to the auto shop for a new sensor. If there is no response, we look further for the reason. O in the entire system is the most vulnerable point (except, perhaps, the light bulbs). Many VAZ owners begin their search for the cause of non-working brake lights with it.
We looked at the simplest and most likely breakdowns. Next, brake lights that do not light up require a more serious check.
Connection diagram
Before we talk about typical malfunctions of the VAZ 2110 rear light, let’s look at the electrical diagram for connecting it to the on-board network.
Electrical circuit for powering external lighting devices of the VAZ 2110
We are interested in the following positions:
- 2 – mounting block;
- 3 – external lighting switch;
- 4 – ignition switch;
- 6 – rear marker lamps;
- 7 – brake light lamps;
- 10 – reverse signal switch;
- 11 – brake light switch;
- 13 – reverse indicators.
The scheme is quite simple and does not require any special explanation. The side light is controlled by the external lighting switch 3. The reversing lamps are activated by limit switch 10 located on the gearbox. The brake signal turns on limit switch 11 - it is located in the cabin above the brake pedal and is activated when you press it. The side light turns on, bypassing the ignition switch, the brake and reverse signal - through it, and they can only be activated when the ignition is on.
Connection diagram for turn signals VAZ 2110
Here we need the following positions:
- 2 – mounting block;
- 3 – ignition switch;
- 4 – alarm switch;
- 6 – direction indicator lamps in the rear lights;
- 7 – direction indicator switch;
- K3 – relay-interrupter of direction indicators.
Brake lights (stop lights) do not work on VAZ 2108, 2109, 21099
Either two brake light bulbs (in two rear lights) or just one (in one rear light) may not light up at once.
Let's look at the causes of this very common malfunction on VAZ 2108, 21081, 21083, 2109, 21091, 21093, 21099 cars.
Causes of the malfunction - brake lamps (stop lights) do not light up on VAZ 2108, 2109, 21099 cars and their modifications
— The fuse has blown
No. 6 for mounting block 17.3722, F3 for 2114. If it burns out, replace it with a new one. Subsequently, it will be necessary to find out the reason for the blown fuse, perhaps a small short circuit somewhere.
Fuse No. 6 for brake lights (stops) VAZ 2108, 2109, 21099 with mounting block 17.3722
— The contacts in the brake light lamp holders have oxidized
Rotate the lamp in the socket several times to knock off the oxidized layer. To enhance the effect, you can remove the bulbs and clean the contacts with sandpaper.
Contacts in the brake light socket on the rear light board (socket removed for clarity)
— The brake light bulbs in the headlight have burned out
In appearance, the lamp may appear to be in good working order. Two lamps can burn out at once. Therefore, we replace the non-burning paw with a known good one and see if it burns or does not burn.
Brake light (stop) lamp in the rear right lamp of VAZ 2108, 2109, 21099 cars and their modifications
— The contacts in the wiring block, which is placed on the terminals of the tracks on the headlight board, have oxidized
We remove and put on the block several times or clean the contacts on the board and in the block.
— The tracks in the headlight circuit board are burned out
We take out the board and visually inspect the tracks. Burnt out ones can be restored by soldering wires to them.
Tail light board tracks 2108 for brake light
— Brake light switch faulty
It is located under the brake pedal. We remove two wires from it - white and red and connect them together with a piece of wire. The brake lights are on fire - we change the sensor, no, then we check the electrical circuit.
Brake light switch VAZ 2108, 2109, 21099
— The electrical circuit of the brake lights is faulty
It is necessary to identify an oxidized contact, a burnt-out wire or a failed connection in the mounting block. To do this quickly and efficiently, you need to know the electrical diagram for connecting brake lights and its features: “VAZ 21083 (21093, 21099) stops, connection diagram.”
Stops (brake lights) of the VAZ 21083 (21093, 21099), connection diagram
Plus, the brake lights come from output 30 of the generator to block X8 (Ш8) (far left in the engine compartment, pink wires) to the mounting block. Next, through the fuse (No. 6, F3) in the block to block X4 (Ш4) inside the passenger compartment to the white wire going to the brake light sensor. That is, current is supplied to the sensor through the white wire. Next, from the sensor along the red wire to block Ш2 (Х2) (second from the right inside the cabin) and through the mounting block to block Ш9 (Х9) (the large transverse one in the cabin) to the red wire going through the entire cabin to the rear left block, and then to the rear right headlight.
Minus - black wires coming out of the blocks to the headlights. Mounts to the body next to the rear lights.
"Ground" of the rear light of VAZ 2108, 2109, 21099 cars - if the bad foot contacts do not work
You can check the presence of current in the circuit elements using a test lamp - connecting one end to the terminals and the other end to ground. Or by supplying current with a separate wire from the battery positive to the elements of the electrical circuit.
Read more about finding a “break” in electrical circuits: “How to find a break in a car’s electrical wiring.”
Notes and additions
— The easiest way to find a fault is using the diagram: “Electrical connection diagram for brake lights of VAZ 2108, 2109, 21099 cars.”
Twokarburators VK - More information on the topic in our VKontakte group, on Facebook Twokarburators FB and on Odnoklassniki - Twokarburators OK
More articles on electrical faults in VAZ 2108, 2109, 21099 cars
— The “dimensions” on the VAZ 2108, 2109, 21099 do not light up
— The low or high beam headlights on the VAZ 2108, 2109, 21099 do not light up
— Why do the car’s emergency lights work, but the turn indicators don’t?
— Wires for rear lights VAZ 2108, 2109, 21099
— The direction indicators (turn signals) on the VAZ 2108, 2109, 21099 do not work
— The reverse light does not light up on VAZ 2108, 2109, 21099 cars
— The brake lights turn on with a delay, why?
Original diagrams of VAZ 2109 modification VAZ -21093
Here are high-quality electrical circuits of additional equipment installed on modifications of the VAZ-2109 car, model VAZ-21093
Electrical diagram for connecting the front fog lights on a VAZ 21093
| Position number on the diagram | Explanation of position |
| 1 | front fog light |
| 2 | front fog lamp connection connector |
| 3 | relay and fuse box |
| 4 | ignition switch |
| 5 | size switch |
| 6 | Checking the connection of the front fog lights |
| 7 | front fog light switch with light bulb |
| A | to terminal “30” of the generator |
| B | to the instrument panel light switch |
Connection diagram for front door windows on VAZ-21093
| Position number on the diagram | Explanation of position |
| 1 | relay and fuse box |
| 2 | ignition stick |
| 3 | ignition switch |
| 4 | right door electric window motor |
| 5 | left door electric window motor |
| 6 | right door power window connector |
| 7 | left door power window switch |
| K7 | power window power relay |
| A | to contact “30” of the generator |
| B | to the terminal block, a bundle of wires connected to the lighting panel of the stove levers |
| IN | to the stove lever lighting display |
| G | conventional numbering of terminals in the gear motor block |
Diagram of the VAZ 21093 door lock system
| Position number on the diagram | Explanation of position |
| 1 | relay and fuse box |
| 2 | ECU |
| 3 | electric motor for locking the right front door lock |
| 4 | Right rear door locking gearmotor |
| 5 | electric motor with gearbox for locking the left rear door lock |
| 6 | electric motor with gearbox for locking the left front door |
| A | to contact “30” of the generator |
| B | order of allowed terminal numbering in the ECU block |
| IN | method of relative numbering of contacts in blocks of electric motors with gearboxes |
Contact diagram in the terminal connector of the trip computer
| Addresses of output plugs of the trip computer VAZ 2109 modification VAZ 21093 | ||
| Plug number | Connected wire color | Plug address |
| 1 | green | Gasoline consumption meter output |
| 2 | orange | Fuse “5” (to contact “87” of the ignition switch) |
| 3 | red with blue | Fuse “12” (to “+” battery |
| 4 | black | to minus |
| 5 | white | "+" speed meter |
| 6 | blue | "-" gasoline consumption sensor |
| 7 | pink | “+” of the gasoline consumption meter |
| 8 | brown | Fuse “7” (to the headlight switch) |
| 9 | grey | "-" speed meter |