The VAZ-2106 car was produced from 1976 to 2008. This guide provides color-coded wiring diagrams (for the injector and carburetor) with a description of all elements for various modifications. The information is intended for self-repair of the six. Electrical circuits are divided into several blocks for ease of viewing via a computer or phone; there are also circuits in the form of a single picture with a description of each element - for printing on a printer. All electrical equipment of a car can be divided into the following components:
- engine starting system;
- battery charge elements;
- fuel mixture ignition system;
- elements of external and interior lighting;
- sensor system on the instrument panel;
- sound notification elements;
- fuse block.
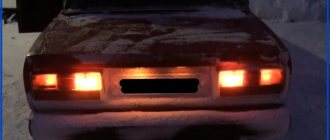
Reasons why the reverse lights of a VAZ car do not light up
Why the reverse lights may not light up
First, you need to find out why the reverse lights do not light up - maybe the bulbs are simply burned out (see Replacing the bulbs in the rear light of a VAZ 2110: do it yourself) and you don’t even need to change the sensor? Here are a few reasons:
The reverse lights are burnt out. You can check their performance by removing them from the flashlights and checking them with a multimeter.
Burnt out light bulbs
- Damaged wiring is another reason. Everything is more complicated here - you will have to search longer. And it is checked in the same way - using a multimeter for continuity or resistance.
- Poor contacts on the reverse sensor. As you know, nothing with poor contact usually works.
- Violation of the insulation on the wires near the sensor leads to their short circuit.
- The fuse has blown (see VAZ 2110: how to replace fuses). Which one needs to be clarified for each car in the repair manual.
- Well, the breakdown of the sensor itself - this is evidenced by both the lights not turning on when reverse gear is engaged, and the constant glow of the lights.
To fix a malfunction of the lights, you may have to perform all the repair points, but you can start with the sensor. The price for it is small - usually about 100 rubles, so you can buy it and change it, and then solve problems as they arise.
Tools
So, what do you need to replace the reverse sensor yourself:
A set of keys. Although this is even said loudly. You will need a 22 key and in some cases a 24 key
An extended 22mm socket will be needed to remove the reverse sensor
Multimeter
Be sure to get a multimeter
- Small container for oil
- Screwdriver
- Pliers
- Knife
- Insulation tape
- Hammer
- Chisel
How to replace light bulbs
Unlike foreign cars, which even for minor repairs need to be smashed almost to pieces, replacing the bulbs in the rear light of a VAZ 2106 is not easy, but very simple. To do this, remove the trunk trim opposite the lamp (see section “Instructions for dismantling and installing the lamp”). Unscrew the nut securing the protective glass. She turns away with her bare hands, no keys needed. In early models the nut is brass, in later models it is plastic.
Unscrewing the fixing nut
The protective glass diffuser can now be removed.
Removing the protective glass
There are four light bulbs in front of us. All of them can be removed by lightly pressing and turning counterclockwise. We remove the burnt one and replace it with a new one, fixing it with light pressure and turning it clockwise. Place the glass in place and secure it with a nut. We return the upholstery to its place and fix it with self-tapping screws.
Replacing the license plate lamp
To replace this bulb, you do not need to remove the glass from the rear light. We fold back the upholstery and in front of us is a backlight lamp socket. We move it down and take it out along with the lamp.
Removing the license plate light bulb socket
We dismantle the burnt device by pressing and turning counterclockwise. We install a new one in its place. We return the cartridge to its place and install the upholstery.
Replacing the fog light bulb
Here we need a Phillips screwdriver. Unscrew the two screws that secure the glass. We remove it and gain access to the light bulb.
Removing the rear fog lamp glass
We replace the burnt out device with a new one and install the glass in place.
At this point, you can finish working with the rear lights on the VAZ 2106. Now we know how to replace light bulbs in lanterns and the lanterns themselves, and if necessary, we can also eliminate minor malfunctions of these lighting devices.
Basic malfunctions in the vehicle lighting and light signaling system
Possible causes of malfunctions in the vehicle's lighting and light signaling systems and methods for eliminating them are given below.
| Cause of malfunction | Remedy |
| The entire lighting and light signaling system does not work | |
| Open circuit in the circuit common to all lighting devices from the ammeter to the central switch | Check the reliability of connections and serviceability of car wires |
| Contact failure in the switch | Check the switch for serviceability and replace if necessary |
| Individual headlights and flashlights do not light up | |
| Fuse blown | Replace fuse |
| Burnt out or broken lamp filament | Replace lamp |
| Lost contact in connecting blocks | Check the reliability of connections in the blocks |
| Poor contact in the lamp socket | Clean the oxidized contact, bend the spring contact of the cartridge |
| Breaker or switch failure | Check the serviceability of the switch and switch, replace them if necessary |
| Frequent burnout of incandescent lamp filaments | |
| Increased supply voltage | Check voltage regulator |
| Increased vibration of the lamp spiral due to weak fastening of the lamps in the socket, the optical element in the housing or the light device as a whole on the car | Check the fastening of the lamp, optical element and lighting device, secure them if necessary |
| Flashing lights | |
| Poor contact in the socket | Bend the spring contact in the cartridge |
| Wire break and periodic contact of broken wire ends due to vibration | Replace wire |
| Poor contact of wires at connections | Check the connection of plug blocks and wires. If necessary, ensure a reliable connection |
| Periodic short circuit of wires to ground in the power supply circuit of lighting devices | Replace damaged wires. Secure the ground wire |
| The low and high beam headlights do not switch | |
| Oxidation of headlight switch contacts | Check the switch with a test lamp, if necessary, disassemble it and clean the contacts |
| The brake light does not turn on | |
| Brake light switch malfunction | Check the switch with a test lamp, replace it if necessary |
| Disconnecting the wires from the brake light switch | Connect the wires |
| Brake light won't turn off | |
| Brake light switch incorrectly adjusted | Check the switch with a test lamp, adjust or replace if necessary |
| The turn signals do not work (in hazard warning mode, all turn signal lamps work) | |
| Blown fuses in turn signal circuits | Check wires, repair damage and replace car fuses |
| Turn signal lamps light up without blinking | |
| Sintering contacts of the breaker executive relay | Remove the breaker, open and clean the contacts, adjust the gap between them |
| The turn signals do not work in both vehicle maneuvering mode and hazard warning mode. | |
| Blown fuses in turn signal circuits | Check wires, repair damage and replace fuses |
| Poor contact in the turn signal switch or hazard warning switch connectors | Check the plug connections and ensure a secure connection if necessary. |
| Hazard switch malfunction | Check the switch with a test lamp, replace if necessary |
| The turn signal indicator lamp does not work | |
| Bulb burnout in one of the turn signal lights | Replace lamp |
| The turn signal and headlight switch levers do not lock | |
| Destruction of the lever clamp sockets | Replace switch |
| Lever lock ball popping out | Reinstall the locking ball |
| Turn signals do not turn off automatically after maneuvering | |
| Wear or destruction of the mechanism that ensures the return of the turn signal switch lever to the neutral position | Eliminate the malfunction, replace the switch if necessary |
| The turn signal and headlight switch levers do not move | |
| Sticking lever retainer balls | Check and eliminate jamming |
| The return sector of the switch lever is stuck | Eliminate jamming, replace switch if necessary |
| Headlights do not illuminate the road well | |
| Violation of headlight adjustment | Check and adjust headlights |
| Damaged or faded reflector | Replace the headlight optical element |
| Diffuser dirty | Clean the diffuser |
| Dimming the bulb of an incandescent lamp | Replace lamp |
Functionality check
If a breakdown is detected, you need to check:
- switch on sensor;
- switching wiring.
Frog sensor
The following algorithm is used:
- Place the car on a viewing hole or overpass.
- Stop the engine and secure the vehicle with the parking brake or wheel chocks.
- Inspect the gearbox housing; the sensor is located on the rear wall. On some of the units nearby, a speed detection sensor is installed, which transmits a signal to the electronic speedometer.
- Remove the plug from the sensor connector and inspect the contacts.
- Using a piece of wire or a paper clip, close the metal elements inside the block.
- Turn on the ignition circuit. If the wiring is in good condition, the warning lights should light up.
The turning on of the warning lights indicates a malfunction of the control sensor, which must be unscrewed from the crankcase and replaced. If the indicators do not light up, the defect may be caused by the sensor or wiring.
To test the sensor, a lamp rated for 12 V is used, installed in a socket with patch cables. The indicator is connected to the sensor terminals when reverse gear is engaged and the ignition is active. If the lamp does not turn on, the sensor needs to be replaced or adjusted.
Circuit integrity
To test the continuity of the circuit, use a multimeter set to cable testing mode. When checking the wires, be sure to remove the flashlight or dismantle the cover, which allows you to get to the contact pad of the lamp. The device is connected to the beginning and end of the wire; if the circuit is closed, a buzzer sounds. You can use a control light with a battery that is connected through a wire running from the sensor to the lamp. The damaged wire must be replaced with a copper stranded cord with the appropriate cross-section.
Adjusting the gearbox switch
Some machines provide the ability to adjust the position of the sensor depending on the location of the shift knob. There is a lock nut on the sensor body that needs to be loosened. Then the reverse speed is switched on, and a warning lamp is hung on the sensor contacts. The housing is screwed into the box housing until the contacts are closed and power is supplied to the thread. The sensor is fixed in the found position with a lock nut, and then the electrical wiring plug is connected.
If the sensor design does not provide a lock nut, then the position is adjusted using washers. The thickness of the gasket package is selected experimentally with reverse gear engaged. It should be remembered that a large number of washers shortens the length of the thread holding the sensor housing in the crankcase.
On automatic transmissions there is a reverse sensor combined with a neutral or parking position indicator. Additional indication is necessary to allow the engine to start only when the kinematic chain is open. A similar design is used on some transmissions; there is also a switch in the selector that cannot be adjusted.
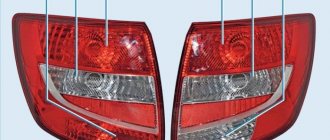
Connection diagram
The rear lights on the VAZ 2114 are connected to the vehicle’s on-board network using connectors, the pinout of which is given below.
The numbers in the photo indicate:
- turn indicator – blue (right), blue-black.
- side light – yellow (right), yellow-black.
- The brake signal is red.
- fog light – red-black.
- The reverse indicator is green.
Both lights are connected to one harness, which runs along the rear of the body from the right light fixture to the left, then along the left side to the mounting block located in the engine compartment immediately behind the windshield opposite the driver. The complete wiring diagram of the electrical equipment of the VAZ 2114 (injector) will look like this:
Complete electrical diagram of VAZ 2114
In this scheme we occupy the marked positions:
- 20 — reversing light switch;
- 26 — mounting block of fuses and relays;
- 27 — brake signal switch;
- 29 — ignition switch (lock);
- 33 — rear fog light switch;
- 35 - combined switch for side lights and headlights;
- 36 — alarm switch;
- 58 — rear light;
- 60 - additional brake light.
Electrical equipment
The original instructions for the VAZ 2103 contained a colored insert with an electrical diagram
Dashboard
In addition to the external differences in the appearance of the models and the richer interior decoration, the dashboard of the VAZ 2103, luxurious for those times, immediately caught the eye.
But the interior wiring of the VAZ 2103 itself was inherited from the “kopek”, including the notorious fuse block.
Tachometer in the center – Italian trace of sporting spirit
It should be noted that other manufacturers, for example UAZ, also experienced problems with low-quality components - see the article Verified wiring diagram for UAZ 452
Fuse box
The VAZ 2103 wiring diagram was a classic version, where the role of the second wire was played by the metal body of the car, and all the main components of the electrical circuit were protected by fuses arranged in one group.
Structurally, this unit was not bad:
- Spring-loaded contacts firmly held the plastic guides;
- Due to this, contact between metal plates and fusible inserts was ensured;
- On the cover of the block there were images of circuits (a kind of instruction), which are protected by one or another fuse;
- In case of a short circuit, it was easy to replace the fuse with your own hands.
The photo below shows the unit with the cover removed. Thanks to it, the wiring in the car is reliably protected, but the unit itself is unreliable.
An old unit that should be replaced with a more modern one
Why are my brake lights not working?
When your brake lights don't work, it's usually due to a blown fuse, a worn or broken brake light switch, or a burned out bulb.
And on most vehicles, the brake light system is usually a simple circuit that includes the brake light switch, the lights or bulbs, a fuse, and the wiring that connects these devices. As such, troubleshooting the system is usually relatively simple, and something that regular car owners can do themselves.
In this guide, you will find the most common brake light problems. Simply go to the appropriate section for your specific brake light condition:
- One or more lights are not working (although at least one light is working).
- None of the brake lights work.
- The brake lights remain on and do not go out.
NOTE. This guide focuses on analog (mechanical) brake light switches rather than the digital sensors included in some modern vehicles.
If only one brake light is faulty, check that part of the circuit.
Main conclusions
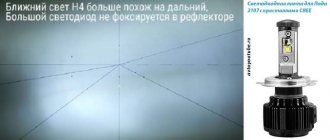
To replace a burnt-out low beam lamp on a VAZ 2106, it is better to choose standard-installed halogen lamps with H4 characteristics of 12 V and 55 W. Other problems that lead to failure in this optics module include:
- A burnt-out element or oxidized contact in the fuse box.
- Relay failure.
- The ground connection wire is rusty.
When replacing light bulbs, you must strictly follow the instructions provided.
VAZ 2106
It is considered to be one of the most popular Volzhsky cars, which is the object of modernization of the VAZ 2103 model, left the AvtoVAZ assembly line in 1976 and was produced for exactly 30 years. Reducing the use of chrome finishing materials has made this car somewhat cheaper compared to the more luxurious “troika”. Significant improvements have been made in the finishing and configuration of the VAZ 2106. For example, rich versions of these cars were equipped with a heated rear window and a radio. At one time, the “Six” was the most comfortable and prestigious car in the VAZ line, which ensured a good level of sales.
For the VAZ 2106, an engine from the 2103 was provided with an increased cylinder diameter (79 mm instead of 76 mm). This modernization made it possible to obtain 12 Nm more torque, but the planned power was 80 hp. The engineers were unable to “squeeze” it out of this power unit the first time. However, by reducing the gear ratios in the gearbox, the VAZ team successfully adapted the transmission, as a result of which the VAZ 2106 engine was able to fully demonstrate its potential. By the way, this internal combustion engine formed the basis for the domestic SUV “Niva” (VAZ 2121). An interesting fact is that in 1986 the cost of a VAZ 2106 was 9,100 rubles, which is 100 rubles more. more expensive than the Niva, which is more complex in terms of design, and, accordingly, should be more expensive. This is explained by the fact that the demand for the VAZ 2121 was lower due to its modest capacity.
Welcome! Lamps - thanks to them, the road is illuminated, the interior lights are on, and much more. But there are times when a light bulb becomes unusable, let’s say the low-beam light bulb stops burning, and after that you have to look for information on how to replace this lamp. In order not to look for information anymore, we have especially for you collected it all in this article, so to speak, into one, and now when you need to change this or that light bulb on a VAZ 2106, by looking at this article you will learn how to do it.
Dimensions of VAZ 2104, 2105, 2107 do not light up
On VAZ 2104, 2105, 2107 cars there are 4 side lights (dimensions): one in the front headlights and one in the rear lights.
Failure of any of them to work is a fairly common occurrence. Let's look at the reasons for this malfunction - “why the lights on VAZ 2104, 2105, 2107 cars don’t light up.”
Symptoms of a malfunction: “VAZ 2104, 2105, 2107 dimensions do not light up”
One dimension, two dimensions (front or rear, right or left side, crosswise) or all of them may not work.
Causes of the malfunction “dimensions of VAZ 2104, 2105, 2107 cars do not light up”
The side light bulb is burnt out
The most common reason. One light bulb, or several at once, can suddenly burn out. In some cases, it may be impossible to visually identify a burnt-out light bulb. Therefore, we replace the burnt out one with a known good one. You can use a similar one from a nearby headlight.
The contacts of the light bulb in the socket have oxidized
We rotate the light bulb in the socket several times to remove the oxidized layer and restore contact. In the future, you can clean everything with sandpaper.
Lost ground to headlights or taillights
Loss of contact with ground leads to failure of not only one size, but also the entire headlight or rear light.
The “negative” wires of the front headlights and rear lights with side lights on VAZ 2104, 2105, 2107 cars are attached to the car body. It is necessary to clean the mounting location to ensure good contact with ground. Usually the negative wire is the black wire from the headlight connection block, attached to the body next to the headlight or tail light.
Broken contact in the headlight or rear light connection block
Either it has oxidized or the block is not attached tightly. In such a situation, either one side lamp or the entire headlight may not light. We put on and take off the pad several times to restore contact.
The track in the rear light board has crumbled
During long-term use of the vehicle, or if a low-quality part is installed, the track to the side light lamp socket in the rear lights may shed (burn out).
Contact is broken in the connecting blocks of the relay and fuse mounting block
Check the pads Ш12 (Х12), Ш13 (Х13), Ш9 (Х9), Ш6 (Х6) of the mounting block. Or Ш2 (Х2) - terminals 1 and 3 if all the dimensions do not light up.
The fuse in the mounting block has blown
If fuse No. 14 (F14) is blown, the side lights in the front left headlight and rear right headlight will not light. If No. 15 (F15), then the marker in the front right headlight and rear left lamp will not light up, that is, crosswise.
The fuses must be replaced with serviceable ones and the cause of their burnout must be determined in the future. There may be a short circuit in the electrical circuit.
The external lighting switch on the instrument panel is faulty
All dimensions will not light up. Remove the switch and remove the wire block from it. Connect the leads of the black and yellow-red wires with a piece of wire. Turn on the ignition. If the dimensions light up, the switch is faulty and must be replaced.
“Open” in the electrical circuit connecting the side lights
It is necessary to check the sections of the circuit responsible for the non-burning light using the connection diagram. Read more: “How to find an open circuit in a car’s electrical circuit.”
Scheme for switching on the external lighting of a VAZ 2105 car
Wiring diagram for dimensions 2107.
Connection diagram of dimensions (external lighting) of a VAZ 2107, 21074 car
Notes and additions
— For a mounting block with finger fuses, the designation of the pads is “Ш” and the fuse is “№”. For mounting block with blade fuses “X” and “F”.
— On VAZ 2104, 2105, 2107 cars, A12-4-1 (T4W) side light bulbs are used in the headlights and rear lights.
TWOKARBURATORS VK -More information on the topic in our VKontakte group TWOKARBURATORS DZ -and in Yandex Zen
— Turn signals of VAZ 2104, 2105, 2107 do not work
— External lighting switch VAZ 2107
— The low or high beams of VAZ 2107, 2105, 2104 do not light up
— Checking high-voltage wires on VAZ 2104, 2105, 2107
— Connection diagram for the electric motor of the heater fan VAZ 2104, 2105, 2107
— Contacts of steering column switches VAZ 2104, 2105, 2107
Common causes of failure
Most often, the low and high beam headlight relay on a VAZ 2106 car fails for the following reasons:
- When the battery is working properly, there is no charging current, which is why it does not charge. This happens when the wires are poorly connected to the relay terminals or when the circuit from the generator to the battery is broken. Eliminated by fixing the wire in the circuit, checking and adjusting the voltage regulator and relay regulator.
- Insufficient charging current with a discharged battery or high current with a fully charged battery is caused by a malfunction of the voltage regulator. It can be eliminated by adjusting the device or replacing it.
- Burning and burnout of lamps with excessive heat occurs when the adjustment of the relay regulator is violated or the contacts are closed. Eliminated by disconnecting and cleaning the closed contacts, adjusting or replacing the voltage regulator.
- High discharge current after stopping the motor. Occurs when the relay-regulator contacts close (contacts sintering, armature spring breaks) or the electrical wire short circuits. It is repaired by finding and eliminating a short circuit with the battery disconnected, checking and adjusting the current limiter, opening and cleaning the contacts, replacing the spring and adjusting its clearance and tension.
External signs of a breakdown of the VAZ 2106 light relay include the following aspects:
The low and high beam headlights stopped working. Dimensions and turn signals stopped working
A malfunction in the relay is one of the reasons why the car’s electrical equipment has stopped working.
And there may be several reasons for its failure:
- failure (burnout) of the contact plates inside the relay (popularly called “nickels”), reduction in their contact area, “sticking”;
- breakage (burning) of the retracting and/or holding winding;
- deformation or weakening of the return spring;
- short circuit in the pull-in or holding winding.
If you find at least one of the listed signs, then the next step to fix the problem is to conduct a detailed diagnosis.
Headlight faults and repairs
During operation, the owner of a VAZ 2106 does not always notice that the headlights are gradually becoming paler, forcing the driver to look closely at the road. The reason is the inevitable clouding of the lamp bulb after a certain time, so experts recommend getting into the habit of regularly replacing the lamps of the front lighting devices. If individual lamps or lights in the car do not light up, this may be due to:
- failure of one of the fuses;
- lamp burnout;
- mechanical damage to the wiring, oxidation of the tips or loosening of the electrical wires.
If the high or low beam does not switch, then most likely the high or low beam relay has failed or the contacts of the steering column switch have oxidized. In both cases, as a rule, replacement is required - respectively, a relay or a switch. It is also necessary to replace the three-lever switch if its levers do not lock or switch.
Experts recommend getting into the habit of regularly replacing headlight bulbs on your VAZ 2106
How to disassemble a headlight
To disassemble a VAZ 2106 headlight (for example, to replace the glass), you need to heat the sealant around its perimeter with a hairdryer, then remove the glass with a thin screwdriver or knife. A hairdryer is a convenient tool in this case, but not necessary: some people heat the headlight in a steam bath or in the oven, although this risks overheating the glass. The headlight is assembled in the reverse order - a layer of sealant is applied and the glass is carefully installed in place.
Replacing light bulbs
To replace a VAZ 2106 headlight bulb, you must:
- Remove the plastic cover using a flat-head screwdriver.
- Use a Phillips screwdriver to loosen the fastening screws of the rim holding the headlight.
Use a Phillips screwdriver to loosen the fastening screws of the rim holding the headlight.
- Turn the rim until the screws come out of the grooves.
The rim must be turned until the screws come out of the grooves
- Remove the rim and lens.
The diffuser is removed along with the rim
- Remove the headlight from the niche and disconnect the power cable plug.
The headlight should be removed from the niche, and then disconnect the power cord plug
- Remove the clamp.
To replace the headlight bulb on a VAZ 2106, you will need to remove the special lamp mounting clamp
- Remove the lamp from the headlight.
A failed lamp can be removed from the headlight
Reassembling the structure after replacing the lamp is performed in the reverse order.
Headlights corrector
A device such as a headlight range control is not used every day, but it can be useful, for example, when driving at night with an overloaded trunk. At the same time, the front part of the car “lifts up”, and the low beam is more like high beam. In this case, the driver can use the corrector to lower the beam of light down. In the opposite situation, when the corrector is configured for a loaded trunk and the car is empty, you can perform the opposite manipulation.
If the car is not equipped with a corrector, you can install this device yourself. Based on the type of drive, correctors are divided into hydraulic and electromechanical. The hydraulic one consists of the main cylinder and headlight drive cylinders, as well as a pipe system and a manual regulator, which is installed on the instrument panel. Electromechanical - consisting of a servo drive, wires and a regulator. The headlights are adjusted using a hydraulic corrector by changing the pressure of the working fluid (which must be non-freezing) in the cylinders. The electric corrector changes the position of the headlights using a servo drive, which consists of an electric motor and a worm gear: after applying voltage to the electric motor, the rotational movement is converted into translational motion, and the rod connected to the headlight by a ball joint changes its angle.
Video: operation of the electromechanical headlight range control on a VAZ 2106
Periodic cleaning is required not only on the outside, but also on the inside of the VAZ 2106 headlights. If you need to get rid of dirt and dust accumulated during operation, you can use one of the many special cleaning products
It is important that the product does not contain alcohol, which can damage the coating of the reflector and the optics will have to be changed. In some cases, toothpaste or cosmetic micellar nail polish remover may be sufficient to clean the surface of the headlight.
To wash the inside surface of the headlight without removing the glass, you need to remove the lamp from the headlight, pour water diluted with a cleaning agent inside and shake well several times, then rinse the container with clean water and dry.
Types of sensors
By drive type:
- Rod or rod: a movable element in the form of a pin with a large range of movement.
Such an element does not require high mechanical precision, but takes up a lot of space in the gearbox. In addition, it is necessary to ensure tightness: for example, a seal around the rod. - Ball-type: a pressure mechanism in the form of a spring-loaded steel ball.
Small stroke (2–5 mm), high precision required. But the sensor takes up little space and is sealed in design.
By connector type:
- opening pin or knife type contacts;
- closed standard connector with casing for protection against oxidation;
- bayonet swivel connector;
- screw terminals for fastening wires without a connector.
The way the wires are connected is fundamentally unimportant. All types of connections, except open ones, are quite reliable and sealed.
Headlight faults and repairs
An unpleasant feature of the headlights on a VAZ is the gradual decrease in the quality of light. In 70% of cases, drivers notice that the lamps have stopped shining normally when the glass on the headlight has already become cloudy by 30 - 40%. Clouding of the bulb on a halogen lamp is the second reason for the decrease in illumination. If the headlights and headlights in your car stop working, there may be several reasons:
- The light bulb itself burned out.
- The fuse or fuse box has failed.
- Burnout, rupture of the electrical wire.
- Oxidation of contact tips, current does not pass through the circuit.
- Loosening of the electrical wire fasteners.
- A breakdown of the switching relay or oxidation of a specific contact of the steering column switch is observed if there is no switching from high beam to low beam and vice versa.
The six is equipped with a three-lever switch for adjusting the headlights. If the levers sink and do not lock, the part must be replaced.
How to disassemble a headlight
Analysis is carried out in 10 minutes. The glass is glued to the reflector, you need to heat the sealant that holds the block around the perimeter, then use a flat screwdriver or knife to pry the glass and remove the element. Installation of glass is carried out using soft glue in the reverse order.
Some drivers heat the headlight with a hairdryer, lamp, or steam bath. If you use a lamp, there is a possibility of overheating the glass. Acrylic parts may further become cloudy if the temperature exceeds 70 degrees.
Replacing light bulbs
Replacing low beam bulbs begins with dismantling the headlight trim. The plastic cover must be pryed off with a screwdriver and removed from its seat. The block is located closer to the edge of the car and is carried out in stages.
Before starting any work related to replacing lamps, checking electrical wiring, or repairing headlights, you must remove the negative terminal from the battery:
- Loosen the three mounting screws holding the headlight rim. Do not remove the screws completely.
- Take the headlight in your hand, turn the loose rim, the screws should come out of the grooves.
- Remove the rim, take out the diffuser; the element is held by the rim and falls out along with it.
- Pull the headlight with the block out of the niche, remove the plug of the power supply wire.
- Disconnect the fastener.
- Remove the used bulb from the headlight.
Install the new part and reassemble the headlight in the reverse order. After installing a new element, it is necessary to correct the geometry of the light beam.
Headlight corrector and repair
A luminous flux corrector, or more simply a headlight corrector, will allow you to adjust the headlights if the vehicle's ground clearance has changed due to a loaded trunk. In this state, the car tilts backwards, the high beam headlights lose adjustment, blind oncoming drivers and do not illuminate the first 10 meters in front of the car. The light from nearby lamps poorly illuminates the roadside and is scattered.
The adjustment is carried out manually; the part will allow you to lower the light beam down when the trunk is loaded and align the beam for normal mode. For the VAZ 2106 there is an option to use electric correctors. The position of the reflector is adjusted through a servo drive, which changes the angle of inclination of the reflector through a worm gear.
18.26. Replacing interior light bulbs
| EXECUTION ORDER |
| 1. Remove the ground wire from the battery. |
LAMP THAT TURN ON WHEN THE DOOR IS OPENED
Removal
| EXECUTION ORDER |
| 1. Using the blade of a thin screwdriver as a lever, remove the lamp from the socket and disconnect the electrical connector from it. |
| 2. On models where the lamp that turns on when the door is opened is combined with a reading lamp, remove the lampshade to access the lamps. |
Installation
| EXECUTION ORDER |
| 1. Installation is carried out in the reverse order of removal. |
GLOVE BOX LIGHT
Removal
| EXECUTION ORDER |
| 1. Using the blade of the screwdriver as a lever, remove the light from the socket and disconnect the electrical connector from it. |
| 2. Remove the light bulb from the lantern. |
Installation
| EXECUTION ORDER |
| 1. Installation is carried out in the reverse order of removal. |
LUGGAGE COMPARTMENT, ENGINE COMPARTMENT AND EDGE LIGHTING LAMP
Removal
Removing the light bulb from the engine compartment light
EXECUTION ORDER
1. Using the blade of a thin screwdriver as a lever, remove the flashlight from the socket and disconnect the electrical connector from it. 2
Using caution, remove the light bulb from the spring contacts of the light (see Fig. Removing the light bulb from the engine compartment light)
Removing the light bulb from the engine compartment light.
Installation
| EXECUTION ORDER |
| 1. Installation is carried out in the reverse order of removal. |
CIGARET LIGHTER LIGHT
Removal
| EXECUTION ORDER |
| 1. Remove the ashtray/cigarette lighter assembly from the instrument panel and disconnect the electrical connector from the cigarette lighter lamp. |
| 2. Pull to remove the lamp from the socket. |
Installation
| EXECUTION ORDER |
| 1. Installation is carried out in the reverse order of removal. |
CLOCK LIGHT
Removal
Removing the socket with the clock light bulb
| EXECUTION ORDER |
| 1. Take off your watch. |
| 2. Turn the socket with the light bulb and remove it from the back of the clock (see Fig. Removing the socket with the clock backlight bulb). |
| 3. Pull to remove the lamp from the socket. |
Installation
| EXECUTION ORDER |
| 1. Installation is carried out in the reverse order of removal. |
ON-BOARD COMPUTER DISPLAY LAMP
See corresponding description above.
HEATER CONTROL PANEL LIGHT
Removal
Removing the socket with the heater control panel light bulb
| EXECUTION ORDER |
| 1. Remove the heater control panel. |
| 2. From the back of the instrument panel, pull out and remove the socket with the light bulb (see Fig. Removing the socket with the light bulb for the heater control panel). |
| 3. Pull to remove the lamp from the socket. |
Installation
| EXECUTION ORDER |
| 1. Installation is carried out in the reverse order of removal. |
MIRROR LIGHT IN THE SUN VISOR
Removal
| EXECUTION ORDER |
| 1. Lower the sun visor and, using the blade of a thin screwdriver as leverage, remove the lens assembly from the mirror. Remove the backlight from the spring contacts. |
Installation
| EXECUTION ORDER |
| 1. Installation is carried out in the reverse order of removal. |
Wiring diagram VAZ 2106 (injector)
1 controller 2 electric fan of the cooling system 3 ignition system harness connector to the left mudguard harness 4 ignition system harness connector to the right mudguard harness 5 fuel level indicator 6 fuel level harness connector to the fuel level sensor harness 7 oxygen sensor 8 fuel level sensor harness connector to the system harness ignition 9 electric fuel pump 10 speed sensor 11 idle speed control 12 throttle position sensor 13 coolant temperature sensor 14 mass air flow sensor 15 diagnostic block 16 crankshaft position sensor 17 canister purge solenoid valve 18 ignition coil 19 spark plugs 20 VAZ-2106 injectors 21 ignition system harness block to instrument panel harness 22 electric fan relay 23 controller power supply circuit fuse 24 ignition relay 25 ignition relay fuse 26 electric fuel pump power circuit fuse 27 electric fuel pump relay 28 ignition system harness block to injector harness 29 injector harness block to ignition system harness 30 block g guta instrument panel to the ignition system harness 31 ignition switch 32 instrument cluster 33 engine anti-toxic system display
Carburetor internal combustion engine
Most classic VAZ models with a carburetor are equipped with a KSZ contact ignition system. Since 1987, cars began to be equipped with a contactless ignition system. The engine for the VAZ 2104 was created on the basis of the VAZ 2103 power unit, and accordingly, the VAZ 2103 electrical circuit was used.
Classic ignition
The KSZ includes a distributor (2), a coil (5), spark plugs (1), high-voltage wires, and connecting wires. The system also includes a capacitor (3), a relay (7), a breaker cam (4), a mounting block (6), and a switch (8).
On machines with KSZ, a distributor 30.3706-01 is installed. It is located on the left side of the cylinder block in the front part. Thanks to it, the circuit of the primary winding is interrupted and high voltage is distributed across the spark plugs in the required sequence. The distributor consists of ignition timing regulators, a high-voltage pulse distributor, and a breaker with contacts.
A B-117A with an open magnetic circuit is used as an ignition coil. It is located in the engine compartment and is attached to the left mudguard using two nuts. The device is used to convert low-voltage current into high-voltage current. The installed A17DVR spark plugs serve to ignite the fuel-air mixture in the cylinders of the power unit.
A VK347 type switch is installed, which has an anti-theft device. The anti-theft operating principle: when the key is removed from the lock in the “Parking” position, the locking rod extends, which blocks the steering shaft, entering a special groove.
Electronic ignition
The design of the contactless ignition system includes:
- distributor (distributor);
- sensor;
- switch that controls the system;
- high voltage coil;
- spark plug ;
- connecting and high-voltage wires.
On VAZs with BSZ, a distributor 38.3706-01 is installed, its location coincides with the KSZ distributor. The coil consists of two windings. One is connected to the ignition switch relay, and the second is connected through a high-voltage wire to the distributor.
Using small cross-section wires, the coil and distributor are connected to a switch, which is responsible for the timely supply of a spark. The commutator converts the sensor pulses into a pulse current, which is supplied to the primary winding of the coil. The coil is also located in the engine compartment, like the KSZ coil.
Do not disconnect the wires from the switch if the ignition is on. The switch may be damaged if the battery terminals are removed while the engine is running.
The operating instructions contain an electrical diagram of the VAZ 21043 carburetor with a description of the main components included in it.
Electrical diagram of VAZ 2104
Glass
When converting factory headlight units, acrylic or polycarbonate elements are used instead of tempered, heavy glass. When choosing, you should take into account the diameter of the new glass, adjusting it to the size of the standard blocks.
Acrylic headlights are made by heat shrinking using old glass as a matrix. The minimum thickness of a new plexiglass headlight is 4 mm. The advantages of an acrylic block are low cost and the ability to be manufactured in a workshop. The disadvantages include rapid wear of the part. Acrylic quickly becomes covered with microcracks after being hit by gravel thrown out from under the wheels of a vehicle in front, and loses transparency after overheating. It is recommended to additionally protect the headlights with armored film.
Polycarbonate headlights are two times lighter than glass and are characterized by increased resistance to mechanical damage. Compared to acrylic glass, polycarbonate glass does not become cloudy over time, does not lose light transmission, and is resistant to temperature changes.
Where is the mounting block located on the “six”?
The VAZ-2106 fuse box is located on the left side of the dashboard, under the instrument panel. Considering that all “sixes” were equipped with carburetor engines, there are no additional units with power inserts in them. They are all in one place. The mounting block consists of two boxes: upper and lower. For protection and insulation, they are covered with a plastic cover. On the inside there is a diagram, after studying which it will be easy to understand how the fuses are located in the VAZ-2106, which one is responsible for what and what the rating of each of them is.
Headlight adjustment
VAZ 2106 cars leaving the assembly line end up in the hands of car owners with adjusted factory optics. However, during operation, the adjustments may be disrupted, as a result of which the safety and comfort of driving the car decreases. Most often, the issue of adjusting headlights arises after accidents or repairs involving the replacement of body parts, springs, suspension struts, etc.
There are several ways to adjust VAZ 2106 headlights, the most preferable of which is adjustment using high-precision optical stands. The operation of such devices is based, as a rule, on focusing a beam of light (emanating from a car headlight) with an optical lens on a moving screen with adjustment markings. Using the stand, you can not only set the required angles of inclination of the light beams, but also measure the light intensity, as well as check the technical condition of the headlights.
You can most accurately adjust the VAZ 2106 headlights using a special optical stand
If it is not possible to adjust the headlights in a specialized workshop using an optical stand, you can do it yourself. For adjustment, you will need a horizontal platform, the length of which will be about 10 m, the width - 3 m. In addition, you need to prepare a vertical screen (this can be a wall or a plywood panel measuring 2x1 m), on which special markings will be applied. Before you start adjusting the headlights, you should make sure that the tire pressure is correct, and place a load weighing 75 kg on the driver's seat (or have an assistant sit). After this you need:
- Place the car strictly opposite the screen at a distance of 5 m from it.
- Make markings on the screen by drawing a horizontal line through the points coinciding with the centers of the headlights, as well as additional horizontal lines that should pass through the centers of the light spots (separately for internal and external headlights - 50 and 100 mm below the main horizontal line, respectively). Draw vertical lines corresponding to the centers of the internal and external headlights (the distance between the centers of the internal headlights is 840 mm, external - 1180 mm).
- Cover the right headlights with light-proof material and turn on the low beam. If the left outer headlight is adjusted correctly, then the upper boundary of the light spot should coincide on the screen with a horizontal line drawn 100 mm below the horizontal, corresponding to the centers of the headlights. The boundary lines of the horizontal and inclined parts of the light spot must intersect at points corresponding to the centers of the external headlights.
- If necessary, perform horizontal adjustment of the left outer headlight using a screwdriver and a special adjustment screw located under the trim on top of the headlight.
- Vertical adjustment is made using the screw located to the left of the headlight.
- Do the same with the right outer headlight.
Then you need to check the adjustment of the interior headlights. To do this, cover not only one of the headlights completely with light-proof material, but also the outer lamp of the second headlight, and then turn on the high beam. If the internal headlight is adjusted correctly, then the centers of the light lines will coincide with the intersection points of a line drawn 50 mm below the horizontal, corresponding to the centers of the headlights, and the verticals passing through the points corresponding to the centers of the internal headlights. If adjustment of the interior headlights is required, this is done in the same way as with the exterior lights.
Replacing the lamp in the sidelight:
Note! Before we start replacing, let's look at what a sidelight is. Firstly, it is installed under the front headlights of the car, by the way, this is where the name “Sidelight” comes from. It contains two lamps, one of which is inserted into the turn signal, which is indicated by the letter “B”, and the other is inserted into the side light, which is indicated by the letter “A”!
To replace these lamps, you will need to stock up on: A screwdriver, as well as a lamp that goes to the side light A12-5 (shown on the right in the photo), as well as a lamp that goes to the turn signal A12-21-3 (shown on the left in the photo) !
1) First, unscrew the two screws that secure the diffuser and then remove it.
2) Next, select the lamp that you will replace, they are both replaced in the same way, so for example, removing the turn signal lamp works like this. First, you will need to press lightly on the light bulb that you are going to replace, and then turn it slightly counterclockwise until the protrusions that are present on the base of the lamp coincide with the grooves, and after matching, remove this lamp from the socket.
Why doesn't the VAZ 2115 reverse? The reverse light doesn't light up - what to do?
biathlonmordovia.ru → Electrical appliances
Reverse sensor
(DZH) - is a device that activates the reversing lights (white) when you engage the appropriate gear and start moving in reverse. In this way, you notify motorists (pedestrians) standing behind you of your intentions, that is, that you are going to drive in the opposite direction.
Today we will talk not only about what this sensor is, but also how to check it if it malfunctions and replace it with your own hands, if necessary.
I would like to note right away that non-working reverse lights are not conclusive evidence that the reverse sensor is faulty; perhaps the reason is quite trivial, for example, a wiring has come loose or a light bulb has burned out. Therefore, in order not to make unnecessary movements, make sure that the reason is in this sensor, and not in the light bulb or wiring.
Additional reasons why the lights do not light up when reverse gear is engaged:
- , which is connected by a DZH chain and lanterns;
- Failure to fit the reverse sensor;
- The contacts of the flashlights have oxidized;
- There is no wiring contact between the fuse block and the plug.
Where is the reverse sensor located?
The DZH can be seen if you drive onto an overpass and climb under the car, there will be two sensors on the gearbox, one of them is the , the second is the reverse sensor
Symptoms of a faulty reverse sensor
You put the car in reverse, but the lights do not come on, although both the bulb and the wiring are in good condition.
How to increase engine power in a VAZ 2106: description, photo, video
Conclusions:
- If the lights are on in this position, the sensor is faulty and must be replaced.
- If even in this position the lights do not light up, the reason is in the circuit, the sensor most likely has nothing to do with it.
- Using a tester or multimeter, measure the voltage on ground and the orange wire that comes from the DZH; if there is voltage, you need to check the board of white lights, as well as the contacts. There may be no contact between the fuse box and the sensor contacts.
Replacing the reverse sensor on the “fourteenth”
To replace the sensor you will need: a new reverse sensor, an overpass, transmission oil, as well as empty containers and rags. The fact is that when you unscrew the old ESD, oil will flow out of the hole.
- Drive the car into the pit and place it on.
- Remove the engine crankcase protection.
- Remove the contacts from the DZH
. - Carefully clean the work area from dirt and dust.
- Bring the container prepared for the oil to the reverse sensor and unscrew it.
- Try to quickly remove the old ESD and install a new one in its place, then quickly tighten it until it stops.
- Connect the power wires to the new sensor.
- Wipe off all remaining oil using a rag.
- (add oil if necessary) and make sure the new reverse sensor is working.
The fact that the car is moving backwards is signaled by white lamps, which are located at the rear of the car.
Sensor failure
The faulty element is identified immediately: the reversing lights and other related devices stop turning on. This problem can also occur due to a broken wiring. How to check the sensor for serviceability?
- Remove the connector, connect the multimeter in dial mode, and engage reverse gear.
- The next step is to unscrew the sensor, connect the device, and press the rod (ball) manually.
Important! When dismantling the sensor, it is necessary to prepare a screw plug to quickly block the hole. Otherwise, oil may leak from the gearbox housing.
Repairing the reverse sensor is not practical. The case is sealed; after opening it and putting the contact group in order, it will be impossible to restore the structure to its factory condition. The unit is inexpensive, especially on domestically produced cars. Therefore, replacement will not be too expensive.
Important! There is no point in experimenting with selecting sensors from other car models. If the mechanical part is larger than standard, the gearbox may be damaged.
Replacing the light relay on the “six” - work order
The “six” light acquires special importance when a motorist has to drive in conditions of poor visibility, in difficult weather conditions and at night. However, any driver must remember that defects in the vehicle’s electrical equipment system, one way or another, affect the functionality of the power plant. And this is despite the fact that the main electrical circuits are protected by relay elements, just as the lighting of the “six” is protected, the safety devices of which are routed to the vehicle’s fuse box.
On the VAZ 2106, the headlight relays, along with other main electrical equipment of this vehicle with high current consumption and high voltage, are connected via relay elements. The main purpose of the VAZ 2106 light relays, whose price is low, is to protect the switch contacts from energy overload.
Car enthusiasts often ask where the high and low beam relays are located on the “six” and what they look like. Let us explain that almost all relay devices, as well as the relay - voltage regulator, are located in the power plant compartment. The exception is the turn signal and hazard warning relays, which are located under the instrument cluster in the car interior, covered by a front panel. Both relays are identical in appearance (they can be easily found on the mudguard on the right as the car moves) and are located next to the battery charging indicator relay.
The electrical diagram of the light relay is located below:
On the general diagram of the electrical equipment of the “six” you can see at number 5 the VAZ 2106 low beam relay, and at number 6 the VAZ 2106 high beam relay, which are interchangeable elements. Also here you can see the integration of the main electronic devices of the vehicle into the general electrical supply circuit of the vehicle of this modification.
Modifications
Various modifications of the VAZ 2106 can be equipped with additional electrical equipment. In this case, the wiring is laid additionally, and the general circuit is equipped with other components.
Switching diagram for electric windows of the front doors
- 1 - main safety module;
- 2 - relay used to protect the power line of additionally installed power windows;
- 3 — switching device for the electric window mounted on the left door;
- 4 - a similar device used to adjust the position of the glass in the front right door;
- 5 — electric motor of the left glass lift;
- 6 — auxiliary module with safety elements;
- 7 - ignition switch.
Pin A is connected to pin 30 on the generator set, pin B is connected to the panel light switching device. Output B is a symbol for the connectors in the system's motor block.
The “Video Video” channel demonstrated the procedure for installing and connecting electric windows on a VAZ 2106.
Carburetor solenoid valve control circuit
The modified version of the carburetor valve control circuit has several differences:
- 1 - ignition switch or lock;
- 2 — generator set to supply equipment with voltage;
- 3 - battery;
- 4 — ignition coil;
- 5 — switch unit located in the engine compartment;
- 6 - control module;
- 7 - the carburetor valve itself;
- 8 — limit switch of the carburetor device.
Engine cooling fan motor
- 1 — generator unit, installed under the hood;
- 2 - battery;
- 3 - ignition switch or lock;
- 4 — main module with safety elements;
- 5 - relay that protects the power line of the activation system of the electric motor of the power unit cooling fan;
- 6 — ventilation device activation controller;
- 7 - the fan itself;
- 8 - auxiliary safety module.
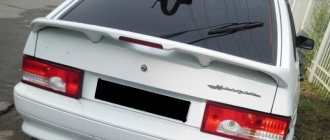
Spoilers
The main task of the spoiler is to hold the car at high speed. Many owners love them for a completely different reason - their beautiful appearance.
The most beautiful and stable spoilers are made of aluminum. There are models that are installed on the hood, side and trunk.