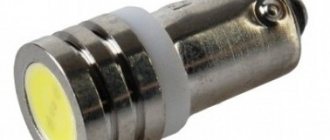
Using LEDs
Inexpensive tuning of VAZ 2107 optics involves using LEDs. This method will transform the optics and appearance of the equipment. To carry out the work, you should have the following materials on hand:
- LEDs;
- resistors;
- various wire designs;
- viscous composition based on polymers;
- drill and drill bit of the required diameter.
Tuned lighting fixtures will transform the car. They will look beautiful both from the front and from the back. The main advantage of this option is that the diodes have a long service life and do not have to be changed frequently. When installing these elements in the front light structures, even and diffuse lighting is obtained. This is a convenient way to tune the optics of a VAZ 2106. After installing the LEDs, you need to connect everything to the electrical circuit. At this stage, you should be careful about the polarity and not mix anything up.
Replacing incandescent lamps in a 2107 headlight with LED ones
Let's start with the most interesting and important question. I know from myself that the low beam on the “seven” is intended only to illuminate the road a meter from the front bumper
It was precisely these considerations that were probably guiding the Tolyatti engineers. At night you need to look closely at what is happening in front of the car, the side of the road is not visible, and if there are potholes in front, then it is not possible to dodge them in time; late they fall into the light beam of the headlights.
For this reason, many car owners replace the factory lamps with brighter ones, in the hope of achieving the brightness of the head optics necessary for safe driving.
There are several tuning options:
- Installation of halogen lamps
- Xenon
- LEDs
We will immediately dismiss the second option, because it is not intended for installation in the standard headlights of a classic VAZ. To do this, you need to retrofit the optics with lenses that collect the light beam. Otherwise, the bright xenon light will simply be scattered by the headlight reflectors into space, without creating the desired cut-off boundary and directional beam shape.
As a result, you will blind oncoming traffic, and the efficiency of night road lighting will tend to zero. At the same time, there is a high chance of getting your driver’s license revoked for installing xenon in a VAZ 2101-07.
Alternatives can be halogen and LED lamps. But if you choose between them, LEDs have a certain number of advantages.
Advantages of LED technology over halogen and xenon
- Same power with low power consumption compared to halogen
- Durability with proper installation and decent quality LED technology
- High brightness. Its level can reach up to 2200 Lm
- There is no need to modify the headlight unit or install additional equipment (ignition units) as for xenon.
Modern LED lamps are available in different types of sockets, each brand of car has its own. It is enough to remove the old lamp and, using the same connection, insert a new LED lamp - there are no alterations or problems.
Which LED lamps to choose for VAZ 2107
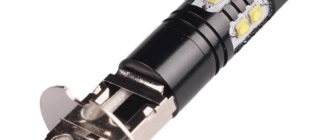
For the Semerka's head optics, size H4 is required. There are several versions of such lamps on the market. Let's look at each of them in detail and decide which one is better to install in the headlights of the Seventh Lada model.
Passively cooled
When LEDs operate, a large amount of heat is generated, which must be removed for reliable operation of the diodes. These types of lamps use a passive cooling system. It can contain a compact aluminum radiator or “feathers” - flexible radiators in the form of feathers.
Heat is dissipated only due to the area of the radiators. In the first case, the lamps have a compact size, but the efficiency of such a radiator is lower; in the second case, the radiator area is larger, but its dimensions do not always allow such equipment to be placed in the headlight housing of a VAZ 2107 without alterations to the protective casing. The heat dissipation efficiency is higher, the crystal durability is longer.
With additional and built-in driver (stabilizer)
On the market you can find H4 lamps with an additional diode control unit - stabilizer, driver (called differently in different online stores). It connects to the LED light bulb connector, and power is taken from the standard low and high beam connection socket.
Pros:
- Has an additional stabilization unit. This increases the service life of the LEDs, smoothing out possible voltage drops in the on-board network of the VAZ 2107
- Eliminates the effect of “noise” - interference in electrical wiring when a powerful current consumer is turned on. In a simple way - in the speakers, when the radio is turned on, no extraneous noises or hums will be heard
- “Gentle” temperature mode of operation of the LED module.
Not only the crystals heat up, but also their power supplies. In the version with a remote unit, the temperature load can be divided, making the operating conditions of the LEDs easier. The control unit is located separately from the diode board, isolating them from the influence of high temperatures of the control electronic elements filling.
In lamps with a built-in driver, it is necessary to additionally install radiators with passive or active cooling so that the crystals do not degrade and their service life does not decrease. Moreover, in VAZ 2107 models, such bulbs are located in a sealed housing of the headlight unit, which impairs heat dissipation.
Flaws:
- All the advantages listed above are canceled out by one drawback - you need additional space under the hood to install the driver.
- Plus, you have to “collectively farm” the wiring, since the headlight protective casing is not designed to pull additional wires through it. This affects the tightness of the entire head optics with the ensuing consequences - moisture and dirt getting inside.
From the above, another drawback follows - a visual inspection of the headlight unit shows that retro-reflective equipment has been converted to cars. This will raise additional questions from traffic police inspectors. In the case of a driver built into the lamp body, the entire structure with the control unit is located in the headlight housing, there are no additional wires and controls, which will not visually reveal the placement of non-standard lighting equipment on the car.
According to the design of the LED part
This is the most important part of the light bulb, on which the board with diodes is located. The effectiveness of the VAZ 2107 headlight largely depends on its shape and design.
What you need to pay special attention to when choosing and purchasing LED lamps for Lada 2107:
- Type of installed diodes. Depending on the cost of the lamp, LEDs can be used in the form of assemblies and individual crystals
- The presence and shape of the low beam protective curtain.
Let's look at the points in order. On cheap versions, diodes are installed in the form of assemblies - a set of small crystals on one circuit board. They use COB (chip-on-board) technology. Its purpose is not to increase the brightness of individual LEDs, but to increase their number on the board.
This technology is not suitable for automotive LED lamps with reflector headlights.
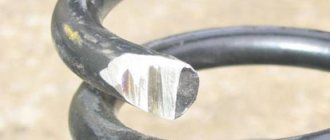
When used, they will blind oncoming drivers. Cheap Chinese lamps can use CREE diodes. But in most cases it is a fake, because such crystals cannot be cheap. They are very different in shape and size from the original, as shown in the photo below. Using such light bulbs you will not get guaranteed quality light.
It is recommended to buy LED lamps based on original Philips Z ES or CSP crystals.
Protective curtain. If you look at the stock H4 lamps on the 2107, there is a reflective screen installed on the low beam. Its shape and location on the matrix of the LED lamp affects the shape of the light beam and the cut-off line. If visually this “curtain” is installed crookedly or does not completely block the low-beam crystals, then flare and a blurred cut-off line (cut-off line) appears, which does not have the correct “tick” shape.
If such a reflector is installed evenly, being part of the body, cast, and not its separate element, then there is a chance to purchase high-quality lighting equipment.
According to the temperature of the light flux
Below is a table of light temperatures in Kelvin. Based on my own experience, I would like to note that the optimal value is 4300-5000 K. Above that, the light will have a white color with a bluish tint. Below is a warm, yellow color, like incandescent or halogen lamps.
It is recommended to choose an H4 LED bulb in this temperature range , because if it is higher, then in fog, rain or snowfall, you will see a white “wall” in front of the car. On a snowy road, the side of the road will not stand out well. In clear weather, visibility will be better than that of lamps with a “warm” light output color.
How to remove and repair the signal button on the steering wheel using the example of a VAZ 2107
Carrying out independent repair of the signal button on the steering wheel of a VAZ 2107 will not be difficult.
To do this, just read the following instructions:
- Initially, it is recommended to disconnect the ground from the battery, since the upcoming work is electrical. This will eliminate the possibility of a short circuit.
- To remove the steering wheel top cover, you will need to unscrew two bolts from the inside using a Phillips screwdriver.
- The steering wheel itself is dismantled using an open-end or regular 24mm wrench, which is used to unscrew the fixing nut. To completely remove this part, you will need to perform rocking movements in different directions while simultaneously applying pressure in your direction.
- After removing the steering wheel, you can find a special contact that should be cleaned of oxidation/contamination and bent if it is positioned incorrectly.
- The entire structure is assembled to its original state in reverse order.
- Performs a system health check.
Tail lights
We move to the rear of the car. There are screws on the trunk side that secure the protective cover.
- Unscrew them and remove the plastic cover of the lights
- Remove the power plug and loosen the plastic board holders with your fingers. To replace it, just loosen the board latches to remove it from the flashlight body
- We remove it from the taillight unit
All lamps are located on the printed circuit board. To replace them, you need to turn them a quarter turn and pull them out of the socket. We replace burned out ones. We assemble the lantern in reverse order.
Video, replacing rear light bulbs on a Zhiguli 2105-07:
What to do if xenon headlights stop working?
If xenon bulbs stop functioning, the reasons may be as follows:
- damage to the contact on the connector for connecting to the power circuit;
- broken wiring;
- failure of the lighting source, the lamps cannot be restored;
- control module failure.
Why does the ignition unit break?
Reasons for failure of the ignition device:
- Lack of tightness on the module body, which leads to dirt and moisture getting inside the unit. The problem can be determined by disassembling the device and diagnosing its internal components. If dirt or water gets into the module, the lights will not light up or will begin to blink when turned on.
- Negative effects of corrosion. The solder joints of electronic components may oxidize, causing components to fall out of the solder. The problem is associated with assembly errors or regular exposure to moisture.
- The pulse signal from the controller has disappeared. There may be problems with the transistor elements, multiplier or transformer device.
How to repair a xenon ignition unit yourself?
Module repair is performed as follows:
- All electrical circuits are diagnosed for breaks or leaks. This refers to the wires that go to the module. The problem may be a pinched or damaged power line.
- The device is treated with an alcohol solution, this will remove rust and traces of condensation. You must act carefully so as not to damage the board. The sealant is removed from the back of the circuit and the contact elements are re-soldered with a soldering iron. Everything needs to be soldered, since leaky parts are difficult to visually identify.
- An opened ignition device is diagnosed on something that does not allow voltage to pass through. When diagnosing, there are no parts that light up nearby. The test is performed while the device is connected to a light source. The voltage of the multiplying element is 35 kV, so if the unit is not turned on, then it will not be touched until it is completely turned off.
- The next step will be to perform diagnostics on the transistor elements, there are a total of four on the board. A multimeter is used to check. If testing shows a device with a breakdown, it is soldered again. It is recommended to install 4N60 parts.
- Using a tester, it is not always possible to determine an element with a breakdown. It may be necessary to remove each transistor before the ignition device is activated. You can turn it on briefly, for a couple of seconds.
- If the transistor elements are intact, the resistor devices are checked. The burnt out part is replaced with a new one.
When assembling the block, it is not recommended to use silicone sealant.
After hardening, this product is as hard as possible. If the transient device needs to be replaced in the future, opening the module will be problematic.
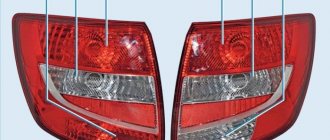
Design and characteristic malfunctions of the rear lights of the VAZ-2107
Structurally, the rear light of the VAZ-2107 car consists of:
- left and right diffusers;
- left and right conductors;
- two 4 W lamps and two sockets for them;
- six lamps with a power of 21 W and six sockets for them;
- four M5 nuts.
The brake light and side lights on the rear light should be red, the turn signal should be orange, and the reverse light should be white . The most typical malfunctions of the rear lights of the VAZ-2107:
- lack of mass on the lantern;
- lamp burnout;
- oxidation of contacts;
- broken or frayed wiring;
- failure of connector contacts, etc.
No mass
One of the reasons that the tail light does not work may be the lack of weight on it. You can check the integrity of the ground wire visually or by ringing it with a tester. The ground wire in the standard configuration of the VAZ-2107 is usually black, and it occupies the extreme position on the connector block. It is followed by wires:
- brake light (red);
- side lights (brown);
- fog lamps (orange-black);
- reverse lamps (green);
- direction indicator (black and blue).
Lamp burned out
The most common malfunction of rear lights is the burnout of one of the lamps. In this case you will need:
- Remove the plastic plug from the trunk side, which is secured with four plastic screws;
Contacts have oxidized
Oxidation or clogging of the contacts of the connector block may be a consequence of their insufficiently tight connection, as well as dust and other small mechanical particles getting inside the headlamp due to wear or drying out of the rubber seal. The processes of oxidation and contamination of contacts can be prevented through regular preventive inspections and maintenance of all elements of the lighting system.
There are many cars whose rear lights do not work at all, or only work halfway; others do not turn on their turn signals and drive with the rear fog lights on. I'm not one of those riders. I do everything so that my car works as it should, so that the moss of signals is visible and does not blind.
Ivan64
https://www.semerkainfo.ru/forum/viewtopic.php?f=7&t=14911&start=75
Broken wiring
The integrity of the wiring is checked with a multimeter if the location of the break cannot be determined visually. The purpose of each of the wires coming to the connector can be determined from the VAZ-2107 electrical equipment connection diagram.
Video: how to improve the performance of the rear lights of a VAZ-2107
Failure of connector contacts
Deterioration of contact in the detachable connection between the board and the plug can lead to burnout of the track with the impossibility of restoration. In this case, additional wires are soldered between the connector and the socket or the connector is completely replaced. It should be remembered that the new board may be equipped with a cartridge with non-spring metal, so it makes sense to keep the old cartridge. When replacing the board, it should be taken into account that the color of the wires may not match the color on the original blocks, so it is better to focus on the order of the contacts and solder the wires of the new connector to the wires in the harness sequentially one at a time.
Connection diagram
On the board connector, the tracks leading to the sockets of different lamps are marked with numbers:
- 1 - mass;
- 2 - brake light;
- 3 — side lights;
- 4 — fog lights;
- 5 — reversing lamp;
- 6 — direction indicator.
Replacing the front crankshaft oil seal on a VAZ 2110
Many motorists have at least once encountered such a problem as oil leaking under the car. There may be several reasons for this.
“American style” with side lights installed in the turn signals is a popular element of tuning the VAZ 2114. Carrying out such a modernization is not at all difficult, so the owners of the “fourteenth” modify the turn indicators themselves.
There are several ways to set the dimensions in the turn signals of the VAZ 2114
But, before you get started, pay attention to one nuance - compliance of this tuning element with the Rules of the Road
Rating of the best headlight lamps for VAZ 2107
The main question that needs to be resolved when compiling a rating is what criteria should be used to select devices? What does better mean – brighter, more durable, cheaper? Therefore, before choosing the best of the best, we will divide the lamps into three categories:
- standard;
- with increased light output;
- with increased resource.
Now let’s create a ranking table for each category.
The best lamps with standard characteristics
| Appearance | Name | Peculiarities | Rating | Cost, rub | Where can I buy |
| Osram Original H4 | minimal risk of dazzle by high beams, long service life | 7 | 150 | ||
| NARVA H4 STANDARD 48881 | low cost, weak “long-range”, stability of parameters throughout the entire service life | 6 | 100 | ||
| Philips Crystal Vision H4 | decent “far”, weak “near”, long service life, comfortable color temperature, high cost | 5 | 950 |
The best lamps with increased luminous efficiency
| Appearance | Name | Peculiarities | Rating | Cost, rub | Where can I buy |
| Osram Night Breaker Laser H4 | excellent light distribution, decent resource by the standards of “bright” lamps, high cost | 8 | 1 500 | ||
| Philips Vision Plus H4 | reasonable price, comfortable color temperature, high range | 7 | 600 | ||
| Koito WhiteBeam III H4 | good brightness, white light, decent resource, good light distribution, high cost | 6 | 1 670 | ||
| Bosch Xenon Silver H4 | Good light distribution, comfortable color temperature, low resource | 5 | 1 100 |
The best lamps with extended service life
| Appearance | Name | Peculiarities | Rating | Cost, rub | Where can I buy |
| Bosch Longlife Daytime H4 | resource corresponds to the declared one, difficult to find on sale, low cost | 8 | 260 | ||
| Philips LongLife EcoVision H4 | good light distribution, good resource, yellowish “near” | 6 | 400 | ||
| Osram Ultra Life H4 | low range, afraid of power surges and shaking | 2 | 500 |
So we got acquainted with almost all the lamps installed in the VAZ 2107 car. Now you can buy the desired type of lighting fixture without first disassembling the lamps.
Previous
Car lampsHow to replace the license plate light bulb Renault Logan
Next
Car lampsHow to choose LED lamps for a car
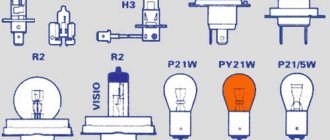
Lamps and bulbs of the VAZ 2107 car
The electrical equipment of the VAZ 2107 car uses several lamps and light bulbs of different shapes and power.
Let's list them all so that if any of them burns out, you can immediately find a similar replacement.
Lamps and bulbs of the VAZ 2107 car
Front headlights
Low/high beam headlight lamp AK12-60+55 Designation according to EAC H4 60/55W
Headlight side light lamp A12-4-1 (T4W)
Turn signal lamp in headlights A12-21-3 (P21W)
Back light
Brake signal lamp (stop) A12-21-3 (P21W)
Turn signal in the rear light A12-21-3 (P21W)
Reversing light A12-21-3 (P21W)
Fog light in rear lights A12-21-3 (P21W)
Dimensions in the rear lights A12-5 (R5W) or A12-10 (R10W)
Other lamps and light bulbs of the car
Turn signal repeater on the front wing A12-4-1 (T4W)
License plate light AC12-5-1 (C5W)
Interior lighting lamps AC12-5-1 (C5W)
Glove box lighting A12-4-1 (T4W)
Engine compartment lamp (engine compartment lamp) P10W
Instrument cluster illumination lamp T3W
Indicator lamps of the instrument cluster A12-1.2 (W1.2W)
Instrument cluster signaling devices AN12-1.2 (W1.2W)
Cigarette lighter socket lamp T3W
Clock backlight lamp A12-1.2 (W1.2W)
Illuminated switch keys
Source
Product range
The website catalog presents LED products for the VAZ 2107 model car. We sell lamps for all VAZ external lighting devices:
- Rear (4-15 W), front (4-15 W) and side (0.7 W) turn signals;
- For low and high beam headlights (16/16-30/55 W);
- Front (0.5-1 W) and rear marker lights (1 W);
- Rear fog lights (3.3-7.4 W);
- Rear license plate illumination (0.5-3 W);
- Brake light (3.3-7.4 W);
- Reverse (3.3-8 W).
All devices come with a minimum one-year warranty.
You can order LED products for the VAZ 2107 car on the website or by phone. Before placing an order, you can consult with our manager - a specialist will tell you which model of light bulb is ideal for installation in the headlights of your car.
The site also presents lamps for DRLs, low beams, PTF and car interior. You can order the product on the website or by calling the phone number indicated above.
VAZ-2107 fuses
F1 (10 A) - lamps in the reversing lights, heater (heater electric motor), heated rear window . If your reverse light does not work, check this fuse, then the lamp itself, and it may also be the reverse light switch (on the rocker or gearbox). If the heater does not work, but this fuse is intact, the fault may be in the wiring or in the heater motor itself, as well as in the switch on the panel.
F2 (10 A) - electric motors for windshield wipers, headlight cleaners, windshield washer pumps and headlights . If the wipers or washer do not work, check this fuse and connector 1 for the relay. A relay or jumper must be installed in it. It could also be the wiring or the wiper motor itself.
Why do the headlights on VAZ 2110 and 2114 shine poorly? We fix and improve
You need to understand and find out the reasons why the headlights on the VAZ 2110 and 2114 shine poorly as quickly as possible. Light on the road is the key to your well-being after sunset, and especially in winter, when it gets dark early (and dawn comes late). If bad weather conditions in the form of rain or snow are added to the general theme, then the lack of lighting becomes literally dangerous.
To drive almost by touch means to begin with risking the integrity of your iron horse: an undetected hole can seriously damage the chassis, or even cause a skid, which is fraught with injuries not only for your car, but also for oncoming/passing people. Why do the headlights on a VAZ shine poorly? 2110 and 2114, you need to look for the reasons until you are completely sure that this particular factor is interfering with proper functioning. Simply changing lamps to more powerful ones does not always solve the problem and may turn out to be an unnecessary waste of money.
Glass The simplest reasons are usually the most likely. Dirty headlights reduce illumination by 50%! Wiping them with a dry cloth is not a good idea. With this approach, you also scratch the glass, which over time will make their dim glow permanent. If you don’t want to regularly wash your headlights by hand, install a washer. By the way, the unit from Volga is perfect for the “ten”.
Moreover, the installation is quite simple and can be done on your own. The glass may burst. If you notice a crack on the surface, you will have to remove the headlight unit and replace it with a new one. If your car has already run well, the glass may naturally become cloudy from age.
Reflector If everything is in order with the glass, a possible reason for the dim glow may be a peeling reflector. No matter how powerful the lamp you screw into the headlight, you will not get the proper brightness of light. On most foreign cars, in this case, you have to change the entire headlight; On VAZs, only the reflector can be replaced. Moreover, the procedure is very simple:
- The headlight unit is dismantled with the battery disconnected;
- The glass is removed from it. It is placed on a sealant, which is softened by heating using a hair dryer. Then the glass is pryed up and carefully removed;
- The light bulb is unscrewed;
- The shabby reflector is dismantled, a new one is installed, and the headlight is assembled in the reverse order.
Voltage problems: Especially typical for cars with halogen lamps. A lack of voltage can be caused by a malfunctioning generator or oxidation/breakage of the contact. Normal light is produced at a voltage of 13.8-14.2 V, and the same should be at the ends of the working lamp. A drop on it of no more than 0.2-0.3 V at 2000 rpm is acceptable.
A lower voltage indicates that there is a faulty contact in the circuit. It is required to detect and eliminate the defect; Installing stronger lamps before repair is strictly prohibited: it can lead to overheating and even ignition of the faulty contact. Direction of luminous flux Insufficient lighting can be caused by unadjusted position of the headlights.
Moreover, at one time the adjustment could be correct, but due to an accidental shock (for example, a bumper catching a curb) it was disrupted. You can correct the position yourself, without optical instruments.
- A flat wall is selected, the car is installed at a distance of 5 m from it and loaded as standard: the tank must be full, and someone must be sitting in the driver’s seat.
- Markings are made on the wall: the central vertical line should coincide with the center of the car, the side lines should coincide with the center of the headlights.
- Horizontal is carried out at the level of the lamps. The border of the light spot is marked 6.5 cm below.
- The glass is removed from the headlight to access the adjustment screw, the second one is covered with any cardboard. The direction is adjusted to exactly hit the point of intersection of the lines. The adjustment is carried out with the low beam on: then the high beam will also be adjusted correctly.
- “How to properly adjust headlights”;
- "How to improve headlights."
After debugging one headlight, the same manipulations are carried out with the second. If the reason why the headlights on the VAZ 2110 and 2114 shine poorly was an imbalance of direction, after adjustment it will become easier not only for you, but also for other drivers: often crooked headlights blind oncoming people. And it also causes inconvenience to fellow travelers if they get caught in the interior rearview mirror.
Dimensions in turn signals using a double-filament lamp
Perhaps this is the easiest way to complement the side lights with the glow of the turn signal lights or move them to the latter. To do this, you will need a double-filament lamp, which should be installed instead of the standard one, and a corresponding socket. Instead of using a socket, you can use soldering, simply soldering wires to the terminals of the lamp, but in this case it will be difficult to change it.
The wires going to the turn signal should be connected to the more powerful lamp filaments, and the side light wires to the less powerful ones. You can connect the latter in parallel, then the direction indicators will complement the standard side lights, or simply switch the wires of the “dimensions” to the lamps in the “turn signals”. The last option is the “American” tuning, in which the side lights and direction indicators are combined.
What lamps to install in the instrument panel for lighting
On the VAZ 2107 car, simple incandescent light bulbs with a tungsten spiral are used for instrument lighting and display. With the development of industry, LED lamps of suitable sizes began to be produced. Despite the fact that they are more expensive, they began to replace incandescent lamps.
The advantages are obvious:
- cleaner light;
- less power consumption;
- durability.
Incandescent lamps
AMN 12-3-1 lamps are installed to illuminate the instrument panel.
Brand A 12-1.2 lamps are installed as signal lamps.
LED bulbs
As mentioned above, LED bulbs have a number of advantages over incandescent bulbs, so you should consider changing them. Selecting the size and power of lighting is quite simple.
You just need to take into account that the battery charging indicator lamp must be connected to the nominal resistance of the incandescent lamp previously installed. Otherwise the control will not be correct. Types of light bulbs for illumination and indication are shown in the photo below.
Instrument panel lighting
- We disassemble and remove the instrument panel to get to the board with the lighting and alarm lamps. You can change them without completely removing it, but you need to act carefully so as not to break the wiring
- Turn the light bulb socket that needs to be changed a quarter turn and remove it.
- The lamp is pulled out in the same way as the socket - by turning it 90 degrees.
Video instructions for replacing instrument panel light bulbs on a “classic”:
In some modifications of the VAZ 2107, baseless lamps can be used. Therefore, it is better to check which ones you have installed, buy them, and only then disassemble the dashboard. Such a light bulb is simply pulled out of the socket without rotation.
You can buy it on the market together with cartridges for installation in a panel. In this case, it is enough to remove it from the “tidy” board and install a new light bulb assembly with a socket - simple and reliable, but they are more expensive.
Electrical diagram for connecting VAZ-2107 headlights
The electrical circuit diagram for outdoor lighting includes:
- Block headlights with side lights.
- Engine compartment light lamp.
- Mounting module.
- Illuminated glove compartment.
- Instrument panel lighting.
- Rear lights with dimensions.
- Illuminated license plates.
- Outdoor lighting switch.
- Indicator lamp in the speedometer.
- Ignition.
- Conclusions A - to the generator, B - to the backlight lamps of devices and switches.
Headlights are part of the car's exterior lighting system, which is controlled by buttons on the dashboard
The operating diagram of the rear lights and fog lights consists of:
- Block lights.
- Mounting module.
- Three lever switch.
- External lighting switch.
- Fog light switch.
- Rear lights.
- Fuse.
- Indicator lamp for fog lights.
- High beam warning lamp.
- Ignition key.
- High beam (P5) and low beam (P6) relay.
The circuit for the rear lights and fog lights is mounted on a separate module
Understeering's shifter
The VAZ-2107 steering column switch is three-lever and performs the following functions:
- high and low beam control;
- turning on the direction indicators;
- windshield washer control.
The location of the switch allows the driver to control vehicle devices without being distracted from the road. The most typical malfunctions of the steering column switch (also called the tube) are considered to be failure of the contacts responsible for the operation of turns, low and high beams, as well as mechanical damage to one of the levers.
Group of contacts 53 in the connection diagram of the VAZ-2107 steering column switch is responsible for the windshield washer, the remaining contacts are for controlling the lighting devices.
Group of contacts 53 in the connection diagram of the VAZ-2107 steering column switch is responsible for the windshield washer system, the remaining contacts are for controlling the lighting devices
Headlight relays and fuses
Responsible for the protection of lighting fixtures are the fuses located in the new type block and are responsible for:
- F1 - reversing lamps;
- F8 - direction indicators in “emergency” mode;
- F9 - fog lights;
- F10 — instrument panel illumination;
- F11 - brake lights;
- F12 - high beam of the right headlight;
- F13 - high beam of the left headlight;
- F14 - dimensions (front left, rear right), license plate and engine compartment lighting;
- F15 — dimensions (front right, rear left), glove compartment lighting;
- F16 - low beam of the right headlight;
- F17 - low beam of the left headlight.
The VAZ-2107 fuse and relay box is located under the hood near the windshield opposite the passenger seat
The operation of lighting devices is regulated using a relay:
- 5 — high beam;
- 6 — low beam.
Daytime Running Lights
Daytime running lights (DRLs) should not be confused with running lights: they are lighting devices designed to improve daytime visibility. As a rule, DRLs are made with LEDs, which provide bright light and have a long service life. It is not recommended to turn on the DRLs at the same time as the low beam or fog lights. To install DRLs on your car, you don’t have to go to a service station; you can do it yourself
It is important to take into account that:
- lighting devices must be installed in accordance with the requirements of GOST R 41.48–2004;
- Not all DRLs are suitable for the “seven”. Many car owners install lights like Philips Led Daylight 9;
- most often, DRLs are placed on the bumper or air intake;
- lighting devices should be at a height of 250–1500 mm from the ground;
- the distance between the two visible edges of the devices must be at least 600 mm;
- DRLs can only be located at the front of the car, and the light beam must be directed only forward;
- The overall brightness of the light should be between 150–330 lumens.
The DRL connection diagram provides for the presence of a five-pin relay type M4 012–1Z2G.
To connect the DRL you will need a five-pin relay type M4 012–1Z2G
The relay is connected as follows:
- contact No. 30 must be connected to the ignition “plus”;
- No. 86 connects to the button for turning on the headlights and low beam;
- No. 87 remains unconnected;
- No. 85 - mass;
- No. 88 (87A) - output to DRL.
There are several options for connecting DRLs, one of which is designed to turn them off when the engine starts.
One of the DRL connection diagrams is designed to turn them off when the engine starts
In this case, the contacts are connected as follows:
- minus DRL goes to the body;
- plus - to relay contact No. 30;
- pin 87 is connected to the battery positive;
- contact 85 - with ground;
- contact 86 is connected to a reed switch, the second contact of which is connected to the positive terminal of the generator.
Dimensions of VAZ 2104, 2105, 2107 do not light up
On VAZ 2104, 2105, 2107 cars there are 4 side lights (dimensions): one in the front headlights and one in the rear lights.
Failure of any of them to work is a fairly common occurrence. Let's look at the reasons for this malfunction - “why the lights on VAZ 2104, 2105, 2107 cars don’t light up.”
Symptoms of a malfunction: “VAZ 2104, 2105, 2107 dimensions do not light up”
One dimension, two dimensions (front or rear, right or left side, crosswise) or all of them may not work.
Causes of the malfunction “dimensions of VAZ 2104, 2105, 2107 cars do not light up”
The side light bulb is burnt out
The most common reason. One light bulb, or several at once, can suddenly burn out. In some cases, it may be impossible to visually identify a burnt-out light bulb. Therefore, we replace the burnt out one with a known good one. You can use a similar one from a nearby headlight.
The contacts of the light bulb in the socket have oxidized
We rotate the light bulb in the socket several times to remove the oxidized layer and restore contact. In the future, you can clean everything with sandpaper.
Lost ground to headlights or taillights
Loss of contact with ground leads to failure of not only one size, but also the entire headlight or rear light.
The “negative” wires of the front headlights and rear lights with side lights on VAZ 2104, 2105, 2107 cars are attached to the car body. It is necessary to clean the mounting location to ensure good contact with ground. Usually the negative wire is the black wire from the headlight connection block, attached to the body next to the headlight or tail light.
Broken contact in the headlight or rear light connection block
Either it has oxidized or the block is not attached tightly. In such a situation, either one side lamp or the entire headlight may not light. We put on and take off the pad several times to restore contact.
The track in the rear light board has crumbled
During long-term use of the vehicle, or if a low-quality part is installed, the track to the side light lamp socket in the rear lights may shed (burn out).
Contact is broken in the connecting blocks of the relay and fuse mounting block
Check the pads Ш12 (Х12), Ш13 (Х13), Ш9 (Х9), Ш6 (Х6) of the mounting block. Or Ш2 (Х2) - terminals 1 and 3 if all the dimensions do not light up.
The fuse in the mounting block has blown
If fuse No. 14 (F14) is blown, the side lights in the front left headlight and rear right headlight will not light. If No. 15 (F15), then the marker in the front right headlight and rear left lamp will not light up, that is, crosswise.
The fuses must be replaced with serviceable ones and the cause of their burnout must be determined in the future. There may be a short circuit in the electrical circuit.
The external lighting switch on the instrument panel is faulty
All dimensions will not light up. Remove the switch and remove the wire block from it. Connect the leads of the black and yellow-red wires with a piece of wire. Turn on the ignition. If the dimensions light up, the switch is faulty and must be replaced.
“Open” in the electrical circuit connecting the side lights
It is necessary to check the sections of the circuit responsible for the non-burning light using the connection diagram. Read more: “How to find an open circuit in a car’s electrical circuit.”
Scheme for switching on the external lighting of a VAZ 2105 car
Wiring diagram for dimensions 2107.
Connection diagram of dimensions (external lighting) of a VAZ 2107, 21074 car
Notes and additions
— For a mounting block with finger fuses, the designation of the pads is “Ш” and the fuse is “№”. For mounting block with blade fuses “X” and “F”.
— On VAZ 2104, 2105, 2107 cars, A12-4-1 (T4W) side light bulbs are used in the headlights and rear lights.
Workflow Description
Preparation
If the low beam on a VAZ 2107 has disappeared and as a result of the check it is found that the lamps are to blame, then you should purchase new products. This model uses the AKG12-60+55 modification with an H4 socket; this marking indicates that the product has a power of 60 W for high beam and 55 W for low beam; you can purchase such an element at any store that deals in spare parts for domestic cars.
The working process
A huge advantage of the work is that, unlike modern models, access to the headlights is not limited in any way; this greatly simplifies doing the work yourself and allows you to achieve the best result, since you are in complete control of the process.
Important! To prevent the battery contacts from oxidizing during operation, you should protect them with lubricant; if there is no special composition, then ordinary grease would be an excellent option - it will protect lead from oxidation and ensure excellent contact over a long period of time
- If there is no low beam on a VAZ 2107 on only one side, then you can replace one lamp, although experts advise installing two at once, since the light may vary. One way or another, the work begins with any headlight that is convenient for you, first wipe the inside, since most often it is dirty and debris can get inside later.
- First of all, you need to remove the plug, which covers the installation site of the light bulb and serves as protection against moisture and dirt getting inside the housing. This element is removed very simply: grab it and turn it counterclockwise until it comes off, usually this happens in half or even a quarter of a turn.
Advice! When disconnecting a block, it is better to immediately check how well the wires fit, since long-term use may cause the connection to break.
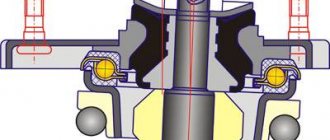
Next you will see a spring clamp that presses the lamp to the body and ensures its immobility during operation. To release it, you need to press the element on top and carefully move it to the side, everything is very simple and very quickly, when you see this knot, you can easily figure out how this is done.
Workflow Description
In order to complete the work, it is necessary to prepare everything necessary and ensure comfortable working conditions.
Preparation
As part of this stage, the following activities are performed:
If the low beam on a VAZ 2107 has disappeared and as a result of the check it is found that the lamps are to blame, then you should purchase new products. This model uses the AKG12-60+55 modification with an H4 socket; this marking indicates that the product has a power of 60 W for high beam and 55 W for low beam; you can purchase such an element at any store that deals in spare parts for domestic cars.
- The work must be carried out in a dry place with good lighting, the ideal solution is a garage, but you can even do it outside if the weather permits and there is no precipitation.
- No special tools are required, which is an undoubted advantage of this type of work.
Review of some faults
The lack of light does not always mean burnt out lamps; there are several main reasons why problems arise, and we will look at them:
| Light bulbs | Since the lamps in this model are combined, if both low and high beam lighting disappear at the same time, the lamps are to blame. Of course, there may be other reasons, but they are less likely |
| Relay | The low beam relay on the VAZ 2107 is separate, so if the low beam has disappeared, then you need to start looking for the reason by checking this element. Its location is shown in the diagram below, there are also other important components of the system, all of them are located in the mounting block, which is very convenient |
| Circuit breakers | This model has a separate fuse for each type of light for the headlights. For example, different elements are responsible for the right low beam and the left low beam, and the same is true for the high beam. If you lose light on one of the lamps, then start with the fuses and only then move on to the rest of the nodes |
| Wiring | If the low beam on a VAZ 2107 does not light up, then the cause may be poor wiring in the car. First of all, you need to check the contacts on the connections in the lamp socket, and also ring the circuit at all connection points; over time, the contacts can burn out and work poorly. Also, in older machines, the wire may break through to ground due to the loss of its properties by the insulation or its destruction. |
How to replace low and high beam bulbs
The advantage of the head optics of the seventh model Zhiguli over its counterparts is that it has H4 lamps installed, which are responsible for two types of road lighting. In other models, for example VAZ 2106, separate lamps are used for each light, which, if they need to be replaced, causes unnecessary material and physical costs.
Remove the waterproof protection of the headlight unit . It is made in the form of a plastic casing installed at the rear. It is removed by turning 180 degrees counterclockwise. It is attached with “tongues” that are inserted into the headlight housing and rotated in its grooves.
Disconnect the wiring block . It consists of three sockets: ground, low beam, high beam.
We snap off the wire retainer . It is made of elastic wire and securely holds the lamp in the reflector socket.
Remove the lamp from the socket. If it burns out, we replace it; if it was removed purely to replace it with an LED one, then it is recommended not to touch the bulb with the filaments with your hands. Otherwise it will become cloudy. Why? - Don't know!