Responsibility for faulty lighting devices
Traffic rules prohibit operating a vehicle with faulty lighting devices. This is due to safety considerations for all road users. It is also prohibited to use vehicles that use lamps that do not meet the design requirements for the operation of the vehicle.
It is important to remember that you are not the only participant driving on the highway, and it is highly not recommended to install more powerful and brighter lamps in the headlights of your car. By this action you endanger traffic participants moving in the opposite direction.
All changes in the design of the vehicle or non-working lighting devices entail administrative penalties.
How to determine whether a car is damaged or not?
Published: 06/05/2018
Spread the love
Spread the love How to tell whether a car is damaged or not? Today, cities are filled with cars. There are so many different companies and models that it will be quite difficult for an ordinary person to remember them all. Many cars are sold every day: from new ones that came from the factory to used ones. But used cars dominate in popularity because they are cheaper. Not …
How to determine whether a car is damaged or not? Read completely "
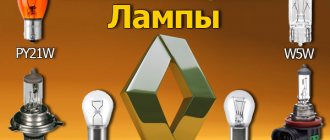
Types of lamps used in Priora
- H7 (Low beam);
- H15 (High beam and DRL);
- PY21W (Turn signal lamp);
- P21W (Reversing lamp);
- P21/5W (Brake and parking lamp);
- H11 (PTF lamp);
- C10W and C5W (Lighting lamp: interior, glove box and trunk);
- W5W (Lamp for side lights of headlights);
- H1 (High beam lamp until 2013 without DRL);
Installation Guide
Before installing and connecting fog lights on Priora 2, weigh your strengths. If installing fog lights on a Priora 2 or restyling may cause difficulties, then it is better to contact an electrician. A specialist, like no one else, knows how to install headlights on a Priora and how to connect fog lights. If you decide to do everything yourself, then first prepare the necessary tool. To do this, you only need a set of keys and screwdrivers, as well as pliers (the author of the video about choosing fog optics for the Priora is the Simple Opinion channel).
Algorithm of actions
To ensure that installing fog lights on a Priora SE or 2 does not cause difficulties, simply follow the instructions:
- First you need to disconnect the battery, remove the negative terminal from it, and then disconnect the front bumper clips. Self-tapping screws for its dismantling are located on the sides, bottom and top. You need to unscrew them and remove the bumper.
- Next, you can move on to the stubs. The plugs are also fixed using self-tapping screws, but to unscrew them it will be more convenient to use a short screwdriver with a Phillips blade.
- Fog lights on Lada Priora 2 are mounted instead of previously removed plugs. To ensure that the lights are securely fixed, they can be secured using the same screws.
- After completing these steps, you need to find the longest cable in the PTF kit. This wire is connected to the left headlight, after which it is routed to the right headlight. And then the wire must be pulled from the battery side into the engine compartment.
- Using an AN 10 wrench, it is necessary to dismantle the expansion tanks in the engine compartment, which will interfere with the process. Having done this, using a 13mm wrench you will need to unscrew the fastenings of the windshield wiper blades. Eventually you will need to gain access to the left edge of the trim, and to do this you will need to remove the guard itself. When these steps are completed, the pipe can be moved to the side, and then loosen the clamp. The upholstery can then be completely removed.
- Your task is to lay and stretch the wires from the lights through the plug into the vehicle interior, and then secure them with a clamp. This clamp should be included in the kit for the PTF Priora 2.
- When the PTFs are installed on the restyled Priora, all elements are assembled in the reverse order. Don't forget to connect the wires to the crankcase protection screws.
1. Open the hood and disconnect the battery, then unscrew the bumper fasteners and remove it.
2. Then remove the plastic plugs, and instead install fog lights and connect them.
We recommend: Insulating the hood of a car
Connection diagram
The installed fog optics will need to be connected.
The PTF connection diagram is as follows:
- First of all, in the car interior, under the steering column, you will need to remove the protective cover. To do this, the three latches should be rotated 90 degrees.
- Having done this, under the mounting fuse block you will be able to see a self-tapping screw - you need to unscrew it, after which you will have access to dismantling the block. In any case, the anti-fog optics kit should come with installation instructions and it must contain a connection diagram. Please use this as a guide during installation.
- Next, you can move on to the torpedo. On the center console, you need to remove the plug, as well as the button for activating the rear window heating system. These components are installed near the clock.
- Next, you will need the fog light button that comes with the kit. The blue wire must be connected to the mounting block, and all other wires are connected to the heating button. This can be done using special clamps, which are also included in the kit.
- At the final stage of connection, you will need to install the relay responsible for the operation of the fog lights in the unit. When performing this task, be careful - the wires that come from the engine compartment must be connected to F18 and F17, and the yellow cable should also be connected to the same contacts. The connection procedure is described in more detail in the diagram.
Wiring diagram for fog light control buttons
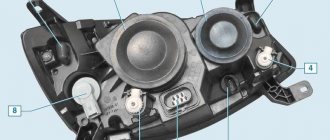
Headlight bulbs
The headlight bulbs of the Lada Priora differ depending on the year of manufacture of the car, since at the end of 2013 daytime running lights began to be installed in the Priora.
Headlight bulbs for Priora models up to 2013.
| Installation location | Lamp type | Power, W) | Number in photo |
| Low beam | H7 | 55 | 1 |
| High beam | H1 | 55 | 9 |
| Turn signal | PY21W | 21 | 3 |
| parking lights | W5W | 5 | 8 |
Headlight lamp for Priora after 2013
| Installation location | Lamp type | Power, W) | Number in photo |
| Low beam | H7 | 55 | 1 |
| High beam/DRL | H15 | 55/15 | 2 |
| Turn signal | PY21W | 21 | 3 |
| parking lights | W5W | 5 | 8 |
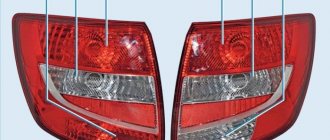
Replacing low and high beam bulbs in the headlight
- To replace the high and low beam lamps, you must remove the rubber or plastic headlight protection covers. Then pull the connector towards you and remove it from the lamp. By pressing on the lamp clamp, release it from the clamps and remove the lamp.
Replacing the turn signal lamps in the headlight
- Replacing the turn signal lamps must be done by turning the socket counterclockwise and removing it towards you from the headlight.
Replacing the headlight bulb
- To remove the side light bulb, you need to pull the bulb socket towards you.
How to defrost and clean glass?
Published: 01/13/2019
Spread the love
Spread the love How to quickly defrost glass? Contents1 How to quickly defrost glass?1.1 You don’t need to overpay for good windshield washer fluid1.2 Window lifter - a trick instead of scraping1.3 Preparations for protecting glass1.4 In our opinion1.4.1 We are in VK Before before going on a trip, we need to prepare the car for driving - in winter this often means that we...
How to defrost and clean glass? Read completely "
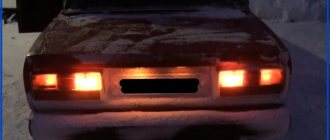
Tail lamps
The taillights also differ depending on the year of manufacture. In cars after 2013. The taillight brake lights have become LED, but the bulbs used in the lights remain unchanged.
| Installation location | Lamp type | Power, W) | Number in photo |
| Reverse | P21W | 21 | 4 |
| Brake light/dimensions | P21/5W | 21/5 | 5 |
| Turn signal | PY21W | 21 | 3 |
| Rear PTF | P21W | 21 | 4 |
Replacing tail light bulbs
- To replace it, you must remove the rear light. To do this, unscrew the 3 screws that secure the light and move it away from the car body. Then unscrew the sockets counterclockwise and remove the desired lamp.
DS111
Attention! The fog lamp is halogen. You should not touch its glass bulb with your fingers, as traces from them will lead to darkening of the lamp when heated
You can remove dirt from the flask with a clean rag soaked in alcohol.
We install the new H11 lamp in the reverse order.
If you have a Chinese car with burned out fog light bulbs and you don’t know how to replace them, then this instruction is especially for you. After all, replacing a fog light bulb is necessary for safety reasons, unless of course you want to get into a dangerous situation on the road. In principle, there is nothing complicated about this, but you still have to be patient and demonstrate your skills. I want to warn you right away that replacing the right headlight bulb will seem more difficult to you than the left one. You will ask why? Yes, because on this side the spring latches are located out of sight and you have to act by touch.
Here's a list of the tools and accessories you'll need:
- short screwdrivers (phillips and flathead);
- wrench 7;
- mirror;
- flashlight;
- a new bulb that matches your car;
This is not a difficult matter at all, and it’s not worth going to a service station for such a small thing. Any car owner can do this. And, if you have never done this, you have an excellent reason to learn something new. Replacing a fog lamp (after mandatory car washing) is carried out in several stages.
To gain access to the PTF, the first step is to free up space in the work area. To do this, turn the steering wheel all the way to the right for the right fog lamp, for the left one, respectively, to the left, while the engine must be started. Also, in order to facilitate access, you can raise the front of the car using auxiliary materials - bricks, boards, a jack, or simply drive the appropriate front wheel onto the curb. In this case, you need to be especially careful and make sure that the wheel does not jump off the ledge.
Next, you need to remove the protective plastic material located on the wing. We equip ourselves with a 7 key and unscrew the screws around the wheel. It is also necessary to unscrew the plastic bolt located on the bottom of the machine. Use a flat screwdriver to pry up the tip into which the plastic bolt was screwed. We bend the freed wing plastic until the wheel allows it. Don't be afraid to break this plastic - it's very flexible and durable.
Turn signal repeaters
Repeaters are installed in the front fender, with the exception of luxury trim levels, where the repeater is installed in the side rear view mirror.
| Installation location | Lamp type | Power, W) | Number in photo |
| Turn signal | W5W | 5 | 8 |
To remove the lamp in the turn signal, you need to pull it towards you and remove it from the wing. Then turn the socket counterclockwise and remove the lamp.
I filled up with diesel instead of gasoline.
Published: 01/13/2019
Spread the love
Spread the love Filled with diesel instead of gasoline. What should I do?Contents1 I filled up with diesel instead of gasoline. What to do?1.1 Hurry up, different cars and... done1.2 Can help... Gas station1.3 Will it be expensive or very expensive1.4 Diesel in gasoline? It will work, but...1.5 Bad fuel? What to do - step by step1.5.1 We are on VK Contrary to appearances, such things happen, and...
I filled up with diesel instead of gasoline. Read completely "
Interior lamps
Lada Priora has lighting for the entire interior, glove box, trunk and license plate lighting.
| Installation location | Lamp type | Power, W) | Number in photo |
| Number plate illumination | W5W | 5 | 8 |
| Interior lamp | C10W | 10 | 7 |
| Glove compartment lamp | C5W | 5 | 7 |
| Trunk light | C5W | 5 | 7 |
Step-by-step instructions for installing PTF on Priora
Now let’s try to install fog lights on the Priora ourselves - after all, they do not come with all car trim levels. First of all, you need to buy the lanterns themselves: they can be either lensed or with regular glass. Which ones to take? There are 4 most common and available options:
- Bosch (Germany-Russia).
- Luch (Russia).
- Kirzhach (Russia).
- "Noname" (China).
Which one to give preference to is a purely personal matter. Everything will depend on financial capabilities, although the PTFs of the first three companies are almost equal in both quality and cost. The Chinese nonname, sold literally “in bulk”, of course, is, to put it mildly, not up to par with the others, and even does not always have the appropriate certification.
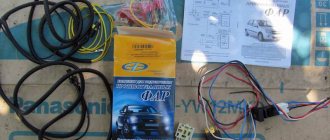
What is included in the kit for installing fog lights
In addition to the headlights, you need to purchase a special kit for connecting fog lights. It includes:
- PTF power button;
- set of installation wires;
- fuses (optional);
- PTF control relay;
- connecting blocks.
Installation process
If everything is purchased, then you can start installing. Let's start with the PTFs and put them in their regular place. To do this, remove the bumper from the Priora by unscrewing all the screws around its perimeter.
Connection diagram
How to connect PTF to the on-board network? Let's not reinvent the wheel, but connect it the way the manufacturer intended. Let's look at the standard connection diagram:
Description of the scheme
The relay must be connected according to this diagram. The relay has only 4 contacts, which are assigned numbers: 85, 86, 87 and 30.
- We connect contact number 86 to the negative of the battery;
- We connect contact number 30 to the “plus” of the battery;
- Contact number 87 is connected to the power wire (plus) of the PTF;
- We connect contact number 85 to the PTF ON/OFF button with a blue wire through a fuse;
We hope our article was useful to you.
Car : Lada Priora. Asked by : anonymous. The essence of the question : lamps in PTF for PRIORU, price/quality?
Hi all. The lamps in the PTF burned out, and my car was yellow. I will change to standard ones, I'm afraid of sanctions from the traffic police. Tell:
- Which PTF lamps are better in price and quality?
- What type?
- Is it possible to install diodes, will there be any benefit?