Snapshot
Block headlight (left): 1 — ventilation tube;
2 — low beam section cover; 3 — cover of the high beam section; 4 — light beam regulator in the vertical plane; 5 — lamp socket for side light and daytime running light; 6 - electrical connector; 7 — regulator of the light beam in the horizontal plane; 8 — direction indicator lamp socket Headlight unit (left): 1 — ventilation tube; 2 — low beam section cover; 3 — cover of the high beam section; 4 — light beam regulator in the vertical plane; 5 — lamp socket for side light and daytime running light; 6 - electrical connector; 7 — regulator of the light beam in the horizontal plane; 8 - turn signal lamp socket
Block headlight (left): 1 — ventilation tube; 2 — low beam section cover; 3 — cover of the high beam section; 4 — light beam regulator in the vertical plane; 5 — lamp socket for side light and daytime running light; 6 - electrical connector; 7 — regulator of the light beam in the horizontal plane; 8 - turn signal lamp socket
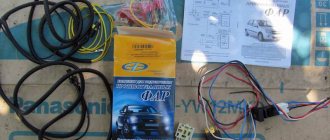
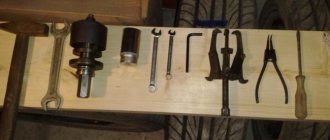
We show the replacement of lamps on the left headlight unit. For better access, move the air filter to the side. To replace the lamp in the right headlight unit, this is not necessary. For clarity, we show the work on a removed headlight. We change the lamps in the right headlight in the same way.
To replace the low beam lamp, remove the larger diameter rubber cover from the headlamp housing.
When to replace
Brake lights, as a rule, burn out at the most inopportune moment, or it happens that they stop working correctly, this especially often happens if it performs two functions, dimensions and stops, and it turns out that the dimensions work, but the stops do not. In addition, if the contact is poor, the light may begin to blink.
In these cases, it is necessary to replace the rear brake light bulb. It is also quite rare to change the working lamp, this is done if the result from the standard one does not suit you, and you want to get a better result, in this case it is changed to LED lights, since it has a number of advantages such as:
- Specific luminous efficiency is better
- The operating time is 100 hours, which is significantly higher than that of a simple lamp, for which these hours are equal to two thousand
- It flares up instantly, thereby warning vehicles behind you about your braking earlier.
- High performance properties, which allows you to extend work, despite the vibrations that occur when driving on our roads
2302-18-10-02 (Copy)
By pressing the spring clamp of the lamp, we disengage it from the hooks of the reflector and move it to the side.
By pressing the spring clamp of the lamp, we disengage it from the hooks of the reflector and move it to the side.
By pressing the spring clamp of the lamp, we disengage it from the hooks of the reflector and move it to the side.
2302-18-10-03 (Copy)
Remove the low beam lamp from the headlight housing.
Remove the low beam lamp from the headlight housing.
Remove the low beam lamp from the headlight housing.
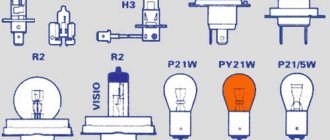
Attention! Low and high beam lamps are halogen. Do not touch their glass bulb , as fingerprints will cause the lamp to darken when heated. You can remove dirt from the flask with a clean rag soaked in alcohol.
We install the new H7 lamp in the reverse order.
To replace the high beam lamp, remove the rubber cover of a smaller diameter from the headlight housing.
Replacing the high beam lamp for lada kalina sedan (VAZ Kalina)
Replacing the headlight bulb on Kalina (photo and video)
We present to your attention detailed photos and video instructions on how to change the headlight bulb on a Lada Kalina with your own hands.
What are the dimensions of the Lada Kalina lamps?
In Kalina's dimensions there are standard baseless lamps of type A12-5-2 (W5W). If desired, LED lamps can be installed instead.
Replacing the headlight bulb on Kalina - photo
Before replacing the headlight bulbs, be sure to turn them off, and it is also advisable to disconnect the negative terminal of the battery.
The clearance lamp is replaced with the hood open.
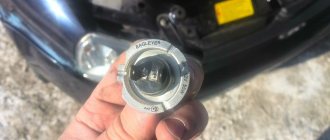
To gain access to the burnt out lamp, remove the headlight protective cover opposite the high beam section.
It is this yellow cartridge at the bottom of the headlight that we need to remove.
This procedure is complicated by the fact that the cartridge of Kalina’s dimensions is located in a very inconvenient place; getting into it with your fingers is problematic. And it often takes a lot of effort to remove the cartridge.
Many people recommend using pliers or another tool to remove an oversized cartridge. We do not recommend doing this, since the plastic cartridge is easy to break, and finding a new one is difficult.
To facilitate access to the size socket, disconnect the chip from the high beam lamp (brown, located above the size socket).
Access is now better.
We put our hand in and carefully pull the cartridge of dimensions towards ourselves. Often the cartridge requires a lot of effort. If it does not give in, you can twist it slightly to the left and right, and then carefully pull it out, gradually increasing the force.
After we have pulled out the socket, we pull out the burnt out lamp from it.
Instead, we insert a new headlight bulb.
Then insert the cartridge back into place until it clicks.
Don't forget to put the high beam lamp chip back in place.
After this, it is advisable to turn on the dimensions and check if everything works.
If the lamp works, close the headlight housing and hood.
Replacing the headlight bulb on Kalina - video
A few days ago, on the Lada Kalina blog, I wrote a post about how a not very pleasant picture arose on my car with the left headlight (driver’s) fogging up. In general, the situation, as it turned out later, is familiar to many owners of not only Kalina, but also other domestic cars. The fact is that for some reason condensation forms in the internal cavity of the headlight, and the light bulb constantly burns out. Moreover, this applies specifically to the low beam, since you have to drive with it constantly due to the law.
When I did this for the first time, of course I had to spend a lot of time and nerves, although with patience and calmness, as well as level hands, everything is done quite simply. Below I will try to describe in more detail the detailed procedure that must be performed in order to replace the lamp.
Instructions for replacing low beam headlight bulbs on Kalina
- So, the first thing you need to do is open the hood of the car. Then, on the side where the light bulb burned out, you need to pull out (remove) the rubber plug.
- When the rubber band is removed, you can proceed to further actions. This is where we need patience. You need to feel the latch that secures the lamp with your fingers and unclick it. There you get two tendrils on each side, and they need to be disengaged.
- All that remains is to pull off the two power wires that go to the light bulb and then you can remove it. But this must be done carefully so as not to break it.
- When installing a new one, you should pay attention that its protrusion on the body is aligned with a similar-sized slot in the headlight. We put the latch in place and connect all the wires.
As promised, I’m posting a few photos of this renovation, I think that now everything is shown more clearly. As for the prices for new light bulbs, it all depends on the thickness of your wallet, that is, you can buy one for at least 80 rubles, at least for 300 rubles. From my own experience I can say that the same MAYAK can last for several seasons if moisture does not penetrate into the headlight.
Replacing lamps in headlights of Lada Kalina
Replacing low and high beam lamps on Lada Kalina 2nd and 1st generation
How to remove a headlight on Kalina 2: adjusting, tuning and replacing the lamp
Tips on how to install low beam lamps on Lada Kalina
2302-18-10-05 (Copy)
By pressing the ends of the spring clamp of the lamp, we disengage them from the hooks of the reflector and move them to the side.
By pressing the ends of the spring clamp of the lamp, we disengage them from the hooks of the reflector and move them to the side.
By pressing the ends of the spring clamp of the lamp, we disengage them from the hooks of the reflector and move them to the side.
2302-18-10-06 (Copy)
Remove the high beam lamp from the headlight housing.
Remove the high beam lamp from the headlight housing.
Remove the high beam lamp from the headlight housing.
We install the new lamp H1 in the reverse order.
To replace the turn signal lamp, press the socket and turn it counterclockwise (in the right headlight - clockwise)...
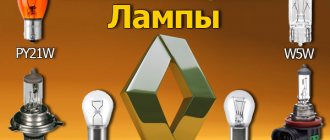
Lamp selection
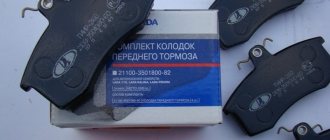
Repair begins with a trip to the store for parts: you need to buy a light bulb. But before you go to the auto parts store for a new one, you need to determine which bulbs are in the brake lights on your Renault Logan. There is a two-filament incandescent lamp installed there, its name is Osram 7528 P21/5W. On its base there are two pins opposite each other, pay attention to this when purchasing - there are models where the pins are not on the same axis. It looks like this.
But Renault Logan has a third, additional brake light: in the cabin under the rear window. It contains an incandescent light bulb with one filament, it is called Osram 7506 P21W. It looks almost the same, except that there is only one contact on its base and one spiral in the bulb.
To make the rear lights shine brighter, you can install LED lamps P21W and P21/5W. There are a great many of them on the market, and in this case, oddly enough, the rule “the more expensive the better” almost always works. Don’t buy outright “fawn” for pennies, good LEDs are expensive. Also pay attention to the direction of the lamp's glow. It should be omnidirectional, and not oriented somewhere specifically.
Now that you have already bought new lamps and are ready to work, let's figure out how to change the lamp in the brake lights on a first-generation Logan (sometimes they say first-phase). For simplicity and clarity, read the step-by-step instructions:
- open the trunk;
- We inspect the place where the headlights are mounted. It is covered with casing, but two plastic wings for attaching the headlight protrude through the cutouts. You can bend the trim, then you can remove the terminal block from the headlight before dismantling it;
Tail light and stop light
- press slightly on the flask and turn it 90 degrees counterclockwise. The lamp will come out of the grooves and you can remove it;
- install and turn the new light bulb all the way clockwise.
Dacia and Renault Logan have slightly different headlights, but the process for replacing lamps is similar.
But when removing the headlight on the new second-generation Renault Logan, motorists have problems - they cannot remove the headlight, even though it is held in place by only one wing. Let's look at the differences. Let's start with the fact that Renault Logan 2 does not have a trunk trim in the area of the rear lights. The headlight is held in place by 1 plastic wing, a plastic guide and a “piston”, which is fixed in the car body.
The fact is that after unscrewing the wing, the headlight cannot be removed. Experts advise doing the following: we do not unscrew the lamb all the way, and then we press on it with the palm of our hand from the trunk. From the outside, you need to firmly press the corner of the headlight, which is located closer to the rear door, with your palm and pull the headlight back.
2302-18-10-07 (Copy)
...remove the lamp socket from the headlight housing.
...remove the lamp socket from the headlight housing.
...remove the lamp socket from the headlight housing.
Pressing the lamp, turn it all the way counterclockwise and remove the lamp from the socket.
The cartridge is sealed in the headlight housing with a gasket. If the gasket is torn or has lost elasticity, replace it with a new one.
Install the new PY21W lamp in the reverse order.
In what cases may you need the help of an auto electrician?
But the cause of failure of brake lights is not always the burnout of the lamps. The problem may lie much deeper!
Standard lamp Lada Granta 21P 5W and its LED analogue
For example, a wiring fault or a malfunction in the on-board electrical network. It is difficult to identify and solve problems with auto electrics on your own, so we recommend that you contact a specialist.
Identifying a problem with the wiring is quite simple: along with the brake lights, you will feel malfunctions of other elements of the car directly or indirectly related to the power supply.
2302-18-10-08 (Copy)
In this case, two protrusions, located asymmetrically relative to the axis of the lamp, must fit into the corresponding grooves of the socket.
In this case, two protrusions, located asymmetrically relative to the axis of the lamp, must fit into the corresponding grooves of the socket.
In this case, two protrusions, located asymmetrically relative to the axis of the lamp, must fit into the corresponding grooves of the socket.
To replace the daytime running light lamp and side light, turn the lamp socket counterclockwise...
Audio system for lada priora overall dimensions // Bishkek house sale
Parameters Car Lada Priora Body type 4-door sedan. Number of seats 5. Overall dimensions, mm length 4350 width 1680 Audi A6 2002 windshield wipers sometimes do not work
Lada Priora hatchback car reviews from car owners (VAZ, sedan, Lada Priora station wagon photo of the Lada Priora salon: overall dimensions A car with air conditioning and a CD audio system is estimated at 380,000
The history of the creation and development of the VAZ-21728 Lada Priora hatchback. You will forget about many of your difficulties, worries and problems in transporting people and large cargo, get a front-wheel drive type. Dimensions. Length, mm, 4330. Width, mm, 1680 Standard audio system (without CD), no
LADA 4×4 5-door Sign up for maintenance; Sign up for a test - Lada Priora Coupe Overall dimensions, length, width, height, mm, 421016801435
reporting mother siberia farm car loans sims
Bishkek house sale
Lada Priora Sedan; |; Lada Priora Hatchback; |; Lada Priora Wagon; |; Lada Kalina Hatchback; |; Lada Kalina Wagon; |; Lada Granta; |; Lada Niva 4×4 5-dr
tester hut start racing buy bishkek house sale audio systems for opel vectra c dimensions, lada priora, overall dimensions, lada priora, audio system, overall dimensions, overall, audio system for lada priora, overall, lada kalina, priora, audio system for lada kalina, overall, kalina, lada, audio system, dimensions, overall dimensions, audio system
The history of the creation and development of the VAZ-21723 Lada Priora hatchback. in a ratio of 2:1), makes it possible to transport luggage of non-standard sizes. transport impressive luggage with significant overall dimensions. Reliable Standard audio system (no CD), no a6 bdv engine audi tails how to check the oil in the automatic transmission
2302-18-10-10 (Copy)
Pulling the lamp, remove it from the socket.
Pulling the lamp, remove it from the socket.
Pulling the lamp, remove it from the socket.
We install the new W21/5W lamp in the reverse order.
Replacing headlight bulbs on a car manufactured before 2013
The only difference in the procedure for replacing lamps in the headlight of a car manufactured before 2013 is that the side light lamp is located under the high beam lamp cover, and the daytime running light lamp is simply absent.
We will show you the replacement of the side light lamp on the right headlight unit.
step-by-step instructions, features and recommendations :: SYL.ru
Your vehicle's side lights must be in good working order for it to drive safely on the road. But not every driver changes burnt-out lamps immediately. This is usually done when visiting a service station, and before that you can drive hundreds of kilometers without working lamps. Let's figure out how to replace the side light bulb on some domestic and foreign cars. Often the work is carried out according to a similar principle, but there are also minor differences.
General information
To indicate the vehicle at night when parked, the design provides side lights. They are present both in front and behind the car. Usually these are low-power lamps, which, unlike the head light, are not in the focus of the reflector. For this simple reason, it makes no sense to install more powerful halogen or LED lamps. Moreover, this can lead to melting of the wiring, which is not designed to withstand such a large load.
As for the reasons for the failure of side lights, there are several of them. Firstly, the light bulb has a limited lifespan. The original shines longer and better, but it is more expensive. Chinese analogues are cheap, but very often burn out. Another reason is a malfunction in the electrical circuit, as well as a leak in the headlight, which causes moisture to get inside the housing. Well, now let's figure out how to replace the side light bulb on a Kalina.
From simple to complex
The first step is to decide on the type of lamps to be installed. Everything is quite simple here. Kalina is equipped with baseless lamps of the 5W5 type, which are widespread, so they can be found in any car store. During replacement, it is advisable to disconnect the negative terminal of the battery. This is necessary for safety, although many do not do it.
The next step is to remove the headlight protective cover opposite the section responsible for the high beam. Next we see a yellow cartridge that needs to be dismantled. The main difficulty is that it is in an inconvenient place. By the way, if the lamp has not been changed for a long time, it will take an impressive effort to remove it. To make the task easier, you can remove the high beam chip. This will create additional space. Next we try to remove the cartridge from the seat. Please note that its body is plastic, so using pliers is not recommended. After this, remove the lamp from the socket and install a new one. Assembly is carried out in reverse order.
How to replace the side light bulb on a Niva Chevrolet
Now let's look at the replacement process using the rear headlight unit as an example. There is nothing complicated here, but there are several important details that are worth paying attention to.