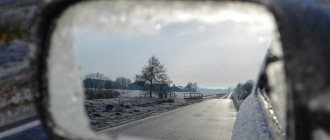
Hello, dear friends! I think many of you drivers are familiar with the problem of fogging and freezing of side mirrors. Therefore, today it would be logical to talk about heating mirrors with your own hands.
This is not just an additional option, but sometimes an extreme necessity. It allows you to constantly be aware of what is happening behind you due to a clear picture without distortion from moisture, condensation and stuck snow.
At the same time, heating for a mirror can be implemented in different ways. Before you take the first step in this rule, I suggest exploring several possible options. I’ll briefly tell you what they look like, what they are and how to connect them without turning to specialists for help, who will obviously demand an impressive amount of money to complete the work.
Varieties
There are several options for organizing heated exterior rear-view mirrors, which are conventionally divided into electrically dependent and independent of the on-board power supply at 12 V or 24 V.
The implementation of heating depends on the specific material you will use.
The following varieties are distinguished:
- Film heaters. Very easy to use, easy to install and at the same time quite effective. An option for the lazy, if you will;
- Heating from light bulbs. Initially, all motorists who did not have standard heating, but wanted to get it, used light bulbs. Today the technology is outdated, but still relevant;
- Conductor elements. It uses a special board that has heating elements. There is nothing difficult to install, and the range is extensive;
- Wire. A special wire is used as heating. It can also be implemented if you follow some rules.
To provide some clarity, I propose to now consider each option separately.
Based on the information received, you can decide what suits you and which idea is better to abandon.
You can organize homemade heating on any mirror. It all depends on your wishes, skills and financial capabilities.
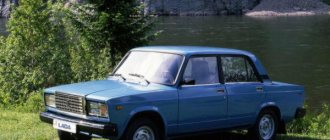
Judging by publications on Drive2, homemade heating systems are most often found:
- for VAZ 2110;
- Daewoo Nexia;
- Daewoo Lanos;
- VAZ classic;
- Lada Kalina;
- Renault Logan;
- on Gazelle trucks;
- VAZ 2109;
- Renault Sandero;
- Chevrolet Aveo, etc.
If you want something similar for yourself, I suggest you get acquainted with short excursions into the issues of creating heating using one method or another.
Using light bulbs
This is the oldest method among all existing ones. But there is absolutely nothing surprising about the fact that incandescent lamps are used for heating.
In fact, such light bulbs are heating devices. They spend about 90% of electricity on heat, and only 10% goes to light emissions. To create a heating system, it is best to take a pair of low-power 10-watt light bulbs, or 1 double-filament light bulb, which will allow each spiral to be connected separately. Usually their size fits perfectly into the mirror body. It is only important to place the lamp so that it does not touch the internal surfaces of the mirror and the body itself.
The process of installing the heater itself is quite labor-intensive. But many cope on their own.
If you are interested in the details of the process, it can be divided into several stages. Think carefully before using lamps. However, the method is outdated and there are a number of alternative solutions.
But I will still describe the process step by step. It looks something like this:
- the mirror housing is removed;
- the body is disassembled;
- the front wall is treated with heat-resistant material;
- a layer of foil is applied on top of the insulation to reflect heat;
- the light bulb is fixed with wires using a socket or clamps;
- everything is carefully isolated;
- connect to power;
- display button;
- assemble everything in reverse order;
- check functionality;
- start heating.
Usually there is a separate button to activate heating. When using 2 10-watt lamps, the mirror can warm up and get rid of ice in about 2-5 minutes.
But such lamps require a lot of energy and cannot be left on for a long time.
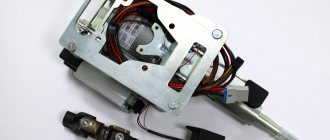
Printed circuit boards
This option is simpler and more effective than lamp heaters. They are not difficult to find on the market or order through Aliexpress.
In fact, here we are talking about 2 layers of polymer material, between which there are conductors made of nichrome or other material. Such products can be model-based, designed for mirrors of specific cars, or universal. If necessary, they are trimmed and adapted to any mirror.
The installation itself looks like this:
What you need
To make a heater you only need:
- Nichrome wire;
- Double-sided and regular tape;
- Wires;
- Sealant;
- Soldering iron;
- Multimeter;
A wire with a cross section of 0.4-05 mm and a length of 1-1.3 m is suitable for the heater. For normal functioning of the heating system, the resistance of the piece of wire must be 12 Ohms. This is exactly what a multimeter is for. That is, we took a section of 1.5 meters and measured the resistance. If it exceeds the specified value, cut off 10 cm and measure again. Thus, we select the desired segment.
Why the cigarette lighter stopped working: looking for and eliminating the cause
It is better to take such products as a kit, as is the case with Defogger DC12.
With your permission, I will not consider installing wire heaters. It is based on tungsten filaments, which provide high temperatures and require an extremely careful approach to organizing heating. There are too many risks when trying to assemble it yourself.
Films
Design of the mirror heating system
Before you begin installation, you need to understand the system design. You can install ready-made heated mirrors on your car. Then it is enough to connect new elements. Or you can do the tuning yourself. The second method is more labor-intensive and takes more time, but is the most attractive in price.
Heating scheme:
- button - usually located on the control panel or on the door on the driver's side, providing starting;
- electrical wiring - required for transmitting current, power;
- heating element - represented by film models, heaters based on wire or printed conductors.
- fuse – required for efficient power supply;
The system is connected to the on-board network via a separate button or connected to the heated rear window. When assembled correctly, the structure ensures rapid heating of the mirrors and removal of moisture from their surface when required.
Thule Proride 591: bike rack review, owner reviews
As for me, for independent implementation, films will be the simplest and most correct solution. Just keep in mind that there are 2 types of films for heating mirrors.
- Film resistor materials. Considered reliable, easy to install and effective. Installation is not much different from fixing boards. The film is attached to the back of the mirror using glue or double-sided tape. The kit already includes outlet wires that connect to the car’s wiring and the button is displayed on the panel in a convenient place;
- Simple films. No electrical connection is required here. This is an option for the lazy, since everything is done in a couple of minutes without much effort and dismantling the mirror. Such films, called anti-rain, are installed in several steps. First, the mirror is cleaned, the marks are checked, the label is separated, a film is glued to the center, air bubbles are removed and the top protective layer is removed.
With the second version of the film, we are not talking about heating, but about creating a special water-repellent layer. At the same time, the film works well, many who managed to buy it remain satisfied. Plus no work with connections, insulation, foiling, etc.
Have you used any heaters? How do you generally solve the problem of icing and fogging of the side rear view mirrors? Share your secrets and observations in the comments.
Thank you for your attention! Be sure to subscribe, leave reviews, and ask relevant questions if you have them!
Preparing for work
To design heated mirrors with your own hands, you need to select suitable materials and tools.
What is needed for work:
- heating elements for each mirror;
- hot water, hair dryer for heating the surface;
- scissors or a knife for cutting the heater according to the shape and dimensions of the mirror itself;
- drill with an attachment for making holes;
- to connect the system you will need wiring, bolt terminals, electrical tape;
- a button that allows you to start the device;
- fuse, relay.
Control
Now a word about heating control. The simplest and most common way is to connect the heaters to the heated rear window switch. This is very convenient and does not require the inclusion of many additional elements in the circuit. The only thing you may need is a relay and a fuse.
On expensive cars, the heated mirrors can be controlled automatically using sensors. In some cars, the side mirrors also include temperature sensors in their design; in others, they are controlled by a rain sensor.
Procedure
Now you can begin installing the heater. First, remove the holder with the mirror from the case. On most cars, it is enough to pry it with a screwdriver or something flat from below and pull it towards you.
Based on the characteristics of the holder, we choose the method of fastening the wire. If the inner surface of the holder is smooth (as in the photo), then stick double-sided tape on it.
Then we lay a piece of wire on this surface. This can be done arbitrarily, for example, in a zigzag or something else. The main thing is to place it so that the thread covers as much of the surface of the holder as possible. In this case, the wire should not intersect anywhere. Scotch tape will hold the nichrome thread well.
If the inner surface of the holder has any protrusions or fastening elements, then it will not be possible to stick the tape. In this case, a soldering iron will help to secure the wire. Everything is simple here - we apply a nichrome thread to the surface and press it with a heated soldering iron. The plastic will begin to melt and the wire will sink into it. Once cooled, the plastic will become hard and will hold the thread. But here it is important not to overdo it with heating the plastic, so as not to “push” it to the mirror. It is enough just to “drown” the wire in it a little and that’s it.
We recommend: How can you reduce fuel consumption on a VAZ-2114?
In this way, we fasten the wire along the accessible surface of the holder without touching the fasteners.
When laying the wire, its ends should be placed towards the side of the holder that is closer to the door, and so that they do not touch each other. To these ends we solder terminals for connecting to the wiring or simply the ends of prepared wires. Then the resulting connections need to be insulated.
All that remains is to provide insulation. If the wire was secured with tape, then to insulate it you can simply stick several more layers of regular adhesive tape on top. This will provide thermal insulation and prevent the wire from peeling off and shorting.
As for the holder where the wire is secured with a soldering iron, you can simply fill the entire surface where the thread passes with sealant and wait until it dries. In this case, the fastening elements will not be affected, which will ensure ease of fastening, and the wire itself will be insulated.
Before installing the holder in place, we pull the wiring through the mirror body into the door, the wiring for powering the heaters. Only after this we assemble the mirror.
Independent heating equipment
Factory universal heating element
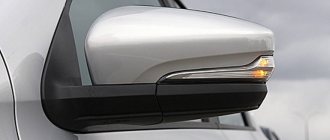
But that’s all – standard heaters that cars are equipped with from the factory, and not all models have them. And this option is really very necessary, because visibility depends on it. But it is quite possible to make heaters for side mirrors yourself.
Of course, you can buy all the necessary equipment and install it on your car, saving yourself the need to invent something. There are ready-made kits on sale that can be installed in standard mirrors, or you can purchase tuning mirrors that are already equipped with heating, but these are additional costs.
Active (or adaptive) type
Adaptive cruise control is an advanced version of the active type. In addition to the ability to maintain the speed limit without pressing the gas pedal, cars with adaptive cruise control can calculate the distance to the car in front, and also reduce or increase speed depending on the situation on the road. That is, if the system determines that the distance to the car in front is decreasing, then the system slows down the speed. The speed is reduced until the gap between the cars, in the opinion of the system, becomes optimal. If the sensor no longer sees an obstacle ahead, the car picks up speed and maintains this speed limit.
General information
Modern cars are mostly equipped with a heating system. But vehicles, such as the VAZ, for the most part lack this advantage. However, this does not mean that the situation cannot be corrected. Agree, home craftsmen already redo a lot of things in classic VAZ models. For example, the chassis, engine and much more are being modified. Compared to this, installing a heated mirror system seems like baby talk.
All you need is free time, desire and theoretical knowledge, which you will get from this article. In general, there are two ways to implement the plan. One of them is the installation of heating elements, the second - light bulbs. We will look at each of them, and you can decide which one you like best.
Selecting a heating element
Of course, for the most part, the heating elements that are installed inside the side mirrors are the same. However, there are differences in the shape and size of the element itself, so if you yourself cannot say with confidence that this particular element will suit you, it is better to consult the seller, since most often heaters are made for specific car models or for entire lines of cars with mirrors of the same size and shape.
If there is no opportunity to consult, then it is better to buy a heating element slightly smaller in size than the mirror surface itself. In this case, you will protect yourself from an unpleasant situation when you have to trim the heater body, which is fraught with depressurization and burnout of the element during operation.
Also, when purchasing, make sure that the voltage and current indicated on the heating element are suitable for powering from your car battery.
Care Tips
In order for the product to serve for a long time, it must be properly cared for.
Firstly, the surface of the new window sill must be cleaned regularly. Especially if it is used daily for cooking.
Wash the product with soapy water and a soft sponge.
Secondly, you need to periodically pay attention to the grout joints. When installing ceramic tiles, it is impossible to do without seams.
During operation, the seams quickly accumulate dirt, and pathogenic mold often develops in this place.
The seams need to be cleaned with a special cleaner at least once a week.
Thirdly, you need to pay special attention to any cracks and damage. If the tile is cracked, it should be replaced immediately
Bacteria can form in the crack.
Tube heater
Self-production of lamp-heated mirrors
We will look at heating made from improvised materials. One of the simplest types of heating is the use of ordinary 12-volt incandescent lamps. When such a lamp burns, enough heat will be released to warm the mirror. At the same time, to create a heater you will not need so many materials:
- two automobile incandescent lamps;
- cartridges for them;
- wires;
- foil;
- insulation (varnished fabric, paronite, textolite);
To install the heating, you need to remove the mirror along with the housing from the car, and then disassemble it so that you can install the bulbs inside. Insulation is needed in order to reduce heat loss from the housing. It needs to be glued from the inside to the body. Then foil is glued to the insulation, which will act as a reflector, providing heat flow towards the mirror.
Next, a light bulb socket is installed inside the housing and secured
This can be done in different ways, but it is important that the installed light bulb does not touch the mirror and reflector, so the light bulb also needs to be selected in the optimal size
If there is not enough space in the case, you can simply solder wires to the lamp and insulate the base. The lamp itself can be secured in the housing using a heat-resistant clamp and glue. Then the mirror is assembled and installed on the car.
The wiring from the light bulb can be pulled through the mirror mounting post into the interior. One of the wires is connected to ground, and the second is stretched to the button for turning on the heated rear window and connected to it.
This type of heating is good because it can be tweaked and improved. For example, install a two-pin lamp, making dual-mode heating, display a separate key, etc.
Installation of finished components
The installation is clear even to a car driver who has recently driven the car.
Procedure:
- Find a device to close and open the circuit (relay). Open the hood of the vehicle, find the black box and relay. There are indications on the box which relay is for what. You need to find one for the mirrors and remove it. Next, replace the relay with the mirror element, connect the wire, and close the hood.
- Remove old mirrors. Open the doors, unscrew the screws. Find mounting locations for rearview mirrors. Remove old components and disconnect wires.
- Supply purchased components.
We recommend: How to properly bleed the brakes on a VAZ 2110?
Advantages
The reflector is in working order.
Some manufacturers offer heated mirrors as standard on their cars, thus attracting customers. But on older or economical modern models there is no such function.
Installing heated mirrors makes it easier to drive cars in winter. You will no longer need to waste time cleaning them manually. Some cars have a button for heated mirrors. Otherwise it will start. The heating element melts the snow, evaporates condensation moisture and makes driving much safer.