Door handles are not so much a matter of aesthetics in the appearance of the car, but rather a matter of pleasant tactile sensations and reliability. For convenience in the dark, some people go to collective farms. For example, illumination of interior handles. As for me, it’s not really needed. But the door handles on the Priora car are not of quality. I would say this is a sore spot of the car. In the cold they break easily. Some people simply do not know how to open them correctly, they pull at random - especially women. The price of the part is from 1000 rubles for a Euro model, pre-restyling ones are cheaper about 200 rubles. The door handles on the Priora were changed only with restyling - to new “Euro” types. Before this, the VAZ-2170 pleased everyone with the handles that remained with the “ten” - black. They were clumsier, but more reliable than the euro.
Until 2013, they matched the color of the rear-view mirrors, highlighting the design elements against the background of the sides of the car. Since 2013, restyling has changed a lot - the Priora’s handles began to be painted in body color, the same thing happened with the rear-view mirrors, and a few more “little things” were changed.
Car owners of different generations of Priora can easily change Priora door handles instead of the set of their generation. For some, the aesthetic component is more important - when the handles match the color of the body, but for others, reliability is important - such a person prefers the classics. Trying to meet the needs of car enthusiasts, spare parts stores willingly place on their shelves a set of Euro door handles for Lada Priora.
Priora gear knob - what is it used for and how to replace it
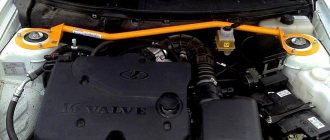
Lada Priora is equipped with a gearbox, which is located under the bottom of the car, so the driver cannot directly change the operating mode of this unit. This is what the handle is designed for, because it provides the driver with communication with the transmission and transmits the last command.
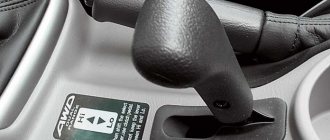
The Lada Priora is a relatively modern Russian-made car designed for driving on good roads. One of the controls for this car is the gearshift knob, located between the driver and front passenger seats. Priora gearshift knob - what is it used for and how to replace it? Despite the simplicity and naivety of the question, it is quite important, especially if for some reason this control does not seem very convenient to the driver.
Why is it being changed?
The main reason for replacing this element is the desire to update the interior design. Some people don’t like the knob, others don’t like the dull cover or the nondescript trim, while others think that replacing the Priora gearbox knob will make the car’s interior more interesting.
However, there is another problem in which you have to remove the lever to replace it, but it can only be solved on your own on machines equipped with rocker gearboxes (2170 and 2180). Not every Priora owner likes too much lever travel, due to which any gear is engaged only with a significant amplitude, so the solution is to install a short-throw rocker.
The cable box is often subjected to the same operation, but the lever installed on the gearbox is changed, so it is quite difficult to do this work on your own.
This operation involves replacing the gearshift lever and the rod connecting it to the gearbox. After this is completed, the Priora gearbox knob moves back and forth almost 2 times less, thanks to which the driver can change gears faster and with a smaller amplitude of movement, which is especially important for those who like to drive in racing mode.
How to replace an assembly part
The replacement method depends on the type of transmission, but the methodology differs even on cars with mechanics, not to mention cars with a robotic gearbox. Therefore, further we will talk about both replacing each part separately and replacing the lever assembly on vehicles with different transmissions. After all, the “Priors-2” gear knob and the “Priors-1” gear knob are very different in design from each other, and are also not at all similar to the robot control lever.
Why remove doors on Priora
Before you begin the actual process of removing the doors on a Lada Priora car, it is recommended to understand one of the main questions, namely, why do this need to be done? There are many reasons why a car owner may need to remove doors, so let’s look at them in more detail.
- Damage to doors in case of an accident. This is one of the most common reasons why there is a need to dismantle products. After removing them, you can perform straightening work and paint the products. If the damage is serious, and you cannot do without using a large amount of soil materials, then it is easier to buy a new door and replace it. This will cost less than straightening, painting, etc.
- Removing rust - the sore spot of almost all cars is the ventilation holes at the bottom of the door, which are designed to ensure that water that gets inside the door does not accumulate, but drains away. However, sometimes they fail to fulfill their purpose, and therefore corrosion processes occur inside the products. This is usually caused by dust accumulated inside or an incorrectly performed noise reduction procedure. To save the part from the appearance of “saffron marks”, which spread very quickly through the metal, it is necessary to remove the door on the Priora and process it, eliminating problem areas.
- Repairing or replacing hinges is another reason why there is a need to remove doors on a Priora. Over time, the vehicle's door hinges wear out, which leads to misalignment of the devices, as well as an unpleasant squeaking sound. If the hinges are worn out, they should be replaced. This process involves welding. The hinges are connected to the door part by welding, so you will need the help of an experienced specialist and appropriate equipment.
If you are convinced that there really is a need to remove the door on a Priora, then you need to do it correctly. You will learn how to implement this from the instructions.
Gear shift levers are also produced by other manufacturers:
In order to remove the gearshift knob on a Priora, as well as to carry out any replacement or modification operations with it, it is necessary to dismantle the control system. So, for example, you can change a part by installing the version developed for Vesta. But the easiest way is to replace it with a standard part: you don’t have to make any modifications.
We remove the Priora gearshift knob, following the standard algorithm:
Watch this video for more details:
Which pen to choose
The article number (also known as the manufacturer's catalog number) of the Priora gearbox knob depends on the type of transmission, because on a cable box it is impossible to replace only the lever, because it is an integral part of the gear selection mechanism, just like with an AMT, but on a cable box it is possible.
Priora gearbox handle close up
Here are the part numbers for handles of various types of transmissions:
Installation procedure
To avoid having to change the locking elements, it is recommended to use cylinders from old handles.
Before inserting them into new handles, you need to wipe the body from dust accumulations with a clean rag and apply lubricant to the surface. The Euro pen should be installed in the reverse order of the work carried out to remove the original. Fastening is carried out using two nuts, under which wide washers and old grommets are placed.
To prevent the handle from damaging the paintwork of the door, a gasket is installed under it. The fastening nuts are tightened, at this time it is recommended to monitor the tightening force so that the plastic fasteners do not burst. After this, the opening rods and unlocking of the locking mechanism are installed. Installation is complete, the handle can be tested for functionality. After opening and closing the door, you need to make sure that the lock works.
Removing and installing the rear window regulator on Kalina
Before starting this procedure, the first step will be to remove the rear door trim, since the entire mechanism is located directly under it. After this, all the nuts securing the window regulator to the inside of the door are clearly visible.
- two nuts on the bottom
- one on top
- three on the side - mounting the coil of the lift mechanism
- two screws securing to the glass
The upper and lower nuts must be unscrewed with a 10 mm wrench:
And the side ones with an 8 mm wrench:
The glass is attached to the lift frame using bolts that are unscrewed with an 8 mm wrench. Of course, you first need to fix the glass by placing something under it, or placing something between it and the door.
The main point is that before removal it is necessary that the pins securing the mechanism go inside the door. To do this, press on them with a little force, adjusting the structure from the inside, if necessary, and thread the pins inside.
It is necessary to achieve such a position of the lift inside so that all its pins are removed from the holes in the door. This is clearly shown in the photo below.
Now you can remove the window regulator from the rear door of Kalina, turning it in the desired position so that it can easily come out through the lower right technological hole.
And the final result of this repair is demonstrated below.
Installing a new one occurs in the reverse order of removal. It is worth noting that the price of a new one, even if it is mechanical, is quite a lot, namely, its price can be from 500 to 650 rubles. Of course, this will be far from factory quality, even if the manufacturer is AvtoVAZ. I talk about this very often, since many people know the quality of conveyor parts and the quality of spare parts supplied to stores.
You can buy a real original with low mileage at a car dismantling center from Lada Kalina Blog: https://vk.com/razborkaavtostaryjoskol. You can arrange delivery to any city or town in Russia by mail or transport company at the buyer’s expense. There are a lot of really new cars with mileages up to 50 thousand km; there have already been cars from 2007 to 2012.
If you have anything to add to the material, leave your comments below.
Stages of removing the casing
Before removing the trim from the clips, you must remove all bolts, clamps and fasteners that are located in different parts of the door. It is most convenient to do this in a certain order.
Before you begin removing the door trim, disconnect the negative cable from the battery.
From the front door
To remove the door trim on a Lada Priora, you need to get rid of all the fasteners. To do this, follow the following procedure.
- Unscrew the button responsible for locking the door and remove it.
- Unscrew the screw on the inside door handle.
- Remove the handle by carefully moving it away with a flat-head screwdriver.
- Find the two screws in the special pocket that secure the power window control module. They can be hidden under a rubber mat.
- Unscrew both screws and remove the ESP module. Now you need to disconnect the connector with wires from it.
- Locate the three screws at the bottom of the door that secure the trim to the door. Turn them inside out.
- This way you got rid of all the screws and fasteners. Now you need to take a flat-head screwdriver and carefully pry off the casing at the bottom.
- Unsnap all eight clips, which are indicated in the diagram, starting from the bottom of the door. Be careful at this stage: broken fasteners are quite difficult to repair.
- Carefully remove the trim. If done correctly, you should encounter almost no resistance.
Location of the main screws that prevent the removal of the casing
after you remove the trim, your door will look like this
Due to their small size, screws and clips are often lost. To make the reassembly process easier for yourself, before starting work, prepare a container where you will put all the small parts.
To install the trim in place, place it against the door. Make sure the fasteners are in place. Insert and tighten the lock button. Thanks to this, you can pre-fasten the door components. Make sure the handle fits into its hole. Now you can snap all the clips into place and screw the screws back in.
Video: how to properly remove the trim from a Lada Priora car with your own hands
From the back door
The procedure for removing the trim from the rear door of a Lada Priora is not much different from what was given in the instructions for the front door. The exception is when working with window lifters: here they have a slightly different mechanism.
- Unscrew the door lock button and remove it.
- Using the same screwdriver, carefully press out the window lifter handle lock.
- Pull out the handle itself and its lock.
- Remove the screw holding the inner door handle trim.
- Remove the trim using a flathead screwdriver.
- Remove the two screws located in the small pen pocket under the rubber mat, and then remove the pen.
- Starting at the bottom of the door, remove the trim from the clips. The operating principle is the same as for the front door.
The rear door is assembled in the reverse order.
Be careful when working with wiring, especially those for window regulators. It is quite thin, so it can tear easily.
As you can see, the process of dismantling both the front and rear door trim of the Lada Priora is not particularly complicated and does not require many tools. A set of two screwdrivers will be sufficient. To avoid damaging the door, follow the main rule: not only unscrew the screws, but also remove the parts attached by them. All additional elements, such as door handles or window lifters, will greatly interfere with the process of removing the trim. If you strictly follow all the instructions, you can easily disassemble and reassemble the door trim without resorting to the help of specialists from car services.
Replacing individual elements
On the mechanics, the procedure is the same for the knob and its cover, as well as the cover; on the robot, only the replacement of the cover and the knob is the same, because the cover is not structurally provided there. In addition, the procedure for pre-restyling and restyling cars, in other words, for the first and second generation, is slightly different.
Overlay
Regardless of why you decide to remove the Priora gearbox handle, always start by removing the trim. To do this, pry it out with a thin, narrow screwdriver, being careful not to damage the upholstery of the ball. Then, when the part snaps off, remove it and replace it with a new one. Once the new pad is in place, press it gently but firmly against the ball until the clips click into place.
Preparing to replace the handle
Sometimes there are balls without an overlay, so before removing this element, carefully inspect the knob; if the overlay is insertable, there will be a thin gap between it and the handle; if there is no gap, the part is not removable.
Knob
To remove the handle, you will first have to snap out its cover, this will open access to the fasteners, then on the first generation, heat the white plastic sleeve using a household hair dryer (3-5 minutes) and, pulling the ball up, remove it from the lever. On the second generation, disassembling this part is even easier - unscrew the nut holding the knob, then, without losing any parts, carefully remove it from the lever. Balls for cars of different generations are not interchangeable, because the Priora-2 gearshift knob is designed differently than on a first-generation car.
If you don’t know what generation of Priora you have, then remove the trim and inspect the fastening; if there is a white bushing, then the first one, if there is a nut, then the second one. If you got a car without a knob, then the first generation has a flat lever, and the second has a round one. This difference arose due to the fact that the first generation of Priora is equipped with a rocker, and the second - with a cable transmission with a different gear selection mechanism.
On some first-generation machines, a knob without a pad is installed; in this case, to dismantle the part, you need to pull it up strongly with both hands. Install in the reverse order, that is, first align the slot in the ball and the lever, then press as hard as you can on the first one until it snaps into place.
On the cable box, remove the cover and unscrew the nut, then dismantle the part and carry out the installation in the reverse order.
If you got a Priora with AMT, then to remove the ball, pull it strongly up, and to install, align the ridges of the lever and the grooves of the knob, then press it hard so that it fits onto the lever.
Case
To replace the cover, also known as the Priora gearbox cover 1–2, proceed as follows:
- Remove the knob.
- Use a thin screwdriver to pry out the plastic frame of the cover, recessed in the tunnel.
- Lift the cover up and turn it inside out.
- Cut off the electrical tape or zip tie holding it to the plastic stopper.
- Take it off.
- Put on the new cover and, turning it inside out, secure it with electrical tape or a clamp on the limiter.
- Turn it back inside and back in, then snap the plastic frame into the tunnel window provided for it.
- Reinstall the knob.
Replacing the gear knob on a Priora
This procedure will allow you to quickly install the cover on the Priora gearbox handle without much effort. In case of any damage, no matter whether the leather is cracked or there is a hole in it, the cover cannot be repaired, only replacement is necessary.
Lever arm
To replace the rocker arm, do the following:
- Remove the ball and cover.
- Using a 13mm wrench, unscrew the nut securing the gearbox linkage to the lever.
- Remove the reverse gear limiter; it is secured with three self-tapping screws.
- Remove the bolt securing the rod to the lever.
- Move the rod away from the lever.
- Remove the old gaskets from the lever.
- Remove the ball joint retaining ring.
- Pull out the gearshift lever along with the hinge.
- Replace the lever and, if necessary, the hinge.
- Install new gaskets.
- Reassemble the mechanism in reverse order.
On a cable box, as well as a robotic transmission, it is impossible to remove the lever separately, only together with the gear selection mechanism.
How to remove and install the front door lock of a Priora
To perform the work of removing the lock, you will need a set of screwdrivers.
- Disconnect the negative cable from the battery.
- Remove the front door trim.
Squeeze the latch.
Video on the topic:
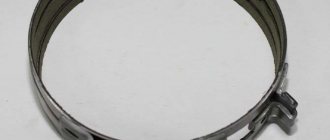
Design and types of window lifters
Kalina front window lift
Window regulators are a device designed to raise or lower car windows.
At the moment, there are a huge number of options for these devices, but the design, despite the differences in component parts for different models, is similar, it includes:
- grooves that hold the glass by the side edges
- so-called “rails” that ensure the movement of glass
- Seal and damper, glass movement limiters in the up and down direction.
A window regulator of any design consists of two main elements:
- drive unit
- lifting mechanism - transmitting vibrations of the drive movement to the glass, and thereby ensuring its movement.
The drive is divided into two types:
- Mechanical, known to us from Soviet cars, where in order to lower or raise the window, you need to turn the window lifter handle.
- Electric, typical of modern cars, where to move the glass you just need to press the window button. The electric drive consists of a reversible electric motor with a worm-type gearbox.
In addition, window regulators differ depending on the mechanism of glass movement:
Each option has its pros and cons and technical features. All these device options have one thing in common: one day they fail; this problem especially often occurs in a model that is so popular today as the Lada Kalina.
There can be dozens of reasons why power windows malfunction, but the most common are the following:
- The commutator brushes of the electric motor, which is responsible for the glass movement process, freeze. This happens, as a rule, due to overheating of fragile graphite brushes, unstable to sudden temperature fluctuations, and this factor starts a chain reaction: overheating of the brushes begins to melt the nest, which is made of plastic in all Kalinas, and not of the best quality. For this reason, the brushes lose mobility, and the device can only be brought into working condition using a hammer. At the initial stage of the breakdown, it is enough to give a good knock or two on the door trim , but after a couple of weeks, this method stops working, and then you will have to disassemble the window regulator to repair it.
- Another cause of failure, typical of the Lada Kalina, as well as many other VAZ models, is the ill-conceived electrical circuit. The contacts cannot withstand the load placed on them, there is no unloading relay, which is why all the window regulators fail at once, and then it is necessary to repair not only the window regulators themselves, but also the remote control.
When it is impossible or too problematic to repair the device, it is more advisable to replace it with a new one. are suitable for the Lada Kalina :
- electric window lifter Garnet VAZ – 530 rub.
- electric window regulator Ningbo – RUB 1,699
- electric window lift AUTO-GEO – RUB 3,300.
Of course, the price is directly related to quality, but if the budget is limited, then the domestic option is not bad.
Now let's talk about how to install window regulators yourself.
Door hinge repair options
Failure or severely deformed hinges are repaired using the following methods:
- Complete door replacement. It is complicated by the fact that it is not always possible to find new VAZs for old ones. You have to buy old elements that are partially worn out.
Replacing door hinges, as well as fingers, is the most rational option in this case. It's inexpensive and relatively easy to do. If necessary, additional equipment can always be rented at a service center or automotive supply store. The cost of the hinges themselves for the VAZ 2110 and similar models is only about 300-500 rubles. You can also find old, used ones for sale. You will have to pay less for them. But new VAZ 2110 doors will cost several thousand rubles. And they are sold, as a rule, without glass and cladding. Their installation is an additional waste of money.
Reasons for handle breakage
Often, replacing the power window handle will only temporarily fix the problem. Soon the new handle also fails. The reason is that the glass goes down and up too tightly, so you have to put excessive stress on the rather fragile plastic part. In this case, you must first eliminate the cause of the stuck glass or window regulator, and then change the handle.
It’s easy to check the operation of the mechanism - just raise and lower the window.
There are several reasons for the mechanism to jam:
- twisted drive cable;
- glass distortion;
- poor lubrication in the mechanism;
- freezing of ice (in winter).
If the window regulator works hard, you need to remove the door trim, find and eliminate the cause: change the lubricant, melt the ice or replace the faulty mechanism.
Another reason for handle breakage is worn-out window drive splines. In this case, it is necessary to replace the window lifter mechanism with a new one and only then change the handle.
Why is the door trim removed?
Most often, the trim of the rear or front doors is dismantled in order to get to the internal cavities where the window lift mechanisms are installed. Although during the entire period of operation of the car there are other situations when it is necessary to remove the trim:
- for installing acoustic speakers built into door cards;
- in case of failure of the electric window lift buttons;
- for dismantling glass for the purpose of tinting or replacement;
- to repair or lubricate window lift mechanisms;
- to replace facing panels that have become worn or scratched over the years of use of the machine.
Front door cards Lada Kalina
It is also necessary to remove the trim during body work, when it is necessary to weld rotten elements, renew the car’s paintwork, or carry out anti-corrosion treatment.
Note. Many motorists remove the upholstery to make additional vibration and sound insulation of the body themselves.
Lada Kalina rear door trim
Instructions: Priora car door handles - removal, installation, price
Door handles are not so much a matter of aesthetics in the appearance of the car, but rather a matter of pleasant tactile sensations and reliability. For convenience in the dark, some people go to collective farms. For example, illumination of interior handles. As for me, it’s not really needed. But the door handles on the Priora car are not of quality. I would say this is a sore spot of the car. In the cold they break easily. Some people simply do not know how to open them correctly, they pull at random - especially women. The price of the part is from 1000 rubles for a Euro model, pre-restyling ones are cheaper about 200 rubles. The door handles on the Priora were changed only with restyling - to new “Euro” types. Before this, the VAZ-2170 pleased everyone with the handles that remained with the “ten” - black. They were clumsier, but more reliable than the euro.
Until 2013, they matched the color of the rear-view mirrors, highlighting the design elements against the background of the sides of the car. Since 2013, restyling has changed a lot - the Priora’s handles began to be painted in body color, the same thing happened with the rear-view mirrors, and a few more “little things” were changed.
Car owners of different generations of Priora can easily change Priora door handles instead of the set of their generation. For some, the aesthetic component is more important - when the handles match the color of the body, but for others, reliability is important - such a person prefers the classics. Trying to meet the needs of car enthusiasts, spare parts stores willingly place on their shelves a set of Euro door handles for Lada Priora.
Preparation for dismantling
To unscrew the fasteners and remove the door trim, you need to prepare a simple set of tools:
- screwdriver with cross slots;
- long flat screwdriver;
- a pointed tool, such as an awl.
Door disassembly tool
Since the door card of the Lada Kalina car is held on by plastic fasteners (otherwise known as clips, pistons), there is a warning regarding the working conditions. It is strictly not recommended to dismantle door trim in the cold, when the plastic becomes brittle and easily destroyed. Hence, there is a risk of breaking all the clips during the process of removing the decorative panel. Therefore, in winter, perform this operation in a heated garage or box.
This is interesting: Is it necessary to flush the engine when changing the oil?
In the summer, there are no requirements for premises; remove the casing even in the open air. There is only one recommendation: in windy weather it is better to drive the car into the garage, otherwise a lot of dust will be brought into the interior when the doors are open.
This is what the door card lock looks like
Advice. In cars that are 5 years old or more, the plastic from which the retainers are made dries out and becomes brittle. When separating the trim from the door of such a car, you will probably ruin some of the clips. So it’s worth buying new ones in advance, there are 8 pieces in the front door, and 10 pieces in the back door.
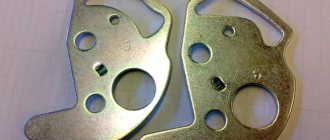
[Replacing door exterior handles]
Good evening, BZ readers. I remember writing about this about 2.5 years ago, but for some reason I later deleted the entry from the Logbook.
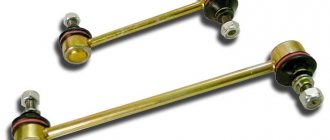
When I bought the car, I began to slowly figure out what and how I would add and change to the current appearance of my car (in fact, like every second car enthusiast nowadays). In fact, one of the first things on my list was replacing the exterior door handles. In my case, the standard black ones from 2110 came from the factory. After the purchase, I drove it all winter, didn’t change anything, didn’t do anything, just slowly collected money and bought parts for replacement. In the spring I bought the door handles I wanted:
With the installation of these handles, in comparison with other types, there is a small problem:
1) first remove the door cards, i.e. different door upholstery; 2) then remove the door handles themselves; 3) after which we try on the new handle itself, outline where we will drill an extra hole in the body (it was not very pleasant to do this on a new car, at least for me);
4)
having drilled a hole, treated it a little with oil and lubricant and removed small burrs from drilling; 5) then a small hassle begins with installing a seal under the door handle and joining the handle mechanism with the rod inside the door (badass, the three of us suffered a lot with my friend and dad);
6)
when everything is connected, put on the door cards and enjoy the appearance.
This was the beginning of changing the appearance of my Leriky.
Thank you all for your attention, click LIKE, it will be nice for me and my Leriky.
Source
Removing the internal lock Lada Priora
Removing the internal lock and external handle of the rear door of Lada Priora (VAZ-2170)
We carry out work when replacing the lock and external door handle.
The work is shown on the left rear door. The lock and outer handle of the right rear door are removed in the same way.
Remove the rear door trim (see “Removing the rear door trim”).
By pressing the latch, disconnect the wiring harness block from the electric locking drive.
Use a slotted screwdriver to disconnect the rod from the outer door handle.
Using a 10mm socket with an extension, unscrew the two nuts securing the outer door handle...
...and remove the handle.
Using a Phillips screwdriver, unscrew the three screws securing the inner handle.
Squeeze the clamps of the plastic rod holder...
...and remove it along with the seal.
Using a Phillips screwdriver, unscrew the screw securing the intermediate lever of the lock lock rod.
Using the “8” head, unscrew the bolt securing the glass guide...
...and remove it through the technological hole in the inner door panel.
Using a Phillips screwdriver, unscrew the screw securing the internal lock. After unscrewing the fastening screws, remove the outer door lock (see.
"Removing the outside door lock").
We remove the internal door lock mechanism along with the rods through the technological hole in the inner door panel.
Rear door lock mechanism assembly with handles. The rods and electric locking drive are removed in the same way as the front door lock (see.
"Removing the interior lock, lock cylinder and outer front door handle").
Install the lock and outer door handle in the reverse order.
Video on the topic “Lada Priora. Removing the internal lock of Lada Priora"
HOW TO REMOVE THE DOOR MOTOR ON A PRIORA Replacement of the outer and inner door lock on VAZ 2110, 2111 and 2112 Replacement of the front door locking gearmotor, Lada Priora. They do not close against the alarm.
Replacing the outside door handle
The main disadvantage of the so-called Euro pens, which began to be installed on Priors instead of the usual decimal ones, is their fragility. It often happens that a passenger starts pulling on it while the door is still locked, and if you overdo it, the handle can be torn off alive! Especially such moments can arise in severe frost, when the plastic becomes more fragile.
If this handle is broken on your Priora or you are removing it for some other reason, then you will need the following tool for this:
conclusions
Replacing the window lifter handle is a simple operation that any car enthusiast can do. When purchasing a kit in the markets, you risk receiving a defective product. In this case, it is better to purchase a kit for a later model in a specialized store. Experts also recommend checking the mechanism itself during replacement, since there are parts that fail over time.
Especially if a problem is found in the glass lifting mechanism. To extend the life of the mechanism, you should not make sudden movements when raising and lowering the glass and you should not pull the handle. The entry of foreign objects into the mechanism is unacceptable. Good luck and easy travels!
0 0 votes
Article rating