Design features: description
Today on a car you can find two design options for thresholds: removable and non-removable. The factory equipment of 2110 involves the installation of non-removable parts that fit into the side of the body and provide the necessary structural rigidity.
For a permanent threshold, rolled or black steel with a thickness of at least 0.9 mm is used. The part is welded to the bottom, preventing the central part of the car from twisting during a frontal impact. This is also an element of passive safety.
Removable sills protect the underbody of the car from mechanical damage, prevent the rapid spread of corrosion and improve the overall appearance of the car. They are installed from inside the cabin, attached to the bottom with self-tapping screws. Rolled iron is used in production and the part is chrome plated.
To further protect both removable and non-removable parts, plastic door sills, steel moldings, aluminum fairings, and body kits are used.
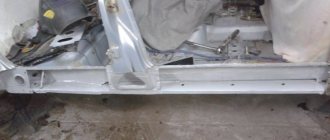
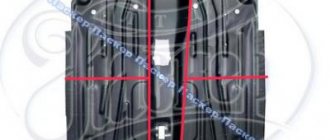
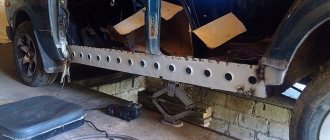
Structurally, the non-removable element is a box welded from several elements:
- Amplifier. The part is spot welded to the sidewall and bears the main force load from vibrations.
- Connector. The lower part of the threshold. May consist of one continuous or several parts.
- External part. It is located directly under the door and is painted at the final stage of repair.
- Inner part. Visible from inside the car after installation.
Official VAZ dealers offer original repair kits for body repairs. The parts correspond to the dimensions and are suitable for the thickness of the metal. But, like factory elements, they do not undergo the galvanizing process. After reinstallation, all parts must be carefully treated with anti-corrosion compounds, in some cases, if the element is changed, partially puttied.
Features of repair of VAZ 2110 thresholds
Before repair, a complete diagnosis of the bottom is necessary. On the overpass, the metal of the bottom is tapped, and the quality of the jacks is checked using a screwdriver or an awl. Replacing the VAZ 2110 thresholds has some features; it is carried out either at a service station or independently. Rules for self-repair:
- The car is installed on a flat surface at a height, which is convenient: you don’t have to bend down to the ground during welding and cutting.
Before welding the upper part of the permanent threshold, it is recommended to hang the dismantled doors in place. In 30% of cases, independent welding of parts leads to a slight distortion of the body geometry, which cannot be determined with the naked eye. As a result, this will lead to the doors closing with difficulty or not closing at all.
- The internal element is treated with anticorrosive. It is recommended to use an oil or paraffin composition for interior work in the cabin and bitumen mastic for external metal processing.
- A rotten threshold must be completely replaced. If you need to get rid of rust, a solvent is used. After cleaning the element with a grinder, it is necessary to treat the surface with a composition that removes rust. All work is carried out wearing gloves and safety glasses.
Important points
- All work on replacing thresholds should be carried out with the machine installed on a level surface, without distortions.
- Before welding the top edge of the new thresholds, you should definitely try hanging the doors on the car yourself. There are often cases when doors after welding either close with difficulty or do not close at all. And this can happen due to one slight misalignment of the thresholds, which is not always possible to notice with the naked eye.
- You should never skimp on anti-corrosion treatment of thresholds. If it is not carried out, all the work done will go down the drain in a few years.
- It is best to clean thresholds from rust and dirt using a solvent. When working with it, you need to follow safety rules: use gloves, wear safety glasses (this is especially important if you have to work on the bottom of the car while standing under an overpass - drops of solvent can easily get into your eyes), and apply the solvent itself only with a paint brush.
- Before welding the thresholds, a series of holes with a diameter of at least 3 mm should be drilled in the areas of metal to which the threshold is planned to be attached. This will greatly facilitate the spot welding process, and the threshold will be held more firmly.
The main thing when replacing thresholds is accuracy and attention. It is very important to cut out all rusty and damaged metal from both the underbody and the sills. If even one small area of rust remains, the destruction of the structure will begin again. And, of course, anti-corrosion treatment when replacing thresholds is mandatory.
- Author: Alexey Stepanov
Copywriter with five years of experience. Rate this article:
- 5
- 4
- 3
- 2
- 1
(5 votes, average: 3.8 out of 5)
Share with your friends!
DIY replacement: step-by-step instructions
A complete replacement of the thresholds is carried out if the part has corrosion wear of more than 50%, there are holes, or the rust has reached the amplifier. Partial overcooking is carried out after a mechanical shock, if there is significant deformation and in cases of a single corrosion plaque. A patch is welded onto the threshold. To replace, you will need the following tools:
- angle grinder (grinder);
- wide chisel, set of screwdrivers;
- electric drill with a set of drills;
- clamps and latches will be needed for installation before welding;
- gas welding or electric semi-automatic;
- automotive primer;
- bitumen mastic;
- iron brush, R-80 sandpaper.
Before welding the part, it is necessary to dismantle the interior and doors. Preliminary work step by step:
- The car is draining fuel.
- The negative terminal from the battery is disconnected; in some cases, the battery is removed completely.
- The doors are being dismantled.
- The trim of the pillars is removed from the interior, the carpet can be rolled to the side and covered with a rag.
- The overhead protective threshold, if any, is dismantled.
It is recommended to remove all plastic trim to avoid ignition due to sparks from the welding machine. The dashboard is covered with rags, the glass can be covered with paper so that dust from the grinding machine does not settle on them.
Instructions for overwelding parts of a fixed threshold:
- Mark the cutting lines of the old element with a marker.
- Using a drill, along the marked line, drill holes with a diameter of 0.4 mm at a distance of 8–10 cm from one another. If a standard unit is changed, the factory spot welding areas are drilled out.
- Use a grinder to cut out the old element exactly along the marking line. You can use a wide, sharp chisel. Drilled holes make cutting process easier.
Cutting or cutting takes place in the following directions: in the area of the front door, rear door, and the last section to be cut is in the area of the central pillar. The quality of the lower edge of the rack amplifier is checked: if the part is rusty, it is replaced or a power patch is welded.
- If the metal of the rack amplifier is in order, the outer panel is partially cut off. In the area of the stand and wings, it is necessary to leave 5 cm of old metal, to which the new outer part will be welded.
- Check the amplifier: in 70% of cases the part must be replaced. Remove the steel panel. The cut should pass through the welding point of the amplifier.
- Clean the seat from dirt and rust with a grinder. Cut out rusty areas completely, sand them down to white metal, and treat them with a solvent or rust converter.
- Weld the threshold connector to the subframe reinforcement with an overlap and align the lower edge.
- Fit the outer part to the connector and secure with clamps.
- Weld the connector to the bottom of the body, do not loosen the clamps.
- Weld the outer part.
- Clean the weld seams with a grinder and sand them.
- Apply a layer of automotive putty, prime the surface after drying, and paint at the final stage.
Replacing thresholds is a rather labor-intensive and labor-intensive process. At the service station, repairs are carried out by two experienced craftsmen. When replacing yourself, special attention must be paid to the fit of the new element and check the installation locations of the jack.
Do-it-yourself painting of VAZ 2110 thresholds
The standard repair kit from official dealers is designed for subsequent painting of the part and is supplied in shipping primer, which must be cleaned off before welding. After replacing the threshold, when the primer layer has dried, it is painted:
- Sand the surface with high and low abrasive sandpaper.
- Paint the body using a spray gun or spray gun. It is necessary to apply two layers of auto enamel. The sprayer is kept at a distance of 25–30 cm from the surface.
- Apply the first layer of auto enamel, wait for the paint to dry for 7-10 minutes.
- Apply a second coat of paint.
- After complete drying, apply protective varnish.
Average prices for work on replacing thresholds on a VAZ 2110
Specialized services carry out a complete replacement of threshold 2110 with painting in 2 days, the cost of work starts from 15,000 rubles, the customer’s repair kit is used. The work includes:
- checking the bottom, side members, jacks;
- complete dismantling of the interior;
- dismantling wings, front trim, doors;
- cutting out waste elements;
- installation of new ones using high-precision welding;
- complete anti-corrosion treatment;
- painting;
- installation of overlays, at the request of the customer.
It is recommended to additionally protect the parts with plastic or metal fairings: this will increase the service life of the main part. The cost of the cover starts from 150 rubles; you can install the fairing yourself in 30 minutes.
Repair of removable structures
Removable thresholds are easy to dismantle and replace. They are convenient and practical to use. They are installed outside or on the side of the side members. Removable thresholds provide effective protection of the underbody of the car from stones.
To repair removable elements, metal or plastic is used. Self-restoration is performed according to the following algorithm:
- Screwing in fasteners.
- Removing the threshold.
- Removing traces of corrosion.
- Applying putty and primer.
- Painting.
How to choose thresholds for a VAZ 2110: average prices
Today, components for the Zhiguli line are manufactured by more than 20 licensed companies and more than a hundred small firms. The average price for a set with an amplifier is 2600 rubles. The assortment includes plastic and iron spare parts. It is recommended to select thresholds made from 300 series stainless steel with a minimum thickness of 1 mm.
Iron
Original parts are produced by the AvtoVAZ workshop; the thresholds are made of rolled steel and covered with transport primer. Spare parts are installed in their original place. The metal does not undergo additional galvanization; after repair, anti-corrosion treatment is required. The set includes a perforated amplifier. Cost 2500 rub.
For self-repairs, profiles are used instead of a threshold. The pipe is installed in place of the original part and is attached to the bottom with cross members. It is distinguished by increased corrosion resistance due to the metal thickness of 1.5 mm and an additional layer of zinc.
Plastic
Plastic thresholds for the VAZ 2110 are produced by several licensed manufacturers. The most famous and popular:
- RS Tolyatti. The cost of the plastic kit is 1600 rubles. When replacing, a steel reinforcement is required, which is not included in the kit. Parts are made from impact-resistant, lightweight ABS plastic, element thickness 3 mm. The parts are installed on the load threshold or base using self-tapping screws or auto glue, are not painted, and are easily adjusted to body dimensions.
- LLC M-version. The company produces tuning sills and body kits for the VAZ 2110/12 line. Parts are made of carbon fiber, can withstand loads of up to 300 kg, and are resistant to chips. The elements must be painted after installation, the cost is 4,700 rubles, the amplifier is not included in the kit.
What affects the cost
The location of the repair is a major factor in the cost of replacement. If you carry out repairs yourself, drivers only spend money on purchasing the necessary material and parts. Tools are often either rented or already present in the garage.
When repairing at a service station, the work is expensive, and this is justified. The design of the threshold, despite its simplicity, requires great skill and care when replacing. If you are not confident in your skills as a welder, straightener and tinsmith, it is better to entrust the replacement of thresholds to a specialist.
FakeHeader
Comments 45
hi. did you make the tipper yourself? can you have a photo or a drawing? thanks in advance
cool, what kind of shifters do you have, send me a photo in a personal message if possible
I'll throw it in the evening tomorrow
cool, what kind of shifters do you have, send me a photo in a personal message if possible
Well cooked! And they started installing amplifiers around 2005, when the Priora was tested. There is such a good amplifier, better than 2109.
not on sale with us
It's a shame, it's a worthwhile thing.
You might think that everyone here drives Bentleys and Maybachs; you should look at the record of which cars appeared on the website. ON Do the same 08-09 (not grant) only from foil, below 500 NO! 500 rubles for a bunch of crap components - crap. My comment about the work: I did it for myself - GREAT!, I did it for someone - I earned money.
I did everything cool, don’t listen to anyone who writes “trash.” With your own hands - your car - here is another moment of happiness.
Reasons for replacing thresholds on the VAZ 2110
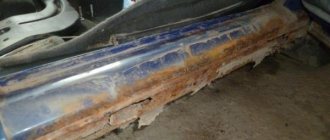
The bottom and sills of the VAZ 2110 are susceptible to corrosion, as a result of which they rust and collapse. Mainly due to the fact that it is this part of the car that is most exposed to moisture and other aggressive environmental factors, such as reagents and salt, which are sprinkled on roads during icy conditions. Mechanical damage cannot be ruled out : impacts and scratches first lead to dents and chips of paint on the thresholds, and then rust occurs. The quality of the metal itself plays an important role. In these cases, the need to change the thresholds becomes obvious.
The work of replacing thresholds involves the use of both welding and abrasive tools. Carrying out painting, puttying and other work. In other words, this is an enterprise that should last at least several days with fairly good labor productivity.
The easiest way to work is with a semi-automatic welding machine, with which anyone can learn how to weld. If you don’t have it, then you probably shouldn’t run to the store. You can always contact your friends or a specialized workshop. After all, the unit costs approximately more than 15 thousand rubles. For a full repair of a VAZ 2110 at a service station, you will be asked for approximately 3 thousand rubles. And it will last for ten years. But if you decide to do the repair yourself, then these instructions will help you.
How to properly replace the underbody of a car?
#1 Maler
- Top
- Insert nickname
#2 Vladimir from Kamyshin
- Top
- Insert nickname
#3 Peacemaker
- City: Irkutsk. Alexander, can you please
Can anyone tell me how to replace it correctly and reliably? I looked for smart welders in the area, but couldn’t find them. Seeing the work of some craftsmen, it became simply creepy (I don’t give a shit either). I would be grateful for your advice.
Attached images
- 4
- Top
- Insert nickname
#4 MIHA75
- City: N. Tagil
- Top
- Insert nickname
#5 Maler
thank you. The car was bought by my sister and who knows. It turned out to be a bit broken. It’s a pity to sell. I changed a lot of things with my own hands (debut). The bottom is rotten. Apparently it was without treatment. I’ll be honest, I don’t know about the thresholds and the above. I don’t even know such words))) that’s why I’m looking for a person who will do it conscientiously. They suggested taking it to a service center to measure and level the geometry (visually the left gap on the trunk is a little larger. I think a stretcher and a properly tightened lid will correct the situation). In general, they don’t take on small rust, they offer to paint everything at once, with welding work the price becomes huge. Don’t laugh, but if I had the extra 100 thousand they ask for at the service center, they wouldn’t take the ’04 VAZ. I cooked it myself, without experience. I've been working recently. and not particularly neat. You still have years of training to reach your level. in general, I’m afraid myself. If I looked at how it’s done, maybe I could learn. In welding, I mastered what I can with the help of your forum and by trial and error. I would have practiced on some Cossack, but not))) inner voice yells - don't poke your nose in) sorry for the many letters)
How to change the thresholds of a VAZ 2110
- To avoid distortion of the car body, place the car on a flat surface.
- Remove the locker, doors (rear and front), driver and passenger seats, car fenders. Also remove seat belts, floor mats, and sound insulation from the floor.
- Protect your car windows with homemade curtains, which can be made from cardboard. This will be needed to prevent them from being damaged by sparks flying from the grinder. Otherwise, black spots will appear on the windows that cannot be removed.
- Remove fusible and plastic machine components from the work area.
- Disconnect the battery to prevent it from being affected by the welding machine.
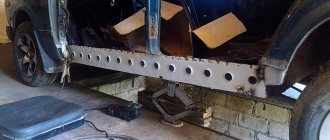
- Mark the cut lines for the old thresholds. A series of holes with a diameter of at least 4 mm are drilled along these lines , located at a distance of 5-8 cm from each other.
- Using a grinder, cut off the old threshold, part of the bottom damaged by corrosion, as well as the threshold connector at the bottom and top of the VAZ threshold.
- When cutting off the outer sill panel, be sure to leave areas of metal at the front and rear fenders. The length of these sections is at least 5 cm; it is to them that the new panel will be welded later. You should also leave a small area of metal under the B-pillar.
- Continue the repair by scraping the surface where the new threshold will be located using a scrubbing brush, and then treat the surface with a corrosion neutralizer .
- Before carrying out welding work at the stage of installing a new part, first hang the doors to ensure correct installation.
- After installing the component on the car, be sure to treat the surface with an anti-corrosive agent or special primer.
It must be remembered: the larger the area of the damaged areas, the more material and effort will be required to repair them.
The tool we need is:
- welding unit (the most convenient and simplest option would be semi-automatic welding);
- grinder and 3 discs for the grinder, a hard metal brush for the grinder;
- a set of new thresholds, amplifiers and connectors for the VAZ 2110;
- grinding tool;
- electric drill;
- metalworking tools;
- packaging of automotive mastic;
- 2 medium-sized paint brushes;
- can of primer;
- bottle of solvent.
Preparing the car
To replace the thresholds, the car must be prepared by performing partial disassembly. To do this you will need:
- Place the car on a level surface (it is important to avoid distortions in the body).
- Remove the locker, front and rear doors, driver's seat, passenger seat, fenders, seat belts, remove sound insulation from the floor.
- Car windows should be covered with rags or cardboard curtains to protect against sparks and flying scale.
- Any items that could catch fire or melt in work areas should also be protected or removed;
- Disconnect the battery so as not to accidentally affect the battery and electrical wiring of the car;
At this point, the preparation of the car for replacing the thresholds can be considered complete.
