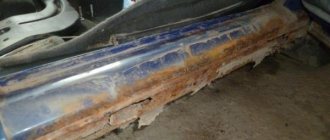
The car body is constantly exposed to mechanical stress, and some parts of the body often experience chemical attack. Parts of the car body such as sills are subjected to this ordeal every day. These elements serve not only as decoration. They provide the body with additional rigidity and help withstand torsion loads and “break” loads.
In addition to the mechanical impact, thresholds are also negatively affected by reagents - salt, etc., which are used liberally on the road surface in winter. Due to the treatment of asphalt with chemicals, the thresholds are destroyed. Corrosion slowly but surely thins the metal from which these elements are made, and over time they turn into dust. It is the threshold that is most often subject to replacement, since it has a short service life. But where can you find a repairman or car service that will replace the thresholds of a VAZ 2111 car in Moscow with high quality and with guarantees?
Replacement of thresholds VAZ 2110, 2111, 2112
By examining the condition of the thresholds and bottom of the VAZ 2110, you can easily determine the age of the car.
It should be recognized that the factory anti-corrosion treatment is not of very good quality and without proper care, after 7-10 years, through holes may appear on the thresholds as a result of corrosion. In this article, we will analyze the process of replacing VAZ 2110 thresholds, list the tools and materials for the work, and also talk about why thresholds rust and how to extend their life when there is no severe corrosion yet.
Why do the thresholds of the VAZ 2110 rust?
There are several reasons:
- Irregular anti-corrosion treatment. On vehicles of the VAZ family, preventive treatments must be carried out before each winter season of vehicle operation.
- The car was damaged in the threshold area and poorly repaired. In this case, corrosion develops very quickly and after 2-3 years through holes may appear.
- Winter operation on roads where a lot of reagents are used. Salts settle on the thresholds of the car and after a short period of time “break through” the external anti-corrosion treatment, starting the corrosion process. If you operate a car in such conditions, you need to wash it once a month and preferably with warm water.
- Damage to the external protection of the threshold and its untimely restoration.
- Blockage of drainage elements in thresholds. Drains should be checked once a year throughout the entire body.
Threshold selection
The threshold consists of three parts:
- External lining.
- Amplifier inside.
- Connector.
Thresholds can corrode in different ways, but generally, if there are through holes, you will need to purchase the entire three-piece threshold kit.
Threshold article number for the right side is 21100-5401060-00, for the left side 21100-5401061-00. Ask for connectors and amplifiers in stores; they are not available for order according to factory articles.
Tools and materials for work
Step-by-step replacement process
- First, remove the doors, seats, bumper and front fenders. Also remove carpets, seat belts and sound insulation.
- Protect your car windows. Sparks from grinders and welding can damage them. It is also advisable to cover the doorway with cardboard so that nothing gets into the interior.
- Disconnect the negative terminal of the battery.
- Place the vehicle on a pit or tipper.
- Attach the new threshold and use a marker to mark the lines along which you will cut the old one.
Use a grinder to cut through the previously marked areas.We core all the contact welding points along the edges at the top and bottom of the threshold. Next, we drill out the points, and then use a body knife to separate the metals from each other.
After you have separated the threshold, remove it and evaluate the condition of the bottom, amplifiers and connectors. If necessary, cut off rotten parts of amplifiers, connectors, or remove them entirely.
- Cut out the required pieces from the repair parts and weld them in place.
- Prime all welds and repair inserts with epoxy primer, having previously “filled” the abrasive with a scratch to create conditions for good adhesion of the materials.
- Cut the butt pieces to size and drill holes for welding along the edges at the top and bottom of the threshold.
We clean all welds, grind the threshold with abrasive and apply epoxy primer. - We apply sealant to the non-facial welds, putty on the facial seams and paint. You can also apply an anti-corrosion agent, for example, Body Autoflex, before painting.
- After all the work has been done, anticorrosive the hidden cavities with Movil or Pushsal.
The process of replacing thresholds for VAZ 2110, 2111, 2112 is clearly shown in this video:
Let's summarize
To replace VAZ 2110 thresholds with your own hands, you need to have many specific tools and skills. If you are not ready to learn bodywork and invest money in tools, trust the replacement of the threshold to professionals. The price of replacing a threshold with painting and anti-corrosion treatment is from 7,000 to 12,000 rubles.
How to determine the degree of damage to thresholds
Before deciding whether you really need to replace the thresholds or whether you can get by with cosmetic repairs of the car, you must:
- Raise the car using a lift or place it on an overpass.
- After this, a visual inspection of the damaged areas is carried out, namely, where corrosion began to appear. The paint in these places peels off exactly until it reaches the point where it adheres to the car body.
- You should be prepared for the fact that replacing thresholds will entail additional costs required for painting work.
- It is not always necessary to make a complete replacement; sometimes it is enough to do this with just a small damaged area, and your car will serve faithfully for a single year.
As a rule, minor damage occurs when the threshold receives impacts from any foreign objects, as a result of which peeling of the paintwork begins and, accordingly, the further appearance of rust.
How to properly replace the underbody of a car?
#1 Maler
- Top
- Insert nickname
#2 Vladimir from Kamyshin
- Top
- Insert nickname
#3 Peacemaker
- City: Irkutsk. Alexander, can you please
Can anyone tell me how to replace it correctly and reliably? I looked for smart welders in the area, but couldn’t find them. Seeing the work of some craftsmen, it became simply creepy (I don’t give a shit either). I would be grateful for your advice.
Attached images
- 4
- Top
- Insert nickname
#4 MIHA75
- City: N. Tagil
- Top
- Insert nickname
#5 Maler
thank you. The car was bought by my sister and who knows. It turned out to be a bit broken. It’s a pity to sell. I changed a lot of things with my own hands (debut). The bottom is rotten. Apparently it was without treatment. I’ll be honest, I don’t know about the thresholds and the above. I don’t even know such words))) that’s why I’m looking for a person who will do it conscientiously. They suggested taking it to a service center to measure and level the geometry (visually the left gap on the trunk is a little larger. I think a stretcher and a properly tightened lid will correct the situation). In general, they don’t take on small rust, they offer to paint everything at once, with welding work the price becomes huge. Don’t laugh, but if I had the extra 100 thousand they ask for at the service center, they wouldn’t take the ’04 VAZ. I cooked it myself, without experience. I've been working recently. and not particularly neat. You still have years of training to reach your level. in general, I’m afraid myself. If I looked at how it’s done, maybe I could learn. In welding, I mastered what I can with the help of your forum and by trial and error. I would have practiced on some Cossack, but not))) inner voice yells - don't poke your nose in) sorry for the many letters)
Average prices
For a VAZ 2111, re-welding the thresholds from a corrugated pipe will cost up to 1,500 rubles. for self-repair, provided that you have a semi-automatic welding machine. Prices for consumables:
- pipe - from 700 rub. for 3 meters;
- bitumen mastic - 500 rub. jar;
- primer, putty - 300 rub.
The installation of decorative overlays on a metal structure will add originality and style. Plastic covers with backlight, shagreen, chrome, etc. can be installed in 30 minutes.
Prices for repairs at a car service center start from 10,000 rubles. The price includes replacement of a body element, use of original replicas, putty, painting. In most cases, owners have to pay extra for reinforcement of the bottom, since part of the body on half of the models requires repair.
Features of repair and overcooking of the VAZ 2112 underbody
The VAZ 2112 model is the heir to the 10th family. In turn, the first car after the collapse of a large country was designed on the VAZ-2108 platform. The popular hatchback dates back to the mid-80s, which indirectly indicates the shortcomings of the age-old design.
Design Features
The bottom of all modifications of the family was made of rolled steel. Additionally, to increase strength, stiffening ribs are made.
Important! Since the frameless design involves accepting the load from all body and transmission elements, it is the condition of the bottom that determines the functional readiness of the car.
Cars of different body types have different overall dimensions. At the same time, the wheelbase of all modifications is the same - 2,492 mm. The size and shape of the bottom on all machines also has no fundamental differences.
Family service experience indicates that most often - in 9 cases out of 10 - repairing the underbody of a VAZ 2112 begins with checking the condition of the body side members. Corrosion processes require their strengthening.
How to find rust on the bottom
A prerequisite for trouble-free operation of the 12th family hatchback is periodic inspection of the car for corrosion from below. Even cars from recent years of production need additional processing.
It is better to carry out a comprehensive inspection of the bottom. Among the main detected defects are:
- peeling of the anti-corrosion composition;
- the appearance of local foci of corrosion (jack attachment points, thresholds);
- presence of fires on the interior side.
Tools and materials for work
For self-repair, you will need to prepare a welding tool, abrasive materials and finishing agents, a minimum set of tools:
- pipes for thresholds on VAZ 60x60x2 mm, 40x20x2 mm;
- steel plates for connecting the threshold to the bottom;
- grinder with a set of carriage brushes;
- cleaning circles;
- electric drill;
- semi-automatic welding machine;
- sandpaper R-80;
- primer, automotive putty;
- bitumen anti-corrosion mastic;
- rags.
How much does it cost on average to digest the bottom of a VAZ-2112?
VAZ-2112 is a Russian-made five-door hatchback. The car is reliable, of high quality, but, like any vehicle, it breaks down over time. Typically, a motorist is faced with wear and tear on the underbody. The service for overcooking the bottom of a VAZ-2112 in Russia costs from 8,500 to 29,000 rubles .
What is this?
Re-welding the bottom means updating the floor of the car using welding equipment and a number of tools. The bottom of the car is the most vulnerable place. It takes on mechanical damage, the negative effects of active chemicals, and dirt. Most often you have to deal with the corrosion process.
Overcooking the bottom of a VAZ-2112 may be required in the following cases:
- The bottom is covered with rust.
- There are holes.
- There are big cracks.
- The bottom has become thinner.
In these cases, auto technicians recommend overcooking. This work is labor-intensive and expensive. To repair a car, you need to do a number of these steps:
- Find a service station that restores VAZ-2112 cars.
- Contact the administrator and ask him about the terms of cooperation and approximate prices for services.
- Agree on a time to come to the master or call a specialist.
- Provide your vehicle to the mechanic.
- After a professional inspection, negotiate the exact cost of the work and the time frame for its completion.
- Give consent for repairs.
- Accept the job.
- Pay the specialist the previously agreed amount of money.
- Receive a warranty card for the work done.
The wizard performs a number of such actions:
- Inspects the bottom of the car.
- Makes a decision about the need to digest it.
- Cuts out the damaged part.
- A patch is welded to this place.
- Treats the area with an anti-corrosion compound, sealant and mastic to increase resistance to external negative influences.
- Provides the restored car to its owner.
For work, the specialist uses a semi-automatic welding machine, gas welding.
What does the price depend on?
In Russian car repair shops, the price for overcooking the bottom of a VAZ-2112 car varies. When compiling a price list, the company takes into account the following points:
- Dimensions of the damaged part of the bottom.
- Maintainability.
- Difficulty of work.
- Urgency of the order.
- Place of work.
- Prestige of the auto service center.
- Pricing policy.
Types of service
Overcooking the bottom of a VAZ-2112 car can be:
- Using semi-automatic welding equipment:
- Using gas welding.
Depending on the location of the repair, the service is:
- In the garage of a private master.
- On the territory of the car service center.
- At the location of the client's car.
Depending on the time that the client allocates for work, overcooking occurs:
- Urgent.
- Not urgent.
According to the performer, overcooking is classified into:
- Professional.
- Independent.
Practical recommendations
There are two original components for the VAZ 2110 on the market:
- Old style amplifier.
- A new element is cataphoresis coating.
Both spare parts are produced by AvtoVAZ (Rostov) and are installed on the model without additional height adjustment.
The old-style amplifier is a rough metal panel with perforations around the perimeter. Installation on a car is carried out through semi-automatic welding. The cost of one part is from 150 rubles. The element is supplied in transport primer, which must be removed manually without using a sander.
The new threshold amplifier with cataphoresis coating structurally follows the shape of the threshold; the part has perforated transitions. Due to cataphoresis coating and new anti-corrosion protection technology, the amplifier has increased resistance to corrosion. The indicator increased by 20% in comparison with parts that were hot-dip galvanized. The price is from 1500 rubles. a piece.
Experienced drivers and tinsmiths at service stations recommend not using a standard amplifier when doing DIY repairs if the metal thickness is below 1 cm.
The best option is to use a profile pipe as a threshold. Advantages of replacing a standard element with a profile:
- Metal thickness from 1.5 cm.
- 90% of the profile pipe is galvanized using the production method.
- Installed as an amplifier, connector and internal element of the threshold, in rare cases it replaces the entire part.
- The price is 70% lower than the new amplifier with cataphoresis coating.
Underbody repair of VAZ 2110, 2111, 2112
The history of car repairs began precisely because of the floor and everything that should be structurally welded to it. All the “surprises” were hidden under the internal plastic linings and carpet, visually there were no problems visible if not for one “but”! It was summer outside, the temperature was over 30, there was almost no rain for a month, and the places under the rugs at the doorstep were still damp. I took off the plastic, peeled back the carpet, and there the standard thermal insulation was wet and already beginning to deteriorate, and everything “bloomed” under it! It turned out that there were still small holes on the bottom, not noticeable from below under the factory sealant and anti-gravel, and it was through them that the insulation picked up moisture. In addition, some stupid patches that were falling off, holes in the side members and internal sills were discovered. My first thoughts after seeing it were “I’m selling everything!” Then I recovered from the shock and decided that maybe it could be fixed. Since it all worked out in one go, remake the car to suit you.
The scene is a garage. We cut, saw, disassemble.
Survey of the scale of the disaster.
Identification of dead places
We cleaned the floor of standard vibration insulation and inspected weak points. It was decided not to use any repair inserts, but to replace it entirely. The next day, go shopping to look for factory flooring.
We bought it and cut it into three parts so that it would fit into my dad’s car)
Third part, central piece. This part of the body remains original.
We cut and shred, having previously marked the future edge on which the new floor will be applied.
A car without a bottom...
They cut off the floor and part of the threshold on the left.
The lower edge of the spar was badly damaged by corrosion (there had previously been a patch on it to cover the hole), and there was nothing left to weld the floor. The floor spar extension and the spar connector are also replacement parts. Assembled spars were purchased, which were later cut in half. Next is the important stage of adjusting the seam location and fitting it on the car. The old spar was cut down to intact, undamaged metal.
We clean the factory soil.
How far did you manage to remove this blackness?
The “spar assembly” is prepared. The adjacent edge is adjusted in place using a grinder. First roughly, with a cutting wheel, then more precisely with a cleaning wheel. To increase the area of the seam, the cut was made not in a straight line, but at an angle. Also, just in case, two additional pads were welded for strength.
Spar cutting line
This node is in those documentation.
Catalog numbers and exact names of spare parts (used 1,7,8).
Everything is in its place
Before installing the floor, the old part of the spar was sanded and primed as much as possible.
Test fitting of the floor.
Everything matched up as it should. We prime.
Completely ready for welding, holes for the spar are made in advance.
Some of the edges overlap (about 10-20mm) by ). Additionally, 2 pieces of “front floor spar” and 2 pieces of “floor reinforcement for the front seats” are required.
Front floor spar
floor reinforcement for front seats
Well, here’s the finished version) The burnt out spots were sanded with reserve and painted over with phosphating and acrylic finishing primer.
The floor is in its rightful place
The very last stage is sealing the welds. The sealant was gray CARSYSTEM, two 310 ml tubes were used.
It takes about a day for the sealant to dry completely.
This stage has come to its logical conclusion, the body is intact and it makes me happy!
I post technical information that was used during the body work process. Maybe it will be useful to someone.
Publisher: Volga Association for the Production of Passenger Cars (AvtoVAZ) ETC "AvtoVAZ Maintenance" Title: VAZ-2110 car and its modifications. Technology of maintenance and repair. (Volume 6) There are six of them in total: Volume 1 - “VAZ cars: technology of maintenance and repair”; Volume 2 - “VAZ cars: technology for repairing bodies and body parts”; Volume 3 - “VAZ-2108, 2109 cars and their modifications: technology of maintenance and repair”; Volume 4 - “VAZ-1111 car: technology of maintenance and repair”; Volume 5 - “VAZ-2121, 21213 cars: technology of maintenance and repair”; Volume 6 - “VAZ-2110 car and its modifications: technology of maintenance and repair.”
What was useful to me in the repair:
Removing and installing the body side panel.
B — body side right/left; Br — front fender mudguard right/left; UP — right/left front side pillar amplifier assembly; R - wind window frame; C — wind window pillar, inner right/left; UV - wind strut amplifier right/left; PC - roof panel; Nbv — upper right/left sidewall trim; U - roof reinforcement assembly; Pun — corner rear panel, outer right/left; Sp — right/left floor threshold connector; L — front spar assembly right/left; PP — front floor panel; Nbn — lower middle sidewall trim right/left, Кз — rear right/left fender; Ps - middle floor panel; LS - middle right/left floor spar.
Body side assembly with reinforcements and trim
B — body side right/left; UP — right/left front side pillar amplifier assembly; UV - wind strut amplifier right/left; UB — sidewall reinforcement for mounting the trunk assembly; Nbn — lower middle right/left sidewall trim assembly.
View of the front floor from below
Front floor view from above
Detaching and installing the middle floor assembly
Ps - middle floor panel; A — rear wheel arch right/left; LS - middle right/left floor spar: Psr - middle floor cross member; Lz — rear right/left floor spar; N — rear floor extension right/left; PP — front floor panel; Pps - front cross member of the middle floor; Sp — right/left floor threshold connector; B — body side right/left.
Preparing for work
First of all, you need to raise the left side of the machine to make it more convenient to work. We just drove it onto its wheels. Thus, the body remains on natural support points and does not experience additional loads that could lead to its deformation during operation. Be sure to secure the opposite wheels with stops.
Next, we remove everything that will interfere with the work: fender, fender liner, plastic trim, interior trim, seats, wiring, etc. Only bare metal should remain. As you can see, the part of the front arch located at the threshold, the threshold itself, especially at the front and rear, as well as the areas of the bottom adjacent to it, were primarily affected by corrosion. The situation is, one might say, classic. On the right side the picture was similar, perhaps a little sadder.
Removing the old threshold and rotten areas of the bottom
We take a grinder and cut off the outer side of the threshold, trying to immediately cut through the amplifier located behind it. We cut not right down to the door, but a little lower; This will make it easier to weld the pipe. Bend the cut section down and remove it. Then we move on to the inner wall of the threshold; We also cut it approximately along the fold line.
We bend the amplifier towards the outer wall of the threshold, and shorten the elements sticking out between it and the inner wall as much as possible and bend them upward. You can weld them to the top of the threshold, or you don’t have to weld them, because... a little higher they are already connected by spot welding to the threshold and amplifier.
Let's get to the bottom. Here you just need to cut out the rotten areas. In some places it’s more convenient to crawl up from the interior, in others from below.
Features of repair and overcooking of the VAZ 2112 underbody
The VAZ 2112 model is the heir to the 10th family. In turn, the first car after the collapse of a large country was designed on the VAZ-2108 platform. The popular hatchback dates back to the mid-80s, which indirectly indicates the shortcomings of the age-old design.
Design Features
The bottom of all modifications of the family was made of rolled steel. Additionally, to increase strength, stiffening ribs are made.
Important! Since the frameless design involves accepting the load from all body and transmission elements, it is the condition of the bottom that determines the functional readiness of the car.
Cars of different body types have different overall dimensions. At the same time, the wheelbase of all modifications is the same - 2,492 mm. The size and shape of the bottom on all machines also has no fundamental differences.
Family service experience indicates that most often - in 9 cases out of 10 - repairing the underbody of a VAZ 2112 begins with checking the condition of the body side members. Corrosion processes require their strengthening.
How to find rust on the bottom
A prerequisite for trouble-free operation of the 12th family hatchback is periodic inspection of the car for corrosion from below. Even cars from recent years of production need additional processing.
It is better to carry out a comprehensive inspection of the bottom. Among the main detected defects are:
- peeling of the anti-corrosion composition;
- the appearance of local foci of corrosion (jack attachment points, thresholds);
- presence of fires on the interior side.
You should not delay diagnostics, since if the iron is damaged by 70% of its thickness, restorative repairs are difficult to carry out. It is more convenient to do diagnostics when lifting the car on a lift or driving into an inspection hole. It would be a good idea to look under the upholstery and from the interior.
Causes of rust and preventive measures
Among the reasons for the acceleration of corrosion processes on the bottom of the model with index 2112 are:
- storing the car outside during temperature changes and high humidity;
- operating a vehicle in difficult road conditions;
- water getting under the interior trim.
Almost any car over 7 years old is monitored for corrosion.
Preparatory work before restoration
Preparatory actions involve several sequential operations:
- dismantling seats and interior trim;
- removal of moldings (if installed);
- dismantling of air ducts;
- removal of noise and emissions insulation materials;
- Removing wiring elements.
In the case of the proposed replacement of the bottom of the VAZ 2112, it will be necessary to remove the central tunnel with the dashboard. This will make it easier to access the engine compartment.
The procedure for carrying out repair work
All work is conventionally divided into 3 stages: preparation of the bottom, replacement of the entire element or re-welding of individual parts, reassembly of the dismantled parts.
Tools and materials for work
Work is carried out after changing into dry clothes suitable for welding work. Before starting, prepare tools (grinder, welding machine, drill) and consumables. You will need new soundproofing sheets, as well as:
- mastic;
- primer;
- sandpaper;
- protective enamel.
After disassembly, it will become clear whether the repair will include additional metal parts, or whether the entire bottom of the VAZ 2112 will need to be welded.
Safety precautions
Since the work involves welding, fire safety of the work must be ensured. To carry out proper repairs, you should turn off the power to the car and drain all the fuel from the tank. For convenience, the doors in the cabin are dismantled, having previously de-energized the windows. In order to preserve the geometry of the body, after removing the doors, the openings are strengthened by installing spacer elements.
Note! Make sure the vehicle is securely fastened.
Replacement of structural parts
When performing work, take into account that the components of the bottom are:
- support platform;
- composite panels;
- threshold extensions;
- amplifiers of side members and cross members;
- connectors.
When carrying out troubleshooting, it becomes clear whether it is possible to repair a particular body element or whether the entire body will need to be replaced. In the case of fragmentary repairs, it is necessary to drill holes in the places where the part is attached using spot welding. The body element itself will need to be cut out with a grinder.
To digest a separate area, the patch is prepared in advance. Further work is carried out in the following sequence:
- the area is polished, the iron element is welded;
- welds are processed;
- the element is primed, sanded, and coated with an anti-corrosion compound.
Partial replacement is possible only in 1 case out of 10. If the option of individual elements is not suitable, a complete replacement of the bottom is carried out.
Replacing the entire bottom
Before starting work, it will be necessary to dismantle the elements of the exhaust gas exhaust system. From the standpoint of the sequence of operations performed, a complete replacement does not differ from a partial one.
Welding work when repairing the bottom
Readiness for welding is checked according to the following algorithm:
- grounding the device;
- complete serviceability;
- effective room ventilation.
First, the spot welding spots are drilled out and the bottom is cut out along the contour. A new element is inserted into the prepared area and welded around the perimeter in increments of 20-30 mm. The seams are processed. The best results will be achieved when using joint sealant.
DIY replacement: step-by-step instructions
A complete replacement of the thresholds is carried out if the part has corrosion wear of more than 50%, there are holes, or the rust has reached the amplifier. Partial overcooking is carried out after a mechanical shock, if there is significant deformation and in cases of a single corrosion plaque. A patch is welded onto the threshold. To replace, you will need the following tools:
- angle grinder (grinder);
- wide chisel, set of screwdrivers;
- electric drill with a set of drills;
- clamps and latches will be needed for installation before welding;
- gas welding or electric semi-automatic;
- automotive primer;
- bitumen mastic;
- iron brush, R-80 sandpaper.
Before welding the part, it is necessary to dismantle the interior and doors. Preliminary work step by step:
- The car is draining fuel.
- The negative terminal from the battery is disconnected; in some cases, the battery is removed completely.
- The doors are being dismantled.
- The trim of the pillars is removed from the interior, the carpet can be rolled to the side and covered with a rag.
- The overhead protective threshold, if any, is dismantled.
It is recommended to remove all plastic trim to avoid ignition due to sparks from the welding machine. The dashboard is covered with rags, the glass can be covered with paper so that dust from the grinding machine does not settle on them.
Instructions for overwelding parts of a fixed threshold:
- Mark the cutting lines of the old element with a marker.
- Using a drill, along the marked line, drill holes with a diameter of 0.4 mm at a distance of 8–10 cm from one another. If a standard unit is changed, the factory spot welding areas are drilled out.
- Use a grinder to cut out the old element exactly along the marking line. You can use a wide, sharp chisel. Drilled holes make cutting process easier.
Cutting or cutting takes place in the following directions: in the area of the front door, rear door, and the last section to be cut is in the area of the central pillar. The quality of the lower edge of the rack amplifier is checked: if the part is rusty, it is replaced or a power patch is welded.
- If the metal of the rack amplifier is in order, the outer panel is partially cut off. In the area of the stand and wings, it is necessary to leave 5 cm of old metal, to which the new outer part will be welded.
- Check the amplifier: in 70% of cases the part must be replaced. Remove the steel panel. The cut should pass through the welding point of the amplifier.
- Clean the seat from dirt and rust with a grinder. Cut out rusty areas completely, sand them down to white metal, and treat them with a solvent or rust converter.
- Weld the threshold connector to the subframe reinforcement with an overlap and align the lower edge.
- Fit the outer part to the connector and secure with clamps.
- Weld the connector to the bottom of the body, do not loosen the clamps.
- Weld the outer part.
- Clean the weld seams with a grinder and sand them.
- Apply a layer of automotive putty, prime the surface after drying, and paint at the final stage.
Replacing thresholds is a rather labor-intensive and labor-intensive process. At the service station, repairs are carried out by two experienced craftsmen. When replacing yourself, special attention must be paid to the fit of the new element and check the installation locations of the jack.