Any modern internal combustion engine works by igniting the air-fuel mixture. To prevent dust particles from entering the engine, the air intake system is equipped with a special filter. For each car, the manufacturer develops its own air filter that matches the design features of the engine. But over time, the air filter becomes clogged and loses its properties. Therefore, it needs to be changed.
Replacing the air filter on a Lada Vesta car is not particularly difficult. But for some reason, many car owners forget to do this in a timely manner. If we talk about the replacement interval, then the Lada Vesta air filter must be changed after 30 thousand kilometers. But if the machine is operated in difficult conditions, the replacement interval should be reduced by 2 times.
Finalization
And now, another way has appeared - a cold intake and a large air filter on the Lada Vesta, the same as the one on the Sport modification. The peculiarity of this method is that it is suitable for both engines of the model - 1.6 and 1.8 liters.
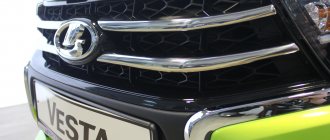
Lada Vesta Sport has an enlarged air filter created specifically for this version. In addition, this modification has a different air intake location - it is located next to the left headlight behind the radiator grille.
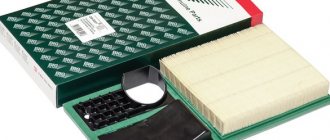
Air filter housing (new model) for VAZ Vesta, X-Ray, Largus
Dear customers, in order to avoid errors when sending the universal air filter housing (box) Lada Vesta / Lada Vesta, Lada X Ray / Lada Xray, Largus, in the “Comment” line, indicate the model of your car, year of manufacture.
For the engine to operate, a mixture of fuel and air is required. To prevent dust and other small particles from entering the engine, an air filter is installed in the air intake.
The universal air filter housing 8450031940 Lada Vesta / Lada Vesta and Lada X Ray / Lada Xray is a design designed to protect the filter element “BIG Filter” GB-95090 with catalog number 8450033130 from mechanical influences and creating an air flow that will be directed exclusively , into the filter element.
The plastic air filter housing 8450031940 is located in the engine compartment. The engine is powered by two things: fuel and air, otherwise the internal combustion engine will not work. If even a small crack appears on the air filter housing, the normal functioning of this system will be disrupted.
The air entering the engine will come not only from the bottom of the box, but also from existing cracks. And if there are large cracks or holes in the air filter housing, dirt, stones and other foreign objects will get into the engine, which will lead to engine failure.
The air filter housing performs a protective function. Replacement must be carried out if it is damaged (through cracks or dents appear on it), since the air filter quickly becomes dirty, and accordingly, more dust and dirt will enter the engine.
The air filter “BIG Filter” GB-95090 with catalog number 8450033130, despite its simplicity, is one of the most important elements in the Lada Vesta and Lada Xray. Street air passes through it and, mixing with fuel, enters the combustion chamber. If the filter is clogged with dust and dirt, then the most harmless thing that can happen in such a situation is a significant decrease in the car’s power level.
If you do not change the filter in a timely manner, then after a while it may break, which can lead to the most unpleasant consequences:
— Scores appear in the combustion chambers on the cylinder walls.
— Scratches form on the valves.
— Engine oil is mixed with dust and dirt.
— The throttle assembly also becomes clogged with dust.
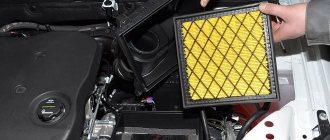
Unlike previous models Lada Vesta / Lada Vesta and Lada X Ray / Lada Xray, replacing the engine air filter is carried out without tools.
AvtoVAZ recommends changing the filter element every 30,000 km. mileage for Lada Vesta / Lada Vesta and once every 15,000 km for Lada X Ray / Lada Xray. When operating the vehicle in difficult conditions (for example, increased dust levels), the filter should be changed more often.
The plastic air filter housing is more often damaged than the metal one. The range of damage is most often limited to melting of the housing caused by high temperatures in the engine compartment and insufficient cooling of the unit, as well as accidental mechanical damage or as a result of an accident. In this case, the housing must be replaced.
Other article numbers of the product and its analogues in catalogues: 8450031940.
Lada Vesta / Lada Vesta, Lada X Ray / Lada Xray, Lada Largus / Lada Largus.
Any breakdown is not the end of the world, but a completely solvable problem!
How to independently replace the air intake on a Lada Vesta family car.
With the AvtoAzbuka online store, repair costs will be minimal.
Just COMPARE and BE SURE!!!
Don’t forget to share the information you find with your friends and acquaintances, as they may also need it - just click one of the social networking buttons located above
Components
The entire Lada Vesta Sport air filter kit consists of a number of elements. Their names and articles are presented in the table.
| Air filter half housing (upper) | 8450032859 |
| Filter element | 8450032860 |
| Semi-housing (lower) of the air filter | 8450032858 |
| Bolt | 7703008226 |
| Screw M6x30 | 8450002332 |
| Washer 6x18 | 8450003738 |
| Elastic bushing for fixing the electric fan | 8450001134 |
| Intake pipe hose assembly | 8450032835 |
| Screw clamp assembly | 8450001108 |
| Clamp 16 | 7703083470 |
| Hose (upper) crankcase exhaust ventilation | 8450008594 |
| Connection pipe | 8450101902 |
| Air intake assembly | 8450032837 |
| Screw clamp assembly | 8450001108 |
| Connection pipe | 8450032838 |
| Washer 6x18 | 8450001123 |
| Bolt M6x25 | 8450006008 |
Alternative
However, one of the owners of Vesta, whose name is Evgeniy and is known on Drive under the nickname gps-nav , found an alternative way to install a large air filter on the Lada Vesta, which is several times cheaper. It involves purchasing components from different cars and their subsequent modification.
Elements:
- filter element - Filtron AP 074/3 is suitable - 330 rubles;
- air filter housing from the Ford Mondeo 3 model – 600 rubles – can be purchased under article number 4609885902;
- air filter pipe from the VAZ 2111 model – 700 rubles;
- sewer pipe 75 mm and sewer bends 90° and 67° – 220 rubles;
- fitting - 30 rubles;
- plastic ties (2 units) and a metal clamp (2 units).
IMPORTANT! Sewer components have not yet demonstrated their reliability. There is an opinion that in the cold they will crack.
After all the listed components have been purchased, you can begin work.
Removing and installing the Lada Vesta engine radiator
We are preparing the car for work. We install the machine on a viewing hole or on an elevator. Disconnect the negative terminal of the battery.
Remove the engine cover.
Remove the front bumper of the car.
Remove beam 1, Figure 1, front bumper.
Press the clamps and disconnect the air intake hose from the deflector 2.
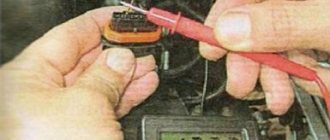
Press the clips and disconnect the ambient temperature sensor 1, Figure 2, from the air deflector 2.
Press the clips and remove the air deflector 2.
Drain the engine cooling system (see article on replacing coolant).
Release the clamps and disconnect:
— supply hose 1, Figure 3, radiator from pipe 3 of the thermostat;
— radiator outlet pipe 4 from the water pump inlet pipe;
— steam outlet pipe 1, Figure 4, from the expansion tank pipe 3 (use pliers).
Cut the clamps on the upper cross member of the radiator frame and the transmission bracket.
Disconnect harness connectors 1, Figure 5, front wires from fan relay box 2, buzzer 3, and radiator fan 4 connectors.
Cut the clamp 5 that secures the front wiring 1 to the fan housing.
For vehicles with air conditioning
Press the clamps, disconnect and remove condenser 1, Figure 6, of the air conditioning system from radiator 2 of the engine cooling system.
Operations for all vehicle configurations
Unscrew and remove from the brackets 1, Figure 7, on the upper cross member of the radiator frame, the clamps 2 securing the radiator 3.
Remove radiator 2, Figure 6, from the support on the lower cross member of the radiator frame and remove the radiator along with the electric fan and pipes.
Press the clips and disconnect the engine cooling fan from the radiator.
Radiator installation
Install the engine cooling fan onto the radiator.
Install radiator 2, Figure 6, of the engine cooling system with the electric fan assembly and pipes into the fastenings of the lower cross member of the radiator frame.
Secure the radiator 3, Figure 7, of the engine cooling system with two clamps 2 on the brackets 1.
Connect the hoses at the inlet, outlet and steam outlet of the radiator of the engine cooling system to the corresponding pipes and secure them with clamps, Figures 3 and 4.
Install new clamps to the upper radiator frame cross member and to the transmission bracket.
For vehicles with air conditioning
Install and secure the air conditioning condenser 1, Figure 6, on the radiator 2.
Operations for all vehicle configurations
Install and secure air deflector 2, fig. 1, on the radiator.
Install sensor 1, Figure 2, of ambient air temperature on air deflector 2.
Connect the air intake hose to the air deflector.
Connect the connectors of harness 1, Figure 5, of the front cables to the connectors of the relay unit 2 of the electric fan, buzzer 3 and electric fan 4 of the radiator.
Install a new clip 5, which secures the front harness 1 to the radiator fan casing.
Install beam 1, Figure 1, front bumper.
Install the front bumper.
Fill the engine cooling system according to the article (Replacing coolant).
Connect the ground wire terminal to the battery.
Start the engine and let it idle for 2-3 minutes to remove any air pockets in the cooling system.
Make sure the heater is working properly.
After turning off the engine, check the coolant level and make sure there are no leaks; if necessary, adjust the coolant level to normal. The coolant level should be between o and “max” on the expansion tank.
Install the engine fender
And spring returns. And again you can do something with the car.
Recently, in principle, there have been no adventures, only problems: - I noticed that the seat heating stopped working, despite the headlights being on; — the right support post was condemned again. They will switch places in pairs again. I'll have a detailed post when the shelves arrive.
Also in the summer I installed an air filter from Vesta Sport.
Tools: — Fixed wrench 10 — Phillips screwdriver — pliers — Torx wrench t30
For details, we needed: - 6 bolts M6 30 for fastening the two halves of the air filter (photos of individual parts taken from the Internet) - 2 terminals d 70-90 - upper semi-trailer - 8450032859
Replacement process 1) Remove the battery, otherwise the original suction system will not survive. 2) Unscrew 2 bolts securing the resonator and 1 bolt of the air filter housing (torx t30)
I’ve only been driving for one day and so far the feelings and impressions are as follows. 1) The vibration at idle has almost completely disappeared. I used to feel confident both through the steering wheel and through the pedals, sometimes it even seemed like the car was being undermined. Now I would say that work has become completely normal. There is a slight, uniform vibration, but this is only a shadow of what happened yesterday. 2) There may already be a “placebo”. The feeling that the ride has become smoother is especially noticeable when moving into an inclined position. It seems like something is missing. 3) It could also be a “placebo”. It is possible that the engine has become quieter, but it is also possible that this is a consequence of strong heating up to 20 degrees and the fact that the engine starts immediately from operating speeds, and not from an increase, as at lower temperatures.
So far, using filters, I have found the following articles: - Lada - 8450032860 (apparently there is a FILTRON inside) - Filter - AP139 / 1 - VAG - 6K0129620B (I ordered it, but the quality turned out to be “so-so”) - MANN - C37132 - hits the basics like an analogue and For some reason there have already been 4 supplier refusals. I'm still waiting and really hoping that there will be something healthier than VAG's.
I would be grateful if someone suggests another analogue, but of acceptable quality (at least with the same fluffy pillow)
Other news: I bought a Lada console lamp for the last row in white (art. 99996350000016). At first it didn't work, but after a few hours of charging it came to life. Shines moderately bright. Enough for rear passengers (and most importantly, they don’t drive often).
UPDATE On xomastorm I also found such a sign on the filters
Work progress
Self-installation of a large air filter on a Lada Vesta begins with modification of the housing itself. First of all, it is necessary to solder the factory hole through which air is taken in.
Next you need to solder the purchased pipe. You can do this in different ways - using epoxy resin, soldering a metal mesh, using a stapler, etc. But in general, soldering using a metal mesh provides the most durable fixation.
Next you need to connect the sewer pipes and outlets.
To prevent the connector from interfering with the installation of the filter housing, it must be recessed and secured with a tie.
All that remains is to put in place the homemade air intake, constructed from sewer components, install it with the desired slope and secure it with a clamp.
Then you need to move the car’s battery to the right and back until it stops, since otherwise it will interfere with the installation of the large air filter housing on the Vesta.
The case itself needs to be tightly fixed, and to do this, place it in such a way that the rear legs rest on the corrugation with wires.
This completes the independent installation of a large air filter on the Lada Vesta.
Installing the Sport intake system
We begin the installation of the new intake system by installing the intake pipe; there is a special hole on the car body (next to the battery) (see photo above), this is where our pipe is attached using an ordinary bolt. After the air intake has been installed, we proceed to attaching the pipes:
The pipes are secured using tightening clamps in a few minutes. After installing all the pipes in their regular places, you can proceed to attaching the new air housing. First of all, install the body in the intended place (do not tighten the bolts to the body), connect the pipe coming from the throttle valve, and then proceed to connecting the air intake:
The air intake itself is plastic, so you will have to connect it using a homemade adapter (see photo above) and two tightening clamps.
After the pipe and air intake are attached, you need to screw the filter housing to the car body. After improving the intake system, car owners note the following improvements in car behavior:
- increase in engine power
- slight reduction in consumption
- smoother engine operation
Effect
If you consider the reviews of the owners who went through with this modification, it becomes clear that the effect is quite noticeable. They note that the engine begins to “breathe”, and not only at the bottom, but also works more vigorously after 3,000 rpm.
The engine revs noticeably easier up to 5,000 rpm. Those who often drive in traffic jams claim that the car has stopped shaking in traffic jams.
In general, installing a large air filter on your Lada Vesta yourself is completely worth it, especially if you don’t buy branded products.
Other options
Below are modification options from other West owners, using several other components. All details can be viewed in their logbooks.
Option from Ivan Kiselyov. On Drive under the nickname BAHO and his car Lada Vesta *Blues Sky*
Option from Alexander. On Drive under the nickname MiheyA and his car Lada Vesta sedan 1.8 AMT
On Drive under the nickname WaPJIaTaH and his car Lada Vesta Fantan