DIY air intake mesh
Hello everyone
! So I was not spared this modification of our favorite cars. I decided to make an air intake mesh, and then install it. I used these safety posters as materials.
I found the mesh sizes on the Internet.
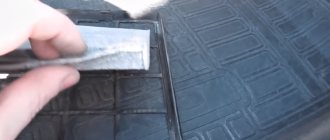
I made the frame width 15mm. Next, I marked and cut out with a serrated knife (a knife with serrations).
Next, I cut out the mosquito net to shape and glued it with waterproof glue.
This is what happened in the end.
The frame thickness was 4mm.
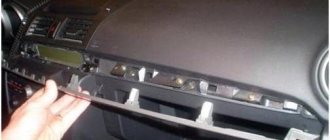
The most difficult operation was to remove the wiper arms. They didn’t want to remove themselves with their hands. Even rocking and light blows with a hammer did not help. In the end, I decided to use a puller, but only a three-legged one was available.
Naturally, not three, not even two such thick paws could not fit. Because I’m an experienced pelvic specialist, and there was no such thing that I couldn’t do anything with the means at hand. I decided to try to use it as a one-legged one)))).
We do not completely unscrew the nut, place one paw under the leash and begin to tighten the rod, while holding the puller tightly and applying tension. Then, with light movements, we swing the leash and it is removed. The frill can be removed quickly and without any difficulties.
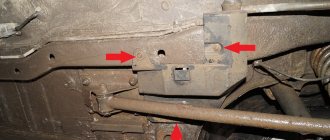
At the same time I decided to enlarge the holes in the drainage rubber bands, because... I read while driving that over time, these rubber bands become clogged with dirt, leaves, and because of this, water begins to enter the cabin through the air intake.
Then everything is assembled in reverse order. Good luck and health to everyone, and if you are sick, be sure to get well!
I installed a mesh on the interior air intake. I had to remove the plastic under the wipers, 6 screws + the wipers themselves (take them off) I ordered the mesh from Ali. arrived in 6 days 546.71 rubles. | Frill mesh filter for Lada Vesta 2015 2016 2022 2018 2022 plastic ABS protection function car tuning accessories https://s.click.aliexpress.com/e/YsL03hC
But to clean the mesh, it’s the same torment?
I installed it last year in the summer. The Internet is full of manuals on how to do it. The only problem was removing the wiper arms, the rest is simple) I bought the mesh at Westashhop)
what to put. what to remove. everything is one.
Lada Vesta SW Cross 1.8 5MT Luxe Multimedia Mars 2022. was.
then you need another mesh to protect the mesh from debris))
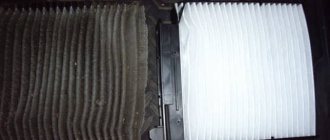
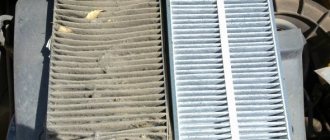
What does this net save her from? I’ve been driving without nets for exactly a year, well, I changed the cabin filter, I won’t say that there was something terrible there..
So nothing reaches the filter - it gets stuck on the fan.
Last edited by mc1aren; 05/03/2019 at 15:32 .
Lada Vesta SW Cross 1.8 5MT Luxe Multimedia Mars 2022. was.
# Literacy is encouraged, but in this case the misspelled word was used to add emotional overtones. The entire offtopic has been deleted, please stay on topic!
Last edited by admin; 05/03/2019 at 18:52. Reason: offtopic
12-640×426.pnghttps://lada.online/do-my-self/tunin. ada-vesta.html tvy61
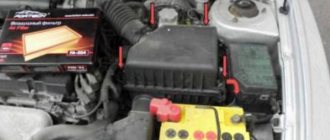
,After all, the filter is installed behind the fan, which means that all the debris first fell on the fan blades, and only after that settled on the cabin filter. Most likely, this was done so that Vesta’s cabin filter acts as additional sound insulation. Solution to the problem It consists of installing an additional filter, but a much smaller one. Previously, sedan owners had to do everything themselves. However, now the problem has become much less acute, because mass production of filters has been established. The air duct mesh itself for Vesta is a black outline surrounding a fine mesh mesh. Fastening is carried out using magnets. This is a very convenient and logical solution, since fixing the air duct mesh with screws or bolts would be extremely inconvenient due to the lack of standard holes and space to drill new ones
Yes, I don’t mind, the question was about the difficulty of cleaning this mesh..
How does the air intake work on a Lada Vesta car?
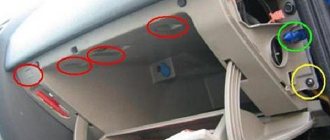
The principle of operation is to take dirty air from the engine compartment with a fan and redirect it through a filter into the heating or recirculation system pipes. As a result, purified air enters the cabin through the openings:
- in the door;
- to the right of the driver's working leg;
- under the glove compartment above the front seat passenger's feet;
- in the middle, on the sides of the control panel.
The operation of the Lada Vesta air intake is regulated by pressing a button that turns the electric fan on or off. The speed of its rotation is regulated by a special resistor. The structure itself is located to the right of the driver, in the glove compartment area.
Air intake components
The air intake system of the Lada SV Cross includes the following components:
- cabin lower filter;
- electric fan;
- pipe system;
- lattice with large mesh;
- control resistor;
- beverage cooling chamber.
Photo source: https://www.drive2.com/l/525869199726216248/
All parts of the system ensure the supply of clean warm or cool air to the vehicle interior.
Advantages of the Vesta Sport air intake
On previous Lada models, the design looked different, which led to inconvenience. And the air intake of the new Lada Vesta model is located closer to the cabin. Because of this, he gained the following advantages:
- repairs of the entire structure are carried out from inside the car;
- To remove and replace the air filter, it is enough to dismantle the glove compartment;
- a more advanced air supply system for heating or ventilation;
- new space under the control panel on the right side for cooling drinks.
Despite so many improvements, there are still unresolved problems with this system.
DIY Vesta air intake mesh
- 340 rub.
- Description
- Reviews (8)
- Question answer
Interior air intake mesh with magnets for Lada Vesta car.
The mesh covers the inlet to the car's air intake, creating an obstacle for various small debris; the dust itself is already filtered by your cabin filter.
The mesh is installed in a regular place without drilling the body, fixed with neodymium magnets (supplied with the mesh)
1. Remove the windshield wiper arms 2. Remove the plastic frill (6 torx t20 screws) 3. Install the mesh 4. Fix it in the hole with magnets 5. Reassemble in reverse order
When should you change?
The frequency recommended by manufacturers does not always “work”; the reasons for this phenomenon will be indicated below in this article.
But there are several practical tips that will help you avoid missing the time to replace the cabin filter.
Signs indicating loss of functionality of an element:
- the intensity of the air flow from the stove decreases when the external air intake is turned on;
- the time it takes to warm up the cabin to a comfortable temperature increases;
- the stove engine runs for a long time and with a critical load;
- the windshield fogs up on the inside or takes a long time to thaw;
- there is a noticeable increase in the amount of dust on the panel elements;
- There are unpleasant odors in the car.
The presence of one of the listed signs indicates that the filter element is clogged and needs to be replaced.
Problem
However, this solution had almost no effect, as a result of which the company received complaints and requests for additional improvements to the design. After all, the filter is installed behind the fan, which means that all the debris first fell on the fan blades, and only after that settled on the cabin filter. Most likely, this was done so that Vesta’s cabin filter acts as additional sound insulation.
And AvtoVAZ gave an answer according to which, from January 2022, the frill was corrected in accordance with the wishes. However, as the actual operation of Vesta showed, although the likelihood of filter clogging was reduced, it was not possible to completely eliminate this design flaw.
Naturally, all this forced the owners of Lada Vesta and X-Ray to resolve the issue on their own.
Review of Manufacturer Prices
Dimensions: 184x133.5x26 mm.
| vendor code | |
| Serial number/item | Price in rubles |
| LUZAR 271153553R (original) | From 5000 |
| STELLOX 10-35126-SX | From 4500 – 4700 |
| FENOX RO0004C3 | From 4500 – 4700 |
| RO0003O7 | From 4500 – 4700 |
| AVA QUALITY COOLING RTA6398 | From 4500 – 4700 |
| VALEO 812374 | From 4500 – 4700 |
| NISSENS 76512 | From 4500 – 4700 |
| MAGNETI MARELLI 350218221003 | From 4500 – 4700 |
| *prices are as of May 2022 | |
Cold intake from Vesta Sport
Lada Vesta SW Cross 1.8 5MT Luxe Multimedia Mars
Lada Vesta SW Cross 1.8 5MT Luxe Multimedia Mars
I feel like the jerking has disappeared in 1.2 gear. The car became more responsive when you press the gas pedal. There is always enough air now. In terms of the temperature of the incoming air, there is no change on the highway; in the city it may be a little hotter, but the difference is not so obvious. Because The entire intake system also got hot before. After 3t. rpm there was a roar like a sports car.
Work: I only pulled out the original box with the filter, unscrewed the adapter from it (with 2 bolts), which is then inserted into the rubber corrugation. This adapter was screwed directly to the Ford filter (all seats fit perfectly) and back into the corrugation to the throttle. Place the corner in the standard filter mounting location.
Functions that a high-quality cabin filter should perform
This list includes:
- remove the smallest solid particles;
- prevent allergenic plant pollen from entering the cabin;
- captures chemical compounds of exhaust gases (oxides of nitrogen, carbon, sulfur, compounds of heavy metals, etc.);
- minimizes the harmful effects of low-quality washer fluids (solvent vapors, alcohols).
But you shouldn’t think that cabin filters only improve the microclimate in the cabin; their use solves several other important problems.
- Reduces the number of interior cleanings. While removing dust from plastic and leather interior elements is not difficult, cleaning fabric elements is a rather complex and time-consuming procedure.
- Increases the reliability of all rotating pairs. This refers to electric motors that drive heating, air conditioning, and other units located in the cabin. Dust has abrasive properties and significantly increases the wear of rubbing parts.
The capabilities of filters depend on their design. The simplest and cheapest ones purify the air only from solid particles. The most effective ones for complex cleaning have, in addition to paper elements, activated carbon fillers.
Checking heating efficiency
The heater should be checked before the start of the winter season, and also several times in winter. Then troubles will not take you by surprise. To do this, you need to check the operation in all modes and evaluate:
- Does the air heat up and how quickly?
- Does the flow of air masses change with a change in command;
- Are there any extraneous noises?
- In general, are you satisfied with the operation of the heater?
Particular attention should be paid to the same temperature of the pipes. If the difference in the heating of rubber pipelines is significant, this means a serious problem. It's worth finding. In the worst case, this means replacing the Vesta radiator; in the best case, airing or a low level of antifreeze.
Door stops
My car is a 2022 model, and the doors swing from side to side like a gate. All this is due to the fact that old-style limiters are installed here.
They perform their functions poorly. New types of limiters have been on sale for a long time. The price for one is about 1,450 rubles. Today we will install them to replace the old ones.
To do this you will need to remove the door trim. Having safely removed the upholstery, we move on to replacing the limiters themselves.
The restrictions have been removed. You see old and new.
The old one is mounted on studs, and to attach the new one you will need additional bolts. Installed new door stops. Now there are 3 clearly fixed positions.
The door is clearly fixed, does not slip, does not dangle like a gate. The thing is really useful. If you have old-style limiters, I strongly recommend that you replace them with new ones.
Lock dampers
Next, a few words about an inconspicuous but useful improvement. These are door lock dampers.
They serve for a softer, quieter closing of doors, tightly fixing the locks in the closed position. This in turn reduces the load on the hinges and extends their service life. In addition, when driving on uneven roads, extraneous sounds from the locks disappear.
Tank neck protection
To protect the paintwork in the fuel filler area, I installed a rubber ring.
But here I would like to talk about another important improvement. Many Vesta owners have encountered the following situation. You press the gas pedal, but the car does not accelerate and moves jerkily. The “check” on the instrument cluster does not light up. That is, there seems to be no pronounced problem.
The reason for this is a clogged fuel pump grid. The point here is not even the use of low-quality gasoline. In my opinion, dirt gets into the tank in another way. This path is a hole for a check valve, which serves to connect the tank with the atmosphere.
Dirt from under the wing gets into this cavity. To remedy the situation, I installed an additional hose in the hole.
This is a hose from the pneumatic system of the intake module 129 of the engine. It fits the hole perfectly. After this modification, neither I nor any of my friends ever encountered a clogged fuel pump strainer. I recommend doing this before you encounter this.
I installed cool speakers with good sound in the Lada Vesta. I show in detail all the installation work
Why is galvanization needed and what is it?
Paintwork is not enough to protect the body. The slightest damage and moisture does its job, causing oxidation of the steel. The corrosion center, unnoticeable at first, grows, and the car has to be repaired.
One of the most effective ways to prevent rust formation is galvanizing the body. Auto industry leaders have been practicing this procedure for many years. Thanks to this, they can provide a warranty on the body for up to 20 years.
The body can be galvanized in the following ways:
- heat treatment;
- galvanic treatment;
- cold processing.
With the cold method, the body is simply treated with a zinc-containing primer. In this case, manufacturers do not provide a long-term guarantee, because the protective layer may be damaged along with the paint.
Trunk mat
For the luggage compartment I bought a rubber carpet with high sides.
There are also cheap plastic carpets, but I advise you to take rubber ones, as they are more elastic. The mat is primarily necessary to protect and preserve the factory carpet. If you often carry luggage, then this accessory will really be useful for you.
The shape of the rubber carpet perfectly follows the geometry of the luggage compartment and is perfectly fixed in place. And most importantly, it is easy to clean.
Trunk lid trims
For the aesthetic component of the luggage compartment, I also purchased two plastic trims.
One of them is placed in the opening on the body reinforcement, the second - on the trunk lid. I can’t say that this metal body reinforcement irritated me very much, but personally it seems to me that it clearly stands out from the general concept of the trunk.
This neat overlay, in my opinion, is an excellent solution to the situation. Quite a different look, isn't it?
Another point relates to the trunk lid. I understand that there was most likely a question of saving money and materials. But the fact that one part of the lid is covered with upholstery and the other is not has always been a very controversial decision for me.
It looks somehow unfinished. Therefore, I think this trim is very useful for creating a visually completed image of the trunk lid.
It looks neat and covers everything unnecessary.
Door seals
The next modification on the list is door seals called RKI-19, which are attached to the front end of the rear doors.
This is what the gap between the doors looks like without a seal.
And here it is with the seal installed.
It doesn’t stick out, it doesn’t puff up, it’s completely in order here. What is the use of this accessory? Thanks to it, the body sills and the central pillar become much less dirty in bad weather.
Door openings remain clean. It even seemed to me that with him in the cabin it became a little quieter.
Hood gas struts
Without the following accessory, it would be wrong to talk about any modifications to the Lada Vesta. And you probably guessed what it is. These are those wonderful gas hood struts. They allow you to open the hood easily and simply, with one hand.
The thing is really useful, when they are not there, you think: “A standard poker is enough.” But when you install them, you realize that using them is much easier and more convenient. The hood stops are installed easily and without problems. One bracket is placed on the front panel, the other on the hood. The entire installation process takes no more than 20 minutes.
Hood seal
Next on the list is a powerful three-meter hood seal, which is easily installed with double-sided tape.
It costs about 800 rubles. To seal the engine compartment, one seal is installed from the factory in the front of the hood.
But it is not enough to ensure cleanliness. This seal is mounted around the entire perimeter of the hood. It really effectively prevents dirt from entering the car's engine compartment.
I have always been scrupulous about the cleanliness of the car, not only outside and inside, but also in the engine compartment.
If you are from the same category, then a seal will obviously not be superfluous for you.