New products
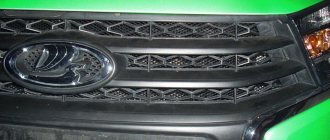
One of the most popular and popular components is the radiator grille for Lada Vesta without a badge, which is installed in place of the standard one.
It is made of durable ABS plastic, thanks to which it perfectly withstands temperature changes and is not afraid of basic road reagents, as well as mechanical stress (within reason, of course).
Its installation allows you to make the car more original and distinctive, primarily due to the fact that the company nameplate will be hidden. The product is painted in black lacquer, but the client can order other colors.
More details about it are described in the video.
Review of product prices for LADA Vesta
Price is an important criterion when choosing parts for tuning; it often affects the quality of the product and its durability. Let's consider the most optimal products in terms of price-quality ratio.
- YAROPLAST winter grilles consist of two elements. One of them is for the lower grille, the other for the upper protection.
Cost – 600 rub. and 900 rubles, respectively. This is a high-quality product that allows you to completely block the oncoming flow of air masses for the radiator. If the air temperature drops below 3-4 °C below zero, it is better to remove the upper part of the structure so that the cooling fan does not turn on too often.
- Icarus-VENERA.
Link on topic:
Tuning the dashboard lighting of the Lada Vesta. Self-improvement methods
Designed for top-end vehicles, installed in place of the factory design. All other configurations can be upgraded with a product with article number 8450008876. The cost is about 1,700 rubles.
- Chromed bottom trims.
For manufacturing, they use polished stainless steel, which is not susceptible to corrosion, and it can be installed on top of the standard system. A quality product costs about 5,000 rubles.
- External mesh for radiator.
An alternative solution for those who decide to abandon metal mesh. You can install it yourself on the inside of the bumper in just five minutes. For the edging of the protection, soft black plastic is used, secured with clamps. A high-quality bottom set will cost 2,300 rubles, an upper set will cost 3,300 rubles, a winter set for the bottom costs 650 rubles, and an upper set will cost 1,000 rubles. Winter covers can only be installed on protective nets.
- Linings produced by FERRUM-GROUP.
High-quality products that have many positive reviews. Cost from 1850 rub. up to 2850 rub.
- Another stylish tuning is an emblem for the Vesta radiator grill; it will cost from 300 to 1000 rubles.
Next, we suggest that you familiarize yourself with the price table in the most popular online stores. In specialized stores, the cost of goods may be higher by 300-100 rubles, in automobile markets - by 200-500 rubles.
| Manufacturer | Price |
| ICAR-VENERA | 1650 – 1730 rub. |
| YAROPLAST | 1400 – 1600 rub. set top, bottom |
| FERRUM-GROUP | 1700-2900 rub. |
| Chrome protection | From 4500 rub. |
| External structures | 2000 to 3500 |
| Winter external protection | 1630-1650 rub. set |
*prices are current as of October 10, 2018.
Experts do not advise purchasing the cheapest goods, since they are not of good quality; it is better to choose an average cost and a trusted manufacturer. For example, products produced by FERRUM-GROUP have good characteristics.
List of online stores
Related link:
Options for tuning the interior of the Lada Vesta: recommendations from upgrade specialists
https://ladatuningshop.ru/reshetka-radiatora-lyuks-bez-znachka-dlya-lada-vesta
Yaroslav: “I needed a radiator grille for Vesta, tuning - I decided to buy it in this store. I was pleased with everything - the price was reasonable, the goods arrived whole, not broken.”
Max: “Problems with delivery, they promised to send it right away, they sent it in a week. I called and asked what the reason was - they said they were out of stock and were waiting for delivery.”
Sergey: “Quality product, good material, but it came to me with two scratches on the left side of the part.”
https://lada-vesta-shop.ru/shop/tyuning/reshetka-radiatora-ikar-dlja-lada-vesta.html
Artem: “On weekends it is impossible to contact the store - this is very inconvenient, since on weekdays there is simply no time for conversations.”
Alexander: “The product fit perfectly - I talked to the seller by phone, he helped me choose the size of protection, told me all the characteristics - a good store.”
Nikita: “A large selection of different parts for Vesta, I found not only protection, but also many other things necessary.”
https://rs-motor.ru/vneshniy-tuning/reshetki-radiatora/vesta-lyuks
Dima: “I’ve already ordered goods for my car from this store twice, they always arrive quickly, the delivery is good, and the quality is excellent.”
Matvey: “I ordered a Lada Vesta radiator grill here and decided to do the tuning. It arrived beautiful, good, I can’t say anything, but the price turned out to be higher than what I later saw in our car market.”
Denis: “I am satisfied with the speed of delivery, the speed of order processing, the quality of the goods - there are no complaints about the seller.”
https://avtoform-plast.ru/catalog/reshetki_radiatora_top/product_12568/
Stas: “I called a store representative, received high-quality advice, they advised me on both the size and characteristics of the product - I was pleased with the seller’s work.”
Egor: “The materials and products are really high quality, worth the money. The seller actually sends original parts, verified.”
Grigory: “I waited for delivery for two weeks - that’s quite a long time, although in the conversation they promised that the goods would be available tomorrow, in fact it arrived five days after the conversation.”
Front bumper - disassembly, replacement of linings, moldings (CROSS body)
The front bumper of a car in the “CROSS” design has a more complex design and consists of several elements interconnected by latches and self-tapping screws (Figure 2-1).
Figure 2-1 — Elements of the front bumper of the “CROSS” configuration: 1 — radiator trim; 2 — upper radiator grille; 3 — right arched bracket; 4 — right fog lamp: 5 — left fog lamp; 6 — left arched area bracket: 7 — bumper: 8 — lower radiator grille; 9 — upper right front bumper molding; 10 — upper left front bumper molding; 11 — lower front bumper trim; 12 — right front bumper trim; 13 — left front bumper trim; 14 — lower right front bumper molding; 15 — lower left front bumper molding
Place the bumper on the desktop. Unscrew screws 3, Figure 2-2, securing bracket 4 of the arched area to the bumper, remove the bracket. Unscrew the screws and remove the second bracket on the other side of the bumper (Torx T20 head).
Unscrew the screws 2 securing the bracket 1 of the fog lamp, remove the bracket as an assembly with the fog lamp. Unscrew the screws and remove the second bracket on the other side of the bumper (T20 Torx head).
Figure 2-2 — Attaching the arched tone bracket:
1 — fog lamp bracket:
2 — screw securing the fog lamp bracket:
3 — screw securing the arched area bracket
4 — left arched tone bracket
Unscrew three screws 2. Figure-2-3, securing the lower molding to the bumper (T20 Torx head. wrench).
Remove the molding by squeezing the locking latches (using a flat-head screwdriver).
Unscrew three screws 1 securing the upper molding to the bumper (Torx head T20. wrench).
Remove the molding by squeezing the locking latches (using a flat-head screwdriver).
Figure 2-3 Attaching the top and bottom moldings:
1 — screw for fastening the upper molding:
2 — screw securing the lower molding
Remove twelve screws 2. Figure 2-4. fastening bumper trim 1 to bumper 3 (Torx head T20. wrench).
Remove the cover by squeezing the locking latches (using a flat-head screwdriver).
Dismantle the moldings and trim on the other side of the bumper in the sequence described above.
Figure 2-4 — Attaching the bumper trim:
1 — bumper trim;
2 — screw for fastening the lining;
Unscrew nine screws 3, Figure 2-5, securing the radiator trim 1 to the bumper 2 (Torx head T20. wrench).
Release the latches and remove the trim assembly with the radiator grille (using a flat-head screwdriver).
Figure 2-5 Attaching the radiator trim:
1 — radiator trim; 2 — bumper; 3 - cladding fastening screw
Unscrew screws 2, Figure 2-6, securing the upper radiator grille 3 to the lining 1 (Torx head T20. wrench).
Press the latches and separate the parts (flat head screwdriver).
Figure 2-6 Radiator Grille Attachment:
1 — radiator trim; 2 — grille fastening screw; 3 upper radiator grille
Unscrew screws 2, Figure 2-7, securing the lower bumper trim to the bumper (T20 Torx head. wrench).
Remove the trim. pressing the locking latches (flat screwdriver).
Figure 2-7 — Fastening the lower bumper trim: 1 — trim clamps; 2 screw securing the trim to the bumper
Unscrew eight screws 1, Figure 2-8, securing the lower radiator grille 2 to the bumper 3 (Torx head T20. wrench).
Remove the grille by squeezing the locking latches (using a flat-head screwdriver).
Figure 2-8 Fastening the lower radiator grille: 1 - screw securing the grille to the bumper; 2 — lower radiator grille; 3 - bumper
Where can I buy?
The most convenient and easiest way to buy a radiator grille for Lada Vesta without a badge is through the Internet.
IMPORTANT! Initially, these grilles were suitable exclusively for the Lux package, which limited their use. However, later the manufacturer expanded the range and now you can purchase goods for any configuration of Vesta. This point needs to be clarified with the manager, since the price for them is different - products for Vesta Lux are cheaper.
The most popular sites are in the table.
| Online store | vendor code | Version | Price, rub.) |
| ladatuningshop.ru | Comfort and Start | 2 900 | |
| ladatuningshop.ru | Lux | 1 890 | |
| timeturbo.ru | 8158 | Lux | 1 780 |
| avtoform-plast.ru | Lux | 1 500 | |
| lada-vesta-shop.ru | VS-RIV | Lux | 1 900 |
| motorring.ru | 10691 | Lux | 1 790 |
| rs-motor.ru | rs-0066-rr | Lux | 1 790 |
| ladatorg.ru | 842 | Lux | 2 000 |
In addition, it is possible to order painting in any color - either the one that is in the catalog on the website, or the one chosen by the owner - this will cost about another 1,000 rubles.
