Car enthusiasts today are increasingly choosing the Lada Granta liftback - a beautiful, affordable and practical car. Solid style and volume, a spacious interior have retained the classic features of a fast car. Any driver cares primarily about two things: the technical condition of the vehicle and comfortable movement on it. If the first criterion is strictly mandatory, then the second rule depends on the desires and capabilities of the car owner.
The internal state, namely the covers, reflect the driver’s “mood”, his wealth and taste. The Granta liftback has its own characteristics: the car can be called a novelty in the domestic automobile industry. Released quite recently, it claims to be an esthete. Car seat covers play a major role in interior tuning. Knowing the differences and advantages of the cover models, you can ensure long-term, flawless operation of the interior of your car. Types of materials for covers:
- modern material - eco leather;
- leather;
- upholstery fabric;
- fur.
Installing covers on the front seats
It is better to remove the seats - this way the tension will be as tight as possible and without wrinkles.
If the covers have a separate putting on pattern, then first put the cover on the chair cushion.
- Put on the cover;
- Tuck the tongue between the pillow and the backrest;
- Spread the material around the entire perimeter.
- We first fix it with long thin elastic bands - we put them under the seat, stretch them and tie them together.
- We finally fix the lower part of the cover using installation rubber bands with hooks at the bottom of the seat.
car owners were advised to purchase a strong nylon cord from a fishing store and sew it to the covers instead of ribbons. With the Avtoprofi models, such efforts are not required: all models are pre-installed with wide stitched elastic bands with stainless steel hooks.
- The tongue of the upper half of the cover also fits between the pillow and the back.
- Then the fabric of the cover should be pulled down with a slight movement and smoothed so as to pull the material down as much as possible, towards the tongue.
- The cover is pulled over a tongue on the back of the chair, like leather on a drum.
- With maximum tightening, the front part of the cover is literally imprinted into the shape of the chair.
- The tongue is inserted under the back of the cover and secured with Velcro.
A little trick: holes for the headrest rods in the cover can be made using a screwdriver or... A regular cigarette!
Mounting features
To fasten eco-leather car covers, cord, Velcro, hooks, elastic, various latches, etc. are usually used. When attaching a cover, you need to know the following:
- In the process of putting the product on the seat, fasteners made of elastic bands with hooks can be pushed under the plastic decorative parts located on the side, using a thin wooden strip like a ruler for further threading them below.
- It is important to know that the fastener must be made exactly at the location of the fastener, therefore, when putting on the product, it is necessary to apply force to tighten it. The main thing is not to overdo it, otherwise you can damage the car cover.
- When you put the cover on the back, squeeze the side supports.
- Be sure to tuck the machined holes on the car cover under the plastic.
- The headrest cover is pulled on and secured with a tie near the riser.
Installing car covers on the rear row
Now you need to install the covers on the back row of the car. We remove the pillows and the backrest. Leave the back in place.
The donning pattern here is exactly the same as with the first row:
- On the back of the rear seat, you need to remove the seat belts, if present, and then fold the backrest.
- The cover consists of two halves and is positioned so that its zippers coincide with the fault lines of the back.
- Once put on, the zippers are closed and the two separate halves of the cover become one.
The rear covers are secured to the backs of the chair using elastic bands and hooks (everything is included in the kit).
On headrests, the covers are placed on top and secured with elastic bands.
Removing the seats
Sometimes you can hear that changing the car covers of some car models is possible without removing them. This opinion is refuted by the following arguments:
- Before putting on the product, you will need to remove the plastic covers, which will be difficult to do in a salon.
- In order to put on the eco-leather cover, you will have to constantly turn the seat.
- At times there simply won’t be enough space to get the job done properly.
Therefore, in order to avoid the listed difficulties, it is recommended to put covers on previously removed seats, and it is advisable to have assistants.
Dismantling the seats can be divided into the following stages:
- you need to start from the front seats;
- move the chair all the way, unscrew the bolts on both sides;
- move the seat to the opposite side and repeat the steps;
- remove all the side trims from it, to do this, first pull out the plugs, then start unscrewing the bolts;
- start removing the cladding; to do this, press it out with a screwdriver.
Additional tips:
- The tighter the material adheres to the case, the longer they will last. Therefore, it is better to take the time to remove the seats before installation.
- If the seats have built-in side airbags, then choose the appropriate cover models.
- The unraveling seam must be placed on the side where the Airbag pillow is located.
- Remove the seats. At least the front row. The quality of planting will be higher, and it will take less time. Removing the seats is quite simple: turn off the electrics and unscrew the mounting bolts of the slide.
- Be sure to turn off the ignition before removing the seats and rear sofa!
- There is no need to remove the plastic on the sides of the seats. In principle, it is not suitable for removal and returning it to its place can be problematic. To better push the cover fabric between the seat and the plastic, it is good to use a smooth metal plate (about the same as what doctors use to examine the throat).
- Squeeze the seat upholstery while pulling the cover. This will make it easier to install the covers without damaging the fabric around the seams.
- It’s unlikely that anyone is going to install seat covers in the cold, but just in case, it’s worth pointing out that it’s best to install protective coverings at above-zero temperatures. Especially if the covers are made of natural or artificial leather (eco leather). These materials “tan” and lose elasticity at low temperatures, so if you don’t have a warm garage, then summer is the best season to install covers.
Shape Features
When purchasing car covers and putting them on, it is necessary to take into account the following features of seat shapes, which are determined by:
- Body type. For example, when sewing products for a sedan and a hatchback, different patterns are used. You can still somehow put covers from a “foreign” body on the front seats, but for the rear ones you will have to make cuts, otherwise the car covers won’t fit.
- The passenger and driver's seats are similar, but do not confuse the covers, the shapes of which are slightly different. They are distinguished by their tear seams; when putting them on, they must be on the door side, otherwise problems with the airbags may arise. That is why a special “AIRBAG” label is sewn into the seam side.
Car compatibility
Approximate list of compatibility of covers size S*
| Audi | A1, A2 |
| BMW | Episode 1 (04 - 07) |
| Chery | |
| Chevrolet | Lanos, Lacetti, Aveo, Spark |
| Citroen | C2, C3 |
| Daewoo | Tico, Matiz |
| Fiat | Panda, Punto, Albea, 500 |
| Ford | Ka, Fiesta, Fusion |
| Honda | Jazz, Civic |
| Hyundai | i20, i30, Atos, Getz, Accent |
| Kia | Rio, Picanto |
| Mazda | 2, 3 |
| Mitsubishi | Colt |
| Nissan | Note, Micra |
| Opel | Tigra, Corsa, Astra |
| Peugeot | 1007, 107, 206, 207, 306, 307, 308 |
| Renault | Logan, Symbol, Twingo, Clio |
| Seat | Ibiza, Leon |
| Skoda | Fabia, Roomster |
| Suzuki | Swift, Ignis, SX4, Jimny |
| Toyota | Aygo, Yaris, Vitz, Corolla, Echo |
| Volvo | C30 |
| VolksWagen | Lupo, Polo, Golf |
| VAZ | 1111, 2104—2109, 21099, 2110—2121, Granta, Kalina, Largus, Priora |
| UAZ | 3151 Hunter |
*The list is provided for informational purposes only and is not complete.
Sample list of vehicles with M-size seats*
| Audi | 80, 90, 100, 200, A2, A3, A4, A6, TT |
| BMW | Series 1 (since 2010), Series 3, Series 5, Series 7, X5, Mini One, Mini Cooper, X3, X6, M6 |
| Chery | Amulet, Tiggo |
| Chevrolet | Astro, Blazer, Captiva, Tracker, Aveo, Lacetti, Lanos, Niva, Cruze, Cobalt, Epica |
| Chrysler | Town&County, Voyager |
| Citroen | AX, BX, ZX, Berlingo, Jumper, Saxo Visa LN, Xantia, C2, C3, C4, C5, C8, XM |
| Daewoo | Espero, Laganza, Magnus, Nubira, Gentra |
| Daihatsu | Charmant, Sirion, Move, Rocky, Feroza |
| Dodge | Caravan, Caliber |
| Fiat | Brava, Bravo, Idea, Marea, Weekend, Panda, Punto, Stilo, Doblo |
| Ford | Escort, Ka, Maverick, Ranger, Focus, Focus II, Focus C-Max, Fusion, Escape, Galaxy |
| Great Wall | Safe, Deer |
| Honda | Concerto, CR-V, HR-V, FR-V, Logo, Accord, Civic, Jazz |
| Hyundai | Lantra, Matrix, Sonata, Santa Fe, Tuscon, Tiburon, Grandeur, Elantra, Solaris |
| Kia | Ceed, Cerato, Clarus, Magentic, Shuma, Rio, Spectra, Sorento, Sportage |
| Mazda | 626, 121, 2, 3, 6, 323 S, RX-7, RX-8, MX-5, CX-5, CX-7, CX-9, Familia, MPV |
| Mercedes | 100, 190, A-Class, C-Class, E-Class, S-Class, R-Class, CLK, SLK, GL, ML |
| Mitsubishi | Galant, Carisma, Colt, Lancer, Outlander, Delica, Diamante, Dingo, Dion, Eclipse, Pajero, Mirage |
| Nissan | Maxima, Primera, Avenir, Murano, Note, Cedric, Liberty, Cefiro, Pathfinder, Skyline, X-Trail, Terrano, Patrol |
| Opel | Calibra, Kadett, Manta, Tigra, Agila, Astra, Combo, Meriva, Signum, Vectra, Zafira |
| Peugeot | 106, 204, 205, 306, 307, 309, Partner, 406, 407 |
| Renault | Clio, Laguna, Megane, Scenicll, Twingo, Scenic, Modus, Safrane, Sandero, Logan, Duster |
| Rover | 200, 214, 400, Mini, 45, 75, ZT, ZS |
| Seat | Alhambra, Altea, Arosa, Cordoba, Ibiza, Leon, Toledo |
| Skoda | Favorit, Felicia, Forman, Fabia, Oktavia, Superb |
| SsangYong | Musso |
| Subaru | Impreza, Legacy, Leone, Forester, Outback, Tribeca |
| Suzuki | SJ 410, SJ 412, Alto, Baleno, Swift, Grand Vitara, Ignis, Wagon R, Jimny |
| Toyota | Camry, Carina, Lavd Cruiser, Lite Ace, RAV 4, 4 Runner, Starlet, Tercel, Avensis, Corolla, Prius |
| Volvo | C30, S40, S60, S70, S80, V40, V40-Cross Country, V50, V60, V70, XC60, XC70, XC90 |
| VW | Golf, Golf II, Jetta, Scirocco, Bora, Polo, Passat |
| TaGAZ | Tingo ('12- ) |
| GAS | 3102, 3110, Siber |
| UAZ | 3160, 3162, 3163, Patriot, Pickup |
*The list is provided for informational purposes only and is not complete.
Go to the catalog of universal car seat covers.
Installing covers on the Lada Granta Liftback or how to inexpensively protect the interior of a new car.
A Lada Granta Liftback car came to us to install the covers. The client chose Eco-leather for the installation of car seat covers, and the color was a combination of Black and Dark Brown. I was pleased with the car’s interior, everything is modern, of course it’s not a foreign car, but the price of this car implies economy class. Nevertheless, I think the car turned out to be decent, especially in the Liftback body, such cars are very practical, I myself have a car in such a body. A lot of things fit into the trunk of the Liftback, and if you fold down the backrest, you can generally load a full car.
Starts installing car covers…………
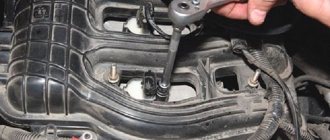
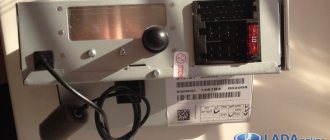
First of all, of course, we inspect the fasteners of the front seats in order to remove them. We see bolts with this key (Fig. 1). We find the one we need in the set, try it on and begin dismantling. Removing the seats on the Grant Liftback does not take much time, but the process of installing car covers simplifies it significantly. After we have unscrewed the bolts on the driver's seat, we tilt it back a little in order to disconnect the only piece, after which we remove the seats from the car to the outside. The passenger seat is removed in the same way, only there is no chip on it, so we just pull it out of the car. We begin the process of installing seat covers for the Lada Granta Liftback by trying on the covers. Trying on is necessary in order not to redo the work in the future if you mix up the sides. The seats on this car are the same, so let's proceed with the installation. Smoothing the cover on the seat, we run the hooks with elastic bands under the bottom of the seat to secure them. Be sure to insert the hooks into the holes on the sled, and not at the bottom of the sled itself. Since in the future your elastic band may interfere with the movement of the seat. Next, we fasten and tighten the perimeter with a special cord. We turn the front seat over to make sure that the cover sits evenly. Then we move on to installing the cover on the back of the front seat. The cover is easy to put on and just as easy to attach; do not forget to insert the headrest fastenings into the technological holes on the cover. We perform the same operation with the passenger seat; the Grant Liftback front seat covers are on.
Rear sofa………
How to dress correctly
The entire dressing process can be broken down as follows:
- You need to start with the front seats.
- Carry out dismantling.
- Remove the headrest from the chair and cover it.
- First, the seat is put on. It is necessary to carefully straighten the eco-leather, only then place the chair on the side and secure the fasteners. It is important to tighten this part of the chair very well, since this is where the bulk of the load falls. If the tension is weak, wrinkles and folds will form on the chair.
- If the fastening is made from below, the upper part of the chair is put on like a sweater, but it is necessary to apply force, since the cut of the car cover is made exactly to size. Fasteners on the product made on the back of the seat are less preferred by drivers, as they do not look so elegant.
- The bottom of the car cover is secured under the seat, and it must be pulled tight.
- After the covers are put on, you need to install the covers on the previous areas and return the chair to its place.
- Putting on the eco-leather car seat cover for the front and rear seats is identical.
Before installation, be sure to read the included instructions. This will help avoid mistakes and avoid over-tightening the product.
The factory upholstery of the seats inside the car is subject to wear and tear. Eco-leather car covers will help protect the seats externally and significantly transform the car.
A big role here belongs to the correctness of putting on the cover. If you approach this work thoughtfully, it will take a little time, but the result will please you and your loved ones.
Publication date: February 27, 2022. Category: Automotive equipment.
Even after a short period of use of a new car, the standard seat upholstery (especially light colors) loses its neat and attractive appearance. Dust, moisture, food and drinks will certainly leave their “traces” on it, which will then be quite difficult to remove even in specialized services that deal with professional dry cleaning of car interiors. Covers, which are best purchased immediately after purchasing a car, will not only reliably protect the seats from all these troubles, but will also give the vehicle interior an elegant look. How to put covers on car seats: videos, photos and recommendations for installing them are presented in this article.
Start your own blog
Many people think that installing car covers is a thing of yesteryear. They constantly fall off and don't assemble nicely. Others are confident that it is the covers that help keep factory seats, which cannot be washed, from getting dirty. Considering the operating conditions of our cars, we cannot completely abandon seat covers.
We, in turn, strongly recommend buying them, because:
You can change the covers from time to time, and with it the appearance of the interior changes
The covers are removable for washing, and cleaning the factory seat coverings is difficult and expensive
When using covers, the factory seat covering remains as new as when purchased.
What covers are suitable for the Lada Granta?
Salespeople in the store advise using covers for Lada Kalina, Priora, “Seven” or “universal”. It’s worth noting right away: the covers of Kalina, Priora and other VAZ models will not suit you. Only generic jerseys fit, but they don't have any look. The cost of such covers ranges from 600 to 2500 rubles, depending on the quality of the material.
The original “Grant” covers are ideal. They are intended specifically for Grants, and no questions arise here. Their price varies between 2500-3500 rubles, but it is almost impossible to buy them at the moment. The model is relatively new, not all stores have enough sets of Granta covers. However, you can already find sites on the Internet where you can order covers.
How much does it cost to order covers for the Lada Granta?
If you have the idea to order covers for your beautiful Granta, this is, of course, the best option, but it is by no means cheap. But ordering has advantages: the ability to choose color, material, texture, shape and other little details, but it also costs between four and six thousand rubles.
But the point here, most likely, is not the price - it is difficult to find a performer doing such a thing, especially in small towns. In addition, you will probably have to remove the seats to take measurements.
An example of custom-made covers. Such pleasure cost the car enthusiast 6,000 rubles. Expensive, but beautiful
Installing covers on the Lada Granta is not the most difficult task; by working moderately, you can do it in half an hour
Pay attention to the even fit of the seat covers, secure the elastic bands and harnesses correctly. Original covers should turn gray as if they were factory equipped
What thoughts did you have in connection with this issue? What covers do you have and how did you install them? We look forward to your feedback.
Cases made of soft materials
To prevent them from looking baggy, patterns should be made from two types of material - the main one and the mattress one. They are connected together with the wrong sides facing each other.
But just remember that it is necessary to provide an unsewn hole. Foam rubber material cut in advance is inserted through it. The headrest and armrest areas are made without such inserts. All that remains is to stretch them and sew them up. When the seats located at the bottom have plastic linings, they must first be removed. Now you can press the edges of the cover with them, which will make it possible to securely fix it.