Useful tips
Author: Anastasia Safonova12/29/201612/29/2016
The dashboard of the VAZ 2114 car displays data that allows the driver to monitor the condition of the car - fuel and engine oil levels, speed, revolutions and engine temperature. The panel must always be in good condition, which is the key to the accuracy of the data shown by the sensors and the absence of discomfort caused by non-functioning backlighting. Quite often, VAZ 2114 owners are faced with the problem of the dashboard backlight not working. The problem is resolved independently, without visiting car services or contacting specialists.
- Why do light bulbs fail?
- How to choose dashboard lamps
- How to replace light bulbs
Required Tools
- Replacing the backlight
- How to disassemble the dashboard
- Replacing backlight bulbs
Replacing light bulbs in the dashboard of a VAZ 2114
Replacing light bulbs in the VAZ 2114 dashboard does not require contacting a car service center. You can do it yourself. To do this you will need a Phillips screwdriver and new lamps. Algorithm for performing the procedure:
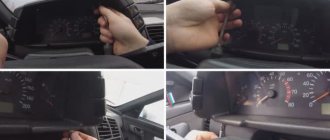
- Remove the decorative trim. To do this, you need to unscrew the fasteners with a screwdriver. You should start removing the part from the bottom, pulling it towards you.
- Disconnect the cigarette lighter wire.
- Remove the screws from the dashboard trim.
- Remove the trim.
- Disconnect the wires from the instrument panel.
- Unscrew the tidy fasteners. Usually the part is held on by self-tapping screws.
- Remove the panel.
- Remove the bulb sockets that have failed. To do this, they must be unscrewed counterclockwise.
- Remove faulty lamps.
- Replace light bulbs.
- Check the functionality of the indicators. If they start working, the fault is identified correctly. If this does not happen, another lamp may have burned out, or the cause of the failure may be different. Sometimes it happens that the new light bulb turns out to be defective. To check it or find a non-lit lamp, you can check them with a multimeter. This is done like this:
- Switch the device to ohmmeter mode;
- Install one probe to the side of the base, and the second to the patch at its end;
If the arrow of the device moves, the element is working. This method is not suitable for testing LED lamps. In this case, for diagnostics, the multimeter should be set to diode mode. Measurements are carried out according to the same principle, but during the process it is necessary to swap the probes. If the lamp is working, the current should only flow in one direction. But usually a burnt-out element can be identified by eye.
- Assemble the dashboard and other elements. The operation is performed in reverse order.
At the end of the work, it is necessary to check the functionality of the dashboard lamps or the entire panel. Some 2114 owners change the bulbs not because they burn out, but to improve the glow or change the color of the dashboard backlight using LED elements. Driving with the instrument panel or individual indicators not illuminated is not prohibited by law. But this causes noticeable discomfort. Failure of the battery warning lights, oil pressure or fuel level may prevent you from noticing a serious vehicle breakdown or lack of gasoline in time. Therefore, it is recommended that a backlight malfunction be repaired immediately when detected.
On the VAZ-2114, the dashboard, like on other cars, is equipped with backlight. This makes using the machine more comfortable, but the trouble is that the light bulbs sometimes burn out, and then they have to be replaced. The procedure itself is not too complicated, and many drivers carry it out on their own. Difficulties often arise for novice car owners. The latter, in particular, are interested in exactly how many lamps are installed on the instrument panel of the 2114th VAZ model. We'll talk about this in more detail later.
If all the lights don't light up
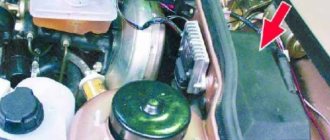
Sometimes on 2114 the dashboard backlight stops turning on completely. Usually, to restore its functionality, you need to change the fuse. In the new type mounting block it is F10 at 7.5 A. The part is green. Its location is shown in the figure below:
Replacing a fusible element, as a rule, does not cause difficulties for car enthusiasts. You can change it yourself. Therefore, when the instrument panel stops lighting, you need to remove the fuse and install a working one. If everything works, then the fault has been identified correctly. If in doubt, the part can be checked with a multimeter. But sometimes the tidy may not light up for other reasons. This:
- Burnt out contact board;
- Broken wiring;
- Oxidation of contacts.
They can be diagnosed using a multimeter and visual inspection. You can usually identify and fix these problems yourself. But in some cases, the help of an auto electrician may be required.
Useful : Where is the mass of the VAZ 2114 dashboard located?
Reasons for failure of dashboard lights
The dashboard lighting performs several important functions in parallel:
- control. The lamps light up when failures or malfunctions of individual components occur;
- informational. Notifies the driver in real time about the status of important vehicle systems;
- decorative In a dark interior, beautiful lighting on the instrument panel decorates and enlivens the front part of the cabin.
The main reason for the failure of light bulbs in the instrument panel is difficult operating conditions - heating, vibration, power surges. This significantly reduces the life of the lamps and causes a lot of problems:
- burnout of filaments in halogen devices, burnout of current-carrying paths in LED lamps;
- broken wires or the appearance of an oxide film on the contacts;
- problems with the fuse box or contact board;
- somewhere shorted to ground.
Before you try to change the lamps, you should accurately determine the cause of the problems that have arisen, otherwise you will not be able to get the expected result
It is important to know the condition of the fuses and the condition of the wires. The insulation on them often frays and begins to short to ground.
It is necessary to inspect the wiring and replace problematic connections.
Burnt-out lamps complicate driver control over car instrument readings
- We release the decorative cover of the front panel. For this we need screwdrivers: a short Phillips and a flathead one. Lower the steering column to the lower position using the height adjustment lever to keep it out of the way. The photo shows the mounting locations for the casing:
- There are four screws on the bottom of the visor and above the steering column. Unscrew them with a short Phillips screwdriver.
- Using a flathead screwdriver, pry off the decorative cap to the right of the row of switches. There is another fastening screw under it.
- Also, remove the handles from the heater switch and damper control sliders by pulling them towards you.
- If you have a car radio, you will also have to remove it. Unfortunately, complete dismantling is not possible. Arrows indicate locations for removal
- Pull the front panel cover towards you. He must move. There is no need to remove it completely - there will be enough space to access the mounting screws on the sides of the instrument cluster. Carry out your actions carefully
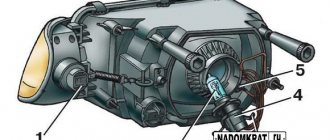
- Unscrew the fastening screws with a long screwdriver. The combination will be released and you can tilt it towards yourself. Pull out the two blocks with wires. Don’t be afraid to mix them up - there is a color marking, and the asymmetrical shape of the connector will prevent you from connecting it incorrectly. The arrow indicates the location of the cartridge handle
- On the back cover of the instrument cluster there are cartridge handles. Arm yourself with small pliers. This will make it easier to unscrew them. To release the cartridge, half a turn counterclockwise is enough. You can safely take out all the cartridges - they are the same. Next, you can check the lamps with a tester and replace the burnt ones, or replace them all with LEDs at once. Try to ensure that they fit tightly in the cartridge, otherwise the contact will be unreliable.
- We reassemble in reverse order. We insert the cartridges into the seats so that the antennae fall into the grooves, carefully turn them with pliers until they stop. We connect both blocks to the connectors of the instrument cluster.
- Let's check if all the lamps are working:
- raise the handbrake and turn on the ignition: so let’s check the handbrake, generator, oil pressure and check lamps,
- turn on the hazard warning lights - check the warning lamp and direction indicator lamps,
- pull the headlight switch lever towards you - temporarily turn on the high beams, check the warning lamp,
- turn on the dimensions - see if the scales are evenly illuminated, and if the warning lamp, if any, is on.
If everything works correctly, we fix the instrument cluster and the front panel casing, and replace the heater switch handles and damper controls.
Check the brightness and functionality of all devices
Congratulations, now the instrument lighting and warning lights are working properly, and you will always be aware of what is happening with the car. The overall aesthetics of the front panel will also improve - the evenly lit front panel looks beautiful.
As they say: neither nail nor rod!
Main conclusions
The process of replacing the backlight takes some time. The whole difficulty of the procedure lies in dismantling the front panel. The following conditions must be met:
- free the casing from handles, sliders and other elements;
- remove the handle from the gear shift lever;
- push the panel towards you, unscrew the shield and disconnect the terminal blocks from it.
The remaining operations are simple, performed quickly and without surprises. It is impossible to make a mistake during reassembly; the blocks with wires are made different and cannot be mixed up. Express your thoughts about replacing light bulbs in the VAZ 2114 dashboard in the comments.
Sources
- svetilnik.info/avtomobilnyj-svet/zamena-lampochek-v-pribornoj-paneli-vaz-2114.html
- drive2.ru/l/3636448/
- kalina-2.ru/remont-vaz/skolko-lampochek-v-pribornoj-paneli-vaz-2114
- ladaprofi.ru/vaz-2114/skolko-vsego-lampochek-v-pribornoj-paneli-vaz-2114.html
How many lamps does the VAZ-2114 dashboard contain?
Now we will tell you how many lighting elements are installed on the dashboard of the VAZ model in question. This will allow you to estimate upcoming expenses and immediately purchase the required volume.
So, the instrument lighting is provided by 7 lamps. In addition, there are other indicators:
- left and right turn signals – 2 pcs.;
- emergency oil pressure – 1;
- handbrake activation – 1;
- battery charge – 1;
- alarm - 1;
- malfunction of the motor control system - 1;
- high beam - 1;
- brake fluid level – 1;
- external lighting – 1;
- fuel reserve – 1.
In total, the VAZ-2114 has a total of 18 units. Experts recommend that even when one incandescent light bulb has burned out, immediately change everything. This ensures that the operation does not have to be performed again in the near future.
Nuances of choice
Nowadays many modifications of dimmers are sold, designed for different types of lamps and lighting devices.
Focusing on the use of incandescent lamps, it is necessary to select regulators that are suitable for them according to the following criteria:
- According to technical and operational characteristics. Typically, dimmers with triacs are used for them. They are less capricious and simple to set up.
- Based on the total load that the dimmer can withstand. Information about this is indicated on the device, for example, 300 W means that the device can serve a chandelier with 5 lamps of 60 W. It is better to buy a dimmer with some load reserve; a 350 W dimmer is suitable for this case.
- According to the planned installation location. Depending on the installation location, you should buy a modular, monoblock or built-in type dimmer.
- By the nature of control: using keys, buttons or using a sensor. The choice of control method depends on personal wishes, the versatility of the device, ease of use and the cost of the controller.
Features of replacing a light bulb in the instrument panel of a VAZ 2114
There are 13 lamps in the dashboard, but not all of them can be replaced. Unfortunately, only 8 bulbs can be replaced.
Before you begin the process of replacing the lamp, you need to clean the contacts in case there are any traces of oxidation on them. Sometimes it is not the lamp that needs to be changed, but only its socket.
Before you buy new lamps for the panel, you need to calculate the total number of devices that are needed for the sensors.
Don't forget about checking. If the new lamps do not work, this means that the replacement was not carried out correctly. It is possible that the reason is that the new light bulb has some kind of defect.
Dashboard side mounting screws
Another relevant tip concerns current trends. Some car owners are not looking for standard light bulbs for their VAZ, but modernized ones. You need to be aware that retrofitted light bulbs may have some significant defects. Ultimately, this can lead to damage to the instrument panel. In order to reduce the likelihood of such an unpleasant scenario, it is best to give preference to standard lamps for model 2114.
What kind of light bulbs are needed?
The instrument panel lighting of the VAZ 2114 consists of 13 lamps. But you can only change eight of them. The device uses 12 Volt 1.2 W lamps. From the factory, the car is equipped with ordinary cheap light bulbs with an incandescent filament, popularly called sunflower seeds, and in the spare parts catalog they have an article number 210613709500.
But some drivers prefer to change the light bulbs on the VAZ 2114 instrument panel to LED lamps. They can be multi-colored or even capable of changing the color of the glow; they shine somewhat brighter than usual. This allows you to change the appearance of the dashboard. In addition, they consume less electricity.
Useful : Do-it-yourself tuning of VAZ 2114 tidy
Experts recommend not buying the cheapest light bulbs for tidying, but purchasing more reliable ones. Among the halogen ones, products from the Philips and Osram brands performed well. If you buy LEDs, it is advisable to replace the cartridges as well, since they may not work well in old ones. The “fourteenth” uses 2W2 type cartridges. As for LED lamps, we can recommend the Korean Sho-Me SM-T5. They come in red, blue or white. White Sho-Me SM-T5-cap-super diodes from South Korea are also suitable. You can install a Chinese-made SMD LED module.
INSTRUMENT PANEL VAZ 2114
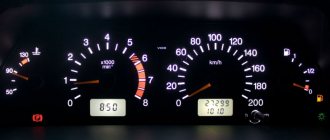
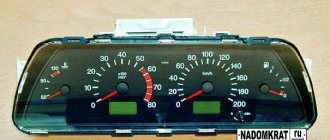
Cars of the Samara 2 family are equipped with a modern VAZ 2114 instrument panel, which is also called the “European panel”. The designers worked on it so that it allows for good forward visibility, a pleasant appearance, combines information content and ergonomics, and at the same time helps the driver cope with ordinary everyday needs. And they mostly succeeded. A block of instruments and sensors installed in front of the driver’s eyes, behind the steering wheel, provides him with the maximum possible amount of information:
- In the central part there are two dial instruments, on the left there is an engine speed indicator, by which the driver determines what load the power plant is working with at a particular moment and, if necessary, corrects this process by switching speeds; in the window under the arrow there is a digital clock. On the right is a speedometer or an indicator of the current speed of the car, in the window under the arrow there are digital readings of the kilometers traveled for the entire period of operation of the car and for the last trip;
- In the upper part, between the dial instruments, there is a turn signal indicator lamp with green arrows pointing left and right;
- In the lower central part there is a red “stop signal” triangle, and below it CHECK ENGINE is a red signal for engine emergency conditions according to information from the electronic on-board unit;
- In the left middle part of the instrument block there is a dial gauge for the engine temperature, or as it is called in the literature, a coolant temperature sensor, above it there is an icon that lights up when the engine overheats. Below it are icons for the throttle, oil pressure, handbrake and battery;
- In the right middle part there is a dial indicator for the presence of fuel in the fuel tank, above it is an icon for a fully filled tank, below it is an icon for the minimum amount of fuel in the tank, as well as icons for low beam, low brake fluid level and high beam.
Ergonomics is ensured by the convenient arrangement of instruments and information icons for visual perception of information, as well as keys, buttons and levers for manipulating them. A standard on-board computer is installed in the central part of the panel, usually a Gamma, Multitronics, Prestige or State computer. The location for its installation was chosen very well and with its help the driver receives expanded information about the state of the operating engine systems and vehicle components.
This information is reflected not only on the BC display, but is also transmitted through other control or information lamps and signs located on the instrument cluster and in other places on the dashboard. In addition, the on-board computer display displays other information, for example about the timing of the next inspection or maintenance.
The glove box, which can be closed, is conveniently located and has a backlight and a fairly large niche underneath it. The central beard also has a niche for storing something and an ashtray. The air duct outlets are quite well made, allowing for efficient glass blowing and preventing fogging.
During the operation of a car, problems constantly arise with malfunctions or failures in various systems. In order to get to some of them, it is necessary to remove the VAZ 2114 panel. Even to remove the instrument panel, you need to figure out how to remove the dashboard on the VAZ 2114 (instrument panel).
In addition, on the VAZ 2114 the panel must be removed completely if there is a need to repair air ducts and the stove, or the car owner wants to completely glue and seal the joints of the panel structure so that it does not creak.
Checking and replacing lamps
Now it’s time to arm yourself with a tester (the simplest Chinese one will do) and start ringing the light bulbs. To do this, put the device in resistance measurement mode (for LED light bulbs, the tester must be put in diode testing mode), and the lamps are removed one by one and dialed.
A tester is necessary for the reason that some light bulbs do not always light up and it is visually impossible to determine their serviceability. We won’t drain brake fluid or fuel from a VAZ to check the low level indicators of one or the other. If it is reliably known which light bulbs are working (for example, the illumination of dial gauges is normal), then these lamps can be left alone.
After installing the new lamps, we connect the shield, without installing it in place yet, and check what can be easily checked visually: turn on the ignition, handbrake, turn indicators, etc. If everything is in order, then the dashboard can be assembled.
Lamp functions
Dashboard-mounted lighting devices serve two purposes. Some of the light bulbs provide the actual illumination of the dials. This allows the person sitting behind the wheel to freely take readings from them, even when it is completely dark outside.
Other products are control. They are indicators that confirm the switching on of certain devices (headlights, headlights, etc.) or indicate problems. Making the panel more aesthetically pleasing is just an additional function.
Solution
The stores offer several options for light sources for replacing lamps in the instrument cluster:
- traditional incandescent lamps,
- LED in a plastic socket,
- SMD LED is a more expensive and reliable option, a super-bright diode.
The choice will always depend on financial capabilities and lighting preferences
The number of backlight and control lamps is up to 19 pieces. It varies slightly depending on the design of the instrument cluster and the modification of the vehicle. Many car owners choose LEDs due to lower energy consumption and longer service life. This backlight is brighter and gives an interesting bluish color instead of the standard green. But due to the design of the diode, the brightness control of the instrument illumination will not work, always turning it on at full power. On a long road trip at night, this can be distracting and irritating to the eyes. But in any case, the choice of light sources is yours.
INSTRUMENT PANEL TUNING
If you want to somehow improve the appearance of the dashboard or make it functional, you can tune it.
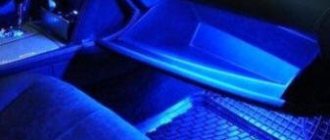
The most common type of dashboard tuning is installing new lamps in the instrument lighting or installing additional lighting. Most often, lamps are replaced with lamps with a different color of luminous flux (for example, green or blue). The color selection should be such that it does not irritate the eyes, especially in the dark. Additional lighting is used mainly for the lower part of the panel at the feet. To do this, you can buy a ready-made set of LEDs and connect them to the car’s on-board network.
Another tuning method involves changing the appearance of the instrument scale. To do this, you can print ready-made solutions on a color printer, glue them to hard cardboard and install them instead of the old scale. It is worth considering that the lighting of the new scale may differ slightly from the factory one. Therefore, important criteria will be the color of the scale and the material to which it will be glued.
A more serious modernization involves changing the appearance of the panel itself. To do this, it can be painted or covered with new material. If you decide to cover the panel, then use only approved materials. Ordinary fabric and fur are prohibited, as they are flammable. The color of the upholstery should be chosen in accordance with the general background of the interior. A combination of two colors at once (for example, beige and brown) looks great.
If you decide to paint the panel a different color, it must be removed. After this, it is cleaned with sandpaper and degreased. First of all, a special sealant is applied, and then car paint. Do not use paint materials that are highly sensitive to high temperatures. If you paint the plastic with any other paint, then when the car is left in the sun for a long time, the paint will melt and simply come off. Another trouble may await you when washing the panel - ordinary paint tends to be washed off with ordinary water, or even better - with soap. Be prepared for the fact that at first the salon will smell like paint.
Didn't find the information you are looking for? on our forum.
We recommend reading:
VAZ 2110 stalls while driving, 8-valve injector, possible causes and solutions
Adjusting the electronic ignition on a VAZ 2106
How to adjust the rocker on a VAZ 2114, varieties, repairs
12124 VAZ
Replacing the float in the gas tank of a VAZ 2107, removal and installation with photo
How to remove the starter on a VAZ 2110, replacing the starter, retractor, bushings
How to close the starter on a VAZ 2110, reasons for starter failure, three ways to start the car
Connection diagram for tow bar for VAZ 2104
How to replace light bulbs
Installing new lamps is a simple process that novice car owners can do.
To replace you will need the following devices:
- Phillips screwdriver;
- a set of new light bulbs.
Replacing the backlight
To improve the quality of dashboard lighting, it is advisable to replace old lamps with new LEDs - they provide brighter and softer light that does not irritate the eyes, have minimal power consumption and allow you to more accurately read data from devices.
Before you begin installing the lighting fixtures, you need to remove the decorative trim from the music system - the instrument panel and radio on the VAZ 2114 are connected to each other, so this step cannot be avoided. Dismantling is carried out by snapping off the fasteners with a flat screwdriver
Remove the cover from the bottom edge and be very careful, as all the latches can be damaged.
How to disassemble the dashboard
Dismantling the VAZ 2114 dashboard is the first step in the process of replacing backlight bulbs. Without removing the plastic cover it is impossible to get to the lighting fixtures themselves.
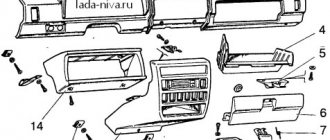
Scheme for disassembling the VAZ 2114 dashboard
The dashboard on the VAZ 2114 is disassembled according to the following scheme:
- Three self-tapping screws are unscrewed, the lower protrusion and the cover are removed.
- There are five screws on the right console trim that also need to be removed.
- The screen is removed and the negative terminal is disconnected from the battery.
- The wiring harness is disconnected from the cigarette lighter.
- The handle is removed from the gear shift lever.
- The stove fasteners are removed.
- The bolts that secure the steering wheel block are carefully unscrewed.
- Decorative inserts, lamp sockets and LEDs are removed from the panel.
- The hydraulic corrector illumination lamp is removed using a 21 key.
- The upper and lower screws are dismantled.
After completing the dismantling of the instrument panel, the wiring circuit is closed to prevent dust, moisture or dirt from entering it.
Only 8 out of 13 lamps can be replaced in the instrument panel of a VAZ 2114.
Before installing new lamps, remove the plastic cover from the instrument panel
Replacing backlight bulbs
After removing the plastic, you can begin the process of replacing the lamps.
- The required number of lamps to replace the backlight of each sensor and panel device is calculated in advance.
- Lamps and resistances are installed in special places - sockets - after removing the block. The cartridges are unscrewed counterclockwise by hand, without the use of tools. New ones are installed in the vacant spaces, then lamps are inserted into them. The LED heads are screwed in with correct polarity.
Placing new lamps on the instrument panel
- The power is connected and the functionality of the updated backlight is checked.
Checking backlights with a multimeter
- The instrument panel is being reassembled. The wiring is neatly routed to the board and attached to it, so that the parts will not interfere during assembly.
The instrument panel is being reassembled with the sensor arrows placed
- All arrows of sensors and instruments must be positioned correctly. If you rush too quickly during installation, you may break or bend them.
- The entire structure is attached with screws.
- The power supply of the LEDs and light bulbs is combined, the arrows are placed in their places and set to zero.
- The operation of the panel instruments and sensors must be checked by the on-board computer. If everything is functioning properly, the dashboard is reassembled and returned to its original state.
Assembled and tested instrument panel of VAZ 2114
Video: replacing the dashboard light bulbs of a VAZ 2114
Replacing the dashboard backlight bulbs of a VAZ 2114 is an easy job that can be done by the most inexperienced car owners. You can restore its functionality in a matter of minutes, the main thing is to correctly select and install sensor and instrument lamps.
How to choose lamps
According to current rules, tampering with a car's structure is punishable by a fine or even deprivation of a license. Therefore, only an equivalent replacement with the same lamps used by the manufacturer is considered acceptable. However, the attitude of traffic police officers towards the dashboard lighting is more loyal. This is explained by the absence of danger for drivers of oncoming cars.
Most car owners use LED analogues instead of conventional incandescent lamps. This choice is explained by the significant advantages of LED devices compared to traditional lamps:
- long service life;
- low power consumption that does not drain the battery;
- no heating that negatively affects plastic parts.
Attention! The only drawback can be considered the relatively high price, but since the appearance of LED lamps on the shelves, there has been a noticeable decrease in their cost. In addition, the range of LED lamps is wide and allows you to choose inexpensive units.
Be sure to check out:
The best lamps for Opel Astra h: manufacturers, markings, table of those used The best lamps for headlights VAZ 2114 High beam lamps Lada Priora: the best models and step-by-step replacement instructions Low beam lamps Chevrolet Lacetti: the best manufacturers, replacement and adjustment process
All lamps are selected according to the following parameters :
- cartridge type - 2W2;
- supply voltage - 12 V;
- power - 12 W.
Sometimes you have to change all the lamps. When purchasing, you need to know how many light bulbs are in the dashboard of a VAZ 2114.
For a complete replacement you will need to purchase:
| Purpose | Quantity |
| Panel lighting | 3 pcs. |
| Bottom row warning lights | 12 pcs. (usually not everyone is involved) |
| BSK (on-board control system) | 6 pcs. |
| Battery discharge indicator | 1 PC. |
Usually LEDs are initially installed in the BSK, since it comes as a separate unit. When purchasing replacement lamps, it is not necessary to purchase sockets; they remain operational for a longer period than the lamps themselves. A total of 8 light bulbs need to be replaced. They are the same; when purchasing, you should be guided by the type of cartridge, supply voltage and power.
Replacing the backlight
In analysis
To improve the quality of your dashboard lighting, it is advisable to install new LEDs in place of the old ones. They provide excellent illumination, consume minimal energy, and guarantee a high level of data reading.
- Buy a set of LED lamps, having previously calculated the number of devices needed for each sensor.
- After removing the block, install the resistors and lamps in specially designated places on the VAZ 2114 - in the sockets. To dismantle the cartridges, they are carefully unscrewed counterclockwise. New sockets are installed in their place and light bulbs are inserted. Respect the polarity and position the LED heads. They will have to be carefully ground off.
- Connect the power and check how the new backlight works.
- Reassemble step by step. Be sure to route the wiring to the board and carefully secure it to it. This way, the backlight components will not interfere with the reassembly process.
- Make sure the instrument panel arrows are positioned correctly. When trying to quickly complete a job, they often become deformed and bent.
- The backlight structure is fixed with screws.
- The power for the LEDs is connected to the power supply for the light bulbs, the arrows are put on and set to zero.
- Using the on-board computer, check the operation of each sensor and device. If the IDs are functioning correctly, return the instrument panel to its original condition. That is, assemble the entire assembly.
Loading …
Functionality check
After completing the replacement, install the panel inside the car, connect the connectors, but do not rush into final fixation - you still need to make sure that everything works properly.
To do this, turn on the ignition and see if the backlight turns on. Then check whether the indicator lights responsible for:
- hand brake;
- oil pressure;
- fault signal, etc.
Then test the turn signals, headlights and side lights. If everything is in order, then complete the panel assembly.
Removing the dashboard
Light bulbs have their own service life. They often last longer than what the manufacturer promised, but more often they burn out much faster. In the case of the VAZ-2114, the last trouble occurs quite often. Fortunately, the designers of the Volzhsky Automobile Plant realized this, and therefore provided the possibility of a quick replacement.
To do this, you only need two screwdrivers - a Phillips and a flathead one. Instead of the latter, it is permissible to use a regular knife.
At the first stage of disassembly, remove the decorative overlay of the panel. In the VAZ it is held in place by 5 screws. Moreover, the screw located at the top right is covered with a plug. It is not difficult to pull it out - just pick it up with a screwdriver and pull it towards you.
Next comes the turn of the levers that provide control of the heater itself and its dampers. If you have a radio or multimedia center, it will also have to be removed.
What to do if error 14 appears on the VAZ-2114 panel
After this, you will be able to slide the cover towards you - the cable loops are long enough to do this without difficulty. As a result, you will have direct access to the instrument panel itself. It is fixed with two screws on the sides. Unscrew them with a Phillips screwdriver.
Next, pull the panel towards you as well. Try not to pull - the power wire harnesses are connected to it, and they can easily come off at the soldering points. Their connectors should be carefully uncoupled, after which the element in question can be pulled out freely.
The procedure is as follows:
- a burnt-out light bulb is rotated 90 degrees;
- stretches out towards itself with fingers;
- a new one is put in its place - it is slightly pressed inside the cartridge and rotated clockwise until it stops.
Procedure for installing new light bulbs
- If there are faults in a particular lamp, the first step is to unscrew the non-working socket where it was located.
- Unscrew it counterclockwise, being careful.
We carefully remove the socket with the light bulb.
The LED light bulb is ready for installation.
Please note that the shape of LED lamps is square, and since it differs from ordinary light bulbs, the excess simply needs to be sanded off.
- After all the new lamps are installed in place, we check their functionality by connecting the wire block to the instrument panel without first fixing it.
- When everything is checked and working, you can reassemble everything in reverse order, remembering to tighten each bolt securely.
Easy replacement of light bulbs in the dashboard of a VAZ 2114
Any driver knows how to track the condition of the car: using instrument readings. In the dark, illumination is responsible for their visibility. But all electrical devices have a limited lifespan, including incandescent light bulbs. They are used in the dashboard of the VAZ-2114. Replacing the light bulbs in it is not difficult, but painstaking.
Why lamps burn out or stop working: causes and consequences
The backlight operating conditions are not ideal: shaking, temperature changes, possible power surges in the on-board network, and so on. When driving, you must turn on low beam headlights. Along with it, the instrument lighting also turns on. This can shorten the life of the lamps, and over time, not the entire panel is illuminated evenly.
Solution
The stores offer several options for light sources for replacing lamps in the instrument cluster:
- traditional incandescent lamps,
- LED in a plastic socket,
- SMD LED is a more expensive and reliable option, a super-bright diode.
The number of backlight and control lamps is up to 19 pieces. It varies slightly depending on the design of the instrument cluster and the modification of the vehicle. Many car owners choose LEDs due to lower energy consumption and longer service life. This backlight is brighter and gives an interesting bluish color instead of the standard green. But due to the design of the diode, the brightness control of the instrument illumination will not work, always turning it on at full power. On a long road trip at night, this can be distracting and irritating to the eyes. But in any case, the choice of light sources is yours.
Step-by-step instructions for replacing light bulbs in the dashboard of a VAZ-2114
- We release the decorative cover of the front panel. For this we need screwdrivers: a short Phillips and a flathead one. Lower the steering column to the lower position using the height adjustment lever to keep it out of the way. The photo shows the mounting locations for the casing:
- There are four screws on the bottom of the visor and above the steering column. Unscrew them with a short Phillips screwdriver.
- Using a flathead screwdriver, pry off the decorative cap to the right of the row of switches. There is another fastening screw under it.
- Also, remove the handles from the heater switch and damper control sliders by pulling them towards you.
- If you have a car radio, you will also have to remove it. Unfortunately, complete dismantling is not possible. Arrows indicate locations for removal
- Pull the front panel cover towards you. He must move. There is no need to remove it completely - there will be enough space to access the mounting screws on the sides of the instrument cluster. Carry out your actions carefully
- Unscrew the fastening screws with a long screwdriver. The combination will be released and you can tilt it towards yourself. Pull out the two blocks with wires. Don’t be afraid to mix them up - there is a color marking, and the asymmetrical shape of the connector will prevent you from connecting it incorrectly. The arrow indicates the location of the cartridge handle
- On the back cover of the instrument cluster there are cartridge handles. Arm yourself with small pliers. This will make it easier to unscrew them. To release the cartridge, half a turn counterclockwise is enough. You can safely take out all the cartridges - they are the same. Next, you can check the lamps with a tester and replace the burnt ones, or replace them all with LEDs at once. Try to ensure that they fit tightly in the cartridge, otherwise the contact will be unreliable.
- We reassemble in reverse order. We insert the cartridges into the seats so that the antennae fall into the grooves, carefully turn them with pliers until they stop. We connect both blocks to the connectors of the instrument cluster.
- Let's check if all the lamps are working:
- raise the handbrake and turn on the ignition: so let’s check the handbrake, generator, oil pressure and check lamps,
- turn on the hazard warning lights - check the warning lamp and direction indicator lamps,
- pull the headlight switch lever towards you - temporarily turn on the high beams, check the warning lamp,
- turn on the dimensions - see if the scales are evenly illuminated, and if the warning lamp, if any, is on.
If everything works correctly, we fix the instrument cluster and the front panel casing, and replace the heater switch handles and damper controls.
Congratulations, now the instrument lighting and warning lights are working properly, and you will always be aware of what is happening with the car. The overall aesthetics of the front panel will also improve - the evenly lit front panel looks beautiful.
Why lamps burn out or stop working: causes and consequences
Burnt-out lamps complicate the driver’s control over the car’s instrument readings.
The operating conditions of the backlight are not ideal: shaking, temperature changes, possible power surges in the on-board network, and so on. When driving, you must turn on low beam headlights. Along with it, the instrument lighting also turns on. This can shorten the life of the lamps, and over time, not the entire panel is illuminated evenly.
The main danger of lamps burning out in the instrument cluster is that some of them are control lamps. In this case, you may not know about the failure of individual machine components. And uneven illumination looks ugly.