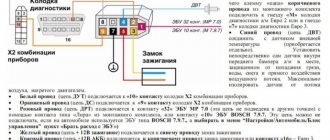
Scheme
The entire line of VAZ 2109 cars can be divided into two branches - those produced before 1998 and those produced after 1998.
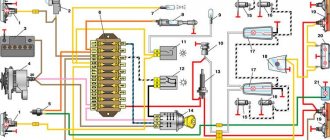
Older cars are equipped with fuse blocks whose marking is 17.3722. This power supply consists of a housing and an engineering board. Wire contacts, fuses and relays are soldered to the board.
Newer versions of nines, the production of which began in 1998, here the power supply is marked 2114-3722010-60. Here we are already seeing fuses.
If we talk about fuse blocks, the factor of the fuel injection system used - carburetor or injector - plays absolutely no role. BP will differ only by the year of manufacture of the car. Therefore, the mounting blocks for the carburetor and injector are the same.
The required mounting block is also located the same everywhere - in the engine compartment opposite the driver's seat, almost under the windshield.
Differences
Are there any differences between the old and new versions of the power supply? Of course. They are as follows:
- The parts of the mounting block are marked differently;
- The fuse ratings are different;
- The new power supply does not have a relay for the cooling system fan motor and a time relay for the rear window washer device.
Fuse box in the engine compartment
It is mounted on the battery shelf on the positive terminal side of the battery.
It contains fuses rated for currents greater than 30 A. Fuse diagrams for LADA Granta of different years of manufacture and their explanation are given below.
For cars assembled in 2011-2014
| Designation | Denomination, A | Protected circuit |
| F1 | 30 | Main relay, interior unit (fuse circuits F1 and F21 |
| F2 | 60 | Generator |
| F3 | 60 | Generator |
| F4 | 30 | Cooling fan |
| F5 | 50 | EUR |
| F6 | – | Reserve |
For cars assembled in 2015
| Designation | Denomination, A | Protected circuit |
| FF1 | 50 | Heated windshield |
| FF2 | 60 | Generator |
| FF3 | 60 | Generator |
| FF4 | 30 | Electric radiator cooling fan (equipped without air conditioning) |
| 40 | Electric radiator cooling fan (equipped with air conditioning system) | |
| FF5 | 50 | Electromechanical power steering |
| FF6 | 40 | ABS ECU |
For cars assembled in 2016, 2022
| Designation | Denomination, A | Protected circuit |
| FF1 | 50 | Heated windshield |
| FF2 | 60 | Generator |
| FF3 | 60 | Generator |
| FF4 | 30 | Electric radiator cooling fan (equipped without air conditioning) |
| 40 | Electric radiator cooling fan (equipped with air conditioning system) | |
| FF5 | 50 | Electromechanical power steering |
| FF6 | 40 | ABS ECU |
For cars assembled from 2022
| Designation | Denomination, A | Protected circuit |
| FF1 | 60 | Generator |
| FF2 | 60 | Generator |
| FF3 | 30 | Electric radiator cooling fan (equipped without air conditioning) |
| 40 | Electric radiator cooling fan (equipped with climate control or air conditioning) | |
| FF4 | 40 | ABS/ESP controller |
| FF5 | 25 | ABS/ESP controller |
| FF6 | 50 | Electric power steering controller |
Old style power supply
Let's first consider the old-style power supply units, which are still quite often found on VAZ 2109 cars. Moreover, as we have already said, with both injection and carburetor engines.
| Fuse number | Current strength | The chain he protects |
| F1 | 10A | Backup fuse |
| F2 | 10A | Turn signal indicators, hazard signal breaker (in hazard mode), hazard warning light |
| F3 | 10A | Rear brake lights, interior lighting |
| F4 | 20A | Rear window heating element, rear window heating switch contacts, carrying socket, cigarette lighter |
| F5 | 20A | Horn (horn), horn switch |
| F6 | 30A | Backup fuse |
| F7 | 30A | Heater fan electric motor, windshield washer electric motor, electric radiator fan relay, rear window heating relay, rear window heating indicator light, glove box light |
| F8 | 7.5A | Backup fuse |
| F9 | 7.5A | Backup fuse |
| F10 | 7.5A | Left side light |
| F11 | 7.5A | Right side lamp |
| F12 | 7.5A | Right low beam headlight |
| F13 | 7.5A | Left low beam headlight |
| F14 | 7.5A | Left high beam headlight, high beam indicator lamp |
| F15 | Right high beam headlight | |
| F16 | 15A | Turn signal indicators and emergency flasher relay-breaker (in the turn signal indication mode), turn signal indicator indicator lamp, rear reverse lights, gear motor and windshield wiper activation relay, oil pressure indicator lamp, hand brake indicator lamp, coolant temperature indicator, fuel level indicator, fuel reserve warning lamp, voltmeter |
BP 17.3722
Relay
In addition to the fuse designations, it will be useful for you to know which relay number in the mounting block is responsible for which functions.
| Relay number | Functions |
| 1 | Performance of the front optics cleaning elements |
| 2 | Rear window washer motor performance |
| 3 | Protection against breakage of turn signal and light signaling lamps |
| 4 | Protection against failure of the windshield wiper motor |
| 5 | Allows you to determine the performance of the lamp |
| 6 | Rear window defogger overvoltage protection |
| 8 | High beam lamps |
| 9 | Low beam lamps |
| 11 | Responsible for the operation of the engine cooling fan. If this relay fails, the risk of engine overheating increases. |
| 12 | Klaxon operation |
Old PSU
How to properly replace a burnt out element
You need to pull the fuses out of the corresponding sockets using special plastic tweezers, which can be found here, in the upper right corner of the VAZ 2114 mounting block. You cannot pry fuses on non-energized circuits with any metal objects due to the risk of a short circuit. It should be taken into account that the electrical circuits of the sound signal, alarm, etc. are always energized. To ensure safety when repairing the circuits, the circuit must be de-energized - you just need to disconnect the wire from the “negative” terminal.
It is not always possible to visually accurately determine the performance of fuses. It will be possible to make a clear decision only after the “ringing”. To do this, you will need a regular tester, which will need to be set in advance to the “dialing” mode. After this, it will be enough to simply attach two terminals of the tester to the terminals of the suspicious fuses. If a characteristic sound is heard, the fuse is good - the cause of the malfunction of the car’s equipment is not in it, but probably somewhere further in the wiring or in the device itself.
New model power supply
Here the mounting block diagram is arranged a little differently, but it is more relevant for owners of the VAZ 2109, since most of the nines that have survived to this day are modernized versions.
The scheme is relevant for both carburetor and injection types of engines.
| Fuse number | Rated current | The electrical circuit for which it is responsible |
| 1. | 8A | Backup fuse |
| 2. | 8A | Backup fuse |
| 3. | 8A | Backup fuse |
| 4. | 16A | Radiator fan relay winding, electrical circuit of switch and heater motor |
| 5. | 3A | Hazard warning switch in turn signal mode, turn signal switch, turn signal switch, turn signal warning light, turn signal warning light, reverse optics switch, reverse lights, tachometer, voltmeter, gasoline level indicator, gasoline level sensor, gasoline level warning light, pointer coolant temperature, temperature sensor, warning lamp and emergency oil pressure sensor, brake emergency lamp, brake system hydraulic switch, hand brake switch |
| 6. | 8A | Brake light switch and bulbs, interior lighting |
| 7. | 8A | Room lighting lamps, indicator lamp for switching on the dimensions, lamp for illuminating the heater and cigarette lighter handles, glove compartment lamp, switch and lamp for instrument panel illumination |
| 8. | 16A | Horn, horn switch, radiator fan motor |
| 9. | 8A | Left side lamp, left rear side lamp |
| 10. | 8A | Right side lamp, right rear side lamp, fog light switch, fog light indicator light |
| 11. | 8A | Turn signal switch and breaker, turn signal lamps, warning lamp in emergency mode |
| 12. | 16A | Cigarette lighter, socket for carrying lamp |
| 13. | 8A | High beam right headlight |
| 14. | 8A | Main beam of the left headlight, high-range optics warning lamp |
| 15. | 8A | Low beam right headlight |
| 16. | 8A | Low beam left headlight |
Relay
As for the relay in the mounting block of the new model for the VAZ 2109, the pinout is as follows.
| Relay number | Its functions |
| K1 | Without it, the rear window washer motor will not work. |
| K2 | Responsible for the operation of turn signal lamps and light signaling |
| K3 | Provides operation of the windshield wiper |
| K4 | Protects brake lights and vehicle dimensions |
| K5 | Provides operation of high beam lights |
| K6 | Guarantees operation of the optics washer device |
| K7 | Protects the power window motor if your vehicle has one. |
| K8 | Sound signal or just a horn |
| K9 | Protects against high voltage going to the engine cooling fan |
| K11 | Responsible for the operation of the rear window heating device |
| K12 | Provides operation of low beam lights |
It is necessary not only to understand the location of a particular fuse or relay, but also to know how to replace a failed element.
Common problems with brake lights
There may be several reasons:
- blown fuse;
- faulty sensor;
- frayed or broken power cord.
The most common cause is a blown fuse responsible for protecting the signal light circuit. This fuse is located on a block built to the left of the steering column. This capacitor can withstand a current of 7.5 amperes, as evidenced by the inscription on it. It is located in the bottom row, fourth from the right edge.
The next troubleshooting point is to check the brake light sensor. To do this, you need to check whether voltage is entering and exiting the sensor. In this case, you need to use a control lamp. If the lamp does not light up when connected in front of the sensor, then the problem may be in the wires going to the sensor. If the lamp works before the sensor, but not after, then the problem lies in this part. You can also simply disconnect the input and output of the sensor and close it “directly” using a copper wire; if after these manipulations the lights in the brake lights light up, then the reason is precisely in the sensor. The sensor cannot be repaired, and the only way out is to replace this part with a new one.
Damaged wires may also be the cause, this will be especially noticeable if the just replaced fuse blows out - this means that the wire is frayed and there is a contact to ground. If the fuse blows without pressing the brake pedal, the wire before the sensor is damaged, and if it blows after pressing, the wire after the sensor is damaged. If there is no voltage, perhaps the wire is simply broken and does not short to ground
When troubleshooting, you should pay special attention to bends and possible areas of damage to the wires.
The next cause of problems is burnt-out LEDs in the brake light; there have been cases when both burned out at once. To replace the light bulbs, you need to remove the flashlight board by squeezing it from the sides and pulling it slightly towards you. Next, you should visually inspect the light bulbs; perhaps a visual inspection will already answer the question about the reason for the non-working brake light. After this, you should replace the old lamps with new ones.
One of the main elements of the electrical system of your VAZ 2110 is fuses. They are responsible for preventing voltage surges and preventing the possibility of short circuits in electrical circuits.
The main fuse box on the “ten” is located in the car’s interior, to the left of the steering column at the bottom. The photograph below shows the appearance of the safety block and symbols.
So, let's look at which parts of the electrical chain the devices located in the safety block are responsible for.
In addition to the fuses themselves, this housing also contains some relays responsible for the operation of electrical components.
- K1 – housing of the relay device that monitors the proper condition of the lighting lamps;
- K2 – housing of the relay device that regulates the operation of the wipers;
- K3 – housing of the relay device that interrupts the electric current going to the turn lamps;
- K4 – housing of the relay device, including low-beam headlights;
- K5 – housing of the relay device, which includes high-beam headlights;
- K6 – housing of an additional relay device;
- K7 – relay device housing, including a heating system for the rear windshield;
- K8 – housing of the backup relay device;
Under the designations F1 to F20 there is a system of fusible safety devices. A significant part of your car's electrical circuits is protected by safety components. Each of them is designed for a specific current. Without protection, the electrical circuits responsible for charging the battery, leading to the generator system, to the ignition and engine starting system remain unprotected.
In order to detect and replace a faulty fuse, we recommend that you use a special table. For replacement, we recommend using original safety elements. Some of the fuses presented in the table may not be present on your vehicle. This is due to the peculiarities of the configuration of electrical devices of a particular model.
So, let's consider the purpose of each of the elements of the VAZ 2110 safety block:
Dismantling and replacement
If one or another equipment fails, you must first check the condition of the fuse responsible for it.
In practice, removing and removing an unusable fuse or relay is not difficult. To do this you need:
- Raise the hood and disconnect the minus from the battery. Since you are working with the fuse box responsible for electrical equipment, the car should not be energized at this moment;
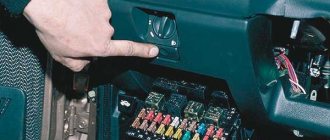
- Find the mounting block. It is located in the engine compartment opposite the driver's seat directly under the windshield. The top of the block is covered with a plastic cover. To remove it, simply press the latches on the sides;
- Remove the cover and look at the back side. There is an electrical diagram showing the location of one or another fuse or relay. Just find the element that is responsible for the failed equipment according to the tables above;
- Remove the fuse. All mounting blocks are equipped with special pliers. Manually removing fuses is not recommended. The relays are removed by gently rocking up and down;
- Replace the failed component.
Fuse failure is determined by the melted filament. These are fusible elements that melt and make contacts, preventing equipment from being damaged by excessive voltage.
That's it, all that remains is to replace the fuse block element, close the cover, replace the battery terminal and check the functionality of the equipment.
Other reasons for backlight failure
Sometimes the instrument panel stops lighting for other reasons. The most common of them are the following:
- Burnt out light bulbs or LEDs . To determine the failure of the lamps, you need to remove the device, but this will not be easy. Faulty lighting fixtures, like fuses, cannot be repaired. They need to be replaced. If the light bulbs burn out frequently, it is advisable to check the car wiring with a multimeter within a reasonable time or contact an auto electrician. Often the reason for this is unqualified replacement of conventional lamps with LEDs;
- The dashboard contact board is burnt out . Due to excessive wear or frequent voltage fluctuations in the on-board network, it may fail. The part consists of microcircuits. It is almost impossible to diagnose and repair it at home. Therefore it will have to be changed. The fee costs about 400-600 rubles. To replace it, you will have to disassemble the dashboard;
- Broken wiring . Damage may occur in one or more places. To identify the defective area, you need to test all the wires with a multimeter. Sometimes this takes several hours. Without a good knowledge of electrical circuits and auto electricians, it is often difficult to determine this malfunction. Sometimes the dashboard may not light up due to oxidized or dirty contacts. Cleaning the contact connections will help restore the functionality of the part. In rare cases, the problem is caused by other faults.
Operating a car with a non-lit instrument is not prohibited by law. But driving with such a breakdown is inconvenient and uncomfortable, since in the dark the instrument readings are not visible, and there is no information about the condition of the car. Therefore, such driving is risky. In addition, this may be accompanied by other, more serious malfunctions. They often prohibit the use of the car. Therefore, it is recommended to diagnose and fix the problem within a reasonable time. Luckily, you can usually do this yourself. And only a wiring break requires the intervention of an electrician.
VAZ 2109 fuses: where they are, replacement
Unlike the VAZ 2110, Lada Priora, Lada Granta, the VAZ 2109 fuse box is pre-installed in the engine compartment.
The regular location was not chosen in the best way.
Often the mounting block is flooded with water, the terminal contacts oxidize, and the insulating layer on the wires dries out. And in bad weather, the driver has to crawl under the hood and look for a faulty element. It is especially unpleasant in winter, in frost, snow, and ice.
The defect was eliminated starting with the VAZ 2110. The fuse block (hereinafter referred to as the fuse block) was moved into the cabin, under the dashboard on the left side.
Relays and additional fuses
The fuse box contains eight relays that are responsible for the following devices in the car:
- K1 – monitoring the serviceability of lamps;
- K2 – windshield wipers;
- K3 – turn signal and hazard signal breaker;
- K4 – turning on the low beam;
- K5 – switching to high beam;
- K6 – backup relay;
- K7 – turning on the heated rear window;
- K8 – control of the operation of the rear fog lights.
Also, car enthusiasts should know that some fusible links in the VAZ-2111 are located separately from the general unit described above. Thus, the fusible link for the central locking is located in a separate box at the back of the fuse box.
This family of car models also has an additional block of three fuses and three relays, which is located to the right of the dashboard behind the trim plate, secured with two self-tapping screws. The following fuses and relays are located here:
- controller and ignition module;
- valve for purging the adsorber, oxygen sensors, speed and air flow;
- fuel pump and injectors;
- electric fan;
- gasoline pump;
- ignition.
As it turns out, finding, diagnosing and replacing the required fuse yourself with minimal preparation is quite simple for the average car enthusiast. Only after checking the fuses should you change the various devices that they protect in the car.
Description of fuses
During the systematic operation of a technical device, due to weather conditions, fuses often fail, overheat, and become deformed.
To restore the performance of the car and its elements, it is necessary to replace the fuses (hereinafter referred to as modules) with new ones. The “update” process is not complicated, but requires care on the part of the repairman. Incorrect installation may damage the vehicle's electrical power system.
The VAZ 2109, as well as older models, has 16 modules and 12 relay switches preinstalled. This is in an old-style power supply unit. In the new PSU model, after 1998, the quantity also remained the same, although the craftsmen reduced the number by three modules.
- PSUs of the old type: they are marked 17.3722, structurally they consist of a plastic case, an engineering board to which the model wires and relays are soldered;
- New model power supply: 3722010-60, design in the form of a plastic case with pre-installed fuses.
Note to the driver!!! It is a misconception that the type of fuel injection system affects the PSU model. The mounting blocks for the carburetor and injector are the same.
Location: engine compartment, on the left side, under the windshield.
Changes in switching and layout of mounting blocks
So, in the first ten years of production, the fog light fuse was located immediately behind the main unit, without any board, it simply hung on the wiring harness. Later it was moved first to a separate board on the left side of the center console, and then to the main mounting block.
As a result, the layout of the block has changed. The mounting block for 7 relays has catalog number 2110-3722010-08, the block for 6 relays is marked 2110-3722010, and the newest block received the article number 2110-3722010-01. In addition, there are blocks without legs for the relay for switching on the front optics K1 (2110-3722010-12), there is a block with legs, but without a relay (the legs are connected by jumpers and in order to install the head light relay yourself, the jumpers need to be cut), but mostly you come across blocks with legs for relays without jumpers. They involve either installing relay K1 or removable jumpers.
Layout diagram, pinout
| Name / amperage (A) | Designations / what they are responsible for |
| F1 (10) | Reservation |
| F2 (10) | Turn signal indicators, hazard warning lights, hazard warning lights |
| F3 (10) | On the brake light, interior lighting of the VAZ 2109 car |
| F4 (20) | Heated rear window, plug, for cigarette lighter |
| F5 (20) | Sound signal |
| F6 (30) | Reserved |
| F7 (30) | Heater fan, windshield washer, radiator cooler activation relay, rear window heating, warning lamp, glove compartment lighting |
| F8 (7.5) | Reserved |
| F9 (7.5) | Reserved |
| F10 (7.5) | Left dimensions |
| F11 (7.5) | Right dimensions |
| F12 (7.5) | Low beam (right) |
| F13 (7.5) | Low beam (left) |
| F14 (7.5) | Left headlight DS |
| F15 (10) | Right headlight DS |
| F16 (10) | High beam indicator, fuel pump |
Designations and markings of the relay mounting block
| Number | What is he responsible for? |
| P1 | Cleaners (wipers) of front optics |
| P2 | Rear window washer |
| P3 | Turn signal lamp relay, light alarm |
| P4 | Wiper motor |
| P5 | Diagnostics of warning lamps on the tidy (high panel) |
| P6 | Surge protection |
| P7 | High beam lamp protection |
| P8 | Low beam lamp protection |
| P9 | Cooling fan |
| P10 | Klaxon |
| P11 | Reservation |
| P12 | Reservation |
The price of a new type power supply starts from 2000 rubles, individual melting elements from 100 rubles, a set from 350 – 450 rubles, depending on the manufacturer.
In Euroblocks, the fuse current was increased by 0.5 Amperes. Instead of the old 7.5 Amperes, 8.0 Amperes are installed. Remember this when choosing and purchasing consumables for repairs or replacement with a VAZ 2109 (8, 16 valves).
Signs of faulty fuses
- The module has changed color, black dots and carbon deposits are visible on the surface;
- An indicator on the instrument panel indicates a malfunction in the engine compartment;
- When the engine is running, the ignition is on, and the battery is charged, some mechanisms do not work or do not work correctly;
- In the interior of the car you can hear the smell of burning, melted in the area where the mounting block is located;
- The modules feel hot to the touch.
Three-level generator voltage regulator for the “ten”
When the heating system, headlights and other additional loads are turned on on the VAZ 2110, the car battery discharges very quickly. This phenomenon is observed even when the “native” generator relay is functioning normally. A three-level regulator allows you to get rid of this problem. You can purchase it at any auto store, equip yourself with a simple set of tools (terminal pliers, a knife, an S10 open-end wrench and a Phillips screwdriver) and install it on the car yourself.
The three-level mechanism is mounted as follows:
- first remove the old relay according to the algorithm given above;
- grind the ends of the spacer bushing using a file (this operation ensures more reliable contact with the diode bridge);
- a new element with a brush holder (sold as a set) is installed in place of the relay;
- Sealant is used to seal the cable entry point;
- put back the plastic casing;
- lay the cable along the standard wiring to the area where the relay is mounted, and secure the new wire tightly with small plastic clamps.
It is recommended to connect the housing of the installed voltage relay and the autogenerator using a reliable shunt. This ensures the necessary contact of the device with ground. However, you can do without a shunt.
The mounted three-level mechanism should be checked with a tester at full consumer load (window heating, stove, headlights, etc. are turned on). At maximum, the device should show 14.5 V, in normal mode - 14.1 V, at minimum - about 13.4 V.
Replacing fuses on a VAZ 2109
Preparatory stage:
- Plastic tweezers for removing the module;
- Rags;
- Additional lighting, provided that work is carried out in the dark.
Sequencing:
- We place the car within the perimeter of the repair zone;
- We turn off the engine, open the hood;
- Loosen the fasteners, remove the battery terminals;
- There is a mounting block on the left side, under the windshield; we snap off the plastic cover;
- We look at the inside where the fuse layout is indicated. We find the faulty one by the exact number or by a visual sign;
- We remove it with tweezers, insert a new one into its original place, and put on the lid.
In an old-style power supply, it is more difficult to identify a faulty module, since you need to remove each of the fuses one by one.
Upon completion, we start the engine and check that the systems are working properly.
Reasons for premature failure of fuses
- A natural factor is the duration of operation without intermediate prevention;
- Ingress of moisture, formation of condensation, oxidation of terminals, drying out of the insulating layer, open circuit of the electrical supply;
- Third-party mechanical damage, accident, impact, collision;
- Deformation of the car wing, windshield, which contributed to damage to the mounting block;
- Short circuit in the electrical supply circuit;
- Direct exposure to ultraviolet rays.
Note to the driver!!! The reason for the inoperability of a particular mechanism is not always a faulty fuse. It often happens that the power supply line is damaged, the terminals are oxidized, the contact is loose, and the units are worn out. Be sure to carry out visual diagnostics in order to assess the technical condition of the car and correctly calculate the amount of consumables.
Subject to compliance with the manufacturer's operating recommendations, the fuse life is from 40,000 km. If you encounter any difficulties with installation, contact certified service stations or auto electricians for help.
Main unit
He's an editor. In all versions of the tenth generation VAZ and higher, it is located to the left of the steering column, under the headlight switch. To open it, just pull the plastic latch. The lid folds down and all elements are available for replacement. If you have to work in the cold in a cold car, it is inconvenient to pick out small fuses, so it is better to remove the entire unit. For this:
- Use a Phillips screwdriver to unscrew the latch at the front edge of the panel.
- Turn the board over.
- Disconnect the contact chips.
- Pull the block out.
Fuse box location
Location of the fuse box
This way it is much more convenient to work with it, especially when it is necessary to re-solder the fuse circuit or replace numerous fusible elements. To replace only one protective module or relay, the VAZ 2112 mounting block does not need to be dismantled. It is enough to use plastic tweezers located on the edge. Pinch the upper part with it and pull upward with loosening movements.
The main VAZ unit contains 20 fuses and 8 relays. Their location is the same for the entire “family”. Relays may vary slightly in placement on the panel. On some models, individual cells may be empty. This is due to the configuration and installed/missing equipment.
Each fuse is responsible for separate electrical equipment and optics. For this purpose, the critical current in strength (A) is precisely selected in it in order to protect the subsequent circuit from damage during voltage surges or short circuits. Without them, cars would catch fire much more often.
All VAZ owners should keep the diagram of fusible protective elements with decoding provided in the table.
| Fuse no. | Current in amperes | Explanation of purpose |
| F1 | 5 | Illumination of the driver's instrument panel, lighting in the luggage compartment, illumination of the rear license plate, dimensions on the left side of the car |
| F2 | 7.5 | Left headlight glowing in low beam mode |
| F3 | 10 | Left headlight glows in high beam mode |
| F4 | 10 | Front right fog lamp light (if provided) |
| F5 | 30 | Power windows |
| F6 | 15 | Responsible for the cigarette lighter, a portable lamp connected to the connector |
| F7 | 20 | Engine radiator cooling fan, sound signal |
| F8 | 20 | Electric heated rear window |
| F9 | 20 | Pump supplying washer fluid to the windshield, wipers operating |
| F10 | 20 | Spare, for connecting additional devices |
| F11 | 5 | Dimensions light on the right side of the car |
| F12 | 7.5 | The glow of the right headlight in low beam mode |
| F13 | 10 | Right headlight glows in high beam mode |
| F14 | 10 | Left front fog light |
| F15 | 20 | Heated front seats (if included) |
| F16 | 10 | Emergency turn signals, left and right direction indicators |
| F17 | 7.5 | Illumination of the on-board PC screen, brake lights, car interior lighting, ignition switch illumination, clock |
| F18 | 25 | Illumination of the heater control panel, glove compartment, cigarette lighter, heater controller |
| F19 | 10 | Responsible for supplying power to the on-board PC, door lock, clock, reverse lamp, |
| F20 | 7.5 | Rear fog lights |
The VAZ 2111 mounting block and similar ones in “related” models hide an additional fuse responsible for the central locking power circuit. It is hidden in a niche, in a plastic box.
The relay block for VAZ 2110 and related modifications is located on the same board with fuses. Relays are responsible for the cyclic actions of individual equipment.
Numbering of elements in the main fuse block
Numbering of fuses and relays in the main unit
If the devices in the car stop working, first check the relays. When a multimeter is not at hand, in order to “ring” the element, simply take out another relay with similar current characteristics and insert it in place of the one being tested. If the equipment works, then the relay needs to be replaced. If not, they look for a breakdown in broken wiring, oxidized contacts, or faulty equipment itself.
| Relay no. | Purpose |
| K1 | Relay responsible for monitoring the health of the lamps |
| K2 | Front wiper relay |
| K3 | Turn stop switch, hazard warning lights |
| K4 | Low beam relay |
| K5 | High beam relay |
| K6 | Additional relay |
| K7 | Heated rear window relay |
| K8 | Rear fog lamp relay |
Instead of K1, sometimes there may simply be contact jumpers. If the VAZ does not have rear foglights, then the K8 remains free. This place can be used to connect other cyclically operating electrical equipment.
How to Test a Fuse Using a Multimeter
If you have a multimeter, then there are two ways to check the fuse.
Voltage check
The first way is to measure the voltage at both contacts (terminals) of the fuse. Small fuses have the top of both terminals protruding through the fuse body. This allows you to measure the voltage on each side of the fuse without removing it.
Set the multimeter to DC voltage measurement mode (=U). Connect the COM probe (black) to the negative or metal part of the body. Set the parking brake and turn the ignition to the ON position.
The ignition must be on, because when the ignition is off, not all fuses are supplied with voltage. Using the positive test lead (red), check the voltage on both sides of each fuse. A fuse is simply an electrical conductor.
If both sides show 12 volts, the fuse is good.
If there is 12V on one side of the fuse and no voltage on the other side, the fuse has blown.
This method works well when many fuses need to be tested at the same time.
Resistance check
If you have already pulled out the fuse but it is not clear whether it is blown or not, you can check its resistance. Resistance is inversely proportional to current. The lower the resistance, the higher the current.
Resistance is measured in Ohms. A conductor, like copper or aluminum wire, has a very low resistance (about 0 ohms). A good fuse will show 0 (or close to 0) ohms.
In other words, there must be continuity between the two contacts of the fuse. A blown fuse will show very high resistance (infinity).
To measure the resistance of any electrical equipment, it must be disconnected from the electrical circuit. You cannot measure resistance while the equipment is connected or turned on. Switch the multimeter to “Ohm” and connect the probes as in the photo.
If the fuse is blown, the multimeter shows OL, which means there is no continuity or the resistance is higher than can be measured. If the fuse is good, the multimeter shows 0 ohms.
Watch the video on how to check the fuse using a lighter or multimeter:
Which fuse is for the cigarette lighter?
Some car models have a problem when the cigarette lighter fuse fails. This is due to the fact that additional electrical equipment is connected to the cigarette lighter. We are talking about video recorders, air purification devices, FM modulators, navigators, chargers and other devices. The automotive market is full of gadgets that need to be connected to, and new products continue to replenish auto stores.
Some of them are low-quality recorders, which often cause the device to break down. This is due to incorrect operation of the gadget and constant voltage surges in the electrical wiring. In this case, not only the fuse, but also the cigarette lighter may break.
DVR plug that requires connection to a cigarette lighter device
There is a possibility of it breaking if a device with a voltage converter is connected to the cigarette lighter. These could be laptops, media players, electric kettles. The device must be protected by a fuse that will take the “blow” in case of overvoltage of the wiring.
In cars, the component is protected by a fuse, but sometimes there is no fuse. This doesn't mean it doesn't exist. It’s just that the cigarette lighter may have the same circuit with a radio or other device, which means they have the same fuse.
Where is?
This is a special device that contains all the fuses that protect the electrical equipment of the vehicle.
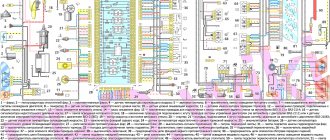
This is what the diagram of an average installation power supply for transport looks like
If you don’t know where the checkpoint is, we’ll give you some tips on how to find it:
- Use the vehicle's operating manual. The instructions will indicate the location of the block. The PP will probably be in it. Note that modern vehicles are equipped with several units. One of them contains fuses, the other contains relays. Depends on the manufacturer. One of the blocks will be located in the passenger compartment, and the other in the engine compartment. The block in the cabin is located on the left side of the dashboard, near the steering wheel. It can be located behind the glove box of the car. As for the second unit, it may be located in the engine compartment near the battery. The device responsible for the cigarette lighter can be located not only in the fuse box, but also in the relay box. It is possible that the relay protects several wiring circuits, so it is likely that the relay is responsible for the lighting device. If you have problems finding a PP, use the service book for the car.
- Open the unit cover. On the reverse side of the plastic cover there is a diagram of the location of fusible parts. Each is responsible for the performance of a specific device. Study the diagram to understand where the PP is located. Perhaps the relay of the car radio or other device is responsible for the operation of the cigarette lighter. Therefore, the scheme needs to be studied in detail.
- Ask online. Today there are many thematic automobile forums on the Internet. Ask the owners of your car model where the PP is located and how to replace it. There may be some nuances that should be taken into account when replacing, so it won’t hurt to familiarize yourself with them.
This is what the power supply diagram looks like, from which you can determine the location of the power supply