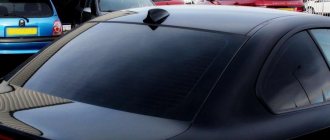
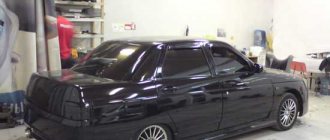
Almost every driver tries to make his car safe and attractive. This purpose is also served by tinting. This way the car takes on an interesting and individual look. In addition, the interior's protection from sunlight, which causes discomfort to passengers and leads to fading of furniture, increases. During cold weather, the film helps retain heat. As a result, the inside of the car becomes comfortable and cozy at any time of the year.
Tinted car
Transparent windows in a car are a reason for strangers to look into the interior. So you feel like a fish in an aquarium. Curious eyes watch you all year round. In addition, it is worth noting the important role of tinting in accidents. It increases the strength of glass. As a result, fragments and other objects are unlikely to break them and thereby harm passengers. A similar property can be observed with mechanical damage, which is presented in the form of gravel, branches and other things.
Advantages
If necessary, silicone tint can be easily removed, rolled up and hidden for a certain time, without worrying about deterioration in its quality. Subsequently, the static film can be easily returned to its place.
The number of removal and installation operations is unlimited. At the same time, the film does not lose its characteristics. The main requirement is to dry the surface after the next installation.
When installing it, you don’t have to worry about claims from traffic police inspectors and the accrual of fines. Below we will consider in detail what the features of removable silicone tint are, its advantages and disadvantages, how to install and remove it, how much installation will cost, and whether you should be afraid of fines.
Manufacturing of air ducts
The modification operation begins with the dismantling of the Renault central tunnel. You will have to remove the plug with the cup holder by unscrewing the fastenings with a Torx adjustable wrench. The plastic parts are removed and a couple of screws in the cup holder are exposed. Directly under the front console of Renault there are a pair of outlets with a rectangular cross-section, from where streams of cold and hot air are randomly sprayed. The intermediate task is to manufacture an adapter measuring 80x20 mm for these nozzles.
The work is being carried out on a Renault Sandero 2 and the standard air ducts from the first model will not fit due to the different diameters of the mounting holes.
Let's complete the task by using an ordinary plastic bottle, preheated with a hairdryer. Let's give the material a rectangular shape of the desired size with a diameter of 34 mm.
Instead of a bottle, it is allowed to use fiberglass.
Having made a couple of adapters, you need to connect one end of them to the Renault nozzle, leading the second to the rear seats. Now, Renault passengers sitting in the back will be able to feel properly distributed heat and the ride will become much more comfortable.
Features and protection
Externally, silicone tinting is similar to classic film. Its peculiarity is to improve the appearance of the vehicle, the ability to withstand low temperatures, and excellent performance.
As noted earlier, it is not afraid of frequent removal and installation - it retains its appearance and quality. In general, the film is practical and durable.
The protective function deserves special attention. Static film reliably filters out UV rays and is not afraid of direct exposure to the sun. The use of such a product allows you to protect the interior elements and the people who are in it from sunlight.
Silicone tint absorbs glare, which minimizes the risk of being blinded by the light of a car moving in the same or oncoming direction.
In the event of an accident, the rear and side windows of the car are often damaged and turn into many pieces. They carry additional danger and can harm humans.
If a static film is installed on the glass, in the event of an accident the glass will not be damaged or shatter. It does not shatter into fragments when subjected to mechanical impact, for example, when hit by a stone or other object. The holding factor is the product itself.
In addition, tinted glass has better mechanical strength - it is more difficult to break. This means that the use of silicone tinting allows you to additionally protect the vehicle not only from prying eyes of passers-by who try to look into the car’s interior, but also from thieves.
Selecting material for tinting
There are several ways to darken car windows, but for tinting yourself it is better to use the film method.
It is important to know how to properly stick the film and what material is best to choose. The film can be:
- simple, with a black adhesive base;
- multi-colored;
- transparent, having various patterns;
- metallized, with different levels of darkening;
- with a changing color scheme;
- “chameleon” with a mirror surface;
- silicone;
- perforated.
The quality of the tint and its service life will depend on the tinting material.
By watching the video you will learn more about the species:
A little more effort will be required to tint glass with rolled material, since you need to cut it yourself. The cost of such material depends on the density and level of darkness. The color range is presented in a wide range, so there is an opportunity to choose for every taste.
Roll tinting material has the following advantages:
- dense structure;
- strength;
- resistance to mechanical damage;
- ease of gluing;
- ease of removal.
Tinting material comes in the form of a roll (click to enlarge).
This material is called removable tinting, since the glass underneath remains unchanged and such tinting can be re-glued as much as you like.
Removable tinting is produced in a standard length, and one roll is enough to cover all car windows.
When choosing a film, it is necessary to take into account its light transmittance. Windshield tinting must transmit at least 50% of light. The film covering the front side windows must have a throughput of at least 35%, the rear side windows and trunk - 15%.
A separate issue is the headlights. Can they be tinted? Tinting can be applied to the front and rear headlights only if the color of their glow and light transmittance are preserved. With headlights tinted in any other way, there is a chance that you will fail inspection and receive a fine.
Leading manufacturers
Today, static silicone tints are produced by many companies, including ASWF, SunTek, Llumar, Johnson, Silicon Tint and others. These companies have earned a good reputation and produce products of high quality, long service life and excellent performance. For example, Silicon Tint tinting became popular in the early 2000s and is in demand to this day.
Experts advise taking silicone film from well-known manufacturers to avoid poor quality and not be disappointed in the performance.
In general, the leaders in this market are companies from the USA and Great Britain. In addition to the companies already mentioned, it is worth highlighting the following manufacturers - Llumar and CarLife.
To avoid mistakes when choosing, you should carefully study the manufacturer’s line, pay attention to its reputation, read reviews about the product, and then make a purchase. There are many known cases where counterfeits were sold under the name of a particular brand.
More chrome!
How else can you make external tuning? Renault Sandero Stepway looks good with various chrome parts. So, one of the most popular little things is the chrome trim on the body pillars. This detail will make the design of your Sandero solid and confident. However, to achieve a greater effect, it is better to purchase chrome trim for other parts of the body - rear-view mirrors, door handles, etc. As a result, your hatchback will be completely transformed, and, mind you, without any body kits or tuned plastic sills! The main thing is not to “overdo it” with chrome. Remember that everything should be in moderation. At this point, the external tuning of the Renault Sandero is almost complete. Finally, don’t forget about the new alloy wheels - what else, if not they, will add dynamism and aggressiveness to your hatchback?
Advantages and disadvantages
Silicone film has a number of advantages that distinguish it from other types of tinting:
- Resistant to UV rays. Over the years, the product does not fade and does not lose its original appearance;
- Resistance to temperature changes;
- Increasing the mechanical strength of the glass surface;
- Preservation of characteristics and shape in case of private withdrawal. If the product is dropped or dented, its shape does not change;
- Increased impact resistance of glass;
- Reducing the temperature inside the vehicle due to effective screening of the sun's rays;
- Protection of interior elements (coverings on seats, dashboard and others) from fading;
- Effective dimming without compromising visibility. After applying silicone tint, visibility for the driver remains at a high level;
- Elimination of dazzle from other cars moving towards or in the same direction;
- Clear fixation on the glass surface. Over time, the material does not come off;
- Quick application. The installation process takes 20-30 seconds, and dismantling is even faster.
- Affordable price.
Silicone tint provides a one-way visibility effect, which guarantees sun protection and increases privacy. This material can be used many times and not worry about losing its effectiveness.
In addition to the already mentioned advantages, it is worth highlighting the long service life, the ability to attach to any glass surface and ease of use.
The product is not afraid of high temperatures, and its application does not require the involvement of specialists - all work is carried out independently. A significant advantage is the ability to quickly withdraw money, which is especially important when traveling abroad frequently.
It is known that when traveling to another country you have to deal with the issue of tinting. If silicone film is installed on the glass, there are no difficulties with dismantling and subsequent application.
Despite a number of positive characteristics, silicone tinting has negative features.
As a rule, they concern goods from little-known manufacturers, focusing on the volume of products produced, rather than on their quality. As a result, the characteristics and parameters leave much to be desired.
Even if we exclude this aspect, the product in question has a number of disadvantages:
- After installation on the glass, a slight distortion occurs, which almost does not affect the overall perception of the picture;
- If installed incorrectly, the static film does not adhere well to the glass and may peel off. As a result, the risk of an accident or other emergency situation on the road increases;
- The corners of the product are the worst to fix, as dust and dirt often get into them. An important role is played by the static effect, which contributes to the accumulation of dust;
- Before being used in cars, silicone film was used in non-residential premises (it was for these purposes that it was produced). For this reason, the product does not have a layer that would protect the surface from scratches and other violations of the integrity of the external part;
- Over time, the edges of the product move toward the center (shrink), leaving minor gaps along the edges of the glass. This happens because when the material is rolled into a roll at the factory onto a transparent liner (backing or protective layer), it stretches a little, and when it is released from the transparent liner before gluing, after 1-2 days the product begins to shrink. This drawback is not typical for silicone tints made on paper substrates; pay attention to this point when choosing products.
To minimize disadvantages, it is recommended to use products from trusted brands and study reviews from other car owners. With a careful approach, it is possible to avoid many negative aspects during operation.
READ ON TOPIC: What is electronic window tinting.
Window tinting step by step
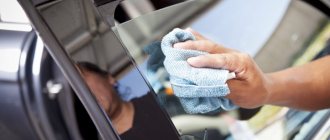
First, you need to dilute the soap solution and thoroughly rinse all the glass with it. Before carrying out this stage of preparation, it is necessary to remove the rubber seals from the glass. Glass treated with soapy water must be thoroughly wiped with paper napkins or a lint-free cloth.
After this, you need to spray the outer side of the glass with soapy water and attach the film to it, pointing its transparent side towards you. Using a knife, you need to outline the boundaries of the future pattern, stepping back about 1-2 cm from the edge of the glass.
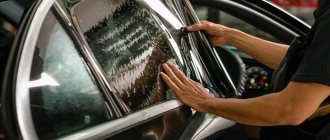
Then you need to spray the inside of the tinted glass with soapy water. It is necessary to attach the film with the adhesive side to the glass, carefully cutting off the bent liner. If the film lies flat and without gaps, then you can begin to carefully squeeze out the soap solution from under it using a rubber spatula or forcing. You need to act carefully. Pressing too hard may scratch the tint.
After the tint has already been glued to the center of the glass, you need to tuck its lower edge into the rubber seal. You must act carefully and slowly. At this stage of tinting, creases and distortions should not form. After this, you need to squeeze out the remaining soap solution from under the film.
After the tint is glued to the glass, you need to trim off the excess with a knife. Excess film around the edges must be removed with sharp movements. The knife must be sharp. The final stage is drying the treated glass with a hairdryer. If it is not there, then you need to close all the car doors. There should be no drafts in the room where the car is tinted. Experts do not recommend returning rubber seals to their place earlier than two days have passed since tinting.
How to install?
To complete the work, you will need two spray bottles with water, two soap solutions (one in the percentage ratio soap/water - 10%/90%, the second - 60%/40%) - then solutions No. 1 and No. 2. Soft forcing (the peculiarity is that it does not leave marks on the surface), ordinary forcing for removing water (we recommend the Zubr company).
You also need a stationery knife, a corner for smoothing wallpaper (see above), and a device for pushing material under the seals.
The algorithm of actions is as follows:
- Treat the prepared smooth surface (preferably glass) with a weak soap solution No. 1. Do this work on the inside of the film as well.
- Glue the product to the wetted glass surface and treat it on the outside with the same soap solution.
- Smooth it out using a soft pressing, moving it from the center to the edges, squeezing out the air.
- To avoid cutting twice, prepare the film for the second car window in the same way; to do this, moisten its inner side with solution No. 1 and glue it on top of the first product.
- Moisten it with soapy water No. 1 and smooth it as in the first case.
- Wash the area of the car around the window and the glass surface itself.
- Wet the glass surface of the car where the tint will be applied with water No. 1 (the glass should be lowered).
- Apply the silicone film to the surface, taking into account the margin (more on this below).
- Treat the surface of the material with the same water and smooth it over the outer part of the glass using a Bison or other forcing, driving it under the seals.
- Hold the workpiece in the corner of the glass with your finger and cut off the excess using a stationery knife (we are talking about the top part, take a gap 1-2 mm above the top edge of the glass). When performing work, do not stop to avoid the appearance of nicks. During the cutting process, immediately remove excess elements by cutting them upward so that they do not interfere.
- Wipe the workpiece with a dry cloth, and then use a marker to make marks on the right and left sides of the glass with a margin of 5 mm on the sides of the seal. For convenience, press the material with your finger in the area of the seal.
- Separate the film from the edges of the glass, leaving only its central part glued. You will get a kind of bun.
- Lift the glass all the way and return the film back;
- Place marks at the bottom of the workpiece, pressing it with your finger in the area of the seal. Here the margin is 1.5 cm or more (15 mm is usually quite enough).
- Remove the product (don’t forget that there are two of them) and fix it on the same surface that was used previously, or better yet, use a special stand for cutting to the size of the glass. Before doing this, treat the stand surfaces with water No. 1 and smooth the film. Moisten it with the same solution and smooth it with a soft distillation, removing all moisture and air.
- Place a ruler from one mark to another and cut off the excess using a utility knife (IMPORTANT: use only a new blade). To cut at the bottom, it is recommended to use a longer ruler to avoid transitions and nicks.
- Make small roundings at the corners of the material, especially important in the lower front corner. Otherwise, there may be problems with placing it under the seal.
- Wash the glass from the inside and outside. Pay special attention to the seals so that no grains of sand or dirt remain on them. To remove them, you can use an old plastic card or another analogue.
- Apply water No. 1 to the inside of the car glass and the inside of the film using a spray bottle. At this stage, it is worth applying a little more soap solution No. 2 to the workpiece.
- Lower the glass slightly to ensure the product is glued flush. Now place the blank on the top of the glass 1 mm below its edge, then straighten the silicone tint and apply soap solution No. 2 to it.
Now expel the air using a rubberized expulsion, moving it from the center to the top, down and towards the seals so that the tint is well fixed. The main task here is to expel all the air and bubbles. - Raise the glass to the top, then treat the bottom with soap solution No. 2 (including the seal).
- Use your fingers to push the film under the lower seal and help yourself with a special piece of thin PET plastic or other device. Make sure all edges are hidden.
- Drive out any small bubbles that may have remained during the gluing process.
- Next, use a special product for removing air and hard-to-reach places (sold in hardware stores), with which the silicone tint is driven completely under the seal.
- Lower the glass slightly to check the quality of the fixation at the top. If there are any bubbles left, push them out. To remove air completely, inspect the surface from the outside. When creases appear on top, you need to heat the problem area with a hairdryer.
Preparing everything you need
Before applying the tint, you need to prepare a clean and dry place to work, as well as a standard set of tools:
- Tinting film that meets the requirements of GOST 5727-88. Light transmittance for the windshield should be at least 75%, for the front side windows - 70%, for the rear side and rear - any. Typically, 4 side windows require 1 roll of film filter.
- Liquid soap (without dyes) to fix the film. It is better to use special installation compounds that do not leave streaks, or a 10-20 percent solution of any transparent shampoo.
- Plastic sticker for smoothing tint. Usually it comes complete with a film filter, but if you don’t have one, you can use any elastic plastic, rubber spatula or construction rubber eraser. Also in the store you can find special distillers for removing bubbles (chisler - for hard-to-reach places, slammer - for squeezing the edges, bloomax - for forcing out liquid).
- Scrapers for cleaning glass surfaces. 12 cm products of various shapes are best suited.
- Spray bottle (manual) for applying soap solution.
- Blade or utility knife. The latter is made of mild steel, so it is convenient to cut the film without fear of the glass being scratched.
- Soft rags, clean rags or napkins made of lint-free material.
- Industrial dryer.
If you are tinting your car yourself for the first time, it would be a good idea to purchase special camouflage markers and tapes. With their help you can correct minor errors.
You should also ensure that you have easy access to clean, cold tap water. The room should be free of insects and dust.
If everything is prepared, you can start cutting the film filter.
Price issue
The car owner has two options at his disposal - to act independently or to hire professionals to install silicone tinting.
Let's look at the costs for each option:
- When installing it yourself, you only have to spend money on purchasing the material. Thus, removable tinting on the windshield costs $17.5. When purchasing a product in linear meters, its cost is about $7 (per linear meter). In a roll 1 m wide and 30 meters long, silicone film will cost $125-130. If you order 10 rolls more, you can save up to $10-20 on your purchase.
- If professionals are involved, installation costs will be higher. For example, installing silicone tinting on two side windows of a passenger car costs about $35. If you need to tint a minivan or SUV, the cost increases to $45 or more. Re-installation, if the car owner does not want to do the work himself, will cost $7.
Tuning Renault Duster
Renault Duster is one of the most popular models in the European automobile industry, as it is distinguished by optimal characteristics, low cost and increased cross-country ability. Transforming such a car is a favorite pastime of many owners of this model.
Their installation makes it possible to prevent breakdowns and malfunctions resulting from driving on unfavorable roads and slopes.
The Duster tuning procedure includes:
- Purchase of new optics;
- Replacing the radiator grille;
- Installation of body protection;
- Installation of a protective mesh that performs filtration activities;
- Replacement of old linings, replacement of moldings;
- Airbrush application;
- Purchase or modification of a dashboard;
- Chip tuning;
- Upgrading the bumper is optional, but recommended;
- Noise and vibration insulation of the interior;
- Adding an improved audio system to the cabin.
Popular myths
When it comes to silicone tinting, there are many myths that do not correspond to reality. As a rule, their appearance is associated with fierce competition in this area, and the sources are often the competitors themselves.
Let's highlight the main stereotypes that often repel people from purchasing such products:
- Dust that appears on the inside of the static film during prolonged use will deteriorate the quality of fixation on the glass in the future. This statement is erroneous, because the product is allowed and even recommended to be washed in warm water. During this treatment, the surface is completely cleaned, which allows the use of silicone tinting in the future. It is worth noting that there is no adhesive base provided here, so the presence of dust does not affect the quality of fixation.
- The reliability of a product directly depends on its thickness. This statement is also wrong. On the contrary, material with a thickness of more than one millimeter is difficult to force under the seals. If, among other things, it is of low quality, the increased thickness will not play any role.
- In the cold season, water collects under the tinting, which impairs visibility and reduces aesthetics. This belief is also wrong, because silicone is not afraid of low temperatures, and its operation is possible in any conditions. In addition, the static film does not fog up and does not interfere with normal airflow.
- Frequent installation/disassembly causes wear and tear on the material. This is another stereotype that applies to PET plastic. On the latter, after 5-7 removals and installations, scratches are visible, and the damage is caused by small abrasive elements. Unlike PET plastic, silicone tinting is not subject to delamination.
- Installation requires special skills, and this task should only be entrusted to professionals. Such reviews are often found on the Internet. This is a lie, because installing the product yourself is not difficult even for beginners. The main requirements are compliance with the specified rules, accuracy and cleaning of the glass surface before application.
Tuning Renault lighting equipment
Do-it-yourself tuning of the elements of the light system at the front of the car involves either installing additional parts or a comprehensive replacement of the entire headlight unit. The result of optical tuning can be seen by looking at various photographs on the web resources of car services and tuning studios.
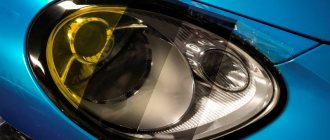
Designers have developed alternative headlight models that fit well into the basic installation grooves. They are presented in the form of lens optical systems and bi-xenon optics. Places for purchasing optical tuning parts are certified distributors. Sometimes, as a tuning, headlights are given the appearance of living eyes, using plastic eyelashes applied to the upper part of the optics. Also a sign of improvement may be the attachment of a stainless steel rim or the gluing of a transparent or tinted film. This makes it possible to protect the headlights from chips, rubbing and various scratches.
Videos show that applying the film does not change the efficiency of lighting devices while driving, even in the evening. The main requirement for such protective surfaces is their resistance to heat.
Installation Tips
Car owners often cover the rear window with a regular film, and install removable silicone tint on the front windows.
With this approach, for maximum aesthetics and matching tones, it is necessary to follow the proportions below and use materials of certain brands:
- If a slight darkening of the interior is required, a Creative product is installed on the front windows by 20%, and a film from the manufacturer Llumar ATR is used on the rear windows by 15%.
- To darken the windows in the car interior as much as possible, you need to use Creative tint material on the front windows, but at 35%. As for the remaining windows, they are tinted with Llumar Bronze by 20%.
The use of the schemes discussed above ensures an aesthetic appearance, excellent visibility and the highest level of comfort in the cabin.
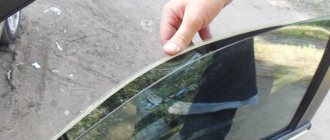
Side window tinting
Initially, the seals and door trim should be removed in order to gain full access to the glass. Next, the pattern is made. There are two options: use a template from thin graph paper or cut a piece with a margin of a few centimeters.
In the second case, you should apply the tinting material on the outside of the damp glass and trim off all excess. Next, you will need to remove the transparent protective layer from the tint, while simultaneously spraying the surface with soapy water.
The final stage is gluing the film onto the glass; to smooth it out, use a spatula, expelling air bubbles from the middle to the edges. After the material has been thoroughly smoothed and taken its place, it is forbidden to use window lifters for several days until the adhesive layer has completely dried, as the edges of the material may peel off.
Advantages and disadvantages based on owner reviews
As already noted, when deciding to install silicone tint, it is worth studying user reviews and listening to their opinions. People note that its installation is simple, and the product itself is inexpensive.
In addition, the following advantages stand out:
- Convenience;
- Practicality;
- No problems with traffic police (the film is quickly removed while the inspector goes to get the device).
On the other hand, static film has a number of disadvantages:
- The appearance of turbidity;
- Poor quality of fixation on glass (despite the manufacturer’s assurances);
- The appearance of small creases at the corners (even with careful fastening);
- Glare in rainy weather;
- Poor visibility.
If you analyze the reviews, there are many negative comments. Many people note that silicone tint is not intended for installation on a car and has a number of negative nuances, which were mentioned above.
Changing the appearance
As we already know, it is initially distinguished by its harmonious and expressive exterior, so we will change it as little as possible. The most popular body accessories installed on this car are window deflectors, spoilers, eyelashes and roof rails. The first part is most often characterized as an element of “collective farm tuning”, since it does not bring any benefit to the car.
A more practical solution would be to install roof rails. This is not only beautiful, but also practical, because when going on a long trip, you can install almost any thing on them, even mountain bikes. New roof rails cost about 3.5 thousand rubles. The plastic spoiler, which is installed on the upper part of the body, costs about the same. It, of course, does not fulfill its direct function - keeping the car on the road by changing the aerodynamic resistance - but with it the car looks very bright and sporty. Another useful little thing that has become a real panacea for car enthusiasts is the so-called “eyelashes” for headlights. With their design, they do not clutter up the flow of light emanating from the lamps, and during the day they make the optics of the car more original, since their shape visually changes the design of the headlights.
Source
Is it worth betting?
Deciding on the relevance of using silicone tint is the driver’s decision. Its use is relevant in countries where there is a ban or severe restrictions on tinting. For example, in Moscow, traffic police officers often fine people for film on front windows. In such a situation, the problem is solved by removing it from the surface.
Some traffic police officers do not take any action at all when they realize that the tint is removable.
At the same time, we must not forget about the disadvantages of the product, which were mentioned in the article - poor visibility, cloudiness and creases at the corners.
Types of films
There are several main types of removable tints, each of which has its own useful features:
- Photochromic tinting. Has good reviews. It differs in that when it is used, the glass becomes lighter or darker, depending on the strength of the applied voltage. This film completely lacks the mirror effect, but it is possible to adjust the transparency of the glass yourself. The only but significant disadvantage is the high price of the product.
- Double glazing. A very convenient and modern technology, when tinting is applied in the form of a second, darkened glass and lowered at will. The disadvantages are the high cost, as well as the complexity of installing this type of tinting.
- German static plastic. This tinting coating is made on the basis of monopolycarbonate and is maintained due to the same static. It has a fairly neutral price and is easy to install. Moreover, recently some craftsmen have been practicing making this type of tinting on their own.
- Silicone tint. A very common version of removable film. This product is also low cost, easy to install using the technology described above, and can be used repeatedly until it wears out. Suitable for all types of cars and practically insensitive to temperature changes and other weather inconveniences.
If you are thinking about choosing a static removable tint, then it is best to give preference to the latter option or German static plastic - these inexpensive tint coatings perform their main functions quite well.
What law governs
The installation of tinting on a car is subject to strict regulatory standards for the light transmission of vehicle windows. You can install a tint film if the following conditions are met:
- The percentage of light transmission of the front and side panels is at least 70.
- The percentage of light transmission of the windshield is 75%.
If the tinting does not meet these requirements, the owner will have to pay a fine. Currently, the fine is 5,000 rubles; until 2022, the fine was five hundred rubles.