Tuning and auto gadgets / From Vladimir
- Varieties: silicone, PET and others
How to tint: the most popular options for removable structures on video
- Video: how to properly glue removable tint onto a car
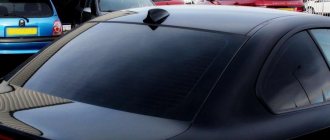
When driving a car, many drivers are faced with the problem of glare and excessive heating of the interior during the warm season. The most practical solution to these problems is removable tint film for car windows. The great popularity of this film is also explained by the fact that when a vehicle is stopped by a traffic police officer, you can easily remove the tint and resume its use in the future. A nice bonus is that you can make such a product and stick it on your car windows with your own hands.
Tools and materials for creating and gluing film
You can make tinting for car windows yourself using special consumables. To create, you will need a sheet of polyester (PET) no more than 0.5 mm thick and a film that will be applied to the plastic. The following set of tools is also required:
- knife with replaceable blades;
- pencil for drawing outlines;
- metal scissors;
- forcing to smooth out irregularities on the film;
- a spray bottle for applying a soap solution to the surface of the glass.
The forcing can be purchased at a construction supply or outdoor advertising store.
In addition to tools and materials, it is necessary to first prepare a cleaned and smooth surface on which the film will be applied to the plastic. For this purpose, you can use glass with a thickness of 15 mm or more.
What is this
The term “removable hard tinting” refers to a modern innovative development, which consists of a sketch of a car window cut out from a template.
This template is inserted into the opening while maintaining a small gap between it and the glass. Installation and removal of frame imitation is carried out in a matter of seconds.
It can be made from various compositions:
- PAT.
- Composite materials.
We cut out the tint
Before gluing the tint onto the car, it is better to study the video instructions for cutting the tint material (at the end of the article), since all further work depends on this stage.
Cutting can be done directly on the glass of the machine, but for beginners it is better to prepare a special glass stand for this. Next, we cut out and apply the film in one of two ways.
1 way
- Cut out a rectangle.
- Wet the glass. This is necessary so that the tinting material does not “run around”.
- Place a film filter on the glass outside of the pattern machine. In the future, the film will be glued from the inside, but for cutting it is more convenient to work from the outside.
- Cut the blank along the curves of the glass with an allowance of 5-10 mm; for convenience, lower the window by at least 5 cm.
- Perform molding.
- Transfer the pattern to the stand and cut off the sharp corners a little.
- Prepare strips of film (10 cm each) and stick them on the front side to make “tails” for which you will remove the protective layer.
Method 2
- Use ready-made patterns that can be selected for a specific car model in any store.
- Cut out the workpiece, leaving a small allowance of 5-10 mm.
- Apply the installation compound to the inside of the glass and attach the pattern.
- Perform fitting and shaping.
- Glue the tails.
Separately, it is worth saying a few words about film formation. You should not do this while pasting, as in this case you will get “arrows” and unevenness. Therefore, it is better to do the molding in advance. To do this, at the cutting stage, when you attach the workpiece to the glass, you need to supply hot air to it. After this, you need to go over the film by forcing it so that the material lays tightly on the glass, taking its shape. This will make it easier for you to remove the protective layer.
After this, the most important work of applying the film begins.
Is it worth betting?
Deciding on the relevance of using silicone tint is the driver’s decision. Its use is relevant in countries where there is a ban or severe restrictions on tinting. For example, in Moscow, traffic police officers often fine people for film on front windows. In such a situation, the problem is solved by removing it from the surface.
Some traffic police officers do not take any action at all when they realize that the tint is removable.
At the same time, we must not forget about the disadvantages of the product, which were mentioned in the article - poor visibility, cloudiness and creases at the corners.
Why do you need to tint your car?
If you want to protect yourself from prying eyes, the best option would be to tint your car . Tinting has several other useful functions .
- The film coating has the property of reflecting heat rays. In summer, the car interior will not be so hot, the plastic elements will not heat up, and the sun's rays will not annoy the driver and passengers.
- The film blocks ultraviolet radiation. In a cabin whose windows are covered with a tinted coating, the upholstery and plastic elements will not fade so quickly.
- Provides additional strength. Tinted windows are more difficult to break.
- This tuning improves the appearance of the car. The design of the car acquires a certain gloss and chic, of course, provided that your vehicle is well-groomed and clean.
Film dismantling
Depending on the type of material, hard tinting can be fixed using different methods, but high-quality composite screens are attached using a single technology, described just above. Dismantling is even easier.
To do this, you just need to pick up the edge of the applied surface with your fingernail or a coin and remove it from the opening.
If the car owner uses high-quality protection, the kit will definitely include a tube for storing it (all companies involved in the production of good products in this area use them as a storage case). A cheap plastic analogue may crack when twisted into a tube.
Installing tinting nets on front windows
Installing front tinted car windows (with light transmission less than 70%!) is prohibited by traffic regulations, and nets are also not allowed if they interfere with the driver’s visibility while driving. But, at the risk of being fined, drivers still install mesh tinting on their front car windows at their own peril and risk. Let's look at how these nets are attached to a Chevrolet Lanos.
The nets for Lanos are framed, each of them has a label on the inside. The mesh tint is attached using four steel hooks covered with polymer material; the hooks have a curved shape.
The grid is set up as follows:
- open the front door, lower the glass all the way down;
- In total, you need to install four hooks to attach the mesh, look at where these points are located;
- the first point is located at the bottom of the frame, behind the glass;
- the second is at the top on the same side;
- the third is on top of the frame;
- the fourth – in the area of the side mirror;
- to install the hooks in their places, it is necessary to pull out the door seal, the mesh fasteners are installed under it;
- Having installed the hooks, we return the seal to its place, pressing it to the door frame;
- snap the mesh onto the hooks - that’s it, it’s already installed, now all that’s left is to squeeze the hooks with your fingers so that the mesh stays more securely in place;
- We put mesh tint on the other front door.
As you can see, the meshes are very easy to install and can be dismantled just as easily. In order not to get into trouble with the traffic police, you can remove the nets along the way. It should be noted that curtains are not prohibited on any rear windows, so you can safely install them without fear of problems with traffic cops. There are also window curtains that are held on by magnets, making them even easier to remove and install.
Advantages and disadvantages based on owner reviews
As already noted, when deciding to install silicone tint, it is worth studying user reviews and listening to their opinions. People note that its installation is simple, and the product itself is inexpensive.
In addition, the following advantages stand out:
- Convenience;
- Practicality;
- No problems with traffic police (the film is quickly removed while the inspector goes to get the device).
On the other hand, static film has a number of disadvantages:
- The appearance of turbidity;
- Poor quality of fixation on glass (despite the manufacturer’s assurances);
- The appearance of small creases at the corners (even with careful fastening);
- Glare in rainy weather;
- Poor visibility.
If you analyze the reviews, there are many negative comments. Many people note that silicone tint is not intended for installation on a car and has a number of negative nuances, which were mentioned above.
Applying film for tinting on the rear window of a car
The process of cleaning the rear window of a car is slightly different as it has heating filaments and extreme care must be taken not to damage them. It is also recommended to use a plastic spatula instead of a scraper.
- After cleaning, the glass should be washed with a hard sponge, wiped dry using a hard scrub and wiped with a napkin around the perimeter.
- Before applying the film for tinting, moisten the glass generously with the solution, while covering the rear shelf with a rag or some other available material so as not to flood the car’s electrical equipment with water.
To apply the tint film to the rear window, it is better to use an assistant.
- When removing the liner, immediately wet the exposed adhesive layer with a soap and water solution.
- Carefully, without touching the adhesive layer to foreign objects, place the workpiece on the glass - this is a very important operation and requires a certain skill.
- Make sure that the film does not curl, wrinkle or bend.
The adhesive layer of the pattern should only touch the treated surface of the glass and, in no case, any parts of the car’s interior or the installer’s clothing.
Align the pattern with the glass so that there are no gaps, and begin to smooth it using a rubber pressing tool.
When tinting the rear window, smooth the film from the center to the edges so that no air or water bubbles remain under it. Use a plastic spatula in hard-to-reach places.
- Next, moisten the tint film and squeeze out the remaining solution from under it using hard forcing.
- Squeeze along the heating threads - from the center to the edges.
- Then perform this operation by hard forcing, but already wrapped in a napkin.
The final stage is pressing the tint film around the perimeter by forcing, while simultaneously heating the glass from the outside using a hairdryer.
Be careful not to overheat the glass with a hairdryer - it may burst!
Leading manufacturers
Today, static silicone tints are produced by many companies, including ASWF, SunTek, Llumar, Johnson, Silicon Tint and others. These companies have earned a good reputation and produce products of high quality, long service life and excellent performance. For example, Silicon Tint tinting became popular in the early 2000s and is in demand to this day.
Experts advise taking silicone film from well-known manufacturers to avoid poor quality and not be disappointed in the performance.
In general, the leaders in this market are companies from the USA and Great Britain. In addition to the companies already mentioned, it is worth highlighting the following manufacturers - Llumar and CarLife.
To avoid mistakes when choosing, you should carefully study the manufacturer’s line, pay attention to its reputation, read reviews about the product, and then make a purchase. There are many known cases where counterfeits were sold under the name of a particular brand.
Characteristics of removable tinting
Removable tinting is a film that has a static effect of adhering to car glass. In terms of external characteristics, it differs slightly from ordinary film. The only noticeable difference is that after gluing it there is a clouding effect, which disappears as a result of shrinkage.
The main characteristics of removable auto-tinting include increased resistance to low temperatures and mechanical stress. During long-term use, the film is not damaged or deformed. Removable tinting perfectly protects the interior from ultraviolet radiation and does not interfere with normal illumination.
Plastic removable tint option
A distinctive feature of removable film compared to conventional film is the possibility of reusable use without loss of proper appearance and effectiveness. Regardless of the number of removals and re-installations with your own hands, it will protect the interior of the car and hold firmly to the windows.
At the same time, it is worth knowing that, most likely, a fine cannot be avoided when stopped by an inspection officer. Judicial practice shows that in most cases the court takes the side of the traffic police, relying on the fact that at the time the illegal actions were recorded (in our case, the presence of tinting not in accordance with GOST), the driver had already violated the norms, that is, the offense had already taken place.
Advantages
If necessary, silicone tint can be easily removed, rolled up and hidden for a certain time, without worrying about deterioration in its quality. Subsequently, the static film can be easily returned to its place.
The number of removal and installation operations is unlimited. At the same time, the film does not lose its characteristics. The main requirement is to dry the surface after the next installation.
When installing it, you don’t have to worry about claims from traffic police inspectors and the accrual of fines. Below we will consider in detail what the features of removable silicone tint are, its advantages and disadvantages, how to install and remove it, how much installation will cost, and whether you should be afraid of fines.
Preparing everything you need
Before applying the tint, you need to prepare a clean and dry place to work, as well as a standard set of tools:
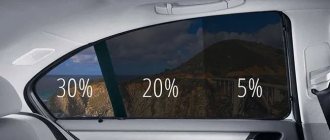
- Tinting film that meets the requirements of GOST 5727-88. Light transmittance for the windshield must be at least 75%!, for the front side windows - 70%!, for the rear side and rear - any. Typically, 4 side windows require 1 roll of film filter.
- Liquid soap (without dyes) to fix the film. It is better to use special installation compounds that do not leave streaks, or a 10-20 percent solution of any transparent shampoo.
- Plastic sticker for smoothing tint. Usually it comes complete with a film filter, but if you don’t have one, you can use any elastic plastic, rubber spatula or construction rubber eraser. Also in the store you can find special distillers for removing bubbles (chisler - for hard-to-reach places, slammer - for squeezing the edges, bloomax - for forcing out liquid).
- Scrapers for cleaning glass surfaces. 12 cm products of various shapes are best suited.
- Spray bottle (manual) for applying soap solution.
- Blade or utility knife. The latter is made of mild steel, so it is convenient to cut the film without fear of the glass being scratched.
- Soft rags, clean rags or napkins made of lint-free material.
- Industrial dryer.
If you are tinting your car yourself for the first time, it would be a good idea to purchase special camouflage markers and tapes. With their help you can correct minor errors.
You should also ensure that you have easy access to clean, cold tap water. The room should be free of insects and dust.
If everything is prepared, you can start cutting the film filter.
Popular myths
When it comes to silicone tinting, there are many myths that do not correspond to reality. As a rule, their appearance is associated with fierce competition in this area, and the sources are often the competitors themselves.
Let's highlight the main stereotypes that often repel people from purchasing such products:
- Dust that appears on the inside of the static film during prolonged use will deteriorate the quality of fixation on the glass in the future. This statement is erroneous, because the product is allowed and even recommended to be washed in warm water. During this treatment, the surface is completely cleaned, which allows the use of silicone tinting in the future. It is worth noting that there is no adhesive base provided here, so the presence of dust does not affect the quality of fixation.
- The reliability of a product directly depends on its thickness. This statement is also wrong. On the contrary, material with a thickness of more than one millimeter is difficult to force under the seals. If, among other things, it is of low quality, the increased thickness will not play any role.
- In the cold season, water collects under the tinting, which impairs visibility and reduces aesthetics. This belief is also wrong, because silicone is not afraid of low temperatures, and its operation is possible in any conditions. In addition, the static film does not fog up and does not interfere with normal airflow.
- Frequent installation/disassembly causes wear and tear on the material. This is another stereotype that applies to PET plastic. On the latter, after 5-7 removals and installations, scratches are visible, and the damage is caused by small abrasive elements. Unlike PET plastic, silicone tinting is not subject to delamination.
- Installation requires special skills, and this task should only be entrusted to professionals. Such reviews are often found on the Internet. This is a lie, because installing the product yourself is not difficult even for beginners. The main requirements are compliance with the specified rules, accuracy and cleaning of the glass surface before application.
Law and punishment for installing inappropriate tint
To avoid having to remove only the pasted tint at the first traffic police post, you should take into account the permissible standards. According to the law, or rather GOST 5727–88, the windshield must transmit at least 75% of light, and the front side windows - 70%! A dark stripe is allowed on the windshield, but not more than 14 cm from the top edge. There are no restrictions on rear windows. The only thing is that deep tinting (less than 5%!) requires the installation of rear-view mirrors on both sides (i.e., possible on all modern cars).
The percentage of light transmittance you choose depends on your goals and applicable regulations.
The penalty for non-compliance with these standards is not very large - 500 rubles. Since the spring of 2015, “frightening” information has been circulating on the Internet about a new law, which provides for a threefold increase in the amount of the fine (with a repeat of 5,000 rubles). At the beginning of autumn 2016, the law had not been adopted.
Thanks to installers, the service of installing reusable tinting has become quite popular. Like, if you were caught with a removable film, then nothing will happen. But reality shows the opposite. In 95% of cases, the court takes the side of the traffic police, arguing that at the time the vehicle was stopped, the offense had already occurred, and therefore, you may well be fined.
Price issue
The car owner has two options at his disposal - to act independently or to hire professionals to install silicone tinting.
Let's look at the costs for each option:
- When installing it yourself, you only have to spend money on purchasing the material. Thus, removable tinting on the windshield costs $17.5. When purchasing a product in linear meters, its cost is about $7 (per linear meter). In a roll 1 m wide and 30 meters long, silicone film will cost $125-130. If you order 10 rolls more, you can save up to $10-20 on your purchase.
- If professionals are involved, installation costs will be higher. For example, installing silicone tinting on two side windows of a passenger car costs about $35. If you need to tint a minivan or SUV, the cost increases to $45 or more. Re-installation, if the car owner does not want to do the work himself, will cost $7.
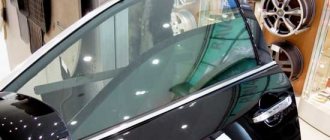
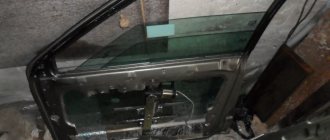
We tint car side windows
Before pasting the side windows, it is better to remove the glass and wash it with soapy water.
Making a pattern for the tint film
Before making the tint, we will make a pattern from the film . For cutting you will need a table; it must be clean and of a suitable size in order to cut the material not only for the side windows, but also for the rear window.
The cutting must be done taking into account allowances for errors, apply the film to the glass and add 5-7 mm on all sides, use a marker to mark the cut line and cut it out. If the glass will not stretch, the edge is made minimal, 2 mm.
Side window tinting sequence
We have the blank, now let’s start gluing it.
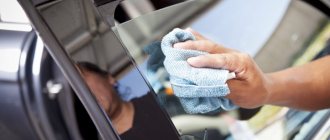
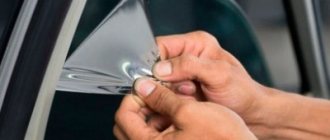
- Before fixing the tint, the entire area to be pasted is generously moistened with soapy water from a spray bottle.
- The gluing process starts from the top. Two-thirds of the protective layer is removed from the film and also sprayed with the solution. Hands should also be moistened with water.
- The workpiece is applied with an adhesive layer and aligned along the top edge.
- If everything is smooth and there are no gaps, begin to force the liquid from the center to the edge. These actions must be performed carefully. In this case, the film can slide over the surface. Use a soft cloth, and then a hard spatula and a hair dryer.
- After removing the bubbles, the protruding edges of the pattern are cut off with a stationery knife.
- Next you need to glue and also smooth the bottom part. The protective layer is removed from the pattern, the adhesive layer is moistened with a soap solution and applied to the glass surface. The liquid is distilled out in the same way as when gluing the upper area. To avoid vertical folds , follow the direction of movement: from the center to the edges.
How to make and stick with your own hands: instructions
To avoid mistakes when creating and then applying removable tint yourself, you should follow the step-by-step instructions. To make a film, you must perform the following steps:
- Remove the pattern from the glass. First you need to glue a transparent protective layer from the film, carefully smooth it over the surface using a solution of soap and water, and using a knife, cut off the side contours and the bottom along the sealing rubber inserts. After this, you need to slightly lower the glass and cut off the film along the upper border. The result is a transparent glass-shaped sample.
Prepare film blanks - Having prepared the pattern, you need to transfer it to a sheet of thick paper and insert it between the glass and the seals. Next, you will need to lift the glass all the way and fit all the parts to the seals. If the contour along the top part coincides unevenly with the edges of the glass, you need to cut off the protruding elements and ensure that the edges match exactly.
Align the contours of the selected film - Having adjusted the pattern to the size of the glass, you can remove it and cut out plastic blanks based on it. To speed up the process, the blanks can be made in pairs, since the right and left glasses have the same dimensions and shape. After cutting out the blanks with metal scissors, it is worth sanding them along the edges.
Sand the patterns so that they do not damage the film - After creating the blanks, you need to prepare patterns from the tint film. Removable tinting requires gluing the blanks on both sides, so you need to cut out two pieces of film of the same format. Then it is enough to remove the layer of protection on one side and wait for the static effect to disappear.
Wait until the static effect disappears - The entire area of the polyester workpiece must be wetted with a soap solution 10–15 minutes after performing the previous step. A similar procedure is performed with a tint film using a spray bottle. If the humidity is not enough, the film may not stick securely in the future.
Do not skimp on the solution before gluing - The treated film should be applied to the plastic blank and smoothed over the entire area using forcing. After careful alignment, the excess edges are cut off along the contour of the glass with a knife.
The lining material should be plastic or rubber - After applying the tint film to all workpieces, you should dry the resulting products for a couple of hours. It is important to ensure that no air bubbles appear on the workpieces. After the first side is completely dry, you need to let the second side dry. The result is a ready-made removable tint, for gluing it you just need to attach it to the glass.
Avoid bubbles and small particles from getting under the tint.
Hard tinting is attached to windows using transparent tape.
Video: how to properly glue removable tint onto a car
https://youtube.com/watch?v=UP2JrrccMKM
How to install and remove film on static
By making your own car window tinting, you can quickly install it on the windows and remove it when not necessary. A well-made overlay will serve its purpose for many years.
DIY methods and technology for tinting headlights
Which tint is best for a car: options and advice from practitioners
How to tint a car's rear window
It is not uncommon to see tinted windows with the film peeling off, or air bubbles visible on the car glass. All defects occur due to the fact that when applying the film material the surface was poorly washed, and when installing the TP, water and air were not sufficiently expelled from under it.
Before tinting the rear window (RW), it must be washed very well, not only from the outside, but also from the inside.
Next we perform tinting in the following order:
- apply a 1.5 m wide film to the rear window, cut off the TP along the contour with a small margin;
- heating with a hairdryer, straighten the film with a spatula, straightening it from the middle to the edges;
- the film should be heated carefully; if overheated, it may become deformed, which will lead to damage to the material;
- using the lighting inside the cabin, we cut out the formed TP along the contour, the size of the workpiece should be approximately 2 mm larger around the perimeter of the white glass, that is, slightly overlap the black edging;
- Before gluing the film material, thoroughly wash the glass from the inside. Each speck of dust remaining on the surface of the surface forms an air bubble;
- wash off the soap suds with a stream of water under pressure;
- We remove the protective layer from the film, while simultaneously wetting the TP with a soap solution. The tint film has two sides - lavsan and tinting (adhesive), so when installing the sides you need to not mix up the sides and install the tint material correctly;
- open the door, place the film in your place, you need to do this together. The TP should be applied smoothly, without sudden movements - you should not touch the adhesive side, nor create dust with your movements. It should be noted that it is more difficult to install the film in a sedan than in a hatchback;
- Having fixed the tinting material on the glass surface, we begin to carefully straighten and smooth it with a spatula, expel air and water from under the film with movements from the center to the edges of the surface;
- Use a rubber spatula to squeeze out the remaining water between the surface and the film;
- to smooth the TP along the edges of the glass in a sedan, we use a forcing tool (trowel) with a long handle, since getting to the edges here is not easy;
- To speed up the drying process of the glue, warm up the surface using a hairdryer.
Despite the apparent simplicity of the work, it is very difficult to properly lay the film on the rear window, and tinting may not work the first time. The most important thing in this matter is to take your time and do everything strictly according to the instructions.
Procedure technology
Car window tinting is a labor-intensive process that consists of a number of interrelated works. The first thing to start with is preparing your work surface. To do this, remove dust and other dirt from it. Then dry thoroughly. There should be no water left on it.
Now you can proceed directly to gluing the film. To do this, it is well wetted in a specially prepared solution. It consists of water and soap. The glass must also be coated with the same mixture. Moreover, all work is first performed inside the car. This will allow you to determine the required size and shape of the film.
To fix the tint on the glass, it is dried using a hair dryer. After all the work is completed, you should not open the doors for two to three days. During this period, the tint will be firmly and securely fixed. As a result, it will have a long service life.