Possible reasons for replacing the rear beam of the tenth model
The rear suspension of a VAZ car, in general, is constantly subject to intense wear. From time to time, knocking, grinding and other extraneous sounds may appear, clearly hinting that something is wrong with the car. The struts, springs, and suspension linkage bushings are checked. Specifically, the beam is the last thing to sin.
However, there is nothing eternal in the world, much less perfect. In pursuit of these simple truths, the motorist decides to completely replace the suspension. Even if the condition of the beam on your VAZ 2110 is satisfactory, its design itself is far from perfect. And the driving characteristics of the car can be improved, at a minimum, by replacing the rear suspension with “Priorovskaya”.
In more modern car models, a so-called torsion bar is used to strengthen the suspension. This also ensures a more even load distribution between the shock absorbers and improves the vehicle's driving characteristics. Fortunately, many of the “Prior” features are perfectly applicable on VAZ cars of the tenth model. That is why replacing the rear beam of a VAZ 2110 is very popular among car tuning enthusiasts.
Many go further, deciding to install an independent rear suspension for their iron horse. This is quite a serious and responsible tuning of a VAZ. Because such pleasure is very expensive. This also means more expensive maintenance due to the complexity of the independent suspension beam design.
Torsion bar in beam
But the issue of this kind of modernization concerns not only the price, but also the risks associated with it. Handicraft designs often turn out to be technologically ill-conceived and cannot withstand the workloads of the VAZ 2110. As a result, the rear suspension can fall apart at any moment right on the road. Agree, you definitely don’t need such “pleasure,” so buy the product only from trusted brands and stores (for example, the same Tehnomaster, Avtoprodukt and other VAZ distributors).
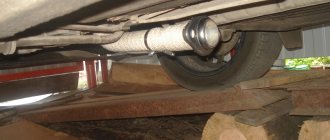
Replacing silent blocks
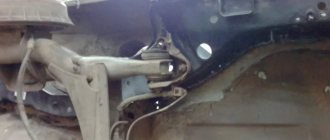
If squeaks and extraneous noises occur in the car, it is necessary to replace worn parts. This will help avoid more significant breakdowns that will lead to complex and expensive repairs. The first thing you need to pay attention to when checking the performance of beams is the silent blocks. They are replaced using a special puller made using several sections of pipes to which washers are welded.
If you do not want to spend extra time on manufacturing, purchase the device at any specialized store. The rear wheels must be secured using shoes specially adapted for this procedure or ordinary bricks. This must be done because the car, raised with a jack, can jump off it and crush you.
Remove the raised wheel and check how loose the silent blocks are in the beam arm. If they are loose, repairs will need to be made. Unscrew the upper support nut and, applying short blows to the bipod, turn out the wheel. The blows must be applied until the support pops out. Then unscrew the long bolt, which is located at the top of the lever, and proceed to directly inspect the silent blocks of the front beam.
How to correctly replace the rear beam using the example of a VAZ 2110
The instructions are suitable for almost any domestic car with semi-independent rear suspension. A design of exactly this type is installed on the VAZ horse Lada 110. Having gotten rid of the stock beam, you are completely free to install a number of alternative solutions, but in no case should you forget about the prudence of such a choice, which we discussed in more detail in the previous section.
It will be extremely convenient to carry out work on a special lift, where you will have a lot of free space, natural light and other amenities. The replacement can be easily done in the inspection hole, or simply on bare ground, or at worst, by jacking up the rear of the car. Now you can proceed directly to dismantling the “ten” beam itself, installed from the manufacturer.
- 1. Remove the rear wheels of the car. We disassemble the brake pads and remove the brake cables and hoses from the beam and the engagement in the brackets;
- 2. Disconnect the parking brake cylinders from the brake system;
- 3. Next, you should disconnect the elastic lever of the VAZ sorcerer from the beam;
- 4. The wheel hub base is attached to the rear suspension parts using four 17 mm socket bolts. They should all be unscrewed. After which you can freely tilt to the side the entire axle assembly with the tens of brake mechanism shield;
- 4. To remove the beam, all that remains is to unscrew the bolts at the points where it connects to the car body. Let's start by disconnecting the lower bolts of the shock absorber struts;
- 6. Next, on both sides of the rear beam, unscrew the nut holding the suspension arm to the bracket;
- 7. Now nothing will stop you from removing the product from under the body of your car by removing the bolts of the rubber-metal hinge. If necessary, the brackets for attaching the VAZ rear suspension arm are also dismantled.
With this we can say that the replacement of the rear beam of the VAZ 2110 is almost complete. Most manufacturers promise that their product fully fits the standard stock suspension mount, so you shouldn't have any problems with reassembly. As you can see, the procedure is not particularly complicated and can be done by almost any motorist without the need to seek help from a service station and waste money, respectively.
Garage or service station
All car owners can be divided into two categories:
- Those who carry out most of the repairs themselves in their garage, and only in emergency cases turn to a car service;
- Those who prefer not to touch anything with their own hands, but completely entrust repairs and maintenance to the masters of service stations.
Each of them is right in their own way. Therefore, we have no right to reproach those who do not want to carry out repairs themselves. After all, garage and professional repair of silent blocks, like other components, has its advantages.
STO has the following advantages:
- A high-quality, responsible car service provides a guarantee for repairs performed;
- In the event of a repeated breakdown covered by the warranty, repairs will be carried out free of charge;
- Professionals are professionals; they have extensive experience and knowledge, which allows them to competently perform their work.
But first you need to find such a car service, which, alas, is not an easy matter. Many provide a guarantee, but when you re-apply, they do everything possible to prove that the breakdown does not comply with the terms of the guarantee. A banal trick.
Repairing your garage will provide the following advantages:
- Significant financial savings, since you only have to spend money on consumables;
- The quality of the work performed by a master is always in doubt if you do not know this person personally. So self-repair may be much better than at a service station;
- You purchase the silent block, and the master only installs it. Why pay money for work that you can do yourself?!;
- Guarantee that a new one will be installed instead of the old silent block. Questionable service stations can easily install an old, more or less usable silent block instead of the one you gave them. You know what the result is.
Important points
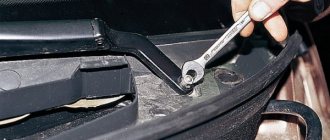
Unscrewing nuts with a 24 mm spanner can be a very difficult task. To move such a nut out of place, as a rule, enormous force is required. And not only that, each next revolution will also require considerable effort. Therefore, it is best to use a long tube mounted on a spanner as a lever.
To make the nuts even easier to unscrew, you can pour plenty of oil on them and wait 10 minutes.
The silent blocks should be pressed in with a hammer blow (or a sledgehammer blow) only after placing the lever on a flat metal surface. In this case, the blow must be very accurate; at the slightest misalignment of the hammer, there is a risk of damage to the silent block.
In order to avoid the above damage, it makes sense to press the silent block into the extension using a vice. A vice will be needed in any case, since new blocks rarely fit completely into the eye after one blow. They almost always need to be “added.”
Factory dimensions
All linear dimensions of the VAZ 2110 body can be found by looking through the instruction book or rummaging around on the Internet.
But the main dimensions are:
Length:
- if we take the end points of the front and rear bumpers, then here we have 4265 mm;
- length between the centers of the front and rear wheels, the so-called. wheelbase is 2492 mm;
- from the center of the front wheel to the extreme point of the front bumper - 829 mm;
- from the center of the rear wheel to the end point of the rear bumper - 944 mm.
The details of dismantling the bumper on a VAZ 2110-2112 can be found in this material:
The height of VAZ 2110 is 1420 mm.
Factory dimensions for length and width
Width:
- in front at the extreme points of the “factory” mirrors – 1875;
- front excluding mirrors (purely hardware) – 1680 mm;
- distance between the centers of the front wheels – 1400 mm;
- the rear of the car has a width between wheel centers of 1370 mm.
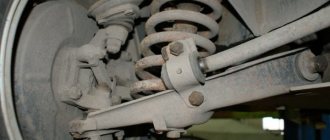
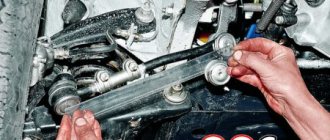
Replacing consumables, eliminating axial play
Having dismantled the suspension elements, you can begin to press out the worn silent blocks and install new ones.
Using a special device prepared in advance, old silent blocks are removed from the crossbar, levers and racks and new ones are pressed into their place.
To facilitate installation, new consumables can be moistened with soapy water.
But the use of petroleum-based lubricants is not recommended, since they have a negative effect on rubber elements.
Regarding the stabilizer struts, before pressing out, they will need to be knocked off the stabilizer, since they are tightly seated on it.
When knocking down, it is better to use a hammer and strike through a wooden spacer.
Also, after removing the struts, the rubber bushings are pulled off the stabilizer and new ones are installed in their place.
Often a phenomenon called axial play occurs at the lower arm.
It is formed when the body bracket to which the lever is attached, for one reason or another, loosened and a gap appeared between it and the metal bushing of the silent block, which is why the silent block itself was able to move along the fastening bolt.
This axial play negatively affects the performance of the suspension, so it should not exist. But if it appears, then there are two ways to eliminate it.
You can try to compress the bracket. But this is very difficult to do, since it is better not to apply impact with a hammer, even through a spacer, and using clamps or a vice is not very convenient.
It is much easier to get rid of axial play using washers that are placed between the bracket and the silent block.
But according to the manual, it is recommended to replace the entire lower control arm with joints
After replacing all consumables, the removed suspension elements are installed in place.
After replacing all the silent blocks on the front suspension, the vehicle must have its wheel alignment angles adjusted.
Tools and accessories
There are not so many tools that will be required to replace all consumables, but some of them are specific.
- Set of keys, heads, knobs;
- A set of new oil seals and bushings;
- Device for pressing out and pressing in silent blocks;
- Puller for ball joint;
- Jack;
- Stops;
- Vise;
- Hammer and wooden spacers;
- Soap solution.
Device for pressing out and pressing in silent blocks.
You can buy it or make it yourself.
The simplest homemade device consists of a long bolt with a nut, pieces of pipe with different diameters and several thick washers.
The principle of operation of such a device is very simple.
To press out the silent block, take a bolt and put a washer on it, the size is slightly smaller than the diameter of the rubber part of the silent block.
The bolt is passed through the bushing of the silent block. On the other hand, a piece of pipe with a diameter equal to the diameter of the seat, for example, a lever, is thrown onto the bolt.
That is, the pipe will have to rest against the circumference of the seat in the lever.
Next, another washer is put on the bolt, its circumference larger than the diameter of the pipe, and then the nut is screwed on.
Pressing out is done like this: the nut, when screwed on, will pull towards itself the washer resting on the silent block.
The installed tube will allow it to come out of the seat and not rest against another washer.
Pressing is done in exactly the same way, with the only difference that it is not necessary to use a piece of pipe, since the silent block will rest against the thrust washer when it sits in place.
You can even press-fit without using a device; it is enough to have only a vice, between the jaws of which a new silent block and lever are installed, so that it and its seat are on the same axis.
Next, the vice compresses and the consumable itself falls into place. But in this way you can install silent blocks only on the lever and stabilizer struts, but on the cross member you will still need a device for replacement.