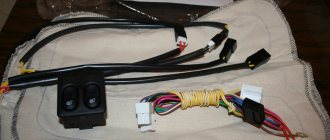
Recently, there has been an increase in the popularity of the Lada Granta among Russian buyers. The model is in demand due to its reliability, practicality and attractive appearance. The price will not upset the potential client either.
The Lada Granta has a very extensive range of positive aspects, but it is not without some drawbacks. Among them we can add that there is no armrest. The usual equipment will not please the owner with such an important element of comfort. However, you can install the armrest yourself. This will be discussed in this article.
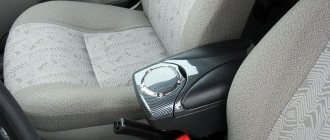
In fact, the armrest can be characterized as a practical and very convenient component of the interior. During a long trip, the driver will be able to relax his hand, resting it on the present element of comfort. Do not despair about the lack of a product in your Lada Granta, because installing it yourself is not at all difficult. Next, we'll look at how to implement this.
Procedure for self-installation of the armrest on the Lada Granta Liftback
- We place the car on a flat platform and provide unobstructed access around the perimeter of the doors.
- We take priority safety measures: secure the rear wheels with wheel chocks and engage first gear.
- We do not squeeze the parking brake lever, as it will interfere with the work when installing the accessory.
- We push the front passenger seat as far forward as possible.
- Pull the driver's seat back all the way.
- We unscrew the “thumb” - the driver’s seat backrest tilt adjuster.
- Remove the decorative plate from the side (two “14” bolts);
- We attach the armrest and screw the metal plate back on.
- We complete the assembly and level the seats.
In the case of installing an accessory with a glove box inside, like from Priora, we additionally fix the base to the sides of the slide.
Product delivery options
Note! Below are the shipping methods available specifically for this product. Payment options may vary depending on the delivery method.
Detailed information can be found on the “Delivery and Payment” page.
Parcel by Russian Post
Available payment methods:
- Cash on delivery (payment upon receipt)
- Using cards Sberbank, VTB, Post Bank, Tinkoff
- Yandex money
- QIWI
- ROBOKASSA
Shipping throughout Russia. Delivery time is from 5 to 12 days.
Parcel by Russian Post 1st class
Available payment methods:
- Cash on delivery (payment upon receipt)
- Using cards Sberbank, VTB, Post Bank, Tinkoff
- Yandex money
- QIWI
- ROBOKASSA
Shipping throughout Russia. Delivery time – from 2 to 5 days. More expensive than regular delivery by Russian Post, approximately 50%. Parcel weight up to 2.5 kg
Express Parcel EMS
Available payment methods:
- Cash on delivery (payment upon receipt)
- Using cards Sberbank, VTB, Post Bank, Tinkoff
- Yandex money
- QIWI
- ROBOKASSA
Shipping throughout Russia. Delivery time – from 3 to 7 days. More expensive than regular delivery by Russian Post, approximately 100%.
Transport companies
Available payment methods:
- Using cards Sberbank, VTB, Post Bank, Tinkoff
- Yandex money
- QIWI
- ROBOKASSA
Delivery is possible to any locality where there is a representative office of the transport company. Delivery time – from 2 to 10 days. Sending large parcels is approximately 50% more profitable than by Russian Post.
Installing an armrest on a Lada Granta
Recently, there has been an increase in the popularity of the Lada Granta among Russian buyers. The model is in demand due to its reliability, practicality and attractive appearance. The price will not upset the potential client either.
In fact, the armrest can be characterized as a practical and very convenient component of the interior. During a long trip, the driver will be able to relax his hand, resting it on the present element of comfort. Do not despair about the lack of a product in your Lada Granta, because installing it yourself is not at all difficult. Next, we'll look at how to implement this.
You can purchase the armrest in question at the automotive retail chain. A “live” purchase will be slightly cheaper compared to ordering online. Before purchasing, you should make sure that the selected element is applicable specifically to your modification of the car.
If this is neglected, then an unsuitable product can cause a lot of inconvenience. Here there may be difficulties in switching transmission stages, or the armrest will touch the seat belt, etc.
If the product has been successfully selected and purchased, then the next logical step will be its direct installation. Installing the armrest involves following this order.
- We move the passenger seat as far as possible towards the dashboard of the LADA Granta, and the driver’s seat in the opposite direction.
- We remove the element by which the angle of the chair is adjusted.
- Unscrew the screw holding the decorative trim.
- The next step is to unscrew the chair slide.
- After this, we install the chair itself on the side.
- We unscrew a couple of bolts, position the armrest approximately in the center (on the side), and screw the bolts into place.
- We install the cover and return the fastening element (the so-called “lamb”) to the mounting socket.
The armrest installation is complete.
If, after long wandering around retail outlets and online resources, you are unable to find the required armrest, then we recommend using the presented technology for making it yourself. If you do everything carefully, the interior of your Lada Granta will immediately be rewarded with an aura of individuality and exclusivity. Can you imagine the faces of your friends already tormented by envy?
The first step will be creating a sketch of the future product. It is done on paper. The drawing assumes the presence of control dimensions taken in advance in the cabin. Now is the time to select the material. In most cases, they resort to plywood, from which the bottom, sides and cover of the future armrest are cut out. Upon completion of cutting the blanks, we proceed to the exciting stage of assembly. The elements are mutually fixed using ordinary self-tapping screws. If the goal is to make the product soft, then glue foam rubber or other material of a similar texture onto the surface of the lid. Let's move on to the LADA Granta armrest upholstery
Here you can choose carpet or leather (natural or substitute - it doesn’t matter). If the integrity of the pieces of upholstery material is not enough, then we simply sew them together.
- Installation of a radio in Grantu
- Grant's dashboard
- Grant fuse box
Having a beautiful “box” will require some work to ensure that the lid can be opened. To do this, we purchase hinges from a construction trade and install them on the armrest.
Now we proceed to install the product itself according to the scenario described here.
Summarize
A new armrest with your own hands will give your Lada Granta more comfort and design sophistication. Such a simple operation as manufacturing and installation can be done by most owners. If difficulties arise at a certain stage of installation, contact the service for advice, because their employees will not dare to refuse you.
As standard, the Lada Granta Liftback is not equipped with armrests. If necessary, the driver can install it himself, having previously purchased an armrest for the Grant Liftback in the store.
There are many modifications and configurations of armrests for the Lada Granta Liftback on sale. Let's look at the most popular ones.
How to install an armrest on a Grant yourself?
The Lada Granta car has recently been in great demand among buyers.
The car is reliable, has an attractive design, and the price is good. With a fairly large set of advantages, the Lada also has disadvantages. One of them is the lack of armrests. Yes, you won’t see them in the standard configuration. This flaw upsets car owners. In fact, the armrest is a very practical and convenient detail that makes being in the car much more comfortable. During the trip, the driver can put his elbow on the “stand” and relax his hand. This will make the ride more comfortable. But if the Lada Granta is not equipped with this much-needed addition, then you can easily install (and even make) an armrest for it yourself.
Do-it-yourself installation
An armrest for the Lada can be purchased at a car dealership or at the market. The purchase will cost a little less if you order online. Before you buy an armrest, make sure that this part fits your “iron horse”. If you purchase an item that does not suit Grant, the armrest will create a lot of inconvenience.
There will be difficulties in changing gears, it will “catch” the seat belt, etc.
Therefore, take your time with the purchase, choose an armrest that will perfectly fit your car and delight you with its practicality.
The range of elements is huge, you can choose the one that suits you. If you have already purchased an armrest, you can proceed to installation. To do this, a number of steps are performed.
- Move the passenger seat forward to the maximum, and move the driver's seat to the other side, that is, back.
- Remove the “thumb” that is responsible for adjusting the angle of the chair.
- Remove the screw securing the decorative trim.
- The next step in installing the armrest on the Grant is unscrewing the chair slide. When this is done, the seat is placed on its side.
- Unscrew the 2 bolts securing the chair, place the armrest in the Grant in the middle, where its “rightful” place is. Tighten the bolts.
- Place the decorative trim and return the “lamb” to its place.
Congratulations, the installation of the armrest is complete. Your Lada Granta is now equipped with a comfortable element on which you can rest your arm.
Making an armrest
The first stage of making an armrest yourself is preparing a sketch. It is done on paper. This is a picture of what you want when the job is completed.
In the drawing it is important to indicate the dimensions taken in advance. Now we need the material from which the armrest will be made. Usually it is made from plywood: the floor, walls and cover of the future part are cut out
When the plywood blanks are cut, proceed to assembly. Fasten all the elements together: this is done with ordinary self-tapping screws. If you want to make your armrest soft, then glue foam rubber to the cover. Then the part needs to be “dressed” beautifully. Carpet, natural and artificial leather are suitable as coverings. If necessary, pieces of the selected material are sewn together.
For those who choose leather for upholstery, a little advice: if, when stretching, you see that folds appear on the armrest, heat the material. A hairdryer is suitable for this. Simply direct a stream of hot air onto your skin. Don't be afraid, it will not deform, but will only become elastic. The main thing is to make sure that the material does not melt. In general, don't overdo it.
Now you have a beautiful box, but getting the lid to open will require some more work. Buy hinges at a hardware store and screw them to the structure. Now mount the armrest as described above. After this, your Lada Granta will acquire unique chic and individuality. It's a small thing, but nice.
By the way, if you don’t want to spend a long time fiddling around and covering the armrest with something, then it’s quite possible to paint it. Before applying paint, clean and then degrease the body. Apply the coloring composition, let it dry, and varnish. Take your time installing the painted part into the interior of your car; let the armrest dry thoroughly first and let the “aroma” of the paint dissipate.
With an armrest, your Lada Granta will become even more convenient and pleasant to use. And such a simple modification as making and installing an armrest on a Lada can be done by every car enthusiast. If something doesn’t work out, then visit the service, they will always help you. Good luck!
TOP 5 armrests for Lada Granta. Comparison of prices and characteristics
Note to the driver!
The accessories below are interchangeable with Lada Kalina, Datsun, Renault Logan. Fastening elements and dimensions are completely identical to those of the Lada Granta.
| № | Brand / modification / article / catalog number | Price, rub.) |
| 1. | Alamar comes complete with cup holders. Dimensions: 65x20x15 cm. Weight: 1.7 kg. Black color. Art. 8875244 | from 1100 |
| 2. | AR 902 “Comfort”: black, 140 x 250 x 65 mm. The covering is fabric, fleecy. Mounting method: on a metal leg. | from 1300 |
| 3. | AR 917 “Premium”: block – module. Black color. Method of fixation: on a support between the seats. Parameters: 138 x 230 x 450 mm. With an internal compartment for storing small items. Art. B56544 | from 1500 |
| 4. | VS BOX leatherette, fixation: on a metal support. Dimensions: 68 x 12 x 19 cm. Color: black | from 1550 |
| 5. | VS-AVTO premium armrest. Material leatherette, color black. Mounting: on a metal leg. Art. VAM5244 | from 1600 |
Related link:
Lada Kalina: changing the engine oil and oil filter
*prices are current as of 10/04/18
The conclusion is as follows:
We install the armrest on the Grant Liftback to facilitate the process of driving a car over long distances, as well as for storing “small things”, a mobile phone;
Price: everyone chooses a model based on the size of the budget allocated for the purchase of accessories;
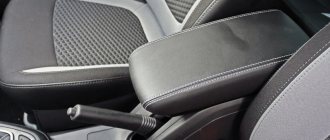
Material: the fabric surface wears out faster, but is less demanding to care for. Leatherette looks aesthetically pleasing, but requires daily maintenance.
Chinese armrests for Lada Granta
Products of this class are sold en masse at car markets, stores and other points of sale. For Chinese accessories:
- there is often no certificate of quality or standardization;
- The hole sizes do not always match;
- short service life.
The main feature that attracts most buyers is its low cost. There are no other advantages to such a purchase.
Armrest for Lada Granta from Priora
The accessory is compatible with Lada Granta Liftback. Fixation method:
- on a metal stand;
- on a metal support (leg).
The storage compartment is made in the shape of a rectangle. Material: polyvinyl chloride. Color: grey. Inside there is a storage compartment for storing documents, small items, and gloves.
Universal armrests for Grant
There are accessories that are made for other car brands, but their design is compatible with the Lada Granta. For example: glove box from Renault Logan, second generation Opel Astra, Datsun On-Do, Mi-Do. The manufacturing shape is typical: rectangular with a compartment inside for storing things.
Instructions: install the armrest for Lada Granta with your own hands!
- Remove the seat and tilt it to the left without removing it from the car;
- Unscrew the decorative plastic trims;
- Pull out the seat adjustment knob;
- Remove the M8 bolts securing the back of your seat;
- Install the armrest;
- Tighten the M8 bolts;
- Install decorative trims;
- Place the seat back into the car.
What is the first thing you pay attention to when purchasing a new car? Technical characteristics, engine power, gas tank volume and fuel consumption? Or maybe the appearance of bumpers, spoilers, headlight shape or body color? No matter how beautiful your car looks from the outside, you will spend most of your time in its interior. So taking care of the car’s interior is not a whim, but a completely necessary condition when buying a new iron horse
And if everything is more or less clear with the seat upholstery and the thickness of the steering wheel, then what about such a mysterious element as the armrest? Is he needed or not? And if you still need it, then how to make it and install it in a car that initially does not have an armrest in the basic configuration? Is it possible to create everything with your own hands or is it better not to suffer and order the work from a master?
Reviews
| № | Positive |
| 1. | Kirill: I recently bought an Alamar armrest complete with cup holders. I'm happy with the choice, no complaints. I didn’t go to the service center, I installed it myself. The process turned out to be so simple and intuitive. |
| 2. | Vyacheslav: my positive review of the modification of the AR 902 “Comfort” glove box. Good fabric covering, high-quality seams, minimal gaps, full compatibility with Lada Granta. Installed it myself. |
| 3. | Gennady: everything in the Lada Granta is good, but it lacks an elbow rest. On the recommendation of my friends, I bought an AR 902 “Prestige”. Since there was no free time, I stopped by the service center, where I installed the accessory. Satisfied. My recommendations. |
| 4. | Mikhail: initially I wanted to order an individual stand design, but after I found out the cost, I decided to buy a ready-made unit. I chose the Alamar modification complete with cup holders. My recommendations. |
| 5. | Vasily: an armrest is a practical and necessary thing in a car. I often travel far, my arm doesn’t get tired, and my back is relieved. |
| Negative | |
| 1. | Victor: I looked through a lot of “boxes”, none of them interested me. The quality is below average, there are many flaws, and the price is simply exorbitant. I decided to order a custom design. |
| 2. | Vasily: I do not recommend purchasing ready-made stands. It’s better to make it yourself, according to your personal drawings. |
| 3. | Sergey: I didn’t like the stands, so I decided to make them myself. My recommendations. |
Conclusion The armrest in the Lada Granta is an indispensable thing for those who spend a lot of time behind the wheel and drive long distances. From time to time you can lean on your elbow and relieve the load on your spinal column. As for the price segment, we won’t recommend it here, since everyone has an individual budget.
Related link:
Lada Granta automatic: owner reviews
What materials will be needed
Before making an armrest, you need to purchase material for its frame. Chipboard boards with a thickness of at least 0.8 cm, but no more than 1.5 cm are best suited for this. The optimal option is 0.8-1 cm, then the product will not look bulky and can be easily sheathed with ordinary foam rubber without fear that the product will quickly become unusable.
If we talk about the trim for the armrest in a car, then it all depends on the financial capabilities of the car owner and the interior of the cabin. However, if the work is being done for the first time, then you should not use leather, as there is a high risk that the car armrest will need to be reupholstered. For VAZ cars, the best option would be velor or Alcantara (artificial suede). It is better to purchase material with a reserve.
When everything is ready, you can start assembling.
Making an armrest with your own hands
Remember that if you have scoured the entire Internet, visited all the specialized stores and even asked your friends, but still have not found the armrest that would ideally fit your Granta, you should not despair. The fact is that you can quite easily make an armrest with your own hands, making it exactly as you imagine.
Also, do not forget that you are far from the first owner of a Lada Granta who was unable to find a good armrest for his iron horse and decided to make it himself. Having realized this, you will understand that on the Internet you can find all the information you need on how to make an armrest for Granta with your own hands.
How to make an armrest?
If, after long wandering around retail outlets and online resources, you are unable to find the required armrest, then we recommend using the presented technology for making it yourself. If you do everything carefully, the interior of your Lada Granta will immediately be rewarded with an aura of individuality and exclusivity. Can you imagine the faces of your friends already tormented by envy?
The first step will be creating a sketch of the future product. It is done on paper. The drawing assumes the presence of control dimensions taken in advance in the cabin. Now is the time to select the material. In most cases, they resort to plywood, from which the bottom, sides and cover of the future armrest are cut out. Upon completion of cutting the blanks, we proceed to the exciting stage of assembly. The elements are mutually fixed using ordinary self-tapping screws. If the goal is to make the product soft, then glue foam rubber or other material of a similar texture onto the surface of the lid. Let's move on to the LADA Granta armrest upholstery
Here you can choose carpet or leather (natural or substitute - it doesn’t matter). If the integrity of the pieces of upholstery material is not enough, then we simply sew them together.
For owners who have chosen leather, we recommend warming up this material while stretching it onto the armrest frame. This way you can avoid wrinkles, especially in the corners. A hairdryer will help here. There is no need to be afraid of temperature deformation of the skin; on the contrary, it will acquire unprecedented elasticity. The main thing is to prevent the leather surface from melting. Don't overdo it!
Having a beautiful “box” will require some work to ensure that the lid can be opened. To do this, we purchase hinges from a construction trade and install them on the armrest. Now we proceed to install the product itself according to the scenario described here. Having completed the work, we rejoice at the updated interior of the LADA Granta with a twist of uniqueness, because even the maestro of AvtoVAZ does not have such a chic armrest.
Purchase and installation
You can purchase the armrest in question at the automotive retail chain. A “live” purchase will be slightly cheaper compared to ordering online. Before purchasing, you should make sure that the selected element is applicable specifically to your modification of the car. If this is neglected, then an unsuitable product can cause a lot of inconvenience. Here there may be difficulties in switching transmission steps or the armrest will touch the seat belt, etc. Therefore, we recommend that you take your time and carefully approach the choice of this interior element.
If the product has been successfully selected and purchased, then the next logical step will be its direct installation. Installing the armrest involves following this order.
- We move the passenger seat as far as possible towards the dashboard of the LADA Granta, and the driver’s seat in the opposite direction.
- We remove the element by which the angle of the chair is adjusted.
- Unscrew the screw holding the decorative trim.
- The next step is to unscrew the chair slide.
- After this, we install the chair itself on the side.
- We unscrew a couple of bolts, position the armrest approximately in the center (on the side), and screw the bolts into place.
- We install the cover and return the fastening element (the so-called “lamb”) to the mounting socket.
The armrest installation is complete.
How to make an armrest for a car with your own hands
If for some reason it is not possible to buy a ready-made element, there is only one way out: make it yourself.
Preparation for the process
First of all, using a tape measure in the cabin, you should measure the place where the device will be installed. Moreover, measurements must be taken in the cabin of your own car. Even for two cars that look identical, the interior layout elements may differ in size. The difference may be only a few millimeters, but it is this that will ultimately interfere with normal installation.
The following parameters are measured:
- distance between driver and passenger seats;
- the level at which the seated driver's elbow is located;
- the distance from the engaged handbrake lever to the back of the driver's seat. This is done so that passengers sitting in the back do not touch the armrest with their feet;
- the maximum height to which the handbrake lever rises when it is turned on (this dimension is removed only if the armrest structure partially covers the brake lever);
- You also need to know how far apart the seat belt latches are.
Choosing material
As a rule, homemade armrests are made from either plywood or chipboard. Sometimes a solid board 7–9 mm thick is used. If it is expected that there will be curved parts, then only plywood can be used, since only this material can be given the necessary bend by holding it over steam. As for upholstery materials, they can be very different: artificial leather, genuine leather, dermantine, etc. The choice here is limited only by the imagination and financial capabilities of the car owner.
We design the main elements
All above dimensions must be recorded. Based on them, a simple sketch is created in three projections. You can even do this by hand, on a regular piece of notebook paper.
The simplest sketch of a homemade armrest, made on a notebook sheet
It is necessary to clearly imagine what the future armrest will look like.
The following points must be indicated on the sketch:
- all sizes;
- if the armrest contains parts with figured bends, the sketch should indicate the radii of these bends;
- location of mounting holes with mandatory indication of their diameter;
- the type and parameters of the fastener that you plan to use (for example, if these are self-tapping screws, then you should indicate their diameter and thread pitch);
- the depth to which the fastener penetrates into the body parts or into intermediate structures (often armrests are screwed with screws to wooden substrates, so knowing the penetration depth of the fastener will allow you to more accurately calculate the thickness of the substrates);
- if you plan to assemble an element with a hinged lid, then you should indicate where and on what the furniture hinges holding the lid will be attached. Also, do not forget about their size.
At the design stage, you should definitely consider how exactly the armrest will be fixed in the cabin. This could be a set of screws, or the piece could be held in place simply by a tight fit between the seats.
Manufacturing process
Having a ready-made sketch with all the necessary dimensions at hand, you can begin assembling the armrest.
- The selected material is marked in accordance with previously determined dimensions, then parts of the armrest are cut out of it (for these purposes it is best to use an electric jigsaw). Tools and some details of the future armrest
- If some parts need to be bent, they are heated over water vapor, bent and fixed in a bent position until they cool completely.
- After preparing all the parts, the body is assembled. The structure can be fixed either with self-tapping screws or with ordinary wood glue. The armrest is assembled, the structure is fixed with self-tapping screws
- The assembled structure is covered with previously selected material and installed in the machine (the reupholstering process is discussed in more detail below). Homemade armrest installed in the car interior
Video - Lada Granta - installing an armrest.
| № | Positive |
| 1. | Kirill: I recently bought an Alamar armrest complete with cup holders. I'm happy with the choice, no complaints. I didn’t go to the service center, I installed it myself. The process turned out to be so simple and intuitive. |
| 2. | Vyacheslav: my positive review of the modification of the AR 902 “Comfort” glove box. Good fabric covering, high-quality seams, minimal gaps, full compatibility with Lada Granta. Installed it myself. |
| 3. | Gennady: everything in the Lada Granta is good, but it lacks an elbow rest. On the recommendation of my friends, I bought an AR 902 “Prestige”. Since there was no free time, I stopped by the service center, where I installed the accessory. Satisfied. My recommendations. |
| 4. | Mikhail: initially I wanted to order an individual stand design, but after I found out the cost, I decided to buy a ready-made unit. I chose the Alamar modification complete with cup holders. My recommendations. |
| 5. | Vasily: an armrest is a practical and necessary thing in a car. I often travel far, my arm doesn’t get tired, and my back is relieved. |
| Negative | |
| 1. | Victor: I looked through a lot of “boxes”, none of them interested me. The quality is below average, there are many flaws, and the price is simply exorbitant. I decided to order a custom design. |
| 2. | Vasily: I do not recommend purchasing ready-made stands. It’s better to make it yourself, according to your personal drawings. |
| 3. | Sergey: I didn’t like the stands, so I decided to make them myself. My recommendations. |
Lada Vesta headrests adjustment
Lada Vesta. FRONT SEATS
Manual adjustment of the front seat in the longitudinal direction
To move the seat forward or backward:
— Pull up the slide release lever and hold it.
— Move the seat to the required position.
— Lower the lever and make sure that the seat is locked in its new position.
Adjust the seat position before driving.
Make sure the seat is securely locked by trying to move it without using the lever. If the seat moves, it is not locked properly.
It is prohibited to adjust the position of the driver's seat while the vehicle is moving. The seat can
move suddenly, which will lead to loss of control over the car.
Seat backrest tilt
To change the seatback angle, follow these steps:
1. Lean forward slightly and lift the seatback angle adjustment lever.
2
Lean back carefully and adjust the seat back to the desired position.
3. Release the lever and make sure that the seat back is locked in the new position.
Seat height adjustment
To change the height position of the seat cushion, operate the lever located on the outside of the cushion. To lower the seat cushion, push the lever down several times. To raise the seat cushion, push the lever up several times.
To use the armrest, pull it down and select the most comfortable fixed position.
In the optional version, the front seats are equipped with electric heaters, which are turned on with switches 1 when the engine is running.
To turn on the left seat heating, press the left switch; to turn on the right seat heating, press the right switch. The heating is turned off
by pressing the switch again. The control light indicator located on the switch button will light during the entire time the heater is operating.
The driver and front passenger seats are equipped with headrests.
Height adjustment.
To raise the headrest, pull it up to the desired position 2. To lower the headrest, press and hold the release button 1 on the headrest support and lower the headrest to the desired position 3. The optimal position of the headrest is when its top edge is flush with the top If this is not possible, for very tall people the head restraint should be raised to its highest position, and for very short people it should be lowered to its lowest position.
Removal and installation.
To remove the head restraint, lift it to its maximum height, press the release button 2 and remove the head restraint from the seat back. To install the head restraint in place, insert the head restraint rods into the holes and press the release button 1. Then adjust the height of the head restraint.
Source