It is impossible to describe detailed instructions for installing a Starline alarm system, since it cannot be universal: the cars are different, and the alarm models are different.
Over the past 10 years, Starline has produced so many different alarm systems that only a professional auto electrician can count their exact number.
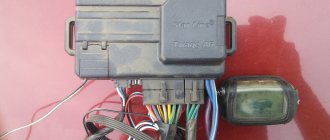
The article provides superficial information on the main details that an ordinary car enthusiast will encounter if he decides to independently install an alarm system of this brand on his car. You should not despair and start planning the costs of visiting a service station, because it is quite possible to install an alarm yourself, you just need to have minimal tools and documentation. No matter what model you purchased, installing a Starline alarm system is impossible without the main document - a pinout diagram for all wires; for example, the picture below shows the StarLine A91 diagram.
Typical connection diagram for Starline a91 dialog It is sold together with the alarm system. In addition to this diagram, you will need the official wiring diagram. If there is no installation map for your car model on one site, keep searching and you will find it, you can ask around for a good site with maps on the forums. If you have found a mounting card for your alarm model for your car, consider that you have made the installation process much easier for yourself. Below we provide a screenshot demonstrating that the card contains the most detailed instructions, following the points of which there should not be any significant problems. But let's move on to the installation.
Tools and additional materials you will need
You should immediately purchase all the necessary tools so that the Starline installation takes place in one go. It is worth warning that the standard set of wires will most likely not be enough, so buy additional ones in advance.
- Multimeter – preferably electronic, as it is more convenient to use;
- Additional wires;
- Foam rubber for packaging the central unit, as well as tape;
- Good electrical tape and high-quality double-sided tape;
- A set of keys and screwdrivers for dismantling panels and doors;
- A normal knife for stripping wire contacts;
- Soldering iron, solder, rosin - it is better to solder the contacts of the wires.
How to reset
If the device did not save the changes during setup, then you need to reset them to factory settings and adjust them again. The ignition is turned off, the key does not need to be removed. The Jack button is clicked 9-10 times. The number of clicks depends on the specific model. This is stated in the Starline operating instructions. Next, start the engine. A certain number of sounds will pass, which depend on the number of clicks on VALET.
VALET must be pressed again, the owner of the car must wait for a response from the system. You need to press 1, the device should beep, after which you need to confirm the reset mode. To leave the menu, you must activate the engine. If everything is done correctly, the turn signals will blink 5 times. Then you can program the options again.
The StarLine car alarm can be called an excellent “security guard” that can protect a car of any price. Easy installation, many options, additional modes, intuitive interface, reliability - all this is worth installing Starline security.
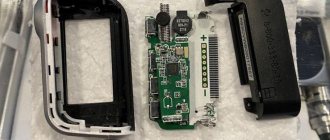
Installation of the central unit
Installation of the Starline alarm system begins with the installation of the central unit; it is best to place it under the dashboard - this will save on the length of the connecting wires. It is necessary to choose the driest place so that drops of water do not flow onto it. At the same time, the central unit should not be located next to a heat source - a stove or air conditioner. Below is a list of recommendations for choosing a location for installation:
- It is unacceptable to install the unit near a source of radio wave radiation: radio station, telephone, antenna cables.
- The unit must be in a securely hidden place so that intruders cannot in any way get to it, at least without the need to hack the dashboard.
- There is no need to stop the central unit close to moving parts: cables, rods, and so on.
The block must be secured securely using self-tapping screws, but in extreme cases, high-quality double-sided or regular tape will do.
It is very important that the vibration is minimal, so most car owners first wrap the central unit with foam rubber, then wrap it with tape, and then attach it under the dashboard, often using homemade fasteners - this method is the most reliable.
Is it worth doing the work yourself?
If you know the Starline A91 connection diagram, you can try to do the work yourself. To successfully complete the job, you must be able to read diagrams, have the necessary tools at hand and at least a little experience.
pros
- Saving on labor costs;
- Possibility of installation in the future;
- Installation of additional modes as desired;
- Full responsibility for the result;
- Higher quality of work (with experience);
Minuses
- Large expenditure of time;
- Lack of guarantees for the quality of work performed;
- The need for special tools;
- Difficulty interacting with electronics;
- High risk of error.;
If you don’t have knowledge and experience, it’s better not to take risks even if you have a Starline A91 connection diagram. The service station technicians will do the work better and provide the necessary guarantee.
Installation of the transceiver with antenna
Mounts on the windshield or under the dashboard, but you need to follow strict rules.
- Do not install the transceiver in such a way that the antenna is no closer than 5 cm to metal parts of the car body. Otherwise, the range of the key fob will not be as large as possible due to the interference created.
- The transceiver must be placed at a great distance from the heat source, because it has a built-in sensor for measuring the interior temperature. It is also not recommended to install it in a place exposed to direct sunlight.
The picture is an example of a transceiver installed on the windshield near the center mirror.
Connection points to internal vehicle communication buses (CAN, LIN)
The task of connecting to car devices is greatly simplified if the car has CAN and LIN communication buses. The CAN bus is usually installed on all vehicles manufactured after 2005.
Typical connection diagram:
In this case, to collect information about body systems, it is collected via the corresponding buses; connecting numerous points of door limit switches and other vehicle sensors is not required.
It is not easy to find the connection point to the communication buses; to do this, you need to refer to the reference literature for a specific car brand. Visually, it looks like twisted wires, similar to computer local communication lines.
Siren and shock sensor
The siren should be placed under the hood away from a source of heat and moisture. The siren horn must be pointed downward, otherwise water may accumulate in it. You also need to make sure that there is no access to the siren from under the car, so that intruders will definitely not get to it.
The sensor must be securely mounted in the vehicle, it is better to rely on the mounting card to be sure that the most suitable place for its installation is used.
Replacing Starline A9 with A93
A replacement is only relevant if the first one has stopped working correctly. Especially when it comes to sensors - the fact is that the A9 is no longer produced, so not all parts can be found on sale and most of those on sale have already been used. Replacing with the A93 allows you to acquire one of the newest models in the line, which at the same time retains the best features of its predecessor.
Laying wires and connecting all components
Wires must be laid away from the ignition coil, high-voltage wires and other sources of electrical noise. Installation is carried out with the battery disconnected. All wire contacts must be soldered, then wrapped with electrical tape.
In general, that’s all, if you try to describe in more detail the nuances of laying the wires, you will only confuse the car enthusiast, so here we can only give the only correct advice: when installing the wiring, keep the installation card and the wire pinout diagram nearby, otherwise the installation of the car alarm will take a long time and is not a fact. that everything will end successfully.
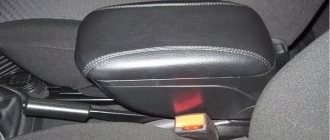
The photo below is an example of the correct routing of wires inside a car.
This may seem obvious, but it would not hurt to say that when installing the wiring, nothing should stick out anywhere; each wire should be neatly laid under the interior trim.
It takes an average of 8-10 hours to lay wires and connect all components. The specialists at the service center will do this work faster, but will they do it efficiently? To install an alarm system in your car yourself, you will have to work hard, and any car owner who has once gone through this stage will tell you this. In addition to installing the alarm, you will also have to spend time and effort programming it if the factory settings do not work correctly or you do not like. For example, you have a Starline model with auto start, but it doesn’t work as well as you would like.
Auto alarm STARLINE ; Alarm STARLINE; Connection diagram STARLINE; STARLINE instructions
It is advisable to install the sensor next to the cylinder block itself.
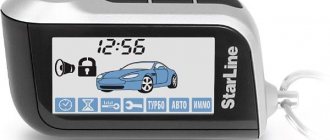
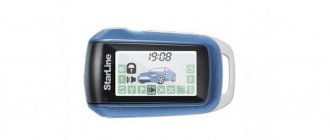
Setting the time on the Starline a91 key fob There are clock icons on the alarm remote control. The black wire is the negative power supply; connect it to the car body, ensuring reliable contact. Below are instructions for installing the Starline A alarm system
If you want to turn off silent security, double-click.
It is necessary to check and reduce the indicator. For convenience, the wiring can be wrapped in some places with electrical tape. Set the required warm-up time or set up an auto-start timer. The block is securely secured with self-tapping screws or plastic clamps and additionally wrapped in foam rubber.
Instructions have already been given in the review. According to the instructions, the Valet key allows you to enter the car and start the engine if the alarm key fob is lost.
The horn should be pointing downwards to prevent moisture from getting into it. Recommendations for use and installation The Starline A91 car alarm can be used on any car with a gasoline, diesel or turbo engine, with manual or automatic control. Connect the wires going to the door sensors to the corresponding contacts on the instrument panel. The instructions say that the Starline alarm system has a turbo timer function.
Comments and reviews
Even if the alarms are similar to each other, you cannot use a diagram from another alarm, because they may have different location points, and the safety zones of different cars are different. A short press on button 1 allows you to select the 1st option, a long press - the 4th. However, it is better to give preference to qualified technicians, because many will carry out diagnostics for free and determine the cause of the problem. Closed doors, hood and trunk. The anti-robbery mode will turn on: the doors will be locked; the engine will be blocked, first pulsed and then permanently; sound and light signals will turn on, their duration is not limited; Corresponding icons will appear on the keychain, and it will vibrate and make sounds.
The information on the key fob is not updated constantly, but only when an alarm occurs in the armed mode or by pressing the asterisk button in the disarmed mode. If there is a gasket, the device will not work correctly. It is very important, as it is responsible for programming and settings of the entire system. The consequence of the error is that the car turns off the engine on command from the key fob, when the doors are closed, 4 beeps sound, and then the system does not respond to the autostart function. Engine blocking via CAN Bus - Immobilizer Starline i96 CAN LUX - Review and Installation
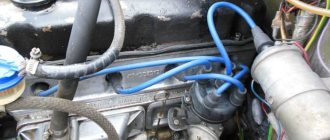
Engine start blocking points
The choice of engine start blocking points directly affects the degree of security protection. For blocking, points are usually selected that do not cause the accumulation of errors in the engine control system. For example, you can block the crankshaft sensor signal, but in this case a crankshaft sensor error is recorded.
The most standard solutions:
- blocking the starter (a universal method, but can easily be done by simply connecting it in the engine compartment, even by a non-professional);
- installation of a breaker relay in the circuit of the low pressure fuel pump (mainly in gasoline cars), injectors;
- disconnecting the power supply circuits of the engine control unit (a more sophisticated method);
- blocking immobilizer circuits (the most reliable, but dangerous method for possible malfunctions in its operation);
- blocking the power supply circuits and the automatic transmission limit switch.
A typical blocking scheme is shown in the figure:
It is easier to access the fuel pump circuits after the fuel pump relay. It is present on most cars. It is easier to provide access to the common (positive) wire of the injectors directly near the fuel rail; you can make an interruption in the area of the main relay. It is usually located in the engine compartment fuse box.
The car immobilizer is usually located in the area of the center console, but it is better not to do such a blocking for cars manufactured after the 2000s.
A very simple, but reliable and universal method is to block the operation of the automatic transmission parking mode lock button. It is located directly in the accelerator area of the automatic transmission.