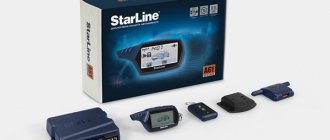
Characteristics of Starline A6
The main functions of the A6 are two-way communication and an interactive encryption code, which does not give attackers a chance to intercept the code and disarm the car without the owner’s knowledge.
In addition, Starline A6 has the following capabilities:
- control using 2 key fobs (one with a display, the other without);
- signal range up to 1200 m in receiving mode and 600 m during control;
- controlled channels for connecting additional equipment;
- engine blocking using a relay;
- parking search mode;
- “Anti-robbery” mode;
- silent security;
- memory of settings, which resumes them after a power outage;
- owner's personal PIN code for emergency shutdown;
- disabling the shock sensor when the security system is running and much more.
The alarm is also available in the Starline twage a6 modification, which features even more reliable protection using an improved dialogue code.
Dealing with blocking
It is known that the Starline Twage A6 signaling can block one of the following lines - the starter or ignition power circuit. The point is that the “02-12” module is connected to the break in the starter line, so you will have to get rid of the first type of blocking. It is implemented according to one scheme:
The wire that comes from pin 50 must be connected to the black and yellow cord of the autostart module. Here we were talking about a “thin” cord coming out of a 6-pin connector. And the “thick” wire of the same color will go to the starter.
The relay is removed from the structure. The signal control wire shown in the diagram is disconnected.
Now let's look at blocking the ignition circuit. If we talk about the Starline A6 model, it can be implemented according to the following scheme:
In this case, one thing is required - to make a T-shaped outlet from the power cable (marked in red). The tap is then connected to the yellow wire coming from the terminal block of the autostart module. Nothing complicated.
Let's consider the third case - the blocking relay is not connected to the alarm system. Then you need to implement blocking according to the second scheme. It is given in the basic instructions, and there can be no problems here. Remember that the alarm itself in this case is programmed:
- Function 11 is left at value 1 if the power wires are connected to pins 30 and 87a (as in the diagram);
- If it is decided to use normally open contacts (30 and 87), the functions are given a new value - 2, 3 or 4.
Equipment and cost of A6
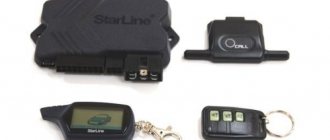
The alarm kit includes:
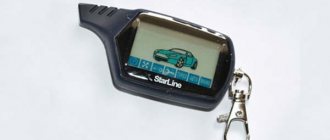
- keychain with LCD display;
- additional key fob without screen;
- shock sensor with two levels of response;
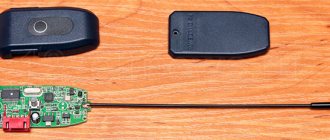
- central block processor in a plastic case;
- antenna module;
- led indicator;
- service (emergency) button;
- hood (trunk) switch;
- instruction manual with connection diagrams;
- wires, terminals and plugs for installation.
The A6 kit does not include a siren, so you will have to buy it separately. You can also use the bell from the previous alarm if it is installed on the car.
At this time, the manufacturer has discontinued the Starline A6 twage car alarm, replacing it with new, more modern modifications. During the period of active sales, its price fluctuated between 50-55 dollars.
Page 40
Operating and installation instructions
7. The automatic engine start function based on temperature can be turned on regardless of the state of the engine autostart functions by trigger or timer.
8. Simultaneous activation of the functions of automatic engine start by prompt and by timer is impossible. An attempt to enable functions at the same time will result in the activation of the function that was last activated.
9. Driving a car and a drop in the supply voltage below +10V of a discharged battery at the moment of starting the engine cancels all automatic engine starts.
Preparing to start the engine on cars with a manual gearbox (MT)
, r00. If the turbo timer mode is enabled, instead of the r00 icon,
icon corresponding to the operating time of the turbo timer r01, r02, r03, r04. Remove the key from the ignition switch. The engine will continue to run.3. Within 30 seconds, leave the vehicle and close all doors. The vehicle with a manual transmission will be ready to start the engine.
Remote engine start from key fob
Remote engine starting is carried out by sequentially pressing buttons 1 and 3 of the key fob. Pressing button 1 should be long, pressing button 3 should be short. The start of the engine is accompanied by 3 flashes of the dimensions and a melodic signal from the key fob.
Upon successful start, an additional sound signal from the key fob will sound. The LED indicator will light up continuously until the engine stops. The status of the side lights is programmable (function 2.6).
Advantages and disadvantages of Starline A6
| Advantages | Flaws |
| Affordable price. |
With a fairly wide functionality, the alarm was relatively inexpensive.
A car alarm key fob with a protruding antenna can be inconvenient and unattractive.
A detailed car alarm diagram is included with each kit, and almost every car enthusiast can install it.
The response to the key fob significantly reduces the risk of theft or car theft.
In control mode, the radius of the remote control often even exceeds that declared by the manufacturer.
Does not allow attackers to use special devices to intercept signals and open the car.
Pre-heating the engine is a mandatory comfort feature in modern security systems.
Alarm malfunctions A6. How to fix it yourself
Characteristic “diseases” of Starline A6 are:
- clouding of the key fob glass;
- sticking of buttons on the remote control;
- loss of connection with the signal receiver;
- sensitivity to radio interference.
Let's look at each malfunction separately and how to deal with them:
- Loss of transparency of the key fob glass. Buttons falling through.
How to deal with it: at a service center you can replace both the entire remote control and its individual parts.
- Lost connection with the central module.
It is necessary to re-register the key fob in the alarm memory. The operating instructions for the A6 describe step by step how this is done.
- Poor performance under strong radio interference.
This flaw cannot be corrected. The driver can only try not to leave the vehicle in places with heavy radio traffic.
Auto start on alarm clock
A one-time auto-start on an alarm clock is not possible if the start-up on a timer is also activated, and vice versa. Only one mode, the one specified last, will be active. That is, for example, if you have set auto-start every 24 hours, but you additionally set an alarm for some time and enabled auto-start on the alarm clock, the next auto-warm-up of the Starline A91 will occur exactly at the time set on the alarm clock, even if the next start is on The timer must be earlier than this moment.
To use auto-start on alarms, configure:
- current time on the key fob screen;
- alarm time.
Both of these operations can be performed simultaneously by entering the key fob settings. Hold down button 3 for a long time until the key fob plays first a long signal, then one short and two short signals. The clock indication on the screen will begin to blink, buttons 1 and 2 will increase and decrease the value. Next, by pressing button 3, go to setting the minutes, then set the alarm in the same way.
After setting the alarm time, pressing button 3 again will switch the key fob to the mode of turning the alarm on and off (inscriptions ON and OFF). Auto start by alarm will only work when set to ON.
Then activate the autorun itself on the alarm clock. It, like other methods of software autorun, is activated through the cursor menu at the bottom of the screen. It turns on by long pressing button 3, but you need to release it after the first short signal. Then, with short presses of button 3, you need to place the cursor on the desired icon, turn it on with button 1 or turn it off with button 2. The icon representing an alarm clock is responsible for autostart on the alarm clock.
Opinions of car owners about the work of Starline A6
| Easy to install. |
| Low resistance to radio interference. The small number of channels through which the signal is transmitted may not be able to cope with high-quality transmission in a large city. |
| Availability of two-way communication. |
| Lack of online monitoring and control from a mobile phone. |
| Quite a large range of the key fob. |
| Lack of connection to the car's digital buses. It is more convenient and reliable to connect modern alarm systems via digital CAN or LIN buses, which is not available in the A6 functionality. |
| Dialogue code. |
| Positive | Negative |
| Reliable, time-tested alarm system. Working properly since 2009. There were no glitches in the process. The keychain, of course, has lost its appearance a little, but after so many years this is not surprising. | Of course, it brings some benefit, but it is unlikely to save you from serious robbers. It is very easy to intercept the signal of such a “security”; even a student can handle it. My friend’s car was recently cleaned out; Starline was also there. The Singal woman didn't even make a sound. They are not very reliable. |
| StarLine TWAGE A6 is inexpensive and good protection for a car. I installed it myself, fortunately the instructions are quite clear and made for people. The entire installation of the car alarm took half a day (my brother and I did it together). We connected the door locks so that they could be opened from the remote control as expected, and the trunk locks. |
Does A6 perform its security functions?
The Starline A6 alarm system is quite old and has not been produced by the manufacturer for a long time. Owners of cars equipped with this system have a question: is this alarm capable of providing full protection or is it time to think about replacing it with a newer model?
Starline A6, which is in good technical condition, has feedback. It is able to warn the owner about:
- attempting to open the doors, trunk or hood;
- broken glass (the shock sensor will be activated);
- loss of connection with the central unit.
The dialog signal code resists hacking using simple code grabbers. The built-in engine lock will prevent the car from being stolen, even if someone managed to get inside. Taking all this into account, we can say that A6 in most cases is able to prevent blatant attempts by intruders.
At the same time, an outdated encryption scheme and an easily detectable blocking relay will not be able to cope with the actions of professional hijackers. The alarm will also be insensitive if the car is carefully jacked up and stolen with the help of a tow truck, since it does not have a tilt relay.
Conclusion
Based on this, we can conclude that the Starline A6 car alarm can only partially provide security, and it is advisable to replace it with a newer one at the first opportunity.
Instructions for car alarm Starline A6
The operating manual for this equipment allows you to use all its technical capabilities, as well as independently install an alarm system on your car.
The instructions consist of several sections, which contain information about:
- technical capabilities of A6;
- its configuration;
- methods of managing and configuring programs;
- installation on the car and connecting the system.
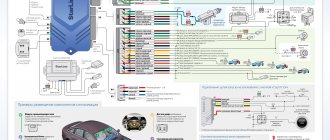
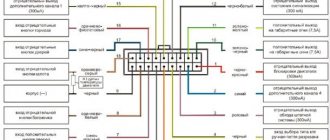
The manual also includes graphic diagrams for connecting all alarm elements.
Installing the Starline anti-theft system is a rather complicated procedure, which not every person can cope with. To perform the installation yourself, you need certain knowledge and skills, as well as installation maps for Starline brand alarms. In this article we will share basic recommendations that will help you install the system at home.
Recommendations for laying and connecting wires
When connecting the Starline anti-theft installation, the wiring must be laid away from sources of electrical noise. We are talking about high-voltage wires, the ignition coil and other components. Please note that the wiring should not come into contact with moving parts of the vehicle, namely steering rods, pedals, etc. Installation of wiring connections according to the connection card must be carried out with the battery disconnected (video author - Auto Electrician Sergey Zaitsev).
If the vehicle is equipped with an air cushion or an encoded receiver, when turning off the power, you must follow the service manual for the car. Installation of all permanent connections without exception must be done using soldering - all connections after connection must be insulated as much as possible.
Tips for installing car alarm components
Diagram of how to properly connect a shock detector
Below we will give recommendations regarding the installation and installation of the main components of the Starline alarm system in accordance with the diagram. It is immediately necessary to make a reservation that the diagram and installation map may vary depending on the model.
Below are recommendations based on the Starline Twage A6 alarm model:
- Transceiver module. This component with the antenna must be connected to the five-pin output installed in the central unit under the opening cover. Installation is carried out using the wire that is included in the anti-theft system.
- Installation of a two-level shock detector is carried out using a four-wire cable to the system control unit. When doing the work yourself, you need to correctly set the regulator so that the sound of the siren does not go off just like that. The sensitivity of the regulator, which determines whether the sound is turned on, is adjusted using potentiometers on the regulator body.
- Indicator light. This component, in accordance with the diagram, must be included in the two-pin output. This output is located on the control unit. The LED indicator flashes always when the alarm is on and stops working after it is turned off. It is advisable to display the light bulb itself on the windshield - thus, even at a distance from his vehicle, the driver will always know whether the system is activated or not.
- Valet button. Connects in the same way. The Calet button from the Starline alarm must be installed so that an attacker cannot reach it in the event of a vehicle break-in. A similar recommendation applies to the button for activating the anti-robbery mode - it is also connected to the control unit and installed in the cabin.
- External motor blocking circuit. This option for blocking the power unit significantly increases the anti-theft characteristics of the system as a whole, since in the event of hacking, the attacker will face a serious problem. To properly control the element, it must be connected to the black-yellow cable of the system, but before that the connector type must be programmed to HP. This step must be carried out in accordance with the diagram and instructions for installing and operating the Starline alarm system.
- Connecting the system to optics, i.e. low beam headlights. To make such a connection, it is necessary to connect an additional channel, in our case the third, marked with a yellow-red cable, in accordance with the diagram. The duration of the signal can be configured for ten or thirty seconds, or until the pulse is turned off by the remote control. Remember that a light path that is too long can lead to battery discharge.
- The control unit is usually mounted behind the glove box or under the center console opposite the driver's seat. It is better not to install this element in the engine compartment, since it contains many sensors and electronic devices that will interfere with the digital signal. The unit is installed using the supplied bolts or ties.
- Siren. As for the siren, this is one of the main elements, because it is the one that warns the driver with sound about possible penetration into the car. A siren with sound is installed in a place inaccessible to a potential criminal, so it is mounted in the engine compartment. To ensure that the sound is always loud, the siren should not be exposed to moisture or high temperatures. When exposed to external influences, the sound quality can be significantly reduced, please take this into account. The hood limit switch should be placed on a metal surface that is in secure contact with the body.
Improvement of built-in relays
Central locking is a standard feature on modern cars. There is a central locking control unit, but the alarm system does not need to be connected to it. But then, to control the locks remotely, you will have to use the car’s standard key fob. To combine the central locking system with the signaling, one or two low-current wires are connected to it. But this connection option is not always implemented, that is, not on all cars.
Basic actuator connection option
The problem is solved by installing an additional actuator.
An additional actuator is mounted in the driver's door. Its operation emulates pressing the “dog”. As you can see, everything looks reliable and simple.
Many people decide to make a radical modification: you can connect not one, but all standard actuators to the connector shown in the diagram. The role of the control module then passes to the car alarm. The Starline A61 Dialog model does not meet these goals well - there is no control input that monitors the position of the “dog”. In general, control is carried out only from the key fob. And the main block itself is modified as follows:
Main module printed circuit board
The tracks leading to the power contacts of the relay were cleaned and soldered.
Video “The process of connecting the Starline alarm system”
Using the Starline A93 model as an example, you can familiarize yourself with the nuances and subtleties of installing the system (the author of the video is Yuri Kadyrov).
The Starline A6 security system has already been discontinued and is therefore rarely available for sale. However, device owners speak positively about its functionality and capabilities. The system has modern and popular options, such as two-way communication and automatic remote engine start.
Specifications
The main technical capabilities of car alarms include:
- two-way communication;
- signal reception radius - reaches 1.2 km;
- radius of interaction and execution of commands - 600 m;
- possibility of automatic engine start;
- use of car alarms for electrical networks with a voltage of 9-18 V;
- active security mode - consumes no more than 20 mA of current;
- moderate current consumption - 2 A current required;
- possibility of connecting additional key fobs.
Advantages and disadvantages
Car owners considered the following to be the positive qualities of the Starline A6 anti-theft system:
- Possibility of programming work with automatic engine start. Starting is performed from the control panel if the car is within range.
- Easy to install the device. Installation requires minimal skills and knowledge, and step-by-step instructions are clearly presented in the user manual.
- Affordable price. The Starline A6 alarm system is no longer produced, but you can still find it on sale.
- Large data transmission radius. The owner of the vehicle will be able to find out about its condition within a radius of more than 1 km.
- Double engine locking reliably protects the car from theft.
Alarm Starline autostart from key fob
Remote autostart starline
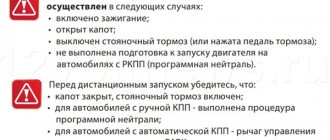
Before learning how to perform starline remote autostart, it is important to study some features. In order for you to be able to enable autostart from the key fob, it is important to meet the following conditions:
- The first step is to put the car on the parking brake.
- Turn the key in the ignition switch, and then remove the key (the engine must be turned off).
- Next, move the gearbox lever to the neutral position.
- Finally, it is worth closing all the doors tightly, as well as the trunk and hood.
Only if all the above conditions are met, then only in this case the security alarm will allow you to set it to autostart.
Switching to security mode with auto-start is also carried out in a special way:
- Park and then put the car on the handbrake.
- Move the gearbox selector to neutral.
- Hold down button 1 on the key fob for 3 seconds, after which a ringing melody will sound.
- Remove the key from the ignition.
- Get out of the car (check that the doors are closed tightly). If you did everything correctly, the alarm will automatically turn off the engine, after which it will switch the alarm to security mode.
To perform a car factory remotely there are 2 ways:
- Press button 1 for exactly 3 seconds, and then press button 3 until the signal appears.
- Select the “start” icon, and then press button 2 once.
If the engine starts, you will see the symbol “exhaust gases” on the screen. The car will warm up for the time that you previously set in the settings. 1 minute before turning off the engine, the code “r01” will appear on the display. If the time is up, this code will change to “r00”.
Auto start on alarm clock
First of all, check the time of the on-board computer, it should be as accurate as possible. To enable auto start on an alarm clock, you must follow all the steps according to the instructions:
- First, enable the option on the keychain with the bell icon.
- Having set the desired time for the alarm, press keys 3 and 1 in turn, confirm your choice on the dial icon. If autostart is configured correctly, the car will blink its side lights.
When the function is turned on, the picture of the bell and dial will change on the display, and a long melody will also be heard.
Auto start by timer
Activation of this option is done as follows:
- Move the cursor over the hourglass, then confirm your choice by successively pressing buttons 3 and 1.
- Set the desired time, and then confirm the activation of the function in the same way.
If you decide to disable the enabled engine start by timer, then this is very simple - press button 2 twice quickly. The previous timer display will disappear from the display, and the key fob will also notify you with a signal that the timer has been turned off.
Autostart based on temperature indicators
This option is one of the most useful; sensors monitor the ambient temperature, and when the desired temperature is reached, the engine starts. You can activate the option using these instructions:
- Move the cursor to the “thermometer” icon, briefly press button 1, then you will see a flash of the dimensions and a sound signal on the key fob. At the same moment, the current outside temperature should be displayed for 5 seconds.
- Quickly press button 1 to set the required temperature parameters.
- Long-pressing button 1 activates the automatic start mode based on temperature.
The option is deactivated using the same method as described above, only in our case the pointer now needs to be placed on the “thermometer” icon.
If you want to visually see how autostart is configured depending on the temperature on a Starline alarm, then watch this video
Setting up autorun using a phone application
Automatic engine start using a smartphone is a useful option, since the driver has the opportunity to start the engine from anywhere on Earth (if a GPS module is built-in). If your security alarm from Starline has a GPS module, then you can start it in the following ways:
- By sending an SMS message to the SIM card installed in the key fob.
- On call.
- By sending a command using a special application, which must first be installed and then connected to the machine.
The app can be downloaded from the most popular app stores and is completely free for everyone. The developers have made the interface as simple and understandable as possible, so even a child can understand the controls.
Functional
Installing a Starline car alarm allows you to use a number of additional functions. These include:
- activation and deactivation of the security mode by pressing one key;
- sound accompaniment of actions;
- the presence of a quiet operating mode, which allows you to turn the system on and off without sound;
- panic mode;
- notification of an attempt to break into a vehicle;
- locking and unlocking door locks;
- searching for a car in a parking lot;
- opening the trunk or hood using the key fob;
- remote engine start.
Protection
According to instructions A6, the security mode is activated by sound and light signals, and a signal is sent to the control panel about an attempt to break into the car. Panic mode allows you to activate the siren on command, and the Anti-Robbery option is also enabled. Double engine blocking prevents the engine from starting, even if attackers were able to deactivate the alarm.
Service
Service options do not affect the level of protection of the car, but help make the system more comfortable for the driver. Service functions include:
- silent mode;
- providing security with the engine running;
- automatic re-arming;
- door lock control;
- remote control of the sensitivity sensor;
- automatic raising of windows and closing of the hatch;
- service mode valet;
- additional control channels;
- reset to factory settings;
- determining the temperature in the cabin and autostarting the engine;
- remote control of key fobs in the system;
- control of lighting in the car interior;
- illumination of indicators on the control panel.
Setting up the Starline alarm system
The car alarm functions are controlled from the key fob. Therefore, you need to start by linking it to the control unit.
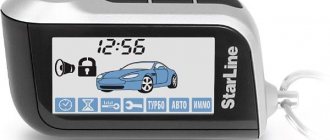
The set includes two keychains:
- with LCD screen and 4 buttons;
- with LED indicator and 3 buttons.
The security complex has a wide functionality with a set of modes:
- immobilizer;
- anti-robbery mode;
- system self-diagnosis;
- panic mode;
- silent mode with the engine running or turned off;
- automatic start of security after shutdown;
- silent alarm activation from the shock sensor;
- GPS monitoring;
- emergency call for help;
- reprogramming a new key fob;
- wheel blocking when trying to evacuate.
Work should start with basic settings:
- date and time;
- timer;
- volume and tone of beeps.
To do this, you need to use the main key fob with a screen. The additional one serves only to activate the main functions of the system. Management and settings are carried out in different ways:
- several quick key presses (lasting less than half a second);
- pressing the button for a long time (until a sound signal appears);
- successive button presses.
Advanced Starline models support the cursor setting method. It is activated by two presses: a long first (until a beep) and a short second to confirm. After this, an image corresponding to the selected action appears on the screen. Pressing the control keys allows you to move between icons to select the desired option. This allows you to enable or disable the following features:
- locking and unlocking doors;
- protection from robbery;
- silent protection;
- third party service;
- turbo timer and others.
Changing and adjusting modes is performed by pressing a combination of buttons on the key fob. The sequence and duration of the presses is important.
Pressing two buttons in turn activates the following actions:
- turning on silent mode (1 and 2);
- engine start (1 and 3);
- engine stop (2 and 3).
Holding the first and third buttons locks the key fob. Holding the first and second will turn on the panic or anti-robbery mode, depending on whether the engine is turned off or on.
Different modes and functions can be activated by pressing only one key.
For example, the first button:
- turns on and off the sound security mode with a short or long press;
- turns the shock sensor on and off by double pressing;
- locks the doors with a single press (if the engine is running).
You can learn in detail about the binding of each button from the instructions included with the car alarm.
How and where to install an alarm
Installation instructions in Russian are included with the system. Installation is carried out with the battery disconnected according to the diagram specified in the manual. When installing the system yourself, you should remember that the Anti-Robbery and Jack buttons, as well as the main microprocessor, are best located in a secret place where the robber cannot reach them.
The system performance indicator is placed on the central instrument panel so that it can be seen from the street.
The siren and wires are located next to the engine. It is important that they cannot be reached from the bottom. The sensitivity sensor is installed in the cabin, and the antenna sensor is installed on the windshield. The engine blocking and auto-start relay is mounted directly into the ignition system.
If the connection is difficult, you should contact specialists who will help you install and configure the system for a fee.
Connection diagrams
The basic connection diagram for the anti-theft system is described in the user manual. For proper operation of the system, connect all elements according to the instructions in the instructions.
Laying and connecting wires
The alarm wires are connected remotely from the starter, ignition, motor mechanisms and other high-voltage cables. Soldering and laying are carried out with the power turned off. The processor and other modules are connected to the pads last.
After connecting the wires, it is advisable to wrap them with electrical tape or cover them with special tubes.
Preparatory actions
Let’s say your car has a “Start/Stop” button and you need to install the car alarm correctly. Only the power cable can be connected to the connector responsible for autostart. True, then the system will protect the car, but will not start the engine. And the last option is not easy to implement:
- It is necessary to determine which pedal (“brake” or “clutch”) is pressed by the car until the engine starts;
- If you need to duplicate the “clutch,” a relay is connected in parallel with the microbutton, which the alarm will control according to its program;
- A separate wire is pulled from the alarm to the microswitch of the brake pedal, that is, to the contact that receives the “12 Volt” potential when pressed;
- The signaling itself in cars with automatic transmission will monitor the brake press, but for manual transmission another option is suitable: the control input is connected to the handbrake limit switch.
By the way, it didn't say how to connect the ignition wiring. It is better to immediately provide the diagrams.
One 18-pin terminal block is connected to the Starline A91 Dialog alarm system, that is, to its X3 connector. It is equipped with a gearbox selection loop, which is broken to install the signaling system on a car with a manual transmission. In the same terminal block there is an “orange-purple” cord. It must be connected according to one of the following schemes:
Connection of “brake control input”
Next, it is advisable to connect the “blue” cord from connector X1 to the relay. It will duplicate the microswitch:
Emulation of a standard pedal micro-button
The two “top” diagrams, by the way, are taken from the Starline basic manual.
Manual
The operating instructions contain information about the buttons on the control panel and their purpose. The initial options and additional options that can be programmed are described.
How to set up an alarm key fob
To make changes to options, the key fob must be linked to the system. Therefore, you first need to enter the remote control into the alarm memory, and then configure the key fob according to the manual.
Purpose and programming of key fob buttons
The first button helps to activate and deactivate security with sound. The second key controls the opening of the trunk, and the third controls the cursor on the device panel. These key combinations allow you to configure 16 additional functions. The process is described step by step in the instructions.
Recording codes
In order to set the code, you need to activate the ignition, hold down the Valet key for 6 seconds until sound signals appear. The first two keys are pressed until the siren is played; to record a spare pager, the 3rd and 4th buttons are pressed. Each new device must be entered within 6 seconds after the previous one. When the recording is complete, the ignition is turned off.
How to enable autorun
The functionality of the Twage alarm does not allow you to directly enable autostart. To connect this option you need to buy the Starline 02-12 module. With its help, you can start the engine automatically based on temperature. To do this, you need to set the correct settings for options 1 and 11. Function 11 is responsible for the type of connection of the locking relay. And function 1 is directly responsible for autostarting the engine: value 2 activates the option, and 1 deactivates it.
Activating and disabling security mode
To activate the security mode, you can use any key. According to the factory settings, key No. 1 is used for this. If the key fob breaks or is lost, the alarm can be activated through the service mode. To do this, turn on the ignition, press the Valet button 4 times, then turn off the ignition. To confirm the action, a siren should sound and the size indicator light should turn on. Within 20 seconds you need to leave the salon and lock the door with the key. A sound signal will indicate the success of the procedure.
| I have an A6 on Lanos. They installed it in the showroom when I bought the car. I can say that it does not always obey the key fob well, sometimes the settings get lost. If there are any obstacles nearby, it is very difficult to open the car. And recently there was a case: I locked my car with the key in the evening, I opened it in the morning, and the alarm went off. I don't understand how this can be? Based on my experience, I would not recommend the starline a6 to anyone. | |
| Although old, but reliable! In 5 years of operation it has never failed. It actually has a lot of possibilities, but most people just don’t need them in everyday life. For example, I only use open-close, I reduced the sensitivity of the sensor several times when there was a construction site near my work and there was a lot of noise, so the alarm was constantly going off. With this mode of operation, it seems that the A6 can last forever. | Very old and outdated alarm system. It was initially not very successful; it is better to buy an A9 with auto start. Some functions, such as trunk release, do not work at all. After a year of use, the glass on the remote control flew out, even though no one dropped it. During severe frosts it always malfunctions, does not open or close the doors. You have to stand in the cold for several minutes to remove the security. |
| It has been on the Chevrolet Lacetti since its purchase in 2007. I'm pleased with the feedback function and good reception range. The alarm is excellent, works like a clock. I recommend to everyone! | There are frequent failures. This alarm has let me down several times. The screen got worn out very quickly, nothing is visible, the buttons are pressed spontaneously and change programs. False positives are also present. I recommend NOT buying this alarm! |
| Alarm with feedback. If it works, the key fob immediately starts blinking and making sounds. The connection with the machine can be checked using a special button. There are a lot of useful functions, there is even an engine lock, which can be activated from a button and from the remote control. | |
| There are very few functions that are needed, but there are a whole bunch of unnecessary ones. It is very difficult to control them, the key fob is extremely inconvenient. To perform one operation, you need to press many times. The A6 is generally not suitable for modern cars, as the car will be stolen at once. |
How to set up the key fob?
For proper operation, you need to configure the remote control. The first button is programmed first.
The setup is done like this:
- Key number 3 is clicked quickly several times so that the cursor on the display moves counterclockwise or clockwise. To change the direction of movement, you need to pause for one second between clicks.
- Move the cursor on the screen using key 3 to a position that will correspond to a specific command, for example, activation or deactivation of the security mode.
- Having selected a function, press key 3 for six seconds until two and then three beeps are heard.
- To activate, click on button 1.
With this setting, by pressing key 1, you can activate or disable the protective mode. When you click, an indicator will appear that corresponds to the installed option. To reconfigure the button assignment, repeat the above steps again.
Programming button number 2 is carried out as follows:
- Perform a few quick presses on button 3, this will allow the cursor to start moving around the screen.
- By pressing the same button, move the cursor to the position that will correspond to a specific function.
- When the option is selected, press key 2.
If you plan to use the autorun function, you need to set the clock to do this:
- To configure, click on key 3 and hold it down until two short beeps are heard. After this, the indicator on the watch will blink. To increase the values, press key 1; to decrease, press key 2. To ensure a quick increase or decrease in values, keys 1 and 2 can be held down.
- When the clock parameters are configured, the minutes are set in the same way, only to go to this menu you need to click on key 3.
- To exit the clock setting menu, press button 3 until a beep sounds.
On the main remote control you can configure the alarm clock:
- To program, click on key 3 and hold it down until the key fob emits two beeps.
- Then successively click on key 3 until an alarm clock icon appears on the screen. The clock symbol will blink. To increase the readings, press button 1, to decrease the readings, press button 2.
- First, the hours are set to trigger the alarm, and then the minutes; to set the latter, you need to press key 3.
When the alarm clock is set, you need to quickly click on key 3, this will allow you to go to the menu for enabling or disabling the function. Activation is done by pressing button 1, deactivation is done by pressing key 2. To leave the alarm clock settings menu, hold down the third key. There should be one beep and the remote control will automatically exit the menu. When the alarm goes off, the remote control will emit one melodic signal. To turn off the feature, press the third key on the pager.
If the alarm option is activated, the corresponding indicator will appear on the key fob display.
Alexander Shkurevskikh spoke about the procedure for linking the Starline A6 signaling key fob.
To set the timer, click the third button on the key fob and hold it in this position until the remote control emits two beeps. Using the same button, you need to move the cursor to the position of the hourglass indicator. The procedure for setting the timer is the same as with an alarm clock. The security complex allows you to set the timer to a maximum of 19 hours 59 minutes. When the function is activated, the status will be displayed on the remote control screen and the hourglass icon will begin to blink. Once the time has been set, the countdown will begin. After the set time period has elapsed, the key fob will emit eight beeps and the hourglass icon will disappear from the screen.