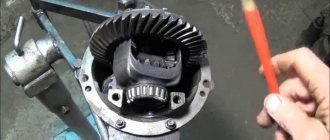
Driving at high speeds with broken universal joint crosspieces does not go without consequences. The rear axle gearbox on the classic and Niva is designed in such a way that when the car moves forward, the shank seems to be unscrewed from the engagement of the main pair. The drive gear of the main pair (also known as the shank) rotates on two bearings: front and rear. The distance between them is elastically fixed by the pretension created by the spacer sleeve when the shank nut is tightened. The vibration of the cardan, transmitted to the rear axle gearbox, gradually unscrews the shank nut. Radial play appears in the shank - especially on the front bearing, because When moving forward, the shank is unscrewed from the joint of the main pair and the front bearing is freed for play. Radial play wobbles the unfixed spacer sleeve and oil flinger washer, gnawing out metal fragments that fall into the tapered bearing. After the fragments cut “patterns” on the rollers and bearing race, noise begins, which continues even after the shank nut is tightened or the spacer is replaced. In theory, in such cases, repair of the rear axle gearbox is required. Repair with complete disassembly, troubleshooting and assembly. The last stage is not performed by anyone in a city of millions at a reasonable price. Everyone just replaces the gearbox with a new one and moves on.
Replacing the front shank bearing.
I decided to go a different route. Replace the front tapered shank bearing without disassembling the gearbox. I calculated the distance between the shank and the front bearing race, which was exactly 13 mm. It is necessary to select a puller into this distance, the clamping tab of which can squeeze through. We searched for a long time at the service station, but found a puller with a suitable jaw width size - 13 mm. Only the puller was external, but we managed to twist the legs for internal removal. We started working with this tool.
The flanges were uncoupled. We tightened the nut, took out the bearing, bushing and washer.
Now all that’s left to do is pull out the outer race of the front shank bearing.
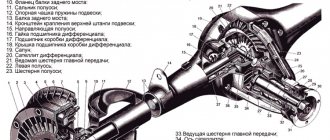
Rear axle gearbox bearings produced by the Volzhsky Bearing Plant (VPZ, 15 GPZ) for VAZ 2101-2107 and the Lada 4x4 family - VAZ 2121, 21213, 21214 (m), 21218, 2131 Niva and VAZ 2123 Chevrolet Niva .
Exactly what they put in at the factory.
№ 7705 - 1 PC.;
№ 7807 - 1 PC.;
№ 7707 - 2 pcs.
They are also installed in the front axle gearbox of VAZ 2121, 21213, 21214, 2131 Niva cars with 22 splines on the front wheel drives.
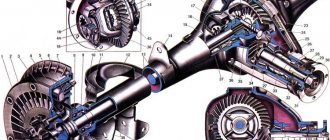
All VAZ classic cars are rear-wheel drive, the vehicle moves using the rear axle, which is the drive axle. The VAZ rear axle gearbox is the most important part in the transmission; it is where the main gear is located.
Differences in VAZ rear axle gearboxes
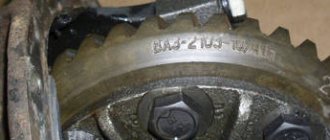
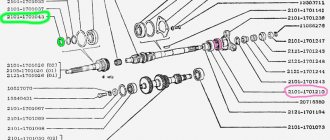
RZMs differ in the gear ratio of the main pair; in total, there are four types of gearboxes on the VAZ classic:
The slowest one is the RZM 2102, its drive gear has 9 teeth, and the driven gear has 40 teeth. To calculate the gear ratio, you need to divide the number of planetary gear teeth by the number of teeth on the drive shaft; for the VAZ 2102 the drive gear is equal to 4.44.
The “penny” gearbox (2101) accordingly has the number of teeth on the gears 10/43, so its IF is 4.3. The next, faster one is RZM 2103 - it has a ratio of 1041, which means the gear ratio is 4.1. And finally, the “fastest” will be the 2106 gearbox, with the number of teeth 11/43 and an inverter frequency of 3.9, respectively.
Many VAZ 2101-07 owners strive to install the fastest gearbox, but this is not always necessary. If the car often carries cargo, that is, the car is a “workhorse”, high speed is of no use, but high-torque power will be very useful. It should be noted that RZM 2102 was not supplied as spare parts; it was installed only on station wagons.
Design and principle of operation
main gear
The main gear can be single or double. The single gear transmits torque to the wheels of the car using one gear pair, and the double gear – using two. Single gear, in turn, can be:
- cylindrical;
- conical;
- hypoid;
- worm
For a cylindrical main gear, the gears are located in the same plane, while for a bevel gear, they are perpendicular to each other. The advantages and disadvantages of the main modifications to single final drives are listed in the following table.
Modifications of single final drives:
| Modification | Efficiency | Noise level | Dimensions |
| Cylindrical | Maximum | Maximum | Large |
| Conical | High | High | Average |
| Hypoid | Average | Average | Average |
| Worm | Short | Short | Compact |
The double main gear can be central or spaced. The central one has a simpler design, a large gear ratio and a greater load on all elements of the system. The spaced one has a more complex design, it is more efficient in operation and compact.
Differential
The cross-axle differential distributes torque between different axle shafts. If the car is slipping or slipping, the differential helps it cope with this problem by allowing the wheels to rotate at different speeds.
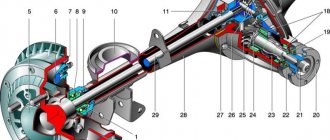
The cup (3) contains the satellite gears (4) and half gears (5). The cup is connected to the driven gear (2). The gear, in turn, receives torque from the main gear drive gear (1). The cup, with the help of satellites, transmits rotation to the axle shafts that drive the driving wheels of the car. The operation of the satellites provides different angular velocities. The amount of torque is unchanged.
A similar device is implemented in most rear-wheel drive cars, such as VAZ-2106, VAZ-2107, Gazelle. It has proven its reliability during operation in the most difficult conditions.
Replacing the rear axle gearbox of VAZ 2106, 2107
The main disease of REM is increased noise (hum), and the gearbox can hum for various reasons:
- there is insufficient oil in the bridge, or it is completely missing;
- the gap between the gears of the main pair is not adjusted;
- the gears are worn out, they have chips and other damage;
- the main pair has a manufacturing defect, the gears are not ground in from the factory;
- the shank nut has become unscrewed or loosened;
- bearings are worn out.
The main malfunction of the center differential is the wear of the gears of the axle shafts and satellites, when the surfaces of the parts are heavily worn, play forms between the differential gears, but the rear axle usually does not make noise due to wear of the differential gears.
ZM gearboxes on VAZ classics can be repaired, but only if there is no wear on the gears. If the mechanism can no longer be repaired, it needs to be replaced. We replace the rear axle gearbox of a VAZ 2106 on a “seven” as follows:
How to replace it yourself: step-by-step instructions
Replacing the rear axle gearbox oil seal on a VAZ 2107
The procedure for replacing a household regulator is not particularly difficult and is quite accessible for you to do it yourself. However, for people who do not have any training, it is recommended that they first familiarize themselves with the rules for performing such work and study the procedure.
Until you are confident in a positive result, you should not proceed with replacement, otherwise you could flood your apartment (both yours and the neighbors below), as well as leave the whole family without hot or cold water.
approximate cost
When performing a replacement yourself, the cost depends only on the cost of the device.
The price of a household regulator can range from 800 to 16,000 rubles (most household regulators cost between 800-2000 rubles).
Based on this price range and your own financial capabilities, you can make a rough estimate of your expenses.
It is recommended to buy a gearbox equipped with a pressure gauge. Such models are more expensive, but they allow you to see the current water pressure and determine whether the device responds to changes in the system.
Tools and materials
No special tools are required to replace the gearbox. You need to prepare:
- adjustable wrench;
- set of sanitary winding (FUM tape or flax, Unipak paste);
- new replacement gearbox;
- a bucket of water for washing the filter and other assembly elements.
If you plan to clean the water filter along with replacing the gearbox (it is recommended to do this, since a clogged filter is not able to do its job), a metal brush will come in handy.
With its help, the cylindrical mesh is cleaned and plaque with solid particles is removed.
Process
It is recommended to change both devices at once - hot and cold water. This will make it possible to determine the service life and determine which of them works in more difficult conditions.
Procedure:
- Turn off the water.
- Open one of the taps located after the entrance group to drain the remaining water from the pipe.
- Using a wrench, unscrew the union nuts on the old gearbox. Sometimes you have to use two wrenches, one of which holds the threaded part motionless, and the second one unscrews the nut.
- Having completely freed the union nuts, remove the gearbox from the assembly.
- Using a 30 mm spanner, unscrew the coarse filter nut.
- Take out the mesh element, wash it in water and clean it of dirt using a metal brush.
- Reassemble the filter in reverse order.
- Install a new gearbox. Care must be taken to ensure correct installation. The direction of flow is indicated by an arrow on the body.
- All connections are sealed using FUM tape or flax.
- Let the water run and check for leaks.
- Configure the device (according to the attached instructions).
There are gearbox models whose design also contains a built-in coarse filter. They must be periodically cleaned of dirt so that the operating mode of the device is not disrupted.
Defects in the gearbox
Increased play in the RZM can be formed due to wear of the differential pinion pin - if you grab the driveshaft and rotate it clockwise and counterclockwise, this play can be felt. Also, increased clearance can be formed due to wear of the splines inside the differential housing itself.
If the gaps in the main pair of gearboxes are not adjusted, a characteristic noise occurs when the car moves:
- when the load increases (sharp acceleration), a characteristic howl is heard in the bridge;
- When I let off the gas the noise goes away.
The engine can hum in a different way, but the characteristic feature described above can most often be heard on VAZ classic cars. Worn teeth of the main pair are clearly visible on the planetary gear - they become rounded, and they often show traces of rust.
Malfunctions and their elimination
The gearbox is reliable and rarely fails, provided timely preventive measures are taken.
Determine mechanism failure as follows:
- At a speed of 20 km/h, extraneous noise appears; when it increases to 80 km/h, it disappears.
- When driving at a speed of 80 km/h, turn on neutral and turn off the ignition - if noise appears, then the problem is in the gearbox.
In the operation of the Kamaz unit, 3 types of malfunctions most often occur:
- Main gear overheating. The reasons may be:
- lack or excess of oil in the crankcase;
- increased bearing tension;
- inaccurate tooth settings.
- Increased noise. Causes:
- bearing wear;
- incorrectly adjusted clutch;
- weak bearings.
- An oil leak may result from:
- cuff wear;
- breather contamination.
When problems are identified, technicians perform repairs. Car owners go to a service station or do it themselves.
How to adjust
Adjusting the axle gearbox in KamAZ vehicles involves setting parameters such as:
- tapered roller bearing ring tension;
- differential;
- lateral clearance in the mesh of a pair of gears;
- contact patch.
When repairing the middle gearbox, the technical data must be observed; nominal values of clearances and tolerances are maintained.
To accurately adjust the tension you need to:
- Reduce the dimensions of the washer pack by the amount of axial shift with a tolerance of 0.04-0.06 mm.
- Tighten the fastening nut.
- Check the turning force of the glass.
- Install into the housing.
To adjust the side clearance to a permissible value of 0.2-0.35 mm, shims of different thicknesses are required.
The differential is installed so that the ring gear of the driven wheel is symmetrical to the drive wheel. The adjustment is made by uniformly tightening the adjusting nuts and tightening the connecting bolts.
How to remove, disassemble and reassemble
Stages of disassembling and assembling the middle or rear gearbox:
- Oil drain.
- Dismantling the drive axle assembly.
- Disassembling it into components sequentially:
- driving and driven gears;
- crankcase;
- differential box;
- satellite axes.
- Status check:
- crosspieces;
- necks;
- semi-axial gears;
- drive.
- Replacement of worn-out products.
- Carrying out adjustments.
- Reassemble the bridge in reverse order.
- Testing the assembled bridge for absence of rattles and leaks at the joints.
After all operations have been completed, the assembled mechanism is installed in its working position.
Adjusting the VAZ rear axle gearbox
If the main pair in the gearbox is worn out, it must be replaced. But you can’t just put the gears back in place; the gaps in them must be adjusted. In total, two types of basic adjustments are made:
- The thickness of the adjusting sleeve (washer) is selected for the shank (drive gear). The washer can have a thickness from 2.6 mm to 3.5 mm;
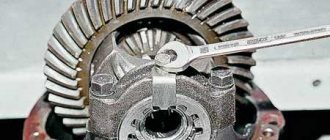
- The gap between the gears of the main pair is adjusted using two adjusting nuts of the differential housing.
The washer for the shank is selected in such a way that the shaft with the drive bevel gear rotates in the gearbox housing without backlash with a force by hand (0.3-0.4 kg). In this case, the shank nut should be tightened with a force of 12 to 26 kg, usually 18-19 kg are tightened.
How to make repairs
To begin, remove the gearbox from the machine, and then clamp it into a clamp. Unscrew both bolts for the locking plates and remove them.
Next, the bearing caps are marked for their future assembly. To do this, you will need a center punch and use a hammer to make marks. Use wrench No. 14 to unscrew the bolts and remove the covers.
It is important to immediately inspect the bearings for wear and serviceability. The outer races from each bearing are marked, since they are selected in pairs and cannot be disassembled
The radial play located on the axle gears is checked. If its size exceeds 0.5 mm, then the box is replaced. In normal condition, the bearing is removed and the planetary gear is unscrewed.
Next, you need to knock out the satellite axis using the adapter and pull them out.
You need to remove the drive shaft and gear from the gearbox housing. A soft metal punch is perfect for this. The inner wheel of the roller bearing is knocked out.
It is also necessary to replace the adjusting sleeve with a new one.
After knocking down the bearing, you need to remove the adjustment ring.
Next, use a drift to knock out the outer rings of the bearings.
Now you can wash all parts in kerosene or diesel fuel. After the washing is done, all parts are diagnosed. There should be no chips or cracks
If these defects are present, it is important to replace the parts. If there are small scratches, they can be polished with sandpaper.
Repair or replacement, which is better?
Car owners of VAZ classics often cannot decide what is best to do - buy a complete ready-made REM assembled or purchase individual parts and repair the gearbox. It’s really difficult to decide here - the price of a new gearbox, of course, is higher, but the owner of the car is freed from the headache of adjustment. The thing is that it’s not so easy to find a good specialist in VAZ gearboxes, and there is no guarantee that the new main pair will not hum.
If a car owner buys a new gearbox, but it hums, the part can be exchanged under warranty, but the car owner loses money on removing and installing the gearbox. If you purchase a defective main pair, the repair itself will be more expensive - you will have to pay a technician for a secondary overhaul of the gearbox.
Replacing bearings. Work plan
Replacing bearings in this case looks like this. Once the unit is removed, you will need the following tools to replace the bearings:
- socket heads for 10 and 17
- ratchet handle
- hammer
- chisel, flathead screwdriver (or bearing puller)
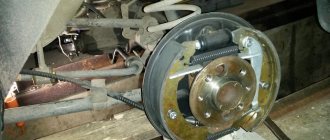
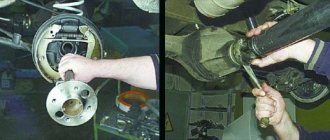
So, the first thing you need to do is unscrew the fixing bracket, which is clearly demonstrated in the photo below:
Then remove it and unscrew the two bolts securing the bearing cover. In terms of their fastening design, all of these are similar to crankshaft covers:
And remove the gearbox bearing adjusting nut:
Next, you will have to try a little to remove the bearing, since its inner race fits quite tightly. I did it as follows: I pointed the impact screwdriver from the inside and knocked out the bearing with hammer blows. Then, when the bearing moves forward a little, you can use a chisel.
And carefully in a circle, turning the gear, we punch through the race until the bearing finally comes off, after which we remove it:
On the other hand, everything is done in the same way. The price of a new bearing is about 150-200 rubles. Installation is carried out in reverse order. It is worth paying attention to the fact that the adjusting nut should not tighten it too much, but at the same time there should be no play!
Source
VAZ rear axle gearbox locking
On VAZ 2101-07 vehicles, the factory does not provide locking of the center differential, but the industry already produces both differentials with locks and fully assembled 3M gearboxes. The most common today are REMs with screw locking; in them, the differential gears are locked depending on the load. In such rear axle gearboxes, a preload clutch is installed, it connects the wheel axle shafts with a certain force, and acts as a blocker.
Locking the VAZ rear axle gearbox provides the following advantages:
- increases cross-country ability, allows the vehicle to avoid slipping on difficult road sections;
- allows the car to accelerate faster at the start;
- The car corners more confidently.
But ZM gearboxes with screw locking also have their disadvantages:
- Fuel consumption increases slightly;
- when accelerating, the car handles worse;
- The differential and assembled gearbox with locking are much more expensive than standard parts (the price is approximately 2-2.5 times higher).
VAZ 2101-07 car owners should know that after installing the RZM with blocking, the car will not become an SUV, and it will not be able to move on severe off-road conditions.
Installation of the VAZ 2107 axle bearing and locking sleeve
1. Find a dense steel object in the garage that can act as an anvil. For such purposes, a piece of railway rails is often used (but this is only one of the options). You can use any available material.
2. Prepare a powerful hammer. If this is not the case, then you can use a small sledgehammer. In addition, take a second small hammer.
3. Place the axle shaft on the anvil so that the device flange does not touch it.
4. Place a thick rag on top of the axle bearing to protect your eyes from accidental flying splinters, or better yet, wear safety glasses. To protect your hands, wear gloves made of thick material.
5. Place any object under the second edge of the axle shaft. The main requirement is the absence of distortion.
6. Use one of the hammers (the smaller one) as a chisel - place it on the top of the holder and strike hard with the other (more powerful) hammer. If you fail to break the knot the first time, give it a few more blows.
7. After splitting the cage, remove the separator and knock down the intake sleeve with a chisel.
8. Remove the inner race. This whole process can be done much faster if you use a grinder, if you have one.
Signs of bearing damage
The primary marker of a problem is a characteristic sound that is difficult to distinguish from the sound of driving on asphalt. Therefore, you need to carefully check the condition of the wheel for characteristic signs:
- heating the wheel from the center without the smell of heated brake pads;
- strong vibrations in the steering column and body from the front wheels;
- pulling the car to the side at high speeds from the direct course;
- heavy steering control off-road;
- a clearly audible crunch when turning the wheel (audible even with the engine turned off, if the car is rolled by hand).
Even one of these signs is a reason to replace the front wheel bearing of Niva 21214. Complete destruction of the element at speed very often provokes the car to roll over. This is due to the short wheelbase of models 21213, 21214 and suspension features.
Without a special stand it is quite possible to diagnose the problem. The wheel hanging on the jack must be taken from both sides and rocked. A broken part will give significant play. Rolling and cracking sounds will also be heard. This is a clear reason for replacing the wheel bearing in Niva 21214 and 21213.
Useful video
After assembly, the bearing clearances should be carefully adjusted.
Experts recommend replacing it with a two-row modification, if possible. You will have to bore the hub for installation, but the service life of the unit increases significantly. Repairing the front hub of Niva 2121 is quite simple if you follow the diagram. All about the Niva Chevrolet axle bearing
A car from the jeep class has all-wheel drive on all 4 wheels. This mechanism determines the presence of a rear axle
, which is designed to transmit torque from the gearbox to the driving rear wheels.
The rotation of the wheels is ensured by the presence of gears and axle shafts in the bridge. The axle shaft is connected to the wheel and sets it in motion. But why do you need an axle bearing in the axle? Because the topic of the article is called axle bearing
, it will be discussed specifically about it further.
Let's take a closer look at this mechanism in the design of the rear axle , its purpose, design (size, number, etc.), malfunctions and the replacement process.
To consolidate the abilities, a video is posted at the bottom of the material, in which you can visually study the procedure for substitution. Replacement kit for cars with abs
The nuances of dismantling the bridge
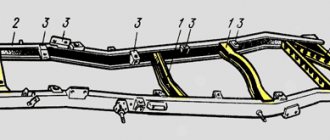
Experienced UAZ owners know: bridges are one of the most “capricious” parts of UAZ cars. They are extremely sensitive to the correct location and serviceability of the components located in them. But you can approach these elements to repair them or replace parts if you dismantle the entire bridge, separating the halves of the crankcase.
The rear axle usually requires more attention from the car owner, since it bears the main load. After all, most often UAZ owners drive on hard road surfaces with the front axle disabled. The main difficulty when dismantling a wheel unit, especially one that has tasted the “salt” of city roads in winter for many years, is to unscrew the nuts of the brake pipes; without this, it will not be possible to remove and disassemble the bridge. To ensure trouble-free unscrewing of such nuts, stock up on:
- split wrench with tightening bolt;
- WD-40 or equivalent.
In especially severe cases, if the lubricant does not help increase the mobility of the nuts, you can use any household detergent based on phosphoric acid.