An oil leak from the axle gearbox through the drive gear oil seal is like a person with a runny nose. It seems that you are working as always, but this constant dampness under your nose is annoying. The only difference is that a person does not need the fluid flowing from the nose, but at the same time it is constantly produced by the body with a cold. And the bridge desperately needs the oil flowing out of the bridge, but it will not be able to replenish the supply without your help. It’s good that replacing the rear axle gearbox seal on a VAZ 2107 and other models of this series is possible with your own hands.
About the consequences of untimely “treatment”
And just as a runny nose can lead to serious problems in the body, even some kind of meningitis, oil leaking from the bridge can lead to serious “diseases” of the drive axle: overheating and jamming of bearings, scuffing on the surface of the gear teeth of the main pair, their rapid wear, increased noise and other troubles, including jamming of the main gear itself. Therefore, if you discover severe oiling in the area of the drive flange, or, even worse, an oil stain on the ground under the gearbox, you should not delay the “operation”. However, if “well, I can’t go on sick leave right now,” then by regularly monitoring and replenishing the oil level in the gearbox, the car can be operated for some time without any special consequences for the health of the bridge.
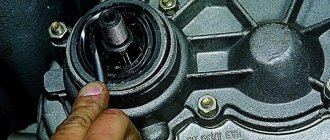
Where is this seal located?
To be able to replace the rear axle gear oil seal, the first thing you need to do is find it. For this:
- drive the car into a viewing hole, or even better, an overpass (the work will be carried out under the car);
- tighten the handbrake;
- drain the oil from the rear axle gear housing;
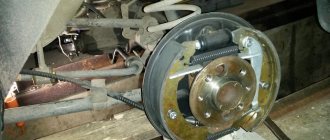
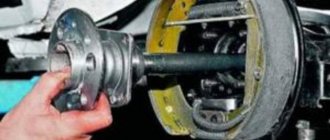
- Locate where the driveline is attached to the rear flange.
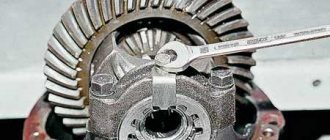
It looks like this:
The blue arrow here indicates the rear flange of the gearbox, the green arrow indicates one of the bolts securing the cardan drive (there are 4 such bolts in the mount), and the red arrow shows the lock nut securing the flange itself.
In order to finally get to the oil seal itself (it is shown in the small photo), this entire assembly will need to be unscrewed, and from there it will only be a matter of little work.
But more on this a little later, while we deal with another, no less important issue.
A little anatomy
In the last years of its life on the AvtoVAZ assembly line, the classic Zhiguli remained perhaps the only passenger car in the world with a rigid drive axle. This design is simple and technologically advanced in production, but has serious disadvantages in operation:
- large unsprung mass of the bridge, which negatively affects the smoothness of the vehicle;
- tendency to steer when one of the wheels hits an obstacle - at this time, due to the misalignment of the bridge, both wheels tilt from the vertical and tend to roll in the direction of the tilt;
- reduction in the useful volume of the trunk, because there must be free space between the axle and the car body for the axle to move during the compression of the suspension.
The advantage of a rigid axle, in addition to manufacturability, is its better adaptability to bad roads: the ground clearance under the axle practically does not change depending on the load, and the wheel drive is reliably protected from external influences by the axle housing.
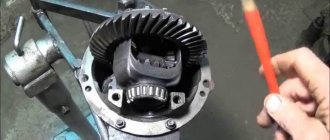
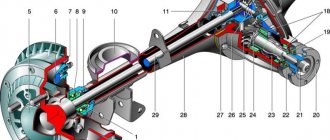
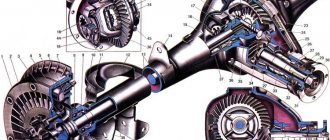
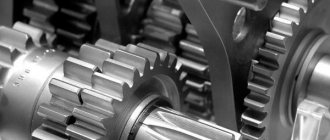
The Zhiguli bridge consists of a stamped-welded bridge beam (such beams are called “Banjo” for their characteristic shape), a main gearbox with a differential, and axle shafts. The gearbox is made in a separate open housing, the flange of which is bolted to the crankcase. A drive gear with a driveshaft mounting flange and a differential with a driven wheel are mounted in the housing on bevel bearings. The main gears are hypoid, that is, their axes are located at an angle of 90 degrees to each other, but do not intersect (they are crossed). The amount by which the axis of the drive gear is offset relative to the axis of the driven gear is called hypoid offset. Such a transmission, if it is precisely manufactured and well adjusted, operates smoothly and with the least noise, but due to the intense sliding of the curved teeth, it is very sensitive to the quality and quantity of oil in the bridge.
The design of the bridge is relatively simple and technologically advanced, although it is not without its drawbacks
Diagnostics and adjustment/repair
The basis for diagnosing the rear axle gearbox is the noise that appears from behind the car. This may be a sign of wear and tear on the device. If a hum appears, this indicates that the gearbox has become unusable and requires a major overhaul, which will require replacing almost all the parts. To prevent this condition, it is necessary to make timely diagnostics at the slightest noise.
Typically, different types of noise appear at certain speeds. For each type of noise, you can determine what deviations and with what parts or assemblies they are associated. If noise appears in the rear axle, you should check the condition of the drive axle and gearbox in different driving modes: moving from a standstill, acceleration, driving at low speeds, etc. Noise during such tests can be divided into the following types:
- continuous noise from the rear wheels;
- noise when accelerating a car;
- noise when braking (slow motion);
- noise when turning.
By carrying out diagnostics by changing driving modes, you can determine the cause of the problem and roughly determine the scope of repair work.
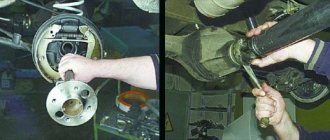
If the gearbox fails, then there are two ways to solve the problem: replace the entire unit or find the faulty part and replace it. To perform the replacement procedure, you will need a standard set of tools. First of all, the oil must be drained from the unit housing. To do this, unscrew the drain plug at the bottom of the rear axle. Next, the rear wheels, brake drums, and pads are removed. Using a socket wrench, the fastenings of the axle shafts are unscrewed. Then the axle shafts are dismantled.
There are some special features when dismantling the driveshaft. Before unscrewing the bolts holding the shaft, it is necessary to note the position of the cardan flange and the gearbox flange relative to each other in order to correctly install them during reassembly to avoid imbalance. During assembly, the nuts will need to be replaced with new ones so that they do not loosen and the driveshaft does not break off when the car is moving.
Now, using a socket wrench, unscrew the bolts that secure the gearbox to the bridge. After all these procedures, you can remove the old unit and install a new one in its place, or a repaired one, and you can adjust the gearbox. Assembly must be done in exactly the reverse order. New oil should be refilled.
The rear axle gearbox is adjusted when a hum occurs in the rear wheels. The cause of the hum may be constant loads on the car or mechanical damage. You should start with a visual inspection of the parts. Bearings, seals, satellites, flanges and axles are removed from the machine. All parts must be washed in kerosene and a visual inspection done. If even one tooth is damaged, the part must be replaced with a new one.
After inspection and replacement of parts, the gearbox is assembled. First, the drive gear with shim, spacer, bearings and flange is installed. To tighten the nut, use a special wrench with a built-in dynamometer. The nut must be tightened to 1 Newton. Next, the driven gear is installed in the differential housing and the bolts are tightened. Now you need to adjust the backlash. Once everything is installed, the nuts should be tightened to the minimum. Next, the driven one rotates, then we check it for the presence of slight play. It is needed as a reserve when the gearbox warms up, so that nothing bursts while driving.
At the final stage, all distances between the bolts holding the nuts are checked. After checking the distances using a caliper, tighten the nuts on the opposite side of the plane to the same amount. At the same time, we constantly check the distances between the bolts; they should not change more than 1.5-2 mm. If everything is in order, the gear play is checked again, it should be the same as we set it. This completes the adjustment.
Can't you spoil the porridge with oil?
Oil is poured into the axle housing up to the lower edge of the filler hole, in the position when the axle is installed and secured to the vehicle. You should not fill oil above this level, since a larger volume significantly increases power loss when the gears rotate and provokes leaks.
Lubrication of gearbox parts occurs as follows. The lower part of the driven wheel and differential are constantly immersed in an oil bath. When the car moves, they rotate, alternately wetting with oil all the teeth of the main gear and differential gears. The differential bearings and the rear pinion bearing are lubricated in the same way. In addition, the teeth of the driven wheel spray oil abundantly, creating “oil mist” in the crankcase. The least amount of oil when splashed goes to the front, most distant, bearing of the drive gear. To lubricate it, a channel is made in the upper part of the crankcase, where, under the influence of centrifugal force, oil is thrown from the outer circumference of the driven wheel. The higher the rotation speed, the more oil enters the channel. This channel leads into the cavity between the bearings of the drive gear, passes through the bearings and returns to the bridge beam. To drain oil from the flange side of the drive gear, there is an oil drain channel in the crankcase. The bearings, due to the conical shape of the rollers, have a pronounced pumping effect, so the flow of oil that flows from the front bearing directly to the oil seal can be quite significant - more than one liter per minute. It is not easy to withstand such pressure, so an oil-removing washer is installed immediately behind the bearing, in front of the oil seal. It slows down the flow rate, but there is still a gap between it and the crankcase through which the oil flows to the oil seal. Therefore, the tightness of the drive gear oil seal is a constant concern for axle designers and manufacturers.
The amount of oil supplied to the oil seal depends on the speed of rotation of the driven wheel of the final drive
But the lack of oil supplied to the oil seal is no less, and perhaps even more harmful to its “health”, because with dry friction against the surface of the flange, no matter how smooth it may be in appearance, the working edge of the oil seal will wear out very quickly, and a gap will form between it and the shaft, through which not only oil can flow out, but also water can flow in if you need to cross a ford or just a deep puddle in a heavy downpour. And water in oil is a very quick “death” for gears and bearings.
When and why to change the front oil seal
The manufacturer recommends replacing the front crankshaft oil seal of VAZ 2101-2107 engines every 150,000 km. However, in practice such replacement has to be performed more often. Accelerated wear of the sealing element and the appearance of engine oil leaks are caused by:
- skewed oil seal during installation;
- loss of elasticity due to engine overheating;
- increased radial runout of the drive pulley of mounted units;
- use of low-quality motor oil;
- wear on the crankshaft pulley hub.
In addition, we cannot rule out hardening of the cuff due to natural aging and the possibility of a manufacturing defect - unfortunately, the quality of parts for rear-wheel drive VAZ models leaves much to be desired.
It is impossible not to notice damage to the sealing element - the rotating pulley scatters oil in the front of the engine and throughout the engine compartment. However, do not think that such a malfunction only leads to oiling of the units and a decrease in the lubricant level. If engine oil gets on the generator belt and other rubber parts, it can quickly render them unusable.
Keep in mind that the appearance of a leak through the engine seals is provoked by another factor - increased crankcase gas pressure. For this reason, be sure to check the cleanliness of the engine ventilation system.
Something else useful for you:
- Replacing the rear crankshaft oil seal of a VAZ 2101-2107 with your own hands
- Replacing valve stem seals: main signs of wear, replacement procedure
- DIY crankshaft bearing replacement for VAZ 2105-2107
Surgery or therapy?
So, our “wounded” axle is leaking oil around the drive gear flange, and we are ready to save it. But first, as is usual with serious doctors, you need to figure out the cause of the “disease.” How does an appointment with a local therapist usually begin? Of course, from measuring temperature and pressure. You may be surprised, but when starting to repair a bridge, we should also remember these physical characteristics. And that's why. During operation, the drive axle gets quite hot - the temperature in the crankcase can reach 80 degrees Celsius. And since, ideally, the axle housing is a sealed container, along with heating in a confined space, the pressure also increases. This is the law of physics. The increased pressure additionally loads all the seals and gaskets of the bridge, breaking out where, for some reason, there is less resistance. This is often the drive gear seal, which is subject to the most intense friction. To reduce pressure, a valve (breather) is installed on the axle housing, which releases excess pressure. Therefore, the first thing you need to start diagnosing a leak is by checking the functionality and cleaning the breather from dirt. The valve cap should rotate freely. When you lightly press the cap from above, it should move freely and return to its original state when the load is removed.
If cleaning the breather does not help, and the leak continues, it’s time to prepare “surgical instruments”. In our case, a regular plumbing kit will be enough, although it would be nice to grab another skein of thread and a hand balance scale (dynamometer) with a good scale.
How much oil is in the gearbox of a VAZ-2107
VAZ-2107 is a car from the classic family of the Togliatti automobile plant, built on the basis of the Fiat 124 and VAZ-2101. A car with a long pedigree, it has established itself primarily as one of the most maintainable and affordable cars in the world. This model is still in demand on the secondary market today; it is bought due to its simple and cheap design. Most repairs in the case of the VAZ-2107 can be completely solved on our own. One of the most common procedures is replacing consumables - for example, selecting and replacing transmission oil. When dealing with this consumable, you need to take into account several parameters in order to select and replace the oil correctly. In this article, we will look at how much oil is needed for a VAZ-2107 manual transmission, as well as how to choose it based on viscosity information, tolerance, types and best brands.
- 1 Replacement frequency
- 2 Check the volume and condition of the oil
- 3 Choice of oil for manual transmission VAZ-2107
- 4 How much to fill
Replacement frequency
Let us draw attention to the fact that the rules for changing transmission oil depend not only on mileage. And yet, first of all, we must proceed from it - for the VAZ-2107 it is 70 thousand kilometers
This indicator may vary depending on the conditions in which the machine is operated.
But in Russian conditions, more frequent replacement of this consumable is most often required. Let us highlight several factors that negatively affect the lifespan of the beneficial properties of the oil:
- Frequent driving on off-road, dusty and polluted areas not provided for in the VAZ-2107 user manual
- Regular driving at high speeds, failure to comply with traffic rules
- The engine almost always runs at high speeds, which causes it to overheat.
- Climate change, temperature changes, precipitation and frost are abruptly replaced by a thaw
As you know, the VAZ-2107 is built on the basis of the Italian model of the same name from the 1960s. Therefore, it is not surprising that the car is not suitable for modern operating conditions or active driving. On the other hand, the “seven” is perfectly adapted to bad roads – from the point of view of comfort, but not endurance. In this regard, in such cases, the manual transmission oil is changed more frequently, preferably every 50-60 thousand kilometers. For preventive purposes, it would also be a good idea to check the volume and condition of the lubricant in advance.
Checking the volume and condition of the oil
You can determine the level of remaining oil in the VAZ-2107 gearbox using a dipstick, as well as available tools. You will need a minimum set of tools. There are Max and Min marks on the dipstick that you need to focus on during testing. So, if the liquid is below the Min level, then a certain volume will need to be introduced until the oil reaches a level not exceeding the Max level, that is, between Max and Min - this is the most optimal level.
If the oil is cloudy and dark and contains sediment, then one additive will not be enough. So, in this situation, you should perform a comprehensive oil change.
Selection of oil for manual transmission VAZ-2107
It is logical that before changing the oil, you first need to study several important parameters
First, let's pay attention to the type of oil - synthetic, semi-synthetic and mineral. For the "seven" you should not spend money on expensive synthetics, and the best option would be semi-synthetics
“Mineralka,” in turn, is recommended for cars with high mileage (you will also have to change the oil more often)
In addition, it is important to pay special attention to the brand, viscosity and tolerances. For the machine in question, you can prefer a product from imported or domestic companies. For example, Shell Spirax S5 oil with viscosity parameters 75W-90 and quality level GL4 or GL5 has proven itself well.
More affordable options include brands Lukoil, Rosneft, G-Energy and others
For example, Shell Spirax S5 oil with viscosity parameters 75W-90 and quality level GL4 or GL5 has proven itself well. More affordable options include the brands Lukoil, Rosneft, G-Energy and others.
How much to fill
Having selected the liquid, you can now decide on the volume. So, for a manual 5-speed gearbox, the standard level is set at 1.6 liters, or 1.3 liters for a 4-speed gearbox - this is exactly how much oil should be filled after the gearbox is completely cleaned of old oil. If you do not do this, you will not be able to enter the full volume.
Tell me, doctor, is there any way to do without surgery?
First of all, you need to drain the oil from the bridge. To do this, we turn out both plugs - both the drain and the filler. Next, disconnect the driveshaft from the bridge. When separating the axle and cardan flanges, be careful - sometimes oil accumulates in the cavity between the flanges. If this happens, then check the axial play of the flange by rocking it along the axis with your hand. There shouldn't be any play. If there is noticeable movement (in fact, play of more than 0.05 mm is already very harmful for the bridge), it is worth once again carefully inspecting the traces of oil on the crankcase. Perhaps the oil leaked not through the cuff, but through the gaps in the splines of the loose flange? In this case, it is worth trying to eliminate the play and observe the bridge in operation. If the leak stops, then that was the reason.
Axial play of the flange is eliminated by tightening the nut. When handling a flange nut, you should always remember that it does more than just hold the flange. This is the most important element in adjusting the drive gear bearings, and improper tightening can have serious consequences, ranging from noise to axle jamming. Having inserted two bolts into the holes of the flange, we insert the mounting between them so that, holding it, we prevent the rotation of the flange when the nut rotates. Pull the nut just enough to select the gap. The thread pitch is 1.25 mm, which means that when you turn the nut one turn, it will move along the axis by the same 1.25 mm. If the flange play is minimal - 0.05 mm, then it is enough to turn the nut 1/25 of a turn, that is, only 15 degrees.
Overtightening the nut loads the drive gear bearings with a large axial force, as a result they overheat and may fail. To be sure that we did everything correctly, we need to measure the moment of resistance to rotation of the drive gear. To do this, you need to remove the rear wheels and brake drums, unscrew the axle shaft mounting bolts and pull off the axle shafts, disengaging them from the differential gears. Then we tightly wind the thread onto the flange shaft and pull its free end with a steelyard, measuring the force at which the flange rotates evenly without jerking or acceleration. A less accurate result is obtained by another method, when the steelyard is hooked to a hole in the flange and also pulled evenly. In this case, care must be taken to ensure that the force is directed perpendicular to the radius of the flange circumference. You can also use a torque wrench, evenly rotating the drive gear shaft by the nut, but with such a movement it is difficult to follow its readings. We multiply the measured force value by the radius value, thereby obtaining the moment of resistance to rotation. The torque value should be in the range of 6–9 kgf.cm.
Torque wrenches usually have a scale marked in Newton meters (N.m). One kilogram-force per centimeter (1 kgf.cm) is equal to 0.098 newton meters, or approximately 0.1 N.m.
You can try to do without removing the axle shafts and measuring the torque on the flange. Experienced mechanics can do this. To do this, tighten the nut exactly until the play is eliminated and a little more. After this, we put the driveshaft in place and make a test drive in a mode sufficient for the bridge to warm up to operating temperatures (several tens of kilometers along a country road). After this, we check by hand the heating of the axle housing in the area of the drive gear bearings. If the hand tolerates heat, then we assume that everything is in order. If the bearings have become so hot that a drop of water on the crankcase hisses, then we have overdone it and now we definitely cannot do without a good adjustment. You cannot reduce the moment of resistance to rotation of the drive gear simply by loosening the nut. The fact is that a deformable spacer sleeve is installed between the bearings, which, when the nut is tightened, gives the structure the necessary rigidity. By tightening the nut, we compressed the bushing more than necessary, and it will no longer be able to lengthen back. When we loosen the nut, the bushing is no longer “spacer”, so it needs to be replaced. You should also pay attention to the bearings. If a blue color appears on the rolling surfaces, it means they have overheated and also require replacement.
How to replace a crosspiece
It is most convenient to change this with the driveshaft removed. Although, if the vehicle’s ground clearance allows it and there is no way to drive it onto a pit or overpass, then you can do it this way, especially in the case of trucks. You can also remove the shaft without a hole. Although it will take much more time, effort and nerves to repair. In the first case, the procedure will be as follows:
- Following safety precautions, you need to block the wheels of the car. After this, you need to engage any gear (so that the driveshaft does not rotate).
- Mark the location of all parts that will be removed relative to each other.
- Unscrew the cardan bolts (secure the shaft to the axle flange). There are four of them.
- Unscrew the suspension bearing mount (two nuts).
- Pull the driveshaft out of the gearbox (there is a splined connection).
Once the shaft is removed, the universal joint spider can be removed. To do this, you will need pliers, a powerful flat-head screwdriver, a hammer and a round attachment (rod, tube). Its diameter should be slightly smaller than the diameter of the eyes in which the ends of the cross are secured. It will be much more convenient to work if you clamp the shaft in a vice.
Next you will need to do the following:
it is necessary to remove the fixing rings that hold the ends of the cross in the eyes. For this operation you need pliers. If the rings are too tight, then you should tap them with a hammer through the adapter so that the cups at the ends of the cross sag a little; After removing the rings, you need to knock the cups out of the eyes. This is done using the same attachment and hammer
It is important to remember that striking the cardan itself is not recommended. In the process of removing the cross in this way, the cup on which the blows are struck will sink inward, and on the other side of the fork the cup will come outward to a certain limit
In some cases, the cups may fall out on their own, but often they need to be pulled out using various suitable tools: pliers, a gas wrench, and so on. All four cups are removed in the same way; When the cross is removed, it is advisable to clean the lugs and the fork itself from dirt using a wire brush. It is recommended to go over the internal surfaces with sandpaper, clean the grooves of the retaining rings and wipe everything well from dust.
It should be separately added that there are special pullers for crosspieces. However, in practice they are used extremely rarely, even in repair conditions at large service stations. Let us add that no special tools are required when replacing the crosspiece, since installing a new part is also not difficult.
The two opposite cups can be easily removed by hand. You must act carefully so that the needle bearing does not crumble. It is important to pay attention to the presence of grease under the cup. The crosspiece is placed between the eyes on the shaft fork, after which the cups are put on. At this stage, they are easily recessed with your fingers as much as possible, and then, using a hammer and adapter, they are lowered so that the grooves of the retaining rings open. Retaining rings are installed. The same operation is performed with the other ends of the cross. Replacement of the cardan cross is complete. Now you can install it back.. As already mentioned, it is not always necessary to carry out this type of car repair
Sometimes lubrication is enough. This can be done without removal if a crosspiece with an oiler is installed - a special hole for introducing lubricant. There is nothing special about how to lubricate the cardan crosspieces. For this procedure you only need a special tool - a syringe. You can fill it with either a special lubricant for crosspieces, or use regular lithol
As already mentioned, it is not always necessary to carry out this type of car repair. Sometimes lubrication is enough. This can be done without removal if a crosspiece with an oiler is installed - a special hole for introducing lubricant. There is nothing special about how to lubricate the cardan crosspieces. For this procedure you only need a special tool - a syringe. You can fill it with either a special lubricant for crosspieces, or use regular lithol.
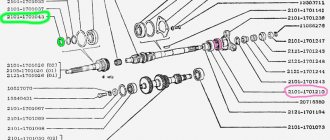
Let's go to the store
So we did everything we could, but the leak didn't stop. This means it's time to change the seal. Actually, according to GOST, these products are called “Reinforced rubber cuffs for shafts.” Or simply - cuffs. If a store offers you a part with that name, don’t be surprised. Factory part designation: 2101–2402052. Further, its variations can be written through a dash: -01, -02 and so on. All of these products are interchangeable and differ in the nuances of their design and manufacturer. Perhaps the most important thing when choosing an oil seal is the manufacturer. Choose products from well-known factories. No name details, in principle, should not attract your attention, because not only according to ours, but also according to Western standards, the cuff must be marked with the manufacturer’s trademark, cuff size, and type of material. Domestic GOST also provides for marking the year of manufacture. As a rule, these are two digits of the year when the mold was made, and next to them are dots, each of which indicates one year of operation of this equipment. You count the points, add their number with the numbers and find out in what year your part was manufactured. The year of manufacture is important because over time, any rubber compound “ages”, losing its shape and elasticity .
The type of mixture from which the oil seal is made is also important. The most expensive and most durable is fluorine rubber. It works well in aggressive environments and at high temperatures. It is usually marked with the Latin letters FBR. Nitrile butadiene rubber (NBR) is considered optimal in terms of price and quality for automobile transmissions. ACM acrylate polymer seals are also available, but they are usually used in components that should not be directly exposed to water. Chemists are constantly improving their products, so the fundamental differences between mixtures are becoming less and less, due to additives introduced into them that improve the weaknesses of certain recipes. Read reviews on the Internet, listen to the seller’s recommendations and make a decision based on your financial capabilities.
When examining externally, first of all pay attention to the quality of the working edge: it should be even and smooth around the entire circumference. You can use a magnifying glass. It will be a big plus for the gearbox seal to have an external boot - like a second edge, but without a spring and with a hole of a slightly larger diameter. The boot, as the name suggests, protects the work area from dust and dirt. The presence of an inclined notch on the boot or near the working edge indicates that the oil seal is designed for shafts rotating in the same direction.
Problems when paying with bank cards
Sometimes difficulties may arise when paying with Visa/MasterCard bank cards. The most common of them:
- There is a restriction on the card for paying for online purchases
- A plastic card is not intended for making payments online.
- The plastic card is not activated for making payments online.
- There are not enough funds on the plastic card.
In order to solve these problems, you need to call or write to the technical support of the bank where you are served. Bank specialists will help you resolve them and make payments.
That's basically it. The entire process of paying for a book in PDF format on car repair on our website takes 1-2 minutes.
If you still have any questions, you can ask them using the feedback form, or write us an email at
“Quiet, the operation is underway!” or Replacing the rear axle gearbox seal on a VAZ 2107
The sequence of work when replacing the gearbox seal is as follows:
- We measure and record the moment of resistance to rotation of the flange (the axle shafts must be removed!) .
- Unscrew the flange nut.
- Remove the flange from the shaft splines.
- Using expansion pliers, remove the oil seal. If you don't have pliers, you can pry it off with a screwdriver. Be careful not to damage the surface of the socket.
- We inspect the flange. If its surface has a pronounced groove in the place where the working edge of the oil seal rubbed, then before installing the new oil seal, insert a washer 1 mm thick into the socket. If the flange is damaged on the working surface, replace it with a new one.
- Lubricate the outer surface of the oil seal with lithol and carefully drive it into the crankcase socket using a mandrel of suitable diameter. If there is no mandrel, press in the oil seal by evenly tapping the end along the circumference of the outer diameter. Make sure that there are no distortions - the working edge should be strictly perpendicular to the shaft axis.
- We inspect the lead-in chamfer on the flange. It should not have defects that could damage the working edge. We install the flange, avoiding sudden movements and impacts, so as not to knock the spring off the oil seal. Before installation, you can lubricate the flange chamfer with transmission oil to make the process easier.
- We tighten the nut, periodically checking the moment of resistance to rotation of the flange. Remember that at the end of the tightening, the resistance in the bearings increases much more intensely than at the beginning . The moment of resistance to rotation should be 1–2 kgf.cm greater than what we recorded before unscrewing the nut. In any case, if the moment exceeded 9 kgf.cm, and the bearings in the bridge were still old, remove the flange again, take out the inner ring of the bearing and change the spacer sleeve. If the bearings are new (new means they have not traveled a single kilometer, because after a hundred kilometers they can be considered old for adjustment purposes), then the normal moment of resistance to rotation after tightening the nut for them should be in the range of 16–20 kgf. cm. Replacing the rear bearing will affect gear alignment, so please refer to the appropriate manual for this procedure .
To prevent self-loosening, the flange nut has a special plastic insert, which, when crushed against the thread, creates additional resistance both when screwing and unscrewing. As a rule, such nuts can withstand up to ten unscrewings without losing their locking properties. If in doubt, get a new nut.
We reinstall the axle shafts and brake drums, screw on the driveshaft, and fill in the oil. We make a test drive and if everything is in order, we enjoy life, until we suddenly find a treacherous spot under the bridge again...
Cardan shaft outboard bearing
During vehicle operation, the driveshaft and crosspiece are subject to increased load, so it is not surprising that this unit often fails, requiring appropriate repairs and replacement. In this article we will tell you how to change the crosspiece on a VAZ 2107. At first glance, such repairs may seem like a complex and time-consuming job, but in reality, using a high-quality tool, every car owner can do such work, which will allow you to significantly save on the maintenance and repair of your car. car.
Symptoms of failure
The main sign of damage to the driveshaft crosspiece is the appearance of knocking sounds in the area of the bridge when starting to move and changing gears. You can determine the breakdown by carrying out the simplest diagnostics of the car, for which you drive it into a pit or overpass, after which you loosen the driveshaft up and down and left and right with your hands. If there is noticeable play in the crosspiece, then it is necessary to replace this unit. Repairs should not be delayed, since a failed crosspiece quickly leads to damage to the outboard bearings, and such work is expensive, and it is not possible to do it yourself. Therefore, at the first sign of damage to the crosspiece, it should be replaced.
Necessary tool
To complete this job you will need the following tool:
- Sets of socket and open-end wrenches.
- Hammer.
- Tweezers and screwdriver.
- Bronze knockout.
- Metal brush.
Step-by-step description of the process of replacing the cross
As mentioned above, these works are not particularly difficult, so every car owner can cope with them. We will tell you step by step how to change the crosspiece on the cardan shaft of a VAZ 2107. All parts removed from the driveshaft must be marked with a chalk or chisel, which will simplify their installation later when reassembling such units.
You will need to remove the driveshaft, for which, using a 13mm wrench, unscrew the two nuts that secure it to the car body.
We unscrew the rear part of the cardan, which is attached to the rear axle shank with four bolts.
The next stage of work involves directly removing the cardan. You need to thoroughly clean the metal elements with a metal brush, which will remove rust and possible contamination. It is necessary to remove the cardan using pliers, which makes it possible to remove the retaining rings and easily remove the cross. In the absence of such special pliers, you can use a screwdriver and pliers. When doing this work, do not be afraid to bend the retaining rings, since new clamps will be used in the future.
To knock out the cups of the cross, you will need to use a drift and a hammer. A wooden block should be placed under the cardan eye. You can knock out the crosspiece as follows. First, carefully hit the lower cup of the cross with a hammer, and at the same time make sure that the needle bearing does not rest against the floor. After this, we take a drift and hit it on the upper cup, which will knock out the lower bearing, and you can easily remove the cross.
Having knocked out the crosspiece, you should carefully clean its seat with a metal brush, after which you usually begin assembling a new crosspiece and installing it in the cardan.
It is necessary to lubricate the bearings of the new cross with the appropriate composition, and then install this unit into the propeller shaft in the reverse order. The crosspiece is inserted into the eyes of the cardan, and only after that the bearing cups are carefully fixed. Watch the bearing needles, which must remain stationary.
Having installed the bearings, we fix the crosspiece on both sides with retaining rings. All you have to do is install the assembled crosspiece in place, then carefully tighten the bolts and check the correct assembly. The crosspiece and all elements must be assembled in full accordance with the pre-made marks. Remember that if this element is assembled incorrectly, increased vibrations may occur, to eliminate which you will have to contact a repair shop.