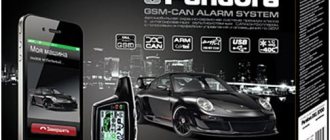
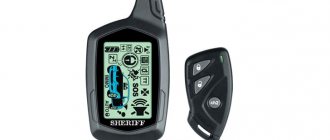
5BTX925LCD is not an alarm model, but the name of the sheriff's security system remote control. The key fob is used in the Sheriff ZX-925 anti-theft systems. On the main body of the pager there is a display and five keys for using the functions:
- insert (ARM) - symbol of a closed lock;
- disarming (DISARMING) - open lock emblem;
- programmable channel control key - standard CH2;
- additional channel control button - written CH3;
- turning off the light and sound alarm on the key fob - sign F.
Sheriff 5BTX925LCD instructions will be given below.
Download the complete instructions.
How to open and close a car
The main functions of the Sheriff 5BTX925LCD remote control are arming and disarming the vehicle. To arm your car, proceed as follows.
- Briefly press button 1.
- This will be followed by a one-time activation of the side lights and siren.
- The LED on the antenna module will flash slowly.
To disarm the vehicle, press button 2.
- The LED will go off.
- The side lights will flash twice.
- The siren will sound twice.
In addition, the following functions can be controlled from the remote control:
- turning on and off the panic mode;
- car search;
- “Silent firmware” and disarmament;
- Anti-high-jack, etc.
User manual
To activate the vehicle protection mode, you need to briefly press the button with the locked lock icon. To unlock the car, use a button with an image of an unlocked lock. When the re-arrangement function is activated, a 20-second timer is activated; If the door limit switch does not open within the specified period of time, the security mode is reactivated.
The instructions provide a description of the additional mode of passive arming.
After unlocking and locking the doors, the timer starts, after 30 seconds the car will be taken under protection (if the driver does not turn on the power unit).
Simultaneous activation of the passive switching and resetting functions is not possible. Pressing the buttons with the locked lock symbol and the text CH2 (simultaneously for 2 seconds) turns on the car search mode in the parking lot. The car's exterior lighting lamps flash 5 times, no sound signals are emitted.
To activate the “Panic” mode, use the CH2 and CH3 buttons (press together for 2 seconds). The siren is activated on the machine and the external light alarm is turned on, after 30 seconds the signaling stops. It is possible to turn off the mode early by repeatedly pressing the CH2 and CH3 buttons. Double short press on the CH2 and CH3 keys allows you to turn off the siren (when the security mode is active). When re-arming, the siren is activated automatically.
To activate the security mode with complete disabling of sensors, press the button with the symbol of a locked lock, and then press the key labeled CH3. After the buzzer sounds, CH3 is pressed again. When the warning or main zone of the shock sensor is triggered, the siren does not sound.
Programming a new key fob pager
If the anti-theft transponder code is to be registered, turn off its power before proceeding. To attach a key fob to the security alarm control unit, disarm the car using a command from the key fob or by entering the code using the “Jack” button. When using a secret password, the pager is paired using the following algorithm.
- Turn the ignition on and off. Turn it on again.
- By pressing the “Jack” button, enter the first digit of the personal code (the number of presses is the first value of the password).
- Turn the ignition off and on again.
- Using the Jack key, enter the second code value.
- Turn the ignition off and on again. A beep will sound.
- Click on Jack three times. There will be a long squeak of the siren.
- Press the 1st button of the first switch. A squeak will follow.
- Repeat the previous step for the remaining remote controls.
- Turn on the transponder. A siren will sound indicating successful actions. Turn off the device.
- To exit programming mode, turn off the ignition or do nothing for eight seconds. A long and short beep will sound. The LED indicator will turn off.
- Check the transponder.
with INCREASED RANGE...
Sheriff, Zx-925 sheriff (with
- Image
- Text
SHERIFF
ZX-925 SHERIFF
(With
EXTENDED RANGE)
CAR SECURITY SYSTEM WITH SIX
SERVICE CHANNELS WITH REPROGRAMMABLE
OPERATION LOGIC, INTERACTIVE LCD PAGER,
SYSTEMS OF PASSIVE AND ACTIVE PROTECTION AGAINST THEFT AND CAR hijacking
INSTRUCTIONS FOR USE
IMPORTANT!
The system has six independent (two of them are remotely controlled) functionally reprogrammable channels. These are six physical wire lines with programmable
logic of operation, providing flexible changes in system functions to control
turning off turbocharged engines (turbo timer), searching for a car in a parking lot, remotely turning off the system siren in “NIGHT” mode with a control channel for an additional pager or mobile communication device, car security service with running
engine without an ignition key, control of additional devices according to specified
time intervals.
An interactive pager (five-button two-way communication key fob) provides real reception of signals confirming the execution of a command by the system. During one security cycle, the system provides information about each triggered sensor on the LCD display of the two-way communication key fob.
To ensure the highest level of protection for your vehicle, this security system
The theme has a programmable manual shutdown function. In some cases, for example
when the system remote control key fob transmitter is lost or does not work (or perhaps your transmitter key fob is blocked by the device’s powerful radio emissions
type "jammer"), you may need to manually install or manually remove the system
from security. Read the sections “Manually arming the system” and “Manually disabling
security system”, which describe in detail the procedures for arming and disarming the system in such a situation. In addition, this manual contains a table in one section of which the system functions are used, including the selected shutdown method.
system, and additional equipment installed in the vehicle. Although the “Secret Code” function is not programmed by default (to disable the system, you must
you can enter a personal code), the switch can also be selected to disable the system
Valet. See what method was programmed to shut down your system,
and review it in the appropriate section of this manual.
If the F13 “Secret Code” function is programmed, then recording the codes of new key fobs,
changing the secret code, changing the status of programmed functions from F12 to F28, emergency disarming of the system, turning off the system when triggered in modes
Anti-Hi-Jack is only possible after entering the secret code! Changing Function Settings
F1 to F11 does not require entering a secret code and is always available.
Prepared by AutoSet. Car alarms and car electronics.
www.AutoSet.ru
Flashing an old 5BTX 925 LCD switch
Each action must be completed within five seconds. If this time is not met, the system will exit setup mode. Start registering key fobs by disabling the anti-theft transponder. So, keep an eye on specific points.
- Disarm the car. Turn on the ignition.
- Click "Jack" three times. A beep will sound.
- Press and hold the 1st button on the first remote until you hear a long beep to confirm registration. The LED flashes rarely.
- Repeat the previous step for the remaining remote devices.
- Check the transponder. The siren will sound. Turn off the switch.
- Exit setup mode by turning the ignition off or without pressing anything for eight seconds. A short and long siren sound will be heard. The LED will go off.
- Turn on the transponder.
Table of contents
Page 2
- Image
- Text
Table of contents
Standard System Features 3 Programmable System Features 4
Controlling the operation of the ZX system - 9 2 5 SHERIFF
4
Functions of the transmitter key fob buttons 4 Low battery indicator, battery replacement 6 ZX system control commands - 9 2 5 SHERIFF from the transmitter key fob 7 Programming the operating modes of the two-way communication key fob transmitter 10 Confirmation signals of the ZX system two-way communication key fob - 9 2 5 SHERIFF 11 Modes operation of the security system LED indicator 12 Siren signals 12
Operating modes of vehicle side lights 12
Additional commands for arming the system
12
Passive (automatic) arming of the system 12 Manual arming of the system 13
Car protection in security mode
13
Car protection when the security mode is on 13 Car protection when the security mode is on and the engine is running 14 Warning signals about an attempt to break into the car 14 Anti-Hi-Jack mode (protection against theft and seizure of the car)
[for all VAZ cars with an electronic speed sensor)
14
Disabling Anti-Hi-Jack mode 15 Passive engine blocking (immobilizer function F17)
15
AV FUNCTION - disarming the system in two stages 16 Active protection against car theft and hijacking in monitoring mode when
engine running (active anti-robbery transponder) - function F14 16
Disabling the system
18
Valet push-button switch 18 Valet mode (temporarily disabling the system) - on/off 19 Manually disabling the security system using the Valet switch 19 Disabling the system using a personal code 19
Additional service functions for system management
20
Additional (emergency) call from a pager 20 Automatic door locking when the ignition is turned on (function F 3 / 2) 20 Automatic door locking when the vehicle starts moving (function F 3 / 3)
(for all VAZ cars with an electronic speed sensor) 20
Automatic door locking when the vehicle's STOP pedal is pressed [function F3/4). .20 Automatic door unlocking when the ignition is turned off (function F4) 20 Remote control of additional devices (CH 2) 21 Remote control of additional devices (CH 3)
21
Remote control of additional devices (CH 4) 21 Remote control of additional devices (CH 5) 21 Remote control of additional devices (CH 6) 22 Turbo timer function .. 22 Remote control of the siren (on/off, night mode of operation of the system 22
System programming
…………………………………………………………………………….23
Programming a personal code for disabling the system 23 Programming codes for new transmitters (anti-robbery transponders) 23 Programming system functions 25
Table of programmable functions of the ZX system - 9 2 5 SHERIFF
26
2 8
System Installation Guide.
— 2 —
Prepared by AutoSet. Car alarms and car electronics.
www.AutoSet.ru
Why doesn't the alarm remote control work?
You notice that the keychain has stopped responding to your actions. One solution to this problem is to reprogram the remote device. But I can't flash the remote control. Let's look at the reasons preventing this:
- low battery. Replace the battery;
- damage to the contacts inside the remote control. Repair it yourself or contact a service center;
- exposure to interference that interrupts the connection between the remote control and the control panel. Move the machine to another location.
Specifications
Technical parameters of the product Sheriff ZX-900:
- voltage in the power supply circuit of the head unit - from 9 to 15 V;
- power consumption - up to 20 mA;
- permissible current in circuits of additional channels: 0.5-1.0 A;
- current strength in the siren line - up to 2 A;
- current in the light signaling and central locking circuits - up to 15 A;
- command transmission distance by communicator - up to 550 m;
- range of the auxiliary transmitter - up to 20 m;
- frequency range of the remote controls is 433.92 MHz.
The Sheriff communicator with 5 buttons is designed to use an AAA battery (voltage 1.5 V), which is installed in a compartment protected by a lid. The device is equipped with a unit for monitoring the degree of battery discharge; the display shows the battery status. When the charge decreases, the icon begins to blink, and then the red control diode turns on.
Equipment
The security complex was supplied to customers in the form of a set of parts packed in cardboard containers, including:
- head unit equipped with a controller and relay contact units;
- main communicator with 5 buttons and LCD screen;
- backup transmitter (with 4 keys);
- external module with antenna and status indicator;
- sensor for measuring impact force (adjustable);
- Valet switch (with separate cable);
- trunk lid contact sensor;
- a set of connecting cables with plugs and fuses;
- additional relay for blocking engine start circuits;
- technical documentation for installation and use.
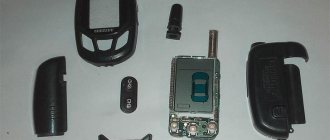
How to remove the body of the Sheriff 5btx925lcd key fob
To disassemble the keychain, you will need: a small Phillips screwdriver, a small napkin, a knife or a thin plate. Follow the instructions to remove the remote control housing.
- Return the keychain to you.
- Open the battery compartment cover. Remove the battery.
- There is a self-tapping screw in the battery niche. Unscrew it.
- Use a knife or narrow plate to pry up the center of the casing.
- Carefully separate the pager in half.
- When finished, reassemble the keychain in reverse order.
Possible problems and their solutions
If the equipment does not respond to the key fob, then you need to check the condition of the battery. The cause of the defect may be destruction of the key mechanisms or failure of the communicator controller due to moisture. To determine the cause of the breakdown, you need to disassemble the device; in case of irreversible damage, you will need to purchase a new remote control.
To disassemble the communicator, you need to remove the battery and then unscrew the small screw hidden in the depths of the niche. To separate the halves of the body, a plastic plate is used, which is inserted into the middle part of the device
Then you need to carefully unfasten the latches located around the perimeter of the case. The removed elements are washed with alcohol, damaged components are replaced independently or in the conditions of a service that repairs electronics.
If the receivers and transmitters located in the remote control and the car are out of sync, you need to re-enter the device code. To enter the setup mode, triple-click the programming switch (with the ignition on). After sound and light alarms are given, the security button is pressed, after entering the code into memory, a siren signal is given and the control diode on the transmitting unit turns on. The remaining remote controls are entered in the same way; no more than 5 seconds should pass between steps.
Incorrect operation of the security system is observed when the switching harnesses or system components are damaged. Cable testing is carried out with a test device, damaged sections must be replaced. Determination of the causes of malfunction of electronic units is carried out at a service center. Since alarm production has been discontinued, if the processor module or transceiver fails, a new security system will have to be installed.
Remote engine start. Commands and functions
Engine start control in the ZX 1070 system
The automatic engine start function is built into the safety system and is not a removable part. All connections must be made to start the engine cables to the vehicle's on-board circuit that control the engine starting function according to the diagram in the installation instructions.
When using engine tachometer control mode, do not forget to program
hot engine idling!
General enable/disable remote boot
The engine start command is performed by pressing button 3 (CH2) on the system remote control twice for 2 seconds. If all conditions are met to allow the engine to start, it will start. Forced shutdown of engine starting is carried out by repeatedly pressing the button twice 3 (CH2) of the remote control transmitters. Engine operation indicator: key fob - flashing indie smoke rollers, wrench and steering wheel; system - dimensions are constantly active.
Setting the system operating time in automatic startup mode (SF3 function)
Installed with remote control or programming functions according to the table.
Press the F button twice. Switch to selection mode, when the LED flashes, press the button
with F, only the selected flashing indicator will remain on the screen. The blinking speed of the indicator is equal to the engine operating time previously selected in automatic start mode.
Using buttons 1 and 2 you can select the desired time. Flashes steadily - 10 minutes Two flashes, pause - 20 minutes Three flashes, pause - 30 minutes Four flashes, pause - 60 minutes Press the F button again to activate the selected hour. If the mode was programmed successfully, the indicator will go out and the remote control will blink twice
autograph pictograms.
Cyclic start control (SF6 function)
Installed with remote control or programming functions according to the table.
The system offers the ability to automatically start the engine at certain intervals
time (1, 2, 4 or 12 hours) within 48 hours, as well as remote start, stop and adjustment to increase the engine starting frequency using the remote control or transmitter program commands by changing the intervals in the SF6 function. The engine operating time is determined by the set temperature in SF3 or the stop temperature in SF5.
In manual transmission engine control mode, start the engine and follow the correct exit procedure.
Sheriff security systems that contain numbers starting from 1000 in the model name always have an automatic start function. According to reviews from car owners, there are no questions about the functioning of the functions and their correctness.
The exception is automatic execution. All Sheriff alarms are complex programmable devices that monitor and store events from various inputs and channels.
Turbo timer option and “Sheriff” signaling
As stated in the instructions provided by the manufacturer, you first need to determine where contact “15/1” is located in the car. It is this contact that receives voltage when the ignition is turned on, as well as when the starter is started. The “IGN1” cord coming from the main signal connector is connected to contact “15/1”. And then, if a turbo timer will be used, connect the “IGN2” cord:
The switching relay, controlled by one of the programmable outputs, will close for 3 minutes (option F1). The relay coil is connected to the Disarm output, but channel CH6 can also be used.
Now see what the instructions say about programming the following two pins: CH5, Disarm. Only the second of them can control the relay, the contacts of which duplicate the turbo timer:
Channel CH6 is also provided to implement the timer. This means that it is better to leave the default values. If required, you can connect a blocking relay to the Disarm output, and a pager (alarm transmitter) is connected to wire CH5.
In theory, a car alarm can be equipped with two Disarm outputs, from which they control not one normally open relay, but a set of them. Program the system as you need it.
Starting and stopping the engine using the key fob
ATTENTION! I found a completely simple way to reduce fuel consumption! You do not believe me? Even a mechanic with 15 years of experience didn’t believe it until he tried it. Now save 35,000 rubles a year on gasoline! Know more"
Once the alarm is installed and connected, it's time to ask questions. Considering what the Sheriff autostart is capable of, it’s worth starting with the simplest. When using for the first time, you need to know that most sheriff models activate the passive operating mode by pressing the CH2 button. For this you will need:
- Stay;
- There is no need to lock the car;
- Put it on the handbrake;
- Press the CH2 button twice.
A short beep will indicate that the engine can be turned off, and a flashing icon will also appear on the key fob. The key is then removed from the ignition (this anti-theft system sets the starter timing to 0.6 seconds, which is important for automatic starting), and you can leave the car.
Once out, press the door lock button, pressing this button again will turn off the car. Some car owners recommend setting the furnace to the lowest temperature to make remote starting easier, and then driving the already warmed car, reducing warm-up time.
You can now start the car by double clicking CH2. It is also convenient that the listed operations can be performed from both the main and additional remote control. The automatic execution time is approximately two seconds. To force autostart to be disabled by pressing CH2 twice when starting the engine, press the same button two more times.
Functions
Alarm functionality ZX-925:
- separate buttons for turning security on and off;
- protection when the engine is running;
- remote activation and deactivation of the siren;
- manual arming or disabling of security using a programming button;
- silent security mode;
- remote control of shock sensor;
- bypass the faulty zone;
- displaying the status of the security system on the communicator display;
- built-in trigger memory;
- ability to control the trunk lid lock;
- remote start of the power plant.
Is there autostart?
The auto-start function is not provided by the alarm design. It is possible to implement remote start through additional equipment that is connected to the CH2 channel output. It is also necessary to provide a device to bypass the standard immobilizer installed in the ignition switch.
Advantages and disadvantages
Equipment advantages:
- feedback is provided;
- low cost.
Alarm disadvantages noted in owner reviews:
- lack of original spare parts due to discontinuation of production;
- rapid discharge of the battery in the communicator;
- the security algorithm used is revealed by scanners;
- loss of connection with the car;
- small range of remote controls.
Autostart at time intervals or at specified temperature
If you want to regulate engine starting at certain intervals, you must:
- Press F twice;
- Switch to indicator flashing mode;
- After pressing the same button again, only the selected indicator will remain;
- The frequency of its flickering indicates a previously established cycle:
- No blinking indicates that the function is disabled;
- Regular flashing: cycle lasts one hour;
- Two flashes and a pause - a two-hour cycle;
- Three flashes and a pause - four hours;
- Four flashes and a pause - twelve hours.
Using the lock button, you can activate this function and continue pressing to adjust the time interval value. Using the door open button, you can disable the option, which will be indicated by the indicator stopping blinking. To make the selected state active, press F. Correct programming of the mode will be reflected in the permanent presence of the indicator icon. The option can be enabled or disabled in any state: ARM or DISARM.
Automatic temperature start has an absolutely identical algorithm, with the only difference being that the cycle corresponds to +5, 0, -5, -10, -15 and -20 degrees Celsius. As in the case of one-time autorun, the system state is not affected.
Alarm programming according to the table
The design of the Sheriff ZX 925 system provides several programmable outputs and one programmable input. This refers to the CH2-4, CH6 cords, as well as the INST2 signal cable:
The first chapter looked at what to do with the CH5 and Disarm (ARM with a bar) outputs. The diagram shown here is a screenshot of the manufacturer's instructions. You can follow it, or implement your own version.
Programmable Options Table
For Sheriff ZX 925 signaling, the number of options is 28. The table printed in the basic manual explains each option:
By connecting the INST2 cable to the speedometer output, set function F16 to “2”. First, another value will be set - “ground fault monitoring”. Choose one thing.
For circuits CH6 and CH3, the maximum current is 1A. Also, the Sheriff signaling of this model is equipped with low-current outputs connected to a relay. Using them, install the diode.
Entering programming mode
To program the system, make sure that the security mode is not active. While inside the car, follow these steps:
- Turn on the ignition;
- Before 3 seconds have passed, press the Valet service button three times (the siren will sound);
- Turn the key to ACC or OFF for domestic cars;
- After a short signal, quickly turn on the ignition, the indicator (LED) will start flashing.
To set the value, press the "locked" key. The number of signals will correspond to the new state.
The option number is selected by pressing the Valet button. Everything is standard here.
Let’s say that when you go to options with numbers above 12, the system exits the service mode. This means that programming protection has been activated. In Sheriff ZX 925 alarms, this protection is disabled by default. Here's a workaround:
- The key is moved along the ON-ACC-ON marks;
- Press Valet 1 time;
- The key is turned to the ACC mark, then to the ON mark;
- Press Valet again;
- Repeat “step 3”, go to “step 2” of the top list.
If in the fifth step you do not hear a signal, it means that a code has been set, which you need to find out from the owner. The code consists of two numbers, dialed with the Valet button when performing steps 2/4. We wish you success.
Possible problems with autorun
- A situation arises when the engine does not start.
When the start signal is given, the engine does not start. This could be due to startup requirements not being met. The system will respond with light and sound signals, and the error that occurs will be stored in its memory. You can identify this problem in diagnostic mode.
Error signal decoding table.
- Refusal to start the engine or stop immediately after starting.
If all starting requirements are met, but a malfunction is received or the engine runs for up to 5 minutes. In this case, the system will try to boot automatically. In total, the system makes four attempts, after which an error code is sent to the system memory, which corresponds to it and can be detected when working in diagnostic mode. Repeating the remote engine start will initiate a new starting procedure.
- Panel clicks and flashes when machine is muted
Indicates an incorrect installation of the security alarm; To solve this problem, it is best to seek qualified help. This may not be a characteristic of the alarm model or vehicle.
- Inability to activate automatic start
The car does not autostart if the alarm installation was performed incorrectly or the autostart conditions were not met.
Selecting the optimal option, programming
Let's turn to the instructions and look at the diagram, which shows what exactly the contacts of the additional relay should close:
How to connect the turbo timer relay
The Sheriff ZX 900 signaling system has a turbo timer initially. The duration of its operation is regulated by option F1. Wires IGN1 and IGN2, shown in the diagram, must be included in the car's ignition wire. The IGN1 cord, when connected to a standard lock, is connected to terminal “15” (not shown in the diagram). It turns out that it remains to consider what the winding of your relay should be connected to. Which is done in the next chapter.
Connecting the turbo timer relay coil
Let's say you have a 30 amp normally open relay and need to implement a turbo timer. Then, when choosing a control output to connect the relay coil, follow the algorithm:
- If both a pager and a lock are used, one channel can control the behavior of the turbo timer relay - CH6 (set option F24);
- If blocking is not needed, it is better to connect the winding to a black wire with a white stripe (program option F22);
- Even when using blocking, you can do as indicated in point “2”, but then the blocking relay is connected to the “gray” wire (CH5).
Note that the Sheriff 5btx900lcd alarm system is initially configured as follows: output CH5 must control another blocking relay (N.R.). To control the pager, configure option F22.
The wiring diagrams for the winding contacts look simple:
Connecting the turbo timer relay to the signaling system
These diagrams are not included in the instructions, but they are generally accepted. Everything that applies to electrical equipment is also true for Sheriff signals. Use the circuits by installing any low-current diode. The voltage value on it does not exceed 16 Volts.
Signal programming
Having opened the instructions, you can immediately find a table of programmable options:
Signal key fobs keys
If function F13 is still assigned the value “code”, programming the Sheriff ZX 900 system is done as follows:
- You need to disable the security mode and turn on the ignition;
- The Valet button is pressed a certain number of times equal to the first digit of the code;
- The ignition is turned off and on again;
- Repeat “step 2” for the second value;
- The ignition is turned off and on, then proceed to “step 3” from the previous sequence.
Pay attention to the important options: duration of the turbo timer (F1), assignment of the INST2 input (F16) and everything that is indicated in the text. It is clear that service functions are indicated by numbers whose value exceeds “13”
And everything that is less than 13 is user options, and nothing more.
Note that by turning off the ignition, the owner can interrupt the operation of the turbo timer at any time. To do this, press the “3” key on the key fob twice.
How to install
The instructions for the ZX-900 recommend adhering to the following installation sequence:
- Unpack the alarm, connect the components, and then apply power from the car battery for a preliminary test of functionality.
- Install the processor unit in the cabin, ensuring good fastening to the structural elements.
- Place switches under the trunk or hood lid that determine the position of the elements.
- Screw the sound alarm to the engine bulkhead (it is permissible to use a product with an autonomous power source).
- Stick the antenna unit onto the upper edge of the windshield.
- Lay the cable and secure the hidden switch. The unit is located in a quick access area from the driver's seat.
- Screw the shock sensor to the engine shield on the passenger side of the car. Provide unobstructed access to the part to adjust sensitivity.
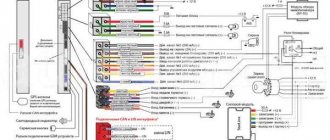
- Connect the elements with the wiring harnesses supplied by the manufacturer. The connection is made in accordance with the diagrams from the documentation. The alarm system is equipped with a built-in controller that implements the central locking function.
How to connect?
Alarm Starline A61 setting the time on the key fob
Let's consider connecting a 12-pin connector using the example of model 2500:
The white contact is pulsed and is used to connect the turning lights of the car. The wire is connected to the positive output. The red contact must be protected by a 15 Amp fuse. This output is necessary to provide power to the built-in power circuits, we are talking about the side lights of the car. The red contact with the white stripe must be protected with a 5 Amp fuse. This output is necessary to provide power to the main electrical circuits of the anti-theft installation. The black and white output is used to provide power to the siren. The white wire is connected to the black strip of the red contact of the siren. The black output connected to the siren must be connected to ground, that is, the body of the car. The black contact is used for the power supply input, this element is connected to ground
It is important not to confuse this wiring with the black contact of the antenna adapter. The latter is connected to the control module separately. The dark blue output is the contact of the second channel CH2
This element is a low current resistor contact and should be used to activate an external relay. This output must not be connected to the luggage lock opening circuit or to the input of the remote start elements, otherwise the central unit may be damaged. The contact is connected to output number 86 of the relay. The dark green contact is used to connect the negative polarity limit switches of the tailgate and hood. It is important that the switches are connected to ground, that is, the ground of the machine. The purple contact is used as an input for connecting door limit switches with positive polarity. The output is connected to one of the limit switches on the doors. It is not necessary to connect it to all elements, since on most machines the switches are connected in parallel. If the car uses limit switches with negative polarity, then there is no need to connect the purple contact to them. The brown output is used as an input for connecting door limit switches with negative polarity. The yellow contact is an input for connecting the ignition electrical circuits. This output must be connected to the electrical circuit of the lock that receives 12 Volts, provided that the key is located in the ignition or starter position. Before connecting, you need to make sure that the standard electrical circuit of the machine is not supplied with power if the key is in the off position. Orange output – pulse contact with negative polarity. This circuit is used to control the operation of the starter disable relay. The output must be connected to relay contact number 86. To do this, connect contact 85 from the relay to the car’s ignition circuit, which receives 12 Volt power if the key is installed in the lock in the ignition or starter position.
Connection diagram
About connection and programming
Car alarm with feedback scher-khan logicar 3
Consider the part of the circuit where the “power connector” is shown:
The “red-blue” cord receives power for the “dimensions”, and then it is switched inside the main unit. And the current flowing through the “red” wire is switched by 4 built-in relays (see figure). The standard circuit protection with the “red” wire should be rated at 30 Amps or less. Everyone knows how to connect every cable except the “purple” one. But it is useless to connect the “purple cord” to the “15/2” terminal, if we talk about standard locks. Options for its connection are discussed below.
Let's understand the purpose of the 6th contact
The text of the instructions indicates that the “IGN3” contact can either duplicate the “IGN1” terminal, or it is used to control additional equipment. The latter in this case includes:
- Starter protection line: current enters it after the engine starts, and the line breaks simultaneously with the ignition being turned off. Note that when starting from the key, the line remains open.
- From the “IGN3” terminal you can remove the voltage used to emulate pressing the brake or clutch. The option is in demand if installations with a “START/STOP” button are equipped with autostart.
- The “IGN3” wire can receive a pulse that coincides in time with the end of the motor operation in the security mode. The pulse duration is controlled by software.
You will need to choose one from several algorithms. What is done even before connecting the wire itself, but after installing the signaling in the car.
If there is a terminal that duplicates the “IGN1” contact, it must be used to control the crawler, which allows you to “deceive” the standard immobilizer and start the engine. This statement is common, but in this case it is not true. The ZX-1070 alarm, for example, is equipped with a separate output, indicated in the first diagram by the abbreviation “Immo”. By the way, the algorithm can be configured in different ways, and in the instructions it is designated as “CH4”.
For anyone who doubts what was said above, here is a screenshot of the basic guide.
Let us note once again: in the diagram, the crawler’s output is indicated by the abbreviation “Immo”. In the table, the same wire is called the “CH4 line”.
Typical user mistakes
The design of the Sheriff system, equipped with auto-start, provides for the following protection: if the engine was started automatically, then switching to alarm mode will result in its shutdown. Everything looks logical here, but now let’s look at another situation when theft protection is not active. In the “disarmed” mode, the engine can be started at any time. But if you open the door when the engine is already turned off by the system, this feature will be canceled. The latter is true for cars with a manual transmission, and bypassing this protection is easy:
- After unlocking the door, the engine is started “with the key”;
- The ignition is turned off, the “correct exit” procedure is repeated again (see above).
This is what the features of Sheriff brand alarms look like.
The system stores error codes caused by the owner and related to autostart in its memory. The decoding of all codes is given in the basic instructions:
To find out what the last error code is, you need to switch the system to programming mode. We are talking about programming options related only to autorun and not related to protection functions. How to enable this mode is described in the manufacturer's instructions. Here you should read the next chapter.
Software system setup
So, let all connections be made according to the basic diagram. Cord “6” coming out of the “power terminal block” can remain free. Let's open the instructions and see how to program options related to autorun:
- The system is disarmed and the ignition is turned on;
- Within 5 seconds, the Valet service button is pressed 3 times;
- After the sound signal, the Valet button is pressed again;
- The ignition is turned off within 5 seconds, and after the sound signals are turned on again.
Types and characteristics of models
Let's look at the most popular models of anti-theft systems among consumers:
- Sheriff with automatic start. The main feature of this anti-theft system is the ability to automatically start the car’s power unit remotely. This function is especially convenient in winter, since the driver can warm up the engine and interior of the car in advance, while at home. The “alarm” kit includes a key fob with two-way communication, which allows you to monitor the condition of the car. The cost of such anti-theft systems will be from 5 thousand rubles and more.
- Anti-theft installation Sheriff with feedback. The central processor installed in the car exchanges data with the control panel via a secure channel. As a result, the car owner will always know the condition of the car. All data on protection and impact on the body are displayed on the remote control screen. The cost of models with two-way communication averages from three thousand rubles.
- The APS-2500 model should be highlighted separately. This is a multifunctional security system equipped with a two-level sensitivity controller. It is possible to connect an additional sensor and channels for data transmission. If it is necessary to perform an emergency shutdown or activate the anti-theft system while the power unit is operating, you can use a PIN code. You can find this model on the market for 1800 rubles.
- Model ZX-750. Another alarm system with two-way communication. The main feature is that the maximum range of operation between the control module and the remote control is up to two kilometers. The anti-theft installation can monitor the operation of the light alarm. The average cost is from 4,500 rubles. The price may vary depending on the store and region where the alarm is purchased.
- BTX 5900LCD. This model belongs to the premium segment of the market and is positioned by the manufacturer as a business class alarm system. It has extensive functionality; you can configure remote engine start and automatic switching on of lights in the car interior. The average cost of the system is 6 thousand rubles.
- TX-35PRO. The system is equipped with a two-channel receiver, as well as a two-level shock controller. You can configure the device to work with four remote controls. The price of this alarm model is from 3 thousand rubles on average.
- APS-2600. The system belongs to the budget segment of the market, its average cost is about two thousand rubles. The alarm has no feedback; the kit includes two key fobs without a display. However, this alarm model allows you to effectively protect your car from burglary thanks to the included immobilizer, as well as a two-level shock sensor.
- The APS95LCD alarm has a feedback function. Signals are transmitted between the system and the remote control via a secure channel, which eliminates the possibility of impulses being intercepted by intruders. The shock controller can be adjusted to reduce or increase sensitivity. The presence of “Panic” and “Anti-grabber” modes allows you to ensure reliable system protection. The car owner can independently reprogram the anti-theft system. It is possible to automatically start the engine. This “alarm” differs from its predecessors in the design of the remote control. The cost of the alarm system is from 3 thousand rubles.
- Sheriff ZX-1070. This model of anti-theft installation is considered one of the most budget options. The package includes an upgraded remote control, and if necessary, you can configure the start of the power unit remotely. One of the varieties of this system is the Sheriff ZX-925 model. The fundamental difference is the presence of a special code intended for emergency unlocking of the system. The average cost of a car alarm is 2,500 rubles.
- ZX-900. The system is recognized as the most successful modification among the entire model range. Some market experts classify this “alarm” as a premium segment due to the large number of useful functions and capabilities. The alarm system is developed on the basis of the ZX-725 anti-theft installation. The car owner can independently program many options, including activating the lights in the car's interior. The average cost is from three thousand rubles.