Lada "Granta" liftback
– the machine is new, available in a wide range of technical equipment.
An improved transmission, a modified suspension, and a range of standard engines and gearboxes have so far satisfied the user. That's why tuning the Lada Granta Liftback
mainly concerns the exterior of the car.
However, adherents of technical improvement of cars have something to contribute to in the Lada “Granta” liftback
.
Initial engine tuning
Having bought a brand new car, it’s unlikely that you should immediately start rebuilding the engine. Let your Granta run in, get used to the loads, and get the rubbing pairs to work in. Perhaps after running it in, you will find the dynamic characteristics of the car ideal! Or maybe factory defects that are covered by the warranty will manifest themselves. However, something needs to be done in any case.
A zero-resistance air filter makes it easier for the car to “breathe.” The increase in oxygen in combustion chambers with such a filter is 3-6%, depending on engine speed. Power output also increases proportionally.
A few more percent of the power of your “Grant” is given by a tuning kit for the exhaust tract. An exhaust manifold with pipes of increased cross-section of the 4-2-1 formula facilitates ventilation of the cylinders and reduces resistance to the movement of exhaust gases.
A pair of smartly sparkling mufflers with exhaust pipes scorched by engine flames complete the job. With them, your car will become both more beautiful and faster!
Pay attention to chip tuning of
Lada Granta Liftback!
Reflashing the car computer makes it possible to optimize the interaction between the driver and the car. After reflashing, the car will meet your expectations and your driving style as closely as possible. At the same time, fuel consumption will be slightly reduced, and power will increase noticeably.
An electronic gas pedal is a useful thing, but not all Lad models are installed by the factory. Mounted before chip tuning
on the Lada “Granta” liftback,
the electronic pedal will give the control unit the ability to accurately respond to the driver’s commands. Using an electronic pedal, the driver can dose the force developed by the engine with pinpoint precision. Which again has a beneficial effect on fuel consumption!
Advanced models of electronic pedals include a control unit with mode switching. By equipping the Granta with a similar device (see the article on the page https://www.autodela.ru/main/top/diy/lada-granta-tuning), you will be able to change the operating mode of the vehicle’s control complex according to your needs.
Deep tuning of the Lada "Granta" liftback engine
may include installation of a forged piston group, boring of cylinders, “feeding” the engine using a turbine and a nitrogen accelerator. It is better to carry out such procedures in combination, since turbocharging a production engine sharply increases the risk of piston destruction under extreme loads. Installing expensive forged piston parts without increasing the performance of the fuel supply system is also of little meaning.
It should be noted that increasing engine power entails the need to strengthen the braking system, modify the transmission and suspension. Otherwise, you won’t have long to enjoy the champion agility of the Lada “Grant” liftback
.
External tuning of Lada "Granta" liftback
Exterior tuning of Lada "Granta" liftback
you can start with the wings, replacing the standard metal body parts with more expressive ones made of durable ABS plastic.
By installing polymer fenders you will not only improve the appearance of your car, but also free yourself from worries about fighting corrosion. Plastic is known to not rust and withstand low-intensity shock loads well. The chopped air intake line of the tuned wing will add
sporty agility and healthy aggressiveness Lada
Granta Liftback
While future owners of the updated Lada Granta meticulously study the car’s exterior, arguing about the features of the serial configurations, fans of automotive originality are not sitting idly by. “A non-general facial expression” is what every car needs, including the beautiful Lada “Granta” liftback
!
Various options for molding the front bumper and radiator grille, made in the studio by
Lada Granta Liftback
tuning , already today surpass the laconic factory design!
The front bumper, designed in the “I’m a Robot” style, is especially popular among fans of a dynamic driving style. Having received a new body kit, the front of the car becomes expressive (and even a little flashy), expressive and aerodynamic.
Thanks to the large air intake located in the central part of the bumper, the engine and braking system of the front wheels receive additional cooling, which is so necessary during active driving.
The options for modifying the front body kit, made by auto design professionals, look even more worthy, giving the middle-class car a discreet solidity. “Narrowed eyes” create the impression of philosophical sophistication and unshakable calm. But it is precisely these qualities that road users in every corner of our country lack so much!
In the white version of the body paint, the car with the same radiator grille shape takes on a somewhat sleepy appearance, but large structural elements improve the perception of the design. The unclouded “look” gives the car an air of interest and openness. A positive attitude is in every feature of the appearance of white Granta Liftback!
Useful little things shape your appearance
The overall appearance of the Lada "Grant" liftback
worked out quite carefully by the designers.
The silhouette of the model compares favorably with the sedan that preceded it. That's why tuning the Lada Granta Liftback with your own hands
often affects small but important elements of the car's appearance.
A small lip spoiler fits onto the rear edge of the trunk lid “like a native one.” By slightly increasing the size of the body, the tuning part noticeably improves the aerodynamics of the rear of the car and really helps keep the rear window clean. Note that such an addition fits perfectly with both the rest of the body elements and the design of the model as a whole.
A visually pleasing and undoubtedly practical tuning addition to the Lada
Grant and Liftback are
stylish roof rails, specially designed for the new body. There is no need to drill into the roof to install Grant roof rails! Tuning parts are offered in two color options: silver and black, and are designed for installation in standard trunk mounting locations.
By purchasing and installing durable aerodynamic cross members yourself, you can easily transport any long cargo weighing up to 50 kg on the roof.
Let's play big! Let's sing at the top of our voices!
When a music lover buys a car, he buys a mobile concert hall. More precisely, Liftback tuning makes the Lada “Grant”
– but the masters have room to turn around! The car is spacious, there is enough space for equipment. Turning rear doors into sound speakers is both expensive and difficult, but with a responsible attitude, the result is impressive.
Widening the track of a production car is not so easy: serious work is required on the suspension and drive. Overlay elements of the wheel arches turn an ordinary car into a racing car. “Multiplied” and modified exhaust pipes look like the nozzles of a spaceship. A stylish bumper ties together all the elements of the car's engineering and design. This is what comprehensive tuning means: the car both sounds and races like a rocket!
Cigarette lighter selection
Not many motorists and Lada Granta owners know that in addition to the standard VAZ cigarette lighter, there are several more analogues of this part.
Let's look at the catalog numbers and names of the spare parts:
- The original article number for the cigarette lighter is divided into 3 parts: 1. Movable part of the cigarette lighter (21230-3725200-00); 2. Cigarette lighter socket (21230-3725100-00); 3. Cigarette lighter illumination ring (21230-3725400-00). As you can see from the catalog number, the Lada Granta has a part from the Niva Taiga installed.
- An alternative to the standard Granta cigarette lighter can be the manufactured part (DA5100F0109).
Both parts fit perfectly into the seat and do not require modifications or modifications to the fastening.
Reasons for cigarette lighter failure
There are several reasons for the failure of the Lada Grant cigarette lighter:
- Short circuit caused by a failure of the on-board network.
- Actions of the passenger or driver that caused the part to break.
- Wear.
Ways to understate Liftback Grants
- Buying an air suspension on a Lada. The average cost is from 37 to 50 thousand rubles, depending on the place of purchase and technical characteristics.
- Front and rear suspension kit with mechanical ride height adjuster. If necessary, we independently adjust the suspension height, reduce (increase) the stiffness of the shock absorbers.
- The most cost effective option is to install a lowered suspension kit. We dismantle the standard shock absorbers and springs and install new ones on the factory mounts. The lowered Lada Granta is ready.
- Low-profile tires: changing the car's shoes to a low-profile range. Cheap and cheerful, but not advisable.
- Installation of lowering springs, which are sold at retail. We select the height according to the ground clearance.
- Trimming one or two coils on factory springs.
Practical advice
Be sure to buy only high-quality certified products for upgrading your car’s suspension. It is important to understand that upgrading a vehicle’s chassis improves the car’s handling and behavior on the road, however, this can significantly reduce the comfort inside the car. If you have not encountered such problems before, consult with specialists before purchasing elements to improve your suspension. Do not make major changes to the chassis design yourself to avoid negative consequences. It is important to select suspension elements so that they are comparable to each other and suitable for the model of your vehicle. For non-professionals, it is important to modernize the suspension progressively
Thus, after installing each improved element, you can check its operation. If the unit is operating correctly, you can continue working, otherwise correct the error immediately.
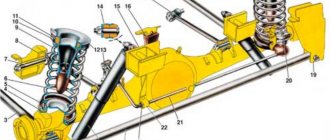
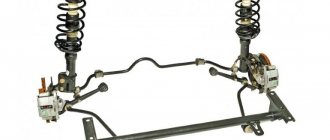
Front suspension "Lada Grants"
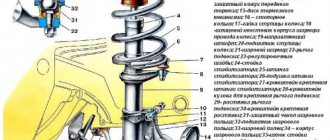
It has an independent suspension with wishbones and a stabilizer bar. Damping of vibrations is carried out by hydraulic shock absorbers. The main structural element is the stand. It includes a swivel bearing, shock absorber and spring. The latter uses coils of variable diameter. The spring itself is made of a metal rod with a circular cross-section. It can have variable and constant hardness.
The front suspension of the Lada Granta is designed so that the lower part of the strut rests on the steering knuckle. When the wheels turn, the spring and shock absorber rotate with it. The stand itself remains motionless. Thus, the engineers achieved an increase in the service life of the elastic element while maintaining the inlet hole in the shock absorber body.
The pillar support has also been improved. Suspension creaking on the Lada Granta appears much less frequently than on Kalinas and Priors. To reduce roll, the design includes a stabilizer bar. It is made of spring steel. The stabilizer is installed with its ends to the lower suspension arms. Its middle part is fixed to the body.
FakeHeader
Comments 27
With cocked hats it will shake a lot on bumps or am I mistaken?
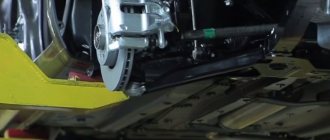
The factory protection is installed with these levers and a spacer in place of the crabs? Thank you.
The protection is different, the factory boot will no longer fit. My pleasure.
And with a damper, the power steering does not swell - additional effort from it on the power steering?
I drove 10,000 km with it. I haven't heard of such a problem.
Not a problem - it’s just that, in fact, the power amplifier + will overcome the resistance of the damper. Accordingly, increasing the load means the unit will fail faster. My opinion from a sofa expert
It seems to me that the crab spreader does not give much in the same place and is so rigid. Or not? I agree between the levers.
Here is information from the website specifically for this spacer: Improving vehicle handling. Possibility of adjusting the longitudinal inclination of the wheel axis within a wider range. Increasing wheel stabilization by setting the caster angle to 1.5-2 degrees or more. Reducing the minimum turning radius. Reducing the longitudinal movement of the front wheels. The wheels do not touch the arches when braking. Possibility of using wheels of larger diameter. Improving vehicle passive safety. Increased rigidity of the body as a whole and suspension mounting points. Reducing body loads during dynamic acceleration and braking
The car suspension is designed to level the movement on any type of road surface and provide comfort for the driver and passengers. The presence of vibration for a long time negatively affects all components and assemblies of the car - bolted and screw connections are weakened. Serious consequences include bent door hinges, sagging doors, and loose closure of the hood and trunk.
The chassis of the Lada Granta has become more modern and modernized. Especially in comparison with previous AvtoVAZ models - two generations of Samara and first generation Kalina. The car has rear and front suspensions, which differ significantly from each other.
The rear suspension of the Grant is the same for the sedan and liftback. In fact, this is the same beam with springs and shock absorbers that is installed on Kalina, Samara and Samara 2. Instead of a stabilizer, a beam is used, which means the structure is dependent.
Sequence of actions when replacing the front shock absorbers of a Lada Granta with your own hands
We prepare a set of tools, rags, WD-40 fluid, a set of new racks, and other components for related repairs.
- We place the car within the perimeter of the repair area, jack it up, and secure the rear row of wheels with wheel chocks;
- We remove the wheel, disconnect the tie rod end, the ball joint;
- We loosen the rod (key to “9”), while holding the main nut to “22”;
- With a key set to “13”, unscrew the three nuts securing the upper support;
- In order to minimize the violation of the camber angle - wheel toe, we use a chisel to mark the relative placement of the steering knuckle and the bracket;
- Unscrew the bolts at the bottom of the fastening (key set to “17”);
- We remove the Grant shock absorber assembly;
- Use a puller to compress the spring several turns.
We replace the Granta racks and assemble the elements in the reverse order. At the same time, we carry out troubleshooting and replace worn-out consumables with new ones (anthers, bumpers). Don’t forget to visit a service station and have your wheel alignment adjusted. Otherwise, the tires will wear out faster. Motorists at a number of service stations prefer replacing the shock absorber assembly, as opposed to partial repairs. The cost of the service is a third less than the price of a new rack, but no one guarantees the serviceability of the accompanying elements. Ultimately, the cost of purchasing consumables will increase.
Removing the shock strut assembly with the steering knuckle
We carry out the work on a lift or inspection ditch.
Loosen the front wheel mounting bolts.
We remove the hub cap, unscrew the hub mounting nut with a 30mm socket and remove the washer.
Remove the front wheel.
We unscrew the nine screws and two bolts securing the engine mudguard and remove the middle engine mudguard.
Using pliers, undo the cotter pin and use a 19mm wrench to unscrew the nut 3 (Figure 2) securing the ball pin of the outer tie rod end 1.
We press the ball pin out of the swing arm 2 of the front suspension strut.
Using a 19mm socket, unscrew nut 3, Figure 3, securing the ball pin to the lower arm of the front suspension and press ball pin 2 out of lever 4 (article - Repair, removal of the ball joint).
Using a TORX E8 socket, unscrew the bolt securing the speed sensor (if the car has ABS) to the bracket on the steering knuckle and remove the sensor from the bracket.
We remove the sensor harness from the guide bracket on the front suspension strut.
Unscrew and remove the pad guide with the caliper and cylinder assembly.
We tie the bracket to the brake hose bracket (Figure 4).
We remove the outer CV joint from the wheel hub and fix it in a suspended state using a wire or a technological hook.
If after removing the shock strut you need to disassemble it, then use a 22mm spanner to loosen the tightening of the rod nut (Fig. 5), holding the rod from turning with a 6mm hexagon.
Using a 13 socket, unscrew the three nuts 2, Figure 5, securing the upper support of the telescopic strut 1 to the mudguard 3 of the body and remove the washers.
Remove the strut assembly with the steering knuckle and ball pin.
Remove the lower support from the upper support 1, Figure 6.
Installing the shock strut assembly with the steering knuckle
Install the speed sensor bracket onto the steering knuckle and secure it with a bolt. Bolt tightening torque 7 – 15 Nm.
We install the lower support on the upper support of the rack.
When installing the lower support, the direction of the arrow on it must coincide with the arrow on the upper support. On the left support to the right of the hole, on the right - to the left.
When installing the rack into the car body, the arrow on the support should be oriented in the direction of travel of the car.
We install the strut assembly with the steering knuckle, brake and ball pin into the car body, install the washers and tighten the three nuts securing the strut to the body mudguard. Nut tightening torque 20…24 Nm (2.0…2.4 kgf.m)
We insert the splined part of the outer drive joint into the wheel hub, put on the washer and tighten, without tightening, the new wheel hub nut.
We press the ball pin into the suspension arm and tighten the nut securing the ball pin. The tightening torque of the nut is 67…82 Nm (6.7…8.2 kgf.m).
We thread the front wheel speed sensor harness into the guide bracket of the front suspension strut, install the sensor in the sensor bracket and secure it with a bolt. The bolt tightening torque is 6…9 Nm (0.6…0.9 kgf.m).
Before installing the speed sensor, apply lubricant (LSTs-15 lubricant) to the surface of the mating hole.
We press the ball pin of the tie rod end into the swing arm of the front suspension strut and tighten the nut securing the ball pin. The tightening torque of the nut is 28…34 Nm (2.8…3.4 kgf.m).
We tighten the nut. If the cutout of the nut does not coincide with the hole in the ball pin, retighten the nut to an angle of no more than 60˚ to ensure cotter pinning.
Install the wheel and tighten it without tightening the front wheel mounting bolts.
We lower the car, tighten and lock the front wheel hub fastening nut, deforming the locking belt of the nut into the grooves of the shank of the outer drive joint housing. We install wheel caps. The tightening torque of the nut is 230 - 250 Nm (23 - 25 kgf.m).
Tighten the front wheel mounting bolts. The tightening torque of the bolts is 76 – 92 Nm. Install the engine splash guard.
Auto steering rack
The main adjustment of the rack occurs at the manufacturer's factory. You must remember: once you start using the car, you can no longer tighten the rack yourself. This is due to the fact that the special spring is almost completely worn out over time. All these factors create a lot of extraneous sounds in the car, to remove which it is necessary to replace a special disc spring.
The most favorable thing about this procedure is the fact that the rail itself does not need to be uninstalled. But extraneous sounds can appear in the car even if the rack and front suspension are fully operational.
Finances decide
There are six people in the family: me and my wife, two children and my wife’s parents. The old “penny” car could no longer cope with servicing such a large family, and one day it was decided to purchase a second car.
I bought Grant two and a half years ago. One of the decisive factors was the budget - it was necessary to keep within 5 thousand euros (at that time 370,000 rubles). For this money you could buy an old foreign car, at least ten years old. But I decided to go a different route - I found a one-year-old Granta in a “luxury” configuration. The car was in almost perfect condition.
Kinematics
Here things are a little different. Many people ask whether it doesn’t matter how the wheels behave, the main thing is that they don’t fly off, and then I’ll get to the finish line. No!
If the kinematics are bad, the only way is to increase stiffness and reduce suspension travel. This can be achieved by installing short springs with maximum rigidity. The ground clearance (landing) will be lower, the load during dynamic acceleration, sharp braking and sharp turns will be distributed and control will improve. There is also one point here. A stiff spring is not a panacea for all ills, especially if you have “stock” silent blocks that are always dangling and allowing the wheels to roll on the planes. It is better to change them to polyurethane ones, but it is even better to install steel hinges. I think it’s not worth mentioning the installation of braces on both axles, in this case the suspension acquires a “multi-link” effect and relieves the car of understeer.
Important! After making the changes, you should make a wheel alignment with a negative angle of the rear wheels to give better stability in corners. Usually the wheels get the so-called “house” look
Owner reviews of the Granta suspension
The opinions of motorists are largely similar. They note a number of advantages of the suspension system:
- for Russian roads it has a strong and reliable design;
- at very low temperatures it does not freeze and works out all the irregularities;
- capable of “swallowing” even deep holes without much damage;
- The car does not pull to the side at high speed when driving on the highway.
There are also disadvantages:
- the suspension is not soft and smooth;
- Unlike Logan, with which the Grant is often compared, the chassis is clearly stiffer.
In general, this is the same suspension system from the “nine” with minor changes, but for the Russian automotive industry this is a big step forward. Especially when you consider that the condition of the vehicle depends entirely on your driving style.
The unpretentiousness, simplicity and reliability of the chassis are the pride of Granta. There is one minus: the suspension with negative caster of the front wheels, front anti-roll bar and negative camber of the rear wheels is installed exclusively in modifications above the basic one - “Norma”, “Lux”. For owners of the “Standard” configuration, a suspension option borrowed from Kalina is provided.
Modernization of suspension systems
1. For front suspension:
2. For the rear suspension, the springs were strengthened and gas-filled shock absorbers were installed. It is worth noting that factory tuning of the suspension is combined with improved sound insulation of the car. With this modification, the car feels quite comfortable on the road up to 150 km/h, while coping well with cornering on almost any road surface.
A detailed analysis of the reliability of the suspension for the Lada Granta liftback is quite difficult to carry out. This is due to the short life of the car. Life tests of the machine are still ahead. However, based on reviews from owners and the results of warranty and service maintenance of these cars, we can characterize the main faults:
- loosening the anti-roll bar fixing bolts;
- failure of hydraulic shock absorbers (after 60-80 thousand km), leakage of shock absorbers;
- wear (increased clearance) of the front wheel bearings, which causes accelerated wear of the silent blocks of the levers;
- loss of spring stiffness (especially for springs with a smaller diameter);
- wear of the ball joints of the front suspension.
- the appearance of squeaks in the place where the shock absorber strut is attached;
- shock absorber failure;
- violation of wheel alignment angles, including due to violation of the adjustment of the clearance of the hub bearings or their destruction;
- Damage to the shock absorber protective covers.
This approach can easily be justified by the increased costs of deferred repairs. Worn bearings will place increased load on ball joints, rubber bushings of levers, and cause disruption of the alignment angles of the front wheels. Over time, the tires will begin to wear out faster. A sagging spring will not only lead to possible damage to the bumper on the first high curb. The shock absorber will wear out faster, and the car will lose comfort at high speeds.
Removing the rear suspension shock absorber strut on a Lada Granta car is done to replace a sagging or burst spring, as well as to replace the shock absorber itself or repair it if it is dismountable and you have the appropriate repair kit.
Prepare a standard set of tools and perform the following sequence of actions:
Inside the car, fold down the back of the rear seat and use a flat screwdriver to pry off the rubber plug of the shock absorber strut cup.
We remove the rubber plug, then use a socket and a regular open-end wrench to unscrew the nut of the upper fastening of the shock absorber rod to the car body.
- We install stops under the front wheels and hang the rear part of the body, remove the wheel from the side being repaired.
- Unscrew the nut of the bolt securing the lower shock absorber to the rear beam bracket.
- We remove the lower end of the rack from the bracket and remove it along with the spring.
Remove the spring from the shock absorber along with its rubber spacer. Next, remove the bushing and lower cushion along with the boot from the rod. All rubber elements must be replaced if the rubber has lost its elasticity, is severely cracked, or has other defects. Don't forget to remove the rubber compression buffer from the boot.
Having completed the necessary repairs or replacement of worn elements, we proceed to install the rack. The installation sequence is carried out in the reverse order of removal
First of all, using insulating tape, fix the rubber spacer on the upper end of the spring.
We put the spring on the strut so that its end fits neatly into the corresponding groove of the shock absorber support cup.
When installing, make sure that the lower end of the spring faces the wheel. At this point, the repair work on removing and installing the rear suspension shock absorber strut on the VAZ 2190 has been completed
At this point, the repair work on removing and installing the rear suspension shock absorber strut on the VAZ 2190 has been completed.
Sources
- https://vashalada.ru/mashiny/lada-granta/podveska-lada-granta.html
- https://1ladagranta.ru/harakteristiki/podveska-osobennosti.html
- https://remladavaz.ru/snyatie-i-ustanovka-stojki-amortizatora-zadnej-podveski-lada-granta
Transmission
Common problems
All cars are strictly front-wheel drive, and the only thing you need to keep an eye on is the CV joint. Here they are not eternal, but you can count on 150-200 thousand service life with any engine. The main thing is not to turn the “nickels” in reverse and not to pull trailers. Well, constantly check the integrity of the covers - they are weak, the clamps on them often rot within 5 years.
Mechanical boxes
The main types of gearboxes for Grant are 2110, the old gearbox with rod drive, and the new 2181 with cable drive. Structurally, they are very different, primarily due to the transfer of the gear selection mechanism to the top of the new box and a completely new housing. Unfortunately, the old Soviet method of saving is used here: optimize it so that there is no safety margin at all, but save 50 grams of aluminum. And the fashionable imported bearings turned out to be not at all as good as planned. But I'm getting ahead of myself...
The manual transmission 2110\1118 is fiercely disliked by everyone who left the front-wheel drive VAZ for something better. It has a permanently loose gear selection mechanism, constant leaks and lost oil levels, and there is no safety margin for bearings, shafts, synchronizers and, what is especially sad, the housing either.
The design essentially goes back to the 2108 box, which was designed as a maximum for a 1.5 carburetor engine. The lower location of the gear selection mechanism and the splash lubrication system make the box quite large, with a bunch of seals in the lower part, which is poorly compatible with the subframes. In addition, by the time Granta appeared, the production equipment was very worn out, so the geometry of the housings and even the shafts floated.
As a result, a howl, an unpredictable resource, an eternally dead synchronizer for the second and almost certainly third gears. Well, and also the play of the gearbox handle with a very rough understanding of which gear you are switching off, and vibrations. You can drive, but the service life until the first bulkheads is about 100-150 thousand kilometers maximum, you need to keep an eye on the oil.
Not only everyone can repair a manual transmission well. This is an unexpectedly difficult task if you need to control the geometry of the case - there simply aren’t enough tools. And simply reassembling with new spare parts of unknown quality usually leads to repeated repairs almost immediately. You need to have a good understanding of the design and spare parts, and have a good set of equipment so that the repair is guaranteed to be successful. It’s even better to buy a new one assembled, since there are a lot of them produced and, again, they are inexpensive.
The new gearbox of the 2181 series is formally better than even Renov’s JR5 from Logan: there are fewer backlashes, it’s more compact, there are no strange solutions. In addition, it was originally made for larger flywheels and clutches. In practice, the housing was made without a safety margin for promising motors; imported bearings did not help solve the howling problem completely, but failures of bearings and shafts became more frequent. But two goals were definitely achieved: the cabin became quieter with the new bearings, and the cable drive transmits much less vibration and howling into the cabin.
Until 2016, the “reinforced” second gear synchronizer paradoxically failed more often than the old one that was not reinforced. Some of the boxes were modified to match the old version of the design. Later the quality of the synchronizers was improved.
Ina's sealed bearings suddenly weren't as good as expected. It’s interesting that at the first sign of howling, lubricating the bearing helped. Well, then only replacement of the assembly, since the sizes are quite common and are included in the range of almost all bearing brands.
A broken pin in the gear selection mechanism is not the biggest problem, since the mechanism can be purchased assembled. As, indeed, the box. The price of 18-20 thousand rubles for a new one against the backdrop of 200 or more for foreign cars and even Logan’s is simply a gift from heaven. Many owners of older versions of manual transmissions change them to 2180 and 2181, and not only on Grant, but on everything up to 2108.
Automatic boxes
The automatic transmission here is the most complete. Renault-Nissan allocated quotas from the master's shoulder for the old Jatco JF414E box. The unit is very respectable, the design is essentially lightweight relative to the more “powerful” Jatco RE4F03A automatic transmissions from the 90s, but formally the gearbox itself is quite new, produced only since 2010. And they installed it not only on VAZs and Datsuns, but also on the latest Nissan Almera and March for the Japanese market with 0.9-1.6 liter engines.
On the Lada Granta, the most problematic element at first turned out to be the front shaft bearing 56x85x25mm, also known as KBC F-846067.01, and the rest suffered, including the differential bearings. To increase efficiency, the box was assembled on ball bearings. It would seem great, but the unit was assembled in China, by Chinese hands, and the bearings were not always of high quality and installed correctly.
To be fair, the situation was corrected quite quickly; cars produced after the end of 2013 no longer needed to be repaired en masse with bearings. But you should monitor the sounds from the box and the amount of shavings on the tray magnets very carefully. If the box overheats or the oil is heavily contaminated, the chances of damage to this bearing are increased. The replacement work is quite complicated; the box is removed and disassembled almost entirely. And if you pull, then the remaining bearings suffer - they are of the open type, as well as all the speed sensors and valve body solenoids.
The second weak point is the cooling system of the box with a heat exchanger; it allows the oil to overheat to 130+ degrees, which leads to its rapid aging and clogging of the internal filter by 100 thousand kilometers.
The designers placed the automatic transmission control unit behind the left headlight, on the wing flange. Actually in the wheel arch. About the quality of the wiring, we will have to repeat the thesis from the first part of the material: the one who designs the wiring for the VAZ is clearly a sent-in Cossack from Hyundai, since the wiring is in a non-sealed corrugation, and is even wrapped in rag non-moisture resistant electrical tape at the connectors. As a result, everything that can rot in the terminal block rots there, although the wires themselves hold up well: such troubles as on Volkswagens, when the wire rots in the middle, do not occur. Only if there are visible signs of abrasion will there be problems with the conductor.
If you change the oil at least once every 60 thousand and avoid overheating, then the box will last over 250 thousand mileage. The gas turbine blocking lining here is almost wear-resistant, in the mechanical part, except for the bearing, except that the clutches can be scorched by too vigorous starts. And fans of their cars install an additional radiator to reduce the oil temperature, especially if the engine is forced.
Less popular are the versions with the AMT robot. Essentially this is an option with a manual transmission of the 2181 series, but with automatic switching. Experience in operating such a system on a Lada Vesta has shown that the system is quite functional, but there is no need to demand from it the capabilities of a classic automatic transmission with a torque converter.
The reliability of such solutions is unexpectedly good both in terms of the clutch life and the life of the actuators. Clutches usually last more than a hundred thousand miles, and the manual transmission itself lasts even longer than in the “manual” version, except that the second gear synchronizer fails more often.
The main thing is not to forget to add lubricant to the clutch drive gearbox more often; initially there is almost no lubricant there, and the creaking appears very early. And it is needed because the spring rubs against the plastic cracker, the guide, damper and hinges rub, and the gearbox worm creaks. Too much lubricant is harmful, so you will have to repeat the operation every 20-40 thousand kilometers. And it is better not to remove the actuator along with the bracket; in this case, you will have to “train” the clutch due to a change in the engagement point. You will need a scanner that can do this. In principle, there is free software, but not very well implemented, like ddt4all and other fan projects.
“Tuning” in the form of a grease nipple embedded in the body can be found, but an abundance of lubricant can have a bad effect on the plastic, and even in winter, grease will interfere with the mechanism’s operation. In addition, during the lubrication procedure, wear products are cleaned out, and so they will not be removed from the working area.
Finally, it is worth adding that the AMT control unit is located exactly in the same place as in hydromechanical gearboxes, and the bunch of problems is approximately the same.
Shock absorber
This element is a damping device. The shock absorber serves to reduce the range of vibrations of the car body. In other words, the element prevents spontaneous rocking. The work of the shock absorber is based on hydraulic resistance. Inside it there is a liquid of a certain viscosity. It moves through a special valve. Thus, the device absorbs sharp impacts while preserving vulnerable suspension parts. Therefore, the shock absorber is one of the most important components in the chassis. On our roads, this element lasts about 60-80 thousand kilometers. But this period may be shorter, even with careful driving. It is enough just to damage the protective boot, and all the dirt will accumulate in the rod seal.
The rear shock absorbers suffer the most wear because they have much longer stroke. When driving quickly through potholes, the hydraulic fluid may simply boil. This is one of the reasons why a shock absorber fails. But most often it leaks - the valve loses its tightness due to a strong breakdown or impact. As a result, the outer side of the cylinder becomes coated with an oily liquid. How to determine that this element has failed? It’s very simple - you will hear a characteristic knock in the suspension of the Lada Granta. Moreover, it is clearly visible in the cabin. From the outside, you can hardly hear a broken shock absorber. This knock is so strong that even good music cannot interrupt it. You will hear a broken shock absorber immediately.
Also note that the damping element changes in pairs. That is, in the event of a breakdown of the rear left shock absorber, the rear right shock absorber also changes. As for the front struts, they are more durable. Often they are replaced already assembled with a spring, since they fail no earlier than after 150-200 thousand kilometers.
Causes of knocking in the front suspension
In total, there are four main reasons why noises and squeaks can annoy the Lada Kalina car owner, and three of them can be eliminated independently and everything can be returned to a safe state.
- The first reason why knocking occurs in the suspension is the poor quality of the road surface. A suspension that is in good working order can also produce some extraneous noise. If the noise disappears when you drive onto a good road, then everything is fine with your suspension, you can move on to the point below.
- If knocking and simultaneous vibration occur in the steering wheel, the reason may lie in a faulty steering rack. If you can tighten the steering rack yourself, then it is better to entrust its repair or replacement to professionals.
- The third reason is the front suspension strut spring that has lost its elasticity. Since the spring tone is significantly reduced, the suspension hits directly against the body. How to change the front struts, and along with it the spring, is described in detail in this article.
- And the last reason is cracked silent blocks, which are simply necessary to thoroughly dampen knocks and vibrations that occur while driving. Read below for information on how to properly replace these front suspension elements.
Damping
The shock absorber serves as a damper, and the smoother it allows the spring to straighten after passing an unevenness, the more stable the car will be. It is worth considering a couple of nuances. It is necessary to take into account the spring stiffness and the severity of the unsprung mass. Based on this, choose a shock absorber. There are two options:
- Progressive
- Degressive
Progressive works great on small bumps at high speeds and is completely useless on larger ones. However, they almost completely neutralize the vibration of the car at long waves.
Degressive, makes the car “knocked down”, responds well to “taxiing”, repeating the trajectory of the road surface. This is due to the fact that degressive shock absorbers start working sharply from the very beginning and calm down at the end. You should choose based on the condition of the roads in the region, the weight and dynamics of the car.
Basic faults
To recognize faults in the chassis of the Lada Granta, it is not necessary to seek help from specialists. Problems can be easily identified on your own. The main suspension faults are presented in the table:
| When the car is moving, a knocking sound is heard from the suspension | |
| Hydraulic shock absorbers are faulty | Repair racks or replace them |
| The bolts that secure the anti-roll bar have become loose. Rubber cushions worn out | Tighten bolts and replace heavily worn pads |
| Unreliable fastening of the upper strut support to the body | Tighten the support nut |
| The rubber bushing of the shock absorber mount is worn or damaged | Replace part |
| Severe wear on the hinges of the suspension linkage system, damage to the braces or stabilizer | Replace worn and damaged parts |
| The ball joint of the lever is badly worn | Install a new ball joint |
| The spring sank, the coils were broken | Replace both springs |
| The shock absorber rod stroke buffer is damaged | Set new buffer |
| Steering wheel imbalance | Balance all wheels |
| Oil smudges on the rack | |
| The shock absorber seal is badly worn | Change the oil seal or shock absorber |
| Damage to the rod (scuffing, wear of the chrome coating) | Replace shock absorbers |
| Warped, damaged or worn strut O-ring | Replace ring |
| When the rod moves upward, there is not enough shock absorber resistance | |
| Recoil valve or bypass valve is leaking | Replace damaged parts or entire shock absorbers |
| There is a leak and there is not enough oil | Eliminate the malfunction and add oil |
| Seizures on the inner surface of the cylinder and piston | Replace elements and change oil |
| Secondary plastic bushing is damaged | Change the bushing |
| Contamination of the working fluid | Change oil |
| At the compression stage there is not enough shock absorber resistance | |
| Compression valve leaking | Fix the problem or replace parts |
| Low oil level in the rack | Fix leak and fill with oil |
| Rod or bushing is worn | Replace damaged elements |
| Liquid is contaminated | Replace working fluid |
| Compression valve discs are worn or deformed | Replacing parts |
| Suspension “breaks through” | |
| Spring wear | Install new springs |
| The shock absorber has failed | Restoring or installing new shock absorbers |
| The clearance in the ball joints is too large | |
| Wear of the ball joint due to dirt entering through a leaky boot | Remove the hinge and install a new one |
| The car does not move exactly in a straight line | |
| Tire pressure is uneven | Equalize the pressure in all tires |
| The wheel alignment angle is incorrect | Set the correct angle |
| Wear and destruction of rubber elements on one of the racks | Dismantle and install new rubber elements |
| The spring stiffness of the struts is not the same | Find and replace a spring with insufficient elasticity |
| Tires wear differently | Install new tires |
| The steering wheels are out of balance | Balance the wheels |
| Wheel tread wears out a lot | |
| Frequent sudden starts with possible slipping | Avoid aggressive driving style |
| Using brakes with full wheel locking | When braking, try to avoid blocking |
| The wheel alignment is incorrect or the vehicle is overloaded | Carry out wheel alignment and do not exceed the permitted load, which is indicated in the car's passport |
| Tires wear differently | |
| Taking corners at high speed | Reduce speed when turning |
| Worn ball joints of levers and rubber silent blocks | Replace parts |
| Wheel balancing is out of balance | Balance the wheels |
Most of the problems described can be easily diagnosed without the need to visit specialized service stations. You can do the repairs yourself, but after all the manipulations you definitely need to do a wheel alignment.
Lada Granta Liftback Orange › Logbook › Suspension 21928 (Part 4)
Hi all. Finally we come to the final stage of replacing the suspension. Left just a little bit.
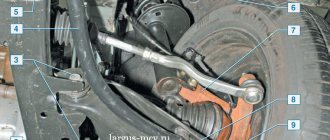
In the previous part, the front struts and steering tips were replaced. Now all that remains is to change: levers, balls, front arm extensions, extension brackets (Crabs) and install anti-roll bar 21928 (24mm). All this will be discussed here. Well, let’s sum it up at the end.
To replace levers and everything else, it would be more convenient to hang both sides of the car at once
First of all, I unscrewed the stabilizer from the levers. To do this you need to take 2 keys for 17
Next, we proceed to removing the levers assembled with a brace, a ball joint and a crab. For removal, we will need the following tools: 2 19mm wrenches (It is better to take a long wrench and a head), a 13mm wrench for unscrewing the crabs from the body, and a Torx E12 socket for unscrewing ball joint from the steering knuckle (had to buy it in a store).
The lever is attached to the body with 1 bolt and nut, 19 keys. To unscrew the nut, I had to use an extension on the knob, since everything was tightened very tightly.
The ball joint came off quite easily, and the extension brackets (Crabs) too.
Let's look at the condition
But the condition of the ball joints after 115 thousand km leaves much to be desired
Now that everything has been removed, you can prepare new parts for assembly and installation.
It is very convenient to put everything assembled. And the design is so simple that sometimes you are even surprised at the Granta’s maintainability.
Now a few words about the anti-roll bar
After assembling the suspension, we immediately go to the wheel alignment
The numbers turned out to be as follows
Now about the sensations:
As soon as I assembled everything, the first thing that was noticed was that there was no significant sagging of the car body when entering the cabin. Previously, if I sat in the driver’s seat, the left side would noticeably drop down (even though I’m not heavy). Now everything is tough, and there is no such thing.
Then I went out and first of all checked the suspension on a dirt road with holes. Fortunately, in our dacha there are a dime a dozen of such roads. I immediately noticed that small pits and nervousness in the suspension began to go through a little softer. The installation of new rubber elements has a greater impact here. Still, the new silent blocks provide some softness.
Now asphalt. At low pit speeds, the suspension moves elastically, but at the same time, if you accelerate a little, it becomes a bit harsh. Especially if you fall into a hole of medium depth at a speed of 40 km/h. Driving quickly on a bad road on this suspension is very uncomfortable. Yes, and on oil, original racks, too, by the way. Yes, it’s a little softer there, but still there. This is already a design feature of this car, which, in my opinion, must be accepted.
But the advantages of the 928 suspension showed themselves in completely different ways:
1) I noticed almost no squealing noise when braking. The car stops hard, while the muzzle does not go much down, but seems to move forward and come back. This is already a plus.
2) There is less roll in corners! You can really feel it. For comparison, before I took the same turn on an oil suspension at a speed of 30 km/h and the car fell on its side. Now, at the same speed, the car is screwed into it without strong rolls. Moreover, it behaves more stable.
3) At high speed, over 100 km/h, on a highway with patches, the car throws less. It feels like the car clings to the road surface more confidently. He is less tossed from side to side. This is because the suspension is stiffer and feels more collected. But at the same time, every joint, and especially the height differences, became very noticeable. The profile of the road in particular. The car even wobbles on small bumps. But this is a price to pay for increased rigidity.
4) When overtaking, at a speed of 120 km/h, lane changes are more confident. Also, returning to your lane occurs more clearly, without unnecessary steering.
5) Sharp lane changes at a speed of 30-40 km/h, or avoiding a sudden obstacle also feel different. If you turn the steering wheel sharply to the side, the body follows the steering wheel clearly, without unnecessary swinging. I like it. Of course, you shouldn’t think that the car immediately turned into a sports car, but if you compare it with stock oil, there is a difference.
Pendant 21928 can be described as:
But here you need to understand that I am comparing the new one with the old one, which ran 115 thousand km. But in any case, there is a difference, and it is noticeable.
As a result, I came to the conclusion that of the factory suspension options for the Grant, only suspension 21928 will provide more confident behavior of the car. This is a good choice for those who want to maintain the factory ground clearance, while improving driving characteristics. Well, if that’s not enough, you can go further...
Why do you need suspension tuning?
Firstly, our roads are not very smooth. They are full of all kinds of unpleasant surprises, to which, unfortunately, we have already become accustomed. In order not to lose stability on such a surface, the suspension must be damped, i.e. increase the stability of the wheel when passing uneven surfaces.
Secondly, the wheels must be optimally positioned relative to the road surface. To ensure the correct trajectory of the wheels, suspension kinematics are necessary.
Thirdly, it is necessary to distribute the load between the axles and the wheels themselves. Those. adjust the angular and vertical stiffness of the wheels.
What is this all for? This is necessary so that your fast car not only absorbs uneven surfaces well, but also handles perfectly during normal and dynamic driving. Many people know that manufacturers of certain brands are famous for their comfortable cars, which in turn are quite durable. Some, on the contrary, are super controllable, but shake like an old cart (a great way to lose weight, by the way). American ones (muscle cars), they generally have a huge engine stuck between the four wheels and they only drive forward (turns? I don’t know what that is!) Many respect the “Bavarians” for their excellent dynamics and handling, but they are far from ideal. They also tilt and fall over, but a little less than all the others. Their owners wander through markets or monitor the Internet in search of Plaza Profi counters. How to make the ideal option? There are no perfect cars. But you can get closer.
Disadvantages of lowered suspension on Grant
- limited vehicle operation area;
- mandatory presence of a smooth road surface, absence of gravel, crushed stone, coarse and medium-sized stones;
- restrictions on the number of transported cargo and passengers;
- frequent need for technical inspection and maintenance;
- premature failure of air suspension elements during frequent use in winter.
How best to make an understated Grant:
- seek qualified assistance from service station specialists;
- install components only under warranty;
- exclude handicraft repairs.
Sports suspension
Setting up the suspension and selecting the necessary rigid elements for it has not been difficult lately. A huge number of manufacturers of springs, shock absorbers, stabilizers, etc. and installation workshops cannot solve only a single problem; they cannot provide their goods and services for free. Well, if you can still save money with the installation, then you will have to shell out “money” for spare parts. For example, rear monotube shock absorbers Plaza Pro (asphalt) for the “ten” cost an average of 10,000 rubles per set. Further - more: springs, stabilizers, silent blocks and so on little things.
For those who don’t know, low-profile tires and negative camber are not for a beautiful look, but for improving cornering stability.
One former professional racer said that in a critical situation, with good tires, you can turn using road markings. Whether this is true or not, I did not check.
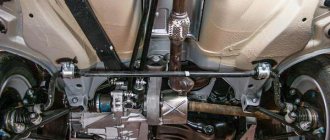
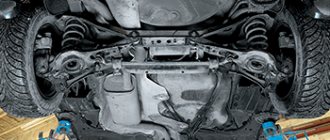
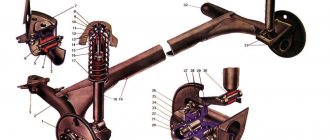
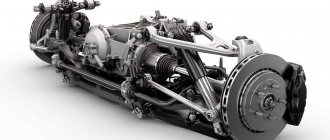
Rear suspension features
The rear suspension of the Grant is the same for the sedan and liftback. In fact, this is the same beam with springs and shock absorbers that is installed on Kalina, Samara and Samara 2. Instead of a stabilizer, a beam is used, which means the structure is dependent. Structurally, the rear part of the suspension system remains unchanged. Looking under the bottom, you can see the usual picture - a beam fixed in a semi-rigid position. It is attached to the body using hinges.
Support struts (springs with shock absorbers) are attached to the levers on the right and left. Despite the outdated design, a semi-rigid beam with racks has a number of undeniable advantages:
- even the maximum load actually has no effect on its behavior, which confirms the high level of energy intensity;
- maintenance, even according to regulations, should be carried out once every 100,000 km, but this period increases for the entire period of operation;
- Parts can be replaced in a garage even by beginners.
The rear suspension of the Granta has a feature that distinguishes it from the Priora - a negative camber of the rear wheels of 1° is created at the rear. This was done to improve the vehicle's directional stability, but given the design features of the suspension system, this solution is not capable of significantly changing anything.
Step-by-step technology for replacing the support bearing without removing the strut
- After hanging the wheel with a jack, remove it and put it aside.
- We dismantle the stabilizer strut in order to prevent restriction of the free movement of the rack assembly.
- Armed with a hexagon, insert it into the recess at the end of the rod and hold it while unscrewing the central nut, which directly fixes the rod itself.
- We roll the jack under the center of the ball pin and raise the stand until the load is removed from the auxiliary jack. The stand begins to show play.
- Using zip ties, we compress the spring coils. We simulate the compression amount to be insignificant, after which we unload the jack, which was used to lift the rack itself. The stand, following the jack lever, goes down.
- Now is the time to “separate” the support bearing from the rod. We carry out the manipulation - we move the rod down and remove the “support” from it through the void that appears under the body cup.
- We clean the support cup and its rubber seal from dirt accumulations. When installing the “SS-20” supports, there is no need for a lower cup.
- Next, we assemble, taking care to follow the reverse sequence to dismantling. We recommend lubricating the fasteners with graphite substance.
- Having completed the installation procedure, we check the tightening torques on all fastening units.
- We install the wheel in its original place and proceed to a similar procedure on the second side of the car.
Adjusting wheel alignment angles
As was said at the very beginning, the collected elements into a single unit will not yet give the expected result of the work. To achieve certain car handling characteristics, it is necessary to adjust three parameters - wheel alignment angles.
Castor angle
The caster angle can be defined as the angle of deviation of the wheel's turning axis from the vertical passing through its center. Without specially simulated animation, it is quite difficult to imagine the influence of the caster angle on the behavior of the car. Designers note that this angle must be different from zero in order to be able to self-center the steering system after the force stops (when exiting a turn).
A larger angle allows for more efficient steering return. But in parallel with this, the turning radius and the effort to perform the maneuver increase. In technical terms, the castor angle allows for an increased range of adjustment of the camber angle, which affects the area of adhesion of the wheel to the road. However, many manufacturers do not provide the ability to adjust the rotation axis, setting the optimal angle at the factory.
This is interesting: How to choose a charger for a car battery
The modern automobile industry is distinguished by the ability to regulate castor. For this purpose, front-wheel drive models have adjusting washers on the strut spacers. Adding one puck increases the angle by 19 minutes. The maximum deviation of the rotation axis is 3 degrees. But when installing SS20 rack supports, you can achieve better results.
Experiments with this parameter should be carried out in a special service, since changing it will entail reconfiguring the camber angle.
Camber angle
The plane of the wheel should not be strictly vertical, as this will play a cruel joke when driving over uneven surfaces and when turning. The camber angle is the angle between the plane of the wheel and the vertical plane. It is considered positive if the top of the wheel protrudes outward, and negative if it protrudes inward.
When turning, the body will begin to roll, which means that the wheel must change its plane relative to the vertical for better traction. This is only possible with negative camber. Some car brands do not provide for setting this parameter, others have their own specific indicators.
If it is not possible to visit a service center, then by any means and means you should achieve a negative camber setting of 15 degrees. Although such an angle will cause more intensive tire wear, it will provide good handling at high speeds.