Unlike previous “classic” models, the VAZ 2107 has an additional element in the starter control circuit - a starter relay. Like any car part, the relay can fail, making it impossible to start the engine. You can identify and fix the malfunction yourself; to do this, it is enough to know where the starter relay is located on the VAZ 2107 and have a minimum of tools for checking and replacement.
Why do you need a VAZ 2107 starter relay?
The starter traction relay on all classic models, except the VAZ 2107, was switched on directly through the ignition switch. The problem is that when it is turned on, a current of more than 15A passes through the contacts on the ignition switch, which over time leads to their oxidation, heating and failure. To reduce the current passing through the ignition switch when the starter is turned on, the designers of the “Seven” provided an additional element - the VAZ 2107 starter relay. The small current required for its operation does not harm the contacts of the ignition switch, and the relay itself more reliably switches the power to the starter traction relay . Often, owners of older “classic” models, tired of regularly changing the contact group of the ignition switch, independently install an additional relay that allows them to increase the service life of the contacts responsible for turning on the starter.
Where is the starter relay located on the VAZ 2107
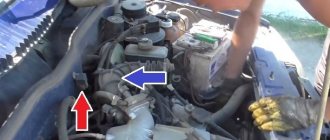
The designers provided for the installation of a starter relay on the VAZ 2107 on the right side of the engine compartment. It is attached directly to the right wing, for which a stud is installed on the wing, onto which the relay mounting nut is screwed.
The easiest way to find it is to trace where the wires from the starter traction relay go.
Decoding old-style fuses, diagram, video
Where is the charging relay on the VAZ-2107
The block of the old-style carburetor “seven” includes 17 fuses fixed to the board using spring contacts and 6 electromagnetic relays.
The block has two printed circuit boards mounted parallel to each other and connected by jumpers. It is also connected to the car’s network through detachable connections made in different colors for proper docking. The photo below shows a diagram of the location of the VAZ 2107 power supply control elements.
Photo of old VAZ 2107 fuse box
The body is made of plastic; there is a cover on top with the location of the elements on the block and their purpose in the form of images. The table below shows the decoding and pinout with the assignment of fuses and relays.
Table with transcript
| Fuse and relay number (rated current*) | Purpose of fuses and relays VAZ 2107 |
| F1 (8A/10A) | Responsible for the operation of the rear lights, or more precisely, for the light that turns on when the gearbox shifts into reverse. It is also responsible for the operation of the electric motor of the stove (heater), the rear window heating relay, also called the winding. In a VAZ 21057 car, this relay is responsible for the electric motor of the rear window washer. |
| F2 (8/10A) | Designed for headlight and windshield cleaner relays, as well as wipers of the VAZ 2107. |
| F3/4 (8A/10A) | Is a backup |
| F5 (16A/20A) | Responsible for the element (heater) of the rear window and, accordingly, for its relay, and all contacts of this unit. |
| F6 (8A/10A) | “Cigarette lighter” in a VAZ 2107 car, as well as a socket (plug) for a lamp. |
| F7 (16A/20A) | Responsible for the engine cooling fan, its engine, as well as the sound signal of the VAZ 2107 |
| F8 (8A/10A) | “Hazard signal”, as well as a breaker for direction indicators and hazard warning lights (in hazard warning mode) |
| F9 (8A/10A) | "Fog lights". Generator voltage regulator G-222 (on some vehicles) |
| F10 (8A/10A) | Instrument panel, parking brake, carburetor electro-pneumatic valve, voltmeter, fuel level, brake fluid level, oil pressure, turn signals, battery charge. |
| F11 (8A/10A) | Stop signals. Interior lighting. Brake lamps. |
| F12 (8A/10A) | Headlight cleaners, high beam (right headlight). |
| F13 (8A/10A) | High beam (left headlight) and high beam indicator lamp |
| F14 (8A/10A) | Engine compartment lamp. License plate lighting. Side light (left headlight and right rear light). |
| F15 (8A/10A) | Glove compartment lamp. Instrument lamp. Cigarette lighter lighting. Side light (right headlight and left rear light). |
| F16 (8A/10A) | Headlight cleaner relay. Low beam (right headlight). |
| F17 (8A/10A) | Low beam (left headlight) |
| * The denominator is the value for pin fuses |
Video review of the pinout of the old block
Repair and maintenance of such an installation structure is very difficult and inconvenient. If a track on the board is shorted or broken, not everyone will be able to repair the device.
How to check the VAZ 2107 starter relay
To check the functionality of the relay, you need a voltmeter or “control”. The functionality check is performed as follows:
- remove the wire block from the relay; check whether the contacts on the relay and the block are oxidized;
- clean contacts if necessary;
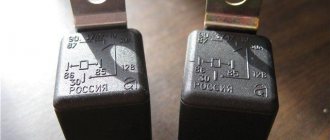
- make sure there is ground on the wire going to contact “86” of the relay;
- check whether voltage appears on the wire going to terminal “85” of the relay if you try to start the car with the key;
- make sure that when the ignition is turned on, voltage is supplied to the wire going to terminal “30”;
- if there is voltage at the terminals, the problem is in the relay, not in the power supply;
- remove the starter relay from the car;
- make sure that when voltage is applied to terminals “85” and “86”, the contact between “30” and “87” relay terminals is closed.
If the relay does not operate, it must be replaced with a new one.
What determines which direction the starter will turn?
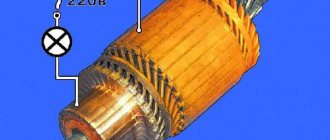
The direction of rotation of the rotor depends on the direction of the current in the rotor windings or the direction of the magnetic field in which the rotor rotates. The direction of the current depends on the location of the brushes relative to the commutator, and the direction of the magnetic field depends on the location of the field windings or the location of the magnetic system.
For starters with a magnetic excitation system, the direction of rotation is determined only by the location of the magnets in the housing.
If you mix up the housings, which are very similar, the starter will come together. The direction of the current in the rotor will remain the same, since the position of the brush assembly does not change, and the direction of the magnetic field will change to the opposite, so the starter will begin to spin in the other direction, and there will be a complete impression that the bendix is faulty (it is spinning in the direction of its freewheel).
(I installed a new bendix, but it still cranks)
Location of magnets in the starter housing
All arguments are also valid for starters with electromagnetic windings.
Replacing the VAZ 2107 starter relay
To replace the VAZ 2107 starter relay, you will need a 10mm wrench. To replace the relay, you must perform the following steps:
- disconnect the ground wire from the battery by removing the negative terminal;
- Using a wrench, unscrew the nut holding the relay on the right wing;
- remove the starter relay;
- install a new relay;
- screw in and tighten the fastening nut with a wrench;
- connect the wire block to the relay;
- connect the ground wire to the battery.
This completes the replacement of the VAZ 2107 starter relay. It remains to check its operation by turning the ignition key.
REPLACEMENT
We figured out where the starter relay is located on the VAZ 2114, now all that remains is to find out how it can be changed. There are two options for replacing this part:
- With the removal and installation of the starting unit itself;
- Without removing the starter.
In any case, you should have the necessary tools:
- Combination key 13;
- A screwdriver (it would be better to have several of them - Phillips and slotted ones);
- Key for 10.
A set of keys is always necessary to have in stock. Let's look at how to replace the solenoid relay on a VAZ 2114 with removing and installing the starter (by the way, this is much easier to replace):
- Remove the battery terminals;
- Unscrew the two bolts securing the air filter housing (10mm wrench);
- Disconnect the connector of the air flow sensor (MAF);
- Unscrew the air pipe clamp and dismantle the housing;
- We pull off the wire chip of the solenoid relay (held on a plastic clip);
- Using a 13mm wrench, unscrew the nut securing the positive terminal;
- We unscrew the fastenings of the starter itself (it is secured with three 13 nuts);
- We take out the mechanism;
- With the starting device removed, use a 13mm wrench to unscrew the wire on the VR cover going to the stator winding;
- Using a screwdriver, remove the three screws securing the VR and dismantle this device.
Now you need to install the new part and put everything back together in reverse order. That's it, the replacement of the retractor on the VAZ 2114 is completed. Of course, you can try to get to the relay mounting screws right in place without removing the starter, but it’s up to you to decide how easier it is to remove this device.
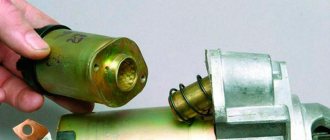
How to replace the starter solenoid relay on a VAZ 2107
One of the main reasons for starter failure on a VAZ 2107 is the failure of the solenoid relay. The first symptoms of a malfunction are when you hear clicks when you turn the ignition key, but the starter never starts to turn. Today we will look at how to replace the starter solenoid relay on a VAZ 2107 with our own hands.
Replacing this part is quite simple, but the first step will be to completely remove the entire device from the car. Let us recall that in the previous article we looked at how to repair the starter on a VAZ 2107 with your own hands. There we looked at the main starter malfunctions that you can fix yourself in a garage.
- one flat screwdriver; - 10mm wrench or ratchet head.
Replacing the starter retractor relay on a VAZ 2107
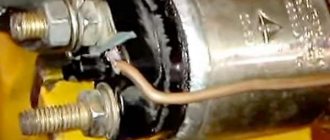
The first step is to unscrew the terminal securing nut, as shown in the photo below.
Then bend the terminal to the side so that it does not interfere with future removal.
Next, take a screwdriver and unscrew the two bolts. with which the retractor is actually attached to the starter itself.
And after that, you can safely remove the relay by turning it slightly in the desired direction, finding a comfortable position so that the rod disengages.
After this, we will need a new solenoid relay, the price of which for a VAZ 2107 is about 450 rubles in most stores in the country. The installation is carried out in the reverse order and there will be nothing complicated in this process either.
DIY repairs. Step by step lesson
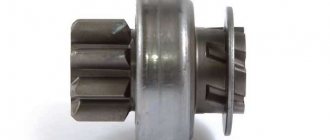
Reliable engine starting in a car depends on many factors and, first of all, on the serviceability of the mechanisms. The VAZ 2107 is equipped with an electric starter, which turns the engine flywheel through a movable overrunning clutch. Among drivers it is often called Bendix. Starter failure can be caused either by malfunctions of its individual parts or components or by a simple discharge of the battery.
Typically, a similar situation occurs in winter or after a VAZ 2107 has been parked for a long time in an open parking lot or garage. Characteristic signs are clicking sounds of the starter solenoid relay, slow rotation or its complete absence. Troubleshooting involves charging the battery using a special device. After installing a new battery, it is easy to verify that the starter works well and spins the engine.
Troubleshooting
Long-term operation of a VAZ 2107 car can lead to failure or breakdown of individual components and mechanisms. How to determine why the car starter does not turn? Possible reasons for the mechanism to not work are as follows:
- Oxidation of contacts directly on the device, damage to the battery ground wire.
- Failure of the starter solenoid relay, breakage of the rotor windings, deterioration of brushes and slip rings.
- Breakdown of the solenoid relay, burnt contacts.
It is possible to determine exactly why the starter failed on a VAZ 2107 car only after dismantling and disassembling. It is much more difficult if the device either turns or does not work at all when you turn the key in the ignition. Such faults are diagnosed with great difficulty and usually, after fruitless searches, the unit is simply replaced with a new one or one that is known to be operational.
Removing the mechanism
The work of dismantling the device from the engine of a VAZ 2107 car will be carried out using the following tool:
- a set of open-end and ring wrenches;
- set of heads with a knob;
- flathead and Phillips head screwdrivers.
Once you are finally convinced that the electric starter is faulty, or rather that it does not turn the crankshaft, you can begin dismantling.
The sequence of operation performed by the wizard is as follows:
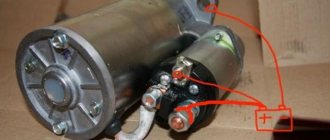
- Open the hood, disconnect the terminals from the battery and remove it from the engine compartment.
- We disconnect the starter, which does not turn the engine from the on-board network.
- Using a “13” key, unscrew the bolts securing the mechanism in the engine cylinder block.
- Carefully push the device out of the socket and remove the starter from under the hood.
In order to determine the exact cause of the malfunction of the engine starting mechanism on the VAZ 2107, it should be disassembled. The main purpose of such an operation is to detect defects in starter parts and assemblies through visual inspection. It is recommended to use a multimeter to check electrical circuits. If the car starter does not work well and intermittently, disturbances in circuits and contacts are possible.
Disassembling and checking the condition of the starter
First of all, the solenoid relay is removed from the mechanism and inspected. On a VAZ 2107 car, some malfunctions of the electric starter are associated with burning contacts.
Helpful advice: fixing this damage is quite simple; just clean the working surfaces with fine-grain sandpaper and sand them. In the vast majority of cases, the starter begins to function after this procedure.
Another reason for failure may be a mechanical failure of the overrunning clutch. If the starter of a VAZ 2107 turns easily with a characteristic buzzing sound and the engine does not start, then the bendix has failed. You can check it by turning the gear in one direction and the other; a working mechanism does not allow reverse rotation. After troubleshooting or replacing the starter, we perform a test run and check the functionality of the device.
7vaz.ru
Starter retractor relay VAZ 2107 - price
Despite the fact that the solenoid relay, as a mature mechanism, was used in a car starter more than a hundred years ago, for the first thirty years of its life it was not particularly popular. Drivers used a "crooked starter" - a handle that engaged with the crankshaft pulley. Naturally, no one was especially delighted with this kind of engine start, but as standard, the crooked starter came to all VAZ cars until the end of the 70s.
This is interesting: Do-it-yourself dent repair without painting
Content:
Starter
The ST-103 starter is installed on the YaMZ-236 and YaMZ-238 engines of all modifications (Fig. 104). It is best to check and adjust the starter on a special test bench mod. 2214. However, it is possible to check the starter without a stand. After cleaning the starter from dust and dirt, it is checked in two operating modes: at idle speed without load and at full braking. In the first case, the voltage at the starter terminals, current consumption and shaft speed are measured; in the second case, the torque that must be applied to keep the starter armature from rotating is measured. Instructions for checking the starter on the stand are set out in the instructions attached to the mod stand. 2214. If there is no stand, the starter can be secured in a vice.
For testing at idle, a DC voltmeter with a scale of up to 30 V, a DC ammeter with a
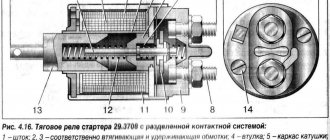
in the starter drive relay, check the serviceability of the retractor and retaining windings using an ohmmeter. The ohmmeter connection diagram is shown in Fig. 106. The resistance of a serviceable pull-in winding should be 0.7-1.1 Ohm, holding 4.2-5.8 Ohm at a temperature of 20° C. A significant difference in the resistance values from those indicated indicates either interturn short circuits in the windings or a short circuit to the housing . In this case, the stater relay is replaced.
To inspect the relay contact system, unscrew the four relay cover screws and remove the cover. In this case, care must be taken to ensure that the output end of the retractor winding is not damaged. The working surfaces of the contact bolts and disk must be clean, without significant burns. If the contact surfaces of the bolts burn, they should be cleaned with a file and polished with fine glass sandpaper. If there is significant wear on the contact surfaces, the bolts should be rotated 180° in their sockets.
If the contact surface is deeply burnt out, the contact disk should be switched to the other side. If both sides are worn, the disc is replaced. The disk must be locked to the housing. This can be easily checked with a test lamp.
The assembled anchor / is inserted into the cover 10, the middle bearing holder 13 is screwed to the cover, the pin of the engaging lever 11 is inserted into the oblique groove of the drum 3, the cover 10 assembled with the armature and the cover 23 are installed in the starter housing 2, and the covers are tightened with two coupling bolts
Particular attention should be paid to the tightness of these bolts, since most faults in the starter most often occur due to loosening of the pinch bolts. After tightening, armature 1 should rotate easily by hand
Next, install the brushes in the brush holders and screw the leads of the excitation winding and the tip of the brush ropes to the brush holders. It is necessary to ensure that the brushes move freely in the brush holders, and the brush springs rest against the middle of the brushes. Then put on the protective tape 26, tighten the screws of its fastening, install the relay, connect it with a jumper to the bolt on the cover on the collector side, insert and pin the pin connecting the relay rods 12 with the turning lever I. Adjusting the starter relay. A correctly adjusted relay should ensure that the contacts close and the armature begins to rotate only after the starter gear is fully engaged with the flywheel ring. Adjustment of the starting moment of the starter is carried out as follows. A test lamp 3 with a voltage of 24-36 V is connected to the positive pole of battery 2 (Fig. 107) and to the copper bolt of the relay; The negative pole of the battery is connected to the starter housing. The relay windings are connected through button 4 to the positive pole of the battery. Installing between gear 9
and a thrust ring 10 on the starter shaft alternately with gaskets 16 and 11.7 mm thick (size a) and turning on the starter, the correct relay adjustment is determined by the lighting of the lamp. With a 16 mm thick gasket, contacts 5 and 6 should not close and lamp 3 should not light up; with a 11.7 mm thick gasket, the contacts should close and the lamp should light up. If the adjustment does not ensure the fulfillment of the specified conditions, it is necessary to make adjustments using screw 8 of the rod screwed into the relay armature. In case of closing of the relay contacts too late (the lamp does not light up with a 11.7 mm gasket), the adjusting screw must be unscrewed from the armature; in case of early closure (the lamp does not light up with a 16 mm gasket), screw it in. To screw in or out the screw, undo the pin and disconnect the relay rods from the control lever. After the adjustment is completed, the wire from the starter is connected to the relay and the lamp used to control the closure of the relay contacts is disconnected.
Why do you need a solenoid relay?
The retractor relay device is quite simple. Its operating principle is based on the use of a conventional electromagnet, and the relay assembly must perform several tasks at once: engaging the starter Bendix gear with the flywheel crown to transmit torque from the starter motor to the crankshaft of the car engine; control of the power supply of the entire starter, both the electric motor and the retractor clutch; The retractor relay synchronizes the starter circuits and the rest of the vehicle's electrical circuits.
Electric starter repair
Methods for restoring device functionality depend on the nature of the malfunction. The easiest way to deal with burnt contacts on the solenoid relay is to sand them with fine sandpaper. The slip rings are also cleaned and polished when replacing brushes. Other faults are eliminated by replacing failed parts or assemblies.
Repairing the starter yourself allows you to save money on purchasing a new device. The restored mechanism is mounted on the car in the reverse order of removal and connected to the on-board network. We check and start the engine with the repaired starter.
1200 rub. for the photo report
We pay for photo reports on car repairs. Earnings from 10,000 rubles/month.
Write:
The starter solenoid relay is an electromagnet that performs two functions in the ignition system. The first is to bring the Bendix starter gear to the flywheel ring gear. The second is its return to its original position after starting the engine. A breakdown of the solenoid relay may result in the engine simply not starting . There are not many reasons for relay failure. In this material we will try to describe the signs and causes of failure, as well as diagnostic and repair methods.
Solenoid relay with core
Diagram and description
The design of the VAZ retractor relay is shown in the diagram and it hardly requires explanation. The solenoid formed by the cylindrical retractor coil and the armature pushes the starter fork and meanwhile moves the contact plate that closes the starting contacts of the starter motor. The relay itself is a dielectric container with contact plates mounted in it. On the outside, the contacts end in a threaded part, onto which the terminals are placed and clamped with nuts.
The relay's operation is also extremely simple. When we turn the ignition key, we supply current not immediately to the starter, but to the control relay, which is located under the hood in the VAZ 2107. The contacts of the device close and pass current from the battery to the contacts of the retractor. Voltage is applied to the holding winding, which creates a magnetic field. Under its influence, the rod is simply retracted into the device body, thereby killing two birds with one stone - using a lever, it brings the Bendix gear to the flywheel crown and closes the contacts that supply current to the electric motor. As soon as the engine starts, the current supply stops, the spring returns the rod to its original position, disengaging the bendix and flywheel, breaking the contacts and de-energizing the electric motor.
Starter: device and principle of its operation
In all cars, including the VAZ-2107, the starter performs one of the main functions - it starts the engine. To start the engine, you need to turn the crankshaft and thus create a flash of the fuel mixture in one of the cylinders. For this, a starter is needed - an electric motor in which alternating current is constantly present.
When the ignition switch contacts close, current flows through the windings. The electromagnet core retracts, and the lever connected to it moves the Bendix gear. At the same time, the core creates pressure on the plate, which closes the contacts at the moment the gear engages with the flywheel. The current through the closed contacts enters the motor winding and creates a magnetic field that rotates the crankshaft. When the engine is already running, the starter must be turned off. The key in the ignition switch is turned back, the magnetic field disappears, and the device goes into a resting state.
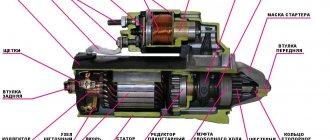
Structurally, the starter consists of the following elements: an electric motor, a retractor relay and an overrunning clutch with a gear (Bendix). Each component performs a specific function, and if something fails, the entire system does not work.
Basic faults
A fairly simple and reliable design, however, given the high loads and high currents with which the mechanism has to work, various problems appear from time to time. They can be expressed either very simply, for example, the starter does not respond at all to turning the key, or as permanent problems, the cause of which is most difficult to establish.
The main malfunctions of the solenoid relay are listed below, but the difficulty is that the malfunctions can either be combined with each other or be a consequence of the usual loss of contact at the battery terminals. Therefore, troubleshooting must begin from afar. However, here are the problems:
- Short circuit of the holding or retracting windings, then the fuses will simply burn or the control relay will simply not supply voltage to the contacts;
- deposits on contacts;
- winding breakage;
- distortions or damage to the return spring;
- physical damage to the relay housing or parts.
Principle of operation
Every detail has its own purpose. Car enthusiasts need to know that the starter traction relay of a VAZ 2107 car can only be connected via a power relay. It is located in the engine compartment, just where the right mudguard is. Its task is to engage the drive gears on the starter with the ring on the flywheel and close the power circuit of the armature windings and stator.
The relay cover is specially equipped with contact bolts, where one is connected using a drive to the positive indicator on the battery, and the second is connected to the stator winding and relay. By turning the key to starter position 2 on a VAZ 2107, voltage will immediately be applied to pin 50. At this moment, a magnetic field is formed and it will begin to retract the armature. The contact plate will close the bolts, and the rod will begin to act on the drive lever. All mechanisms will gradually begin to work.
If something goes wrong and the mechanism does not start working, then minor repair work will most likely be required. You just need to do an inspection first.
How to check the relay on a VAZ 2107
Testing the relay consists of measuring the resistance of the pull-in and holding windings. The retaining one should have a resistance of 75 Ohms, and the retracting one should have a resistance of 55 Ohms. Problems with windings can be of only three types - complete short circuit, open circuit and poor contact on the contact plates. In principle, if the relay is dismountable, then you can eliminate some malfunctions - clean the contacts with fine sandpaper, unsolder and rewind the windings, but given the low cost of the relay, such repairs are unlikely to be justified.
In any case, before disassembling the relay, it is necessary to dismantle the starter, and then draw conclusions about the advisability of replacing or repairing the unit. Good luck to everyone with the repair and quick start of the engine!
Signs and causes of relay failure
External signs of a broken starter relay include the following:
- When you turn the key in the ignition switch, no action is taken to start the engine, or starting is possible only after making several attempts.
- After the engine starts, the starter continues to rotate at high speed. This can be heard by ear by the strong buzzing of the mechanism.
A malfunction in the relay is one of the reasons that the car does not start, and there may be several reasons for its breakdown:
- failure (burnout) of the contact plates inside the relay (popularly called “nickels”), reduction in their contact area, “sticking”;
- breakage (burning) of the retracting and/or holding winding;
- deformation or weakening of the return spring;
- short circuit in the pull-in or holding winding.
How to check the starter solenoid relay with a multimeter
If you find at least one of the listed signs, then the next step to fix the problem is to conduct a detailed diagnosis.
Lada 2107 › Logbook › Replacing the traction relay (retractor) starter
Hi all! As you may have guessed from the title of the post, something has happened to me again. I came out of work like this last night with a lot of plans in my head and got into the car. I start the engine, but it doesn't start. There is a retractor click, and it’s kind of different, but there is no “Dryndygydyn”. Just silence. How come it was still normal?! The first thought was that the battery was drained by an incorrectly connected new device, but experience spoke otherwise. Checking the contacts did not give any results. Well, there's nothing to do. I remove the battery, move the washer fluid reservoir to the side, remove the heat-reflecting shield and take out the starter. In fact, it’s not that simple, you need to get a little tricky)
It is clear that a “patch” has fallen off the back cover of the traction relay or, as it is also called, the retractor. Either he ejected himself, or I “helped” during the removal. The first option is quite likely judging by the dust on the cut. The second option also has the right to life, judging by experience) Upon closer inspection, it turned out that the plastic (or something) of the back cover, under the influence of temperature from a nearby outlet and time, lost its properties and became brittle. That's why he flew away.
I closed everything and stomped towards the nearest spare parts store where this relay was purchased:
I didn’t bother about the manufacturer, I didn’t have time for that. And everything was done quite well. Even the nuts and washers were all present. There’s one thing I don’t understand: how can it be forbidden to modify something in a car that initially contains all sorts of different things?! For example, here is the same starter: the starter itself is 21213, geared, and the retractor is from 2110. And this is just one example)) Just in case, I compare it with the previous retractor. It seems like this:
This is interesting: Device for repairing and adjusting the carburetor for 151C
When the engine starts, a short circuit occurs
Good day. Please help me overcome the problem. Periodically, when trying to start the engine, a short circuit occurs (the voltage drops to 7V, the starter does not turn). The symptoms are like this. I turn on the ignition, try to turn on the starter, there is a click (it doesn’t seem to be retracting, maybe there is an additional starter relay, I’m blaming it for now), the voltage sags. If you turn off the ignition, the short circuit may or may not disappear (often it does not), disconnecting the mass helps, but also not always. It often happens that turning off and on the ground clears the short circuit when the ignition is turned on, but when you try to start, the short circuit occurs again. So you pull the mass, after a few times the short circuit may release. This happened several times if you forgot to take it out of gear and turn the starter, the starter turns, but the next time you start it there is a possibility that there will be a short circuit. What is noteworthy is that if a short circuit occurs, if it is removed by turning off and on the mass, then it can be called again if you simply turn on the consumers. What’s unpleasant is that the last time I returned from hunting I discovered that the fuse had melted, apparently due to dampness and/or roughness the short circuit had occurred on the way; but somehow I got there.
I hope I explained it clearly enough. I would be grateful for your help.
PS. Well, I'm having trouble with the UAZ, and there is still work ahead to make everything okay.
What does a car need a traction relay for?
The starter solenoid (or traction) relay is a fairly important device. At the dawn of the automotive industry, the role of this unit was played by a long handle and the driver himself, who, by inserting it into the hole in the flywheel, accelerated the engine. Later, cars acquired starters with retractor relays, which are designed to provide initial force to the gear that drives the motor shafts.
Starter traction relay
In the designs of most cars (as in “classic” VAZ models), the retractor relay is a small unit mounted directly on the starter housing itself. His tasks are the following:
- moving the bendix gear to engage the flywheel teeth and returning it to its original position after the engine starts running;
- energy distribution between the starter drive and the electromagnet;
- synchronous operation of the starter during engine starting.
The starters installed on the VAZ-2106 and 2107 starters are actually the same. Regarding the solenoid relay, we can say that it has not undergone any significant changes. But there is one more detail with the same name, which is considered the difference between these two models. This is the starter activation relay: on early VAZ models it is not there at all, but in 2107 it appears.
Relay for turning on the VAZ-2107 mechanism
Before this innovation, control from the ignition switch went directly to the solenoid relay.
It is worth saying a few words about this mechanism. The starter activation relay is located some distance from the starting mechanism itself, so you should look for it by wires. Naturally, with each new release of VAZ, its location changed. But when it first appeared in 2107, the starter relay was located on the right mudguard in the engine compartment. It is easy to remove and replace with a 10mm wrench. But the traction relay still does more work and fails much more often, so let’s talk about it in more detail.
how to remove and replace, disassemble and repair
A faulty VAZ 2107 starter causes the engine to simply stop starting. When the key is turned in the ignition switch, the electrical circuit is closed, but the starter itself does not fire, so no force is transmitted to the crankshaft and it simply does not turn. There can be many reasons why this happens, ranging from a banal short circuit in the car’s electrical system, to failure of the starter rotor winding or mechanical wear of the brushes. How to properly disassemble and repair a VAZ 2107 starter?
Starter device for a VAZ 2107 car
The design of the VAZ 2107 starter is to some extent reminiscent of an ordinary electric motor. The basis of the design is the so-called shoe, which is driven by the rotor.
t, in turn, begins to rotate when a voltage of 12 V is applied to it. This is the so-called gear starter. An ordinary electromagnet, which consists of an insulated copper winding, a metal core and brushes, is responsible for generating the magnetic field. On the VAZ 21074 car, a similar scheme is used, but a slightly different fastening is used - 3 bolts each. The brushes transmit voltage to the rotor. They wear out not only due to friction, but also due to the high current generated by the coil. The starter switching relay, located with it in a single housing, is responsible for the supply of electricity and timely shutdown of the shoe. The operating principle of the classic starter on the VAZ 2107 is extremely simple: the device is connected to the crankshaft. When voltage is applied to the rotor, it spins and turns the fists. As a result, the engine starts, after which power is supplied to the spark plugs from the generator, and not from the battery. During an emergency engine start, a similar scheme is used - artificial cranking of the crankshaft.
It is not always the case that the engine does not start due to a faulty starter. It is possible that the problem lies in the wiring. Therefore, the first step is to study the starter connection diagram and all underwater wiring for a break. If one is found, the area will have to be replaced. At the same time, it is advisable to check the operation of the fuse (it is located on the left side of the hood).
It should also be mentioned that in some starter models protection is installed - this is an additional relay that automatically turns off the traction and prevents the supply of electricity from the battery even when the engine is running. These were not included in the factory configuration, but many install them after a certain period of operation.
Troubleshooting VAZ 2107 starter
Repairing a G7 starter mostly involves replacing worn components and parts. These may include an armature, a winding, brushes, a starter relay, and a stator. The most difficult thing is diagnosing the breakdown. Experts recommend starting with checking the circuit. To do this, you will need an ordinary multimeter with a function for testing electrical circuits.
To remove the starter, simply unscrew the bolts that hold it in place. This can only be done on an overpass. In an emergency, you can simply crawl under the hood. The first step is to disconnect the wires that go to the relay. Naturally, before this you need to remove the negative terminal from the battery to prevent a short circuit.
After the VAZ starter has been removed, you can begin to disassemble it. First of all, the relay is untwisted, after which the clamping pins are untwisted. Next, the nose is removed, and then the starter retractor relay is removed. By the way, there is a copper plate there. It must be cleaned of any burning residue and lubricated with silicone oil (at the attachment point). After removing the armature and winding, you can also remove the brushes. If necessary, they are replaced. If the resource has not yet been used, then it will be enough to simply clean it from the burnt material and install it back in place.
If the VAZ starter relay does not work, then it can be replaced with a new one without any problems. Fortunately, these are sold in almost every auto parts store. If it is faulty, when you try to turn it with the multimeter terminals clamped, no dialing is performed. There is no point in repairing it, so they just replace it.
If you need to change the anchor, you should take into account that after this the so-called grinding-in is performed for several days.
The starter may be unstable, but this is normal. As a last resort, remove the shoe casing and lubricate everything there with grease (or better yet, silicone grease).
When diagnosing a starter with a multimeter, you need to consider the following:
- the wires must be disconnected;
- minus is the housing of the starter itself;
- on the VAZ 2107 the starter injector differs only in the mounting;
- The armature winding should be checked for resistance.
VAZ 2107 starter service
A gear starter, like any other car component, requires some maintenance. In this case, this means disassembly, replacement of worn components, lubrication of gears and removal of carbon deposits from the copper plate, brushes, and the armature itself. Even after removing the starter core, you need to check the normal rotation of the gears along the axis. To do this, we disassemble the limiter and the overrunning clutch (it comes complete with the drive gear) and visually evaluate their performance. You also need to pay attention to the locking ring - it may be damaged or chipped.
Of course, a new starter for the VAZ 2107 is relatively inexpensive. But if there is an opportunity to repair it, why not take advantage of it? This will not only save money, but will also allow you to understand the mechanics of the car in more detail.
korchim.ru
Why does the solenoid relay break?
The main parts of the relay: body, contacts, armature, magnet with windings, return spring. When an electric current enters the magnet's retractor winding, an electric field arises. It attracts an anchor, which moves into the core. The latter, using the lever, moves the Bendix gear forward, forcing it to come into contact with the flywheel teeth.
Next, the core, reaching the end, closes the contacts through which current begins to flow to the holding winding of the magnet. The drive is turned on, which spins the starter shaft, transmitting force through the Bendix gear to the flywheel, which spins it. As soon as the engine starts, the current to the relay stops flowing, the magnet turns off, and the return spring returns the shaft and gear to its original position.
bendix gear
What malfunctions can occur during operation of the traction relay on VAZ-2106 and 2107 vehicles?
- Knock. It can occur if the battery does not have a charge, the terminals have oxidized, the connection is faulty, or the magnet holding winding is not connected to ground as a result of its damage.
- Lack of response from the solenoid relay and the starter as a whole after turning on the ignition. As in the first case, the problem is in the condition of the battery. For example, the connection of the holding winding to ground is lost, the contact between the additional and solenoid relay is broken, or the ignition switch board is burned out.
- Incorrect operation of the armature when, after turning on the relay, it does not rotate. And here, most often, the battery is to blame. This can happen if the starter contacts have oxidized or the armature winding has burned out, causing the wire to separate and the armature itself to become jammed.
Why is there a crackling and grinding sound when starting the engine? Most likely it's the starter
Drivers are often interested in why crackling and grinding noises are heard when starting the engine. There may be several reasons for this phenomenon. In any case, you should eliminate the source of this sound as quickly as possible. Otherwise, you risk a breakdown at the most inopportune moment. In general, if any strange sounds appear, you should check their origin. After all, this is most likely a sign of a breakdown. The sooner you eliminate it, the better. After all, most faults can cause a chain reaction. And provoke breakdowns of other engine components. Therefore, always listen carefully to the operation of the power unit.