A broken solenoid relay can cause the starter motor to start the vehicle's engine does not work. But don’t rush to throw it away; you can often repair the solenoid relay and starter yourself.
How to check
To evaluate the operation of the device connected to the starter, you first need to check the integrity of the supply wiring.
Then, by turning the key, you can check for the presence of an operation sound. If there is a click (but the starter does not rotate), the likely cause is burnt contact plates. To find out whether this is the reason, you should apply voltage to the car engine, bypassing the relay. The relay terminal is disconnected from the lock, and two terminals are closed with a screwdriver - from the battery and to the starter. The beginning of rotation indicates a problem with the retractor. It is more convenient to carry out the test when the starter is disconnected.
Then you need:
- place the relay near the battery, connect the “plus” and “minus” to the relay contacts;
- Apply the free end of the minus wire to the starter housing (a distinct click will indicate normal operation of the relay).
Malfunctions and repair of starter traction relay
The traction relay is located on the front cover of the starter and is designed for short-term engagement of the starter shaft with the flywheel ring. It is this, and not the starter itself, that most often fails. In addition to the wiring and contact problems discussed above, the most common traction relay malfunctions are:
- burning of contact bolts (nickels);
- short circuit or break in the winding;
- mechanical damage.
The main sign of relay failure is the absence of a click when turning the key in the ignition switch. It means that:
- the electromagnet did not work;
- the relay contacts did not close;
- no voltage is supplied to the starter.
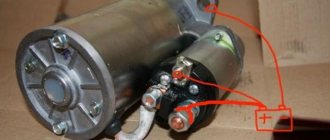
In such a situation, after checking the wiring and contacts, the relay should be removed from the starter and diagnosed. This is done as follows:
- Using a 13mm wrench, unscrew the nuts securing the power wires to the relay contact bolts.
- Disconnect the control wire connector.
- Using a slotted screwdriver, unscrew the three screws securing the traction relay to the front cover.
- Disconnect the relay from the cover.
- We inspect the relay and if we detect mechanical damage or burning of the contact bolts, we replace it with a new one.
- If there is no visible damage, we continue checking and connect the relay directly to the battery. To do this, we find two pieces of wire with a cross-section of at least 5 mm 2 and with their help we connect the terminal of the control wire to the negative of the battery, and the relay body to the positive. At the moment of connection, the relay core should retract. If this does not happen, the relay needs to be changed.
Purpose and principle of operation of the solenoid relay
Checking the starter retractor
On most vehicles, the retractor is mounted in the same unit with the starter, and is designed to control the freewheel. At the end of the clutch there is a gear that rotates at the moment of starting, but during its operation such rotation is not allowed, as it leads to damage to the starter or on-board electrical network if the starter starts working in generator mode.
To do this, the retractor extends the clutch only when it is necessary to start the engine, after which it returns to its original position, removing the gear from engagement with the flywheel. The peculiarity of the solenoid relay is that the starter can only operate when it is activated. This is done to prevent tooth fractures when the rotating gears of the clutch and flywheel meet.
Inside the relay there is a coil with an armature, which is acted upon by current after the circuit is closed. The magnetic field that arises around the coil moves the armature towards it, compressing the return spring and pushing the lever, which moves the freewheel. When the engine starts, the electrical circuit of the coil opens, the magnetic field force disappears, and the return spring pushes the armature with the clutch to its original position.
Common starter problems and their causes
Regardless of whether a gear starter is installed on a VAZ 2106 or UAZ, the problems are similar. If the car does not start, the VAZ 2106 starter does not turn well, first check the quality of battery charging. In addition, you should check how well the terminals are secured. If everything is fine with the charging and terminals, then the cause of problems with starting the engine may be in the starter.
VAZ 2106 starter circuit
The following malfunctions of the VAZ 2106 starter are possible:
- The device turns on, but the traction relay does not work: the traction wire is broken, the tips are not tightened well, there is a short circuit in the traction windings or to ground, the contacts have oxidized, the retractor armature is stuck.
- After switching on, a click occurs, the traction relay works, but the armature does not function or it rotates too slowly, the starter does not turn: the fastening bolts on the retractor are not tightened well, the brushes are worn out or stuck, the commutator plates are short-circuited or are burned out, the windings are damaged.
- When starting, the relay clicks, the armature works, but the crankshaft does not rotate: the buffer spring is broken, the clutch slips, slips out of the axle, or the clutch engagement lever is broken.
- The starter does not turn off when the engine starts: the relay or drive lever is stuck, the contacts are stuck together, the mechanism is skewed, the ignition switch return spring is faulty.
- Increased noise during startup: the unit is poorly secured, the bushings are worn, the teeth on the gears are broken.
Checking the solenoid relay
Lada 2114 Milky Way is Samara Logbook Replacing the fuel pump mesh
Checking the functionality of this element is not so difficult. Moreover, you can check it even without removing the starter from the car. For example, let's take a VAZ-2110 car.
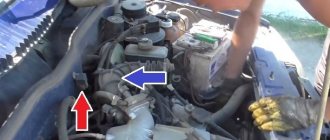
So, the starter on this car does not work. First you need to check the wiring going to it for a break.
If everything is in order with the wiring, you need to find out whether the traction relay works at all.
To do this, you can ask someone to turn the ignition key, and listen for yourself to see if there is a click. If it is missing, it is faulty and needs to be replaced.
If there is an actuating click, but the starter itself does not turn, it is possible that the relay does not operate due to burnt contact plates.
You can check whether this is true using a regular screwdriver. The terminal coming from the ignition switch is disconnected from the relay.
Next, a screwdriver is used to close the terminal coming from the battery with the terminal going to the starter - this results in a direct transfer of electricity to the electric motor, bypassing the relay. If it works, you need to look for the cause in the relay.
You can check the voltage going to the starter with a multimeter, but this will most likely make it clear whether the problem is in the starter or in the wiring and battery.
To do this, a multimeter is connected to the positive terminal of the solenoid relay, to which voltage from the battery is supplied. Connect the other negative wire of the multimeter to ground.
Next, someone must turn the ignition key to the start position. The voltage on the multimeter display should correspond to 12 V.
If it is lower, perhaps the battery is simply discharged and its energy is not enough to start the engine, but at the same time its charge is enough to operate the relay, but there is not enough energy to rotate the rotor.
Lada 2107 › Logbook › Replacing the traction relay (retractor) starter
Hello everyone! As you may have guessed from the title of the post, something has come up for me again. I came out of work like this last night with a lot of plans in my head and got into the car. I start the engine, but it doesn't start. There is a retractor click, and it’s kind of different, but there is no “Dryndygydyn”. Just silence. How come it was still normal?! The first thought was that the battery was drained by an incorrectly connected new device, but experience spoke otherwise. Checking the contacts did not give any results. Well, there's nothing to do. I remove the battery, move the washer fluid reservoir to the side, remove the heat-reflecting shield and take out the starter. In fact, it’s not that simple, you need to get a little tricky)
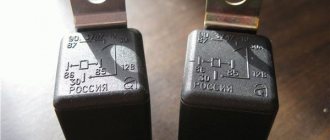
It is clear that a “patch” has fallen off the back cover of the traction relay or, as it is also called, the retractor. Either he ejected himself, or I “helped” during the removal. The first option is quite likely judging by the dust on the cut. The second option also has the right to life, judging by experience) Upon closer inspection, it turned out that the plastic (or something) of the back cover, under the influence of temperature from a nearby outlet and time, lost its properties and became brittle. That's why he flew away.
I closed everything and stomped towards the nearest spare parts store where this relay was purchased:
I didn’t bother about the manufacturer, I didn’t have time for that. And everything was done quite well. Even the nuts and washers were all present. There’s one thing I don’t understand: how can it be forbidden to modify something in a car that initially contains all sorts of different things?! For example, here is the same starter: the starter itself is 21213, geared, and the retractor is from 2110. And this is just one example)) Just in case, I compare it with the previous retractor. It seems like this:
What it looks like and where it is located
Lada Kalina Sedan KoMeTa FEAT AVTOVAZ Logbook Whack-Whack, complete revision of the starter
The solenoid relay controls the freewheel.
Mount the electromagnet with the starter in one unit. The part is equipped with a gear that should rotate the flywheel of the motor when it starts. If the flywheel continues to rotate further, this will lead to failure of the starter or the electrical network of the machine. To avoid this, the clutch is pulled out only when the engine starts (after which the relay returns it back). Externally, it looks like an elongated metal cylinder with a coil with an armature inside, where current is supplied after the circuit is closed. Compressing the return spring, pushing the lever and moving the freewheel, the resulting magnetic field forces the armature to move to the coil. The motor starts, the electrical circuit breaks, the magnetic field disappears, and the return spring pushes the armature and clutch back.
Did you know?
Today, the largest vehicle in the world is the German-made Liebherr T 282B dump truck.
Its weight is more than 220 tons. In order to get into its cabin, you need to overcome as many as 16 steps. The body of this “
monster
”
can easily fit a private house, and its load capacity is 363 tons.
Modern retractors
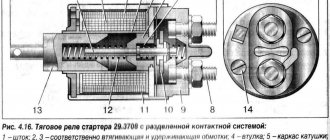
But the next stage of development was the solenoid relay, which is used on most modern cars, including the VAZ 2106. This small electrical mechanism performed all the actions that were described a little higher. And its composition is as follows:
- Frame.
- Two windings - holding and retracting.
- Anchor with a special design hook (depending on the starter model).
- Spring for returning the armature to its original position.
- Two copper bolts serving as power contacts.
- A copper strip that allows you to connect the relay contacts.
The contacts in the relay are normally open, closing only when the engine starts and when the ignition is turned on. This is how the engine starts:
- When the ignition key is turned to the “Start” position, voltage is applied to the starter relay (if equipped), which switches the power circuit of the retractor VAZ 2106.
- When voltage is applied to the retractor power connector, its windings create a magnetic field, due to which the armature (made of metal) moves inside the housing, overcoming the resistance of the spring.
- The armature simultaneously turns on the power supply to the starter and moves the bendix along the axis of the rotor.
- Result: the rotor rotates the crankshaft through the bendix, and voltage appears on the starter windings.
VAZ 2106 starter does not start
What signs indicate that the starter needs to be repaired or is time to be replaced? Why does the starter sometimes not start?
These questions have their own answers:
The relay functions without problems. However, the anchor does not respond or makes slow rotational movements. Solution! As a rule, this is due to burning of the collector
It is also necessary to pay attention to the winding. It must be complete
It is also possible that the relay fastening elements are loose, there is a short circuit in the commutator, the brushes are stuck or have become completely unsuitable for further use. However, the reason may lie in a discharged battery. The starter responds, but the armature relays do not function. Solution! Often the problem is that the anchor is stuck. In this case, it is worth checking how the tips are fixed. Is there a short to ground and what is the condition of the wiring? The armature rotates, but problems arise with the crankshaft. Solution! It's worth checking the buffer spring. Most likely it's broken. Some components of the coupling may be damaged. Powerful noises are heard. This is often the result of damaged bushings and gears. In turn, the starter turns, but does not start. You need to take a closer look at the return spring. The device may also be skewed. It is also possible that the relay and drive handle are jammed.
Starter malfunctions
As you operate a vehicle with a starter, problems of various types may occur. Each breakdown manifests itself with its characteristic symptoms, which allow you to quickly and correctly identify the problem and eliminate it in a short time.
The starter works, but the engine does not start
If you hear that the starter is functioning, but the engine does not spin, then the problems may be of the following nature:
- Worn overrunning clutch gear teeth. This leads to the fact that there is no engagement with the flywheel teeth and rotation does not occur. Tooth wear is normal. However, the failure of this part can be accelerated by the use of thick motor oil, incorrect operation of the relay, or prolonged cranking of the starter after the engine has already started. When the teeth wear out, you will hear a characteristic buzzing sound from the device without any further action. Teeth can also wear out on the flywheel, which is quite rare. If the starter gear breaks, the Bendix will need to be replaced.
- The fork itself, which engages the gear with the flywheel, may fail. In such a situation, you will hear that the relay has activated, but the drive sprocket has not moved out of its place. With such a problem, the starter will turn, but without transmitting torque to the flywheel.
- It is possible that the Bendix drive gear may be misaligned, such that it will not fully engage with the flywheel. This happens when the Bendix spring supporting the gear is deformed. If in such a situation you try to continue to start the engine, the teeth on the bendix or on the flywheel itself may break off.
- It may be that the starter is unable to spin the crankshaft until the start occurs. The malfunction comes down to problems with power supply (wiring, brushes, oxidized battery terminals). In such a situation, the starter will simply not have enough voltage due to its drawdown.
If the bendix wears out, the starter will turn, but the engine will not be able to start.
The starter clicks but doesn't turn over
If the starter makes clicking noises, but nothing else happens, then the reasons should be looked for in the following:
- With one powerful click, you can judge that the retractor relay is working, but the force of this device is not enough to turn the motor. If several unsuccessful attempts have been made, the starter will need to be dismantled for further disassembly and troubleshooting of parts. The probable causes of this phenomenon may be wear of the starter brushes and bushings, short circuit or breakage of the coils, poor contact of the power wire, problems with the retractor or bendix.
- With several clicks, the fault lies in the solenoid relay, unreliable contact between the starter itself and the relay or ground. Before you begin repair work on the starter, you need to check the reliability of the connections, starting from the battery and ending with connecting the wires to the starter.
- Bendix malfunctions (breakage of teeth or fork).
Video: the starter clicks but does not rotate using the example of a VAZ 2110
https://youtube.com/watch?v=M4lhK1TG-ZM
Crackling sound when turning on the starter
There are situations when, when trying to start a car engine, the starter makes sounds in the form of a crackling or grinding sound. In this case, malfunctions may be of the following nature:
- The fastening of the starter to the power unit has become loose, resulting in vibration.
- The bendix is worn out.
- Lack or lack of lubricant on the shaft, which led to difficult movement of the bendix.
- Broken flywheel teeth.
The starter does not turn on
If the starter does not respond to turning the key in the ignition switch, then the reasons should be sought in the following:
- Problems with the solenoid relay. To determine that the problem is in this element, it is necessary to apply voltage directly from the battery to the starter power terminal. If the motor starts to crank, then the reason is obvious - the traction relay is faulty. The contact pads in it quite often burn out, which will require disassembling the device and cleaning the contact elements.
- Broken ignition switch. Sometimes the contact group fails, which can be replaced without completely replacing the lock.
- Problems with power supply. It is necessary to check the entire circuit from the voltage source to the consumer.
- There is a short circuit in the winding, which will be indicated by a characteristic burning smell and the appearance of smoke. In such a situation, the starter must be dismantled and the windings replaced or the old ones rewound.
Due to burnt contacts in the contact group of the ignition switch, problems with starting the starter may occur.
Repair of a collapsible solenoid relay
The manufacturer equips starters with a non-separable or collapsible retractor device. If a non-separable relay breaks down, it must be replaced, but a dismountable relay can be repaired. The described method allows you to check the solenoid relay of all VAZ models: 2101, 2102, 2103, 2104, 2105, 2106, 2107, 2108, 2109, 21099, 2110, 2111, 2112, 2113, 2114, Niva, Lada Priora, Kalina, Granta, Vesta and most foreign cars. Disassembly and repair of the relay is carried out in the following order:
- Unscrew the nuts securing the housing cover.
- If necessary, the ends of the windings are additionally soldered.
- After removing the cover, inspect the power contacts:
- If they burn, the damaged part is cleaned with sandpaper;
- When worn out, replace.
- The device is assembled in the reverse order and tested for functionality.
- The repaired relay is installed back on the starter.
Every driver wants to drive a car that behaves predictably from the moment the key is turned in the ignition. But sometimes it is at this moment that troubles happen with the car. One of the culprits for this event may be the relay in the starter.
Before checking the starter solenoid relay, it is advisable to make sure that the diagnosis is unambiguous. To do this, a superficial check of the participating elements in the vehicle starting system is carried out.
Diagnosis of engine starting problems
The driver must make sure that the problem is solely a relay malfunction. To do this, you can conduct a visual inspection of the electrical wiring and measure the battery charge. If this circuit and all parameters are normal, then with a high degree of probability the breakdown lies in the starter relay.
The absence of clicking sounds from the starter indicates that the solenoid relay is not working. If switching on/off is heard, then the fault is outside the relay.
First you need to try again by turning the key in the ignition. Silence of the motor in response to these actions will lead to disassembly of the starter. But, before disassembling the starter solenoid relay, it must be removed from the engine compartment.
How does a relay work?
Knowledge of the device always helps to understand the malfunctions of the mechanism, so let’s find out the principle of operation of the starter solenoid relay. The coil receives voltage from the car battery. Due to this, a magnetic field is formed that interacts with the armature, which rotates and tensions the spring. Due to its interaction with the bendex, the latter engages with the crankshaft flywheel gear.
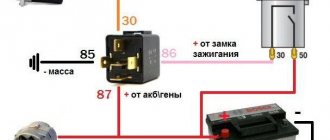
Relay circuit
The closed contact elements block the supply of voltage to the winding, but the armature does not disengage due to the magnetic field. It returns only due to the retaining spring after the electrical supply to the coil is stopped. At this time, the bendex disengages from the flywheel.
Most likely malfunctions
Visual inspection of a faulty relay usually reveals burnt wiring at the contacts. Also, the contacts themselves become recessed (stick), and the coil windings may become insulated and burnt.
You can often focus on the following symptoms, after which you may need to repair the starter solenoid relay yourself:
- the starter does not turn off after starting the engine;
- a click may occur after turning the key on the starter, but the engine does not start further;
- You can hear the starter idling after turning the key, but the engine is silent.
To repair the relay, you will need to disassemble this element. However, there are models that have a non-separable device; these only need to be replaced. This type of repair is the most common.
Relay replacement work
Any action, be it dismantling or checking the starter solenoid relay, must begin by disconnecting the power supply from the car battery. If this is not done, the possible consequences will be a short circuit and damage to all wiring. Such a replacement can be very expensive.
Repair kit
Before opening the case, it is necessary to clean carbon deposits and dirt from the surface so that they do not get inside the electrical device. Then you need to loosen the nut on the brush assembly and disconnect the contact from the bolt. Now you can loosen the tie rod and its bolts that hold the block to the mass. We take out the relay from the engine compartment.
Unscrew the nut at the end and reveal the internal contents. We take out the burnt out or non-working core, and install a new one in its place. We carry out the assembly in the reverse order and mount the part in the engine compartment. If everything was assembled correctly, the engine should start the first time.
ktonaavto.ru
Signs of a generator malfunction
Generator faults are not always easy to identify. Some of them (the so-called “floating” faults) are determined only on a special stand.
But if you notice that the headlights have become dimmer while the engine is running, and that extraneous noise interferes with the normal sound of the running engine or that the battery is quickly discharged, then it’s time to contact the experts. Because it is better to prevent a malfunction by repairing the generator in a timely manner than to ruin your day one day with an unexpected breakdown.
Recently, it has become very convenient to contact specialized companies whose specialization is the repair, maintenance and sale of starters and generators. Modern equipment, combined with qualified personnel and a large selection of spare parts, will allow you to eliminate any malfunction in just a few hours. And diagnostics with disassembly and analysis of the degree of wear of parts will help to quickly determine the degree of performance and carry out restoration work.
However, you can try to diagnose and eliminate some of the causes of generator malfunctions yourself.
If the battery in the car is not charging, then first of all you need to check the tension of the alternator belt - the belt should be tensioned without sagging. This, of course, can be done by eye, but it is better to use a dynamometer: if you pull the longest branch of the alternator belt with a force of 10 kgf, then it should bend no more than 10-15 mm.
On most machines, the tension of the alternator belt can be adjusted by loosening the nut securing the alternator housing to the adjusting bar and using a pry bar to move it away from the engine. After setting the required belt tension, tighten the generator mounting nut back.
If the tension of the generator belt is normal, then most likely the voltage regulator relay needs to be replaced. On older cars it is a plastic box screwed to the front fender mudguard, but in modern cars the regulator is built directly into the generator itself.
To replace the relay-regulator in the generator, you must first unscrew the two mounting screws, disconnect the contacts, and then remove the regulator along with the brush assembly from the generator housing.
Check the slip rings: burnt ones should be cleaned with fine-grained sandpaper and wiped with a cloth soaked in solvent.
For the first time after installing a new regulator, the voltage may be slightly different from the nominal one. When the new generator brushes get used, everything will return to normal.
How does the starter solenoid relay work?
Turning on the ignition starts the power supply to the device winding. As a result –
the formation of a magnetic field in the pull-in winding, retraction of the coil core and closure of the contacts. At the same time, the core pushes the clutch towards the crankshaft flywheel, forcing it to rotate.
The pull-in winding forces the core connecting the power connectors of the relay through the central contacts to retract, transferring energy from the battery to the starter and causing it to work. The winding holds the core, which guarantees the flow of energy to the starter.
If there is insufficient battery charge, the retractor winding is still activated, but it is no longer sufficient for the holding force. A spring acts on the core and pulls it back, and the retracting winding again tries to return it to the coil.
Important! One of the common problems with the starter return relay is burning of the power contacts. If this problem occurs, you should thoroughly clean the damaged area with sandpaper, and if the contacts wear out, replace them. But since the retaining device is not able to hold it, the core moves back again
Such attempts to transfer energy from the battery to the winding are characterized by numerous clicks of retracting and releasing the core
But since the holding device is not able to hold it, the core goes back again. Such attempts to transfer energy from the battery to the winding are characterized by numerous clicks of retracting and releasing the core.
Starter Repair Tools
What you will need to remove and repair the starter:
- Keys for 8, 10 and 13
- Screwdriver (2 pieces)
- Calipers
- Multimeter
You will need such a measuring device
- Pliers
- Hammer
- Bearing mandrels
- Lubrication
- Sandpaper
Replacement
In fact, it is theoretically possible to repair the relay. But in reality this is rarely justified in terms of financial and time costs.
A much simpler and more rational solution is replacement. The procedure will not take much time, but the unit will definitely work properly and reliably. It is unknown what the result of the repair will be.
If the relay is incorrectly repaired, this can lead to blocking the start of the power unit. The cost of repairing such a problem is much higher than buying a new high-quality relay.
Proceed with caution, keeping an eye on each item you take apart and put back together. Clean some contacts, if necessary, tighten loose fasteners. Whatever one may say, as the car is used, it shakes violently and vibrates, which leads to the banal loosening of nuts and bolts. What's most interesting is that this often leads to a whole range of problems. Therefore, make sure that each individual fastener is securely fastened.
Fuse and relay box
The fuse and relay box is located on the left, lower part of the instrument panel. It is accessible by pressing the button and folding the lid down. To remove fuses, there are special non-conductive pliers in the upper left part of the mounting block.
1 - K5 - high beam relay. If the high beams in two headlights do not work, check this relay. If one of the high beam headlights does not work, check fuses F3 and F13, as well as the lamps and the high beam switch.
2 - K4 - low beam relay. If the low beam in both headlights does not work, check this relay. If only one low beam headlight does not work, check fuses F2 and F12, as well as the lamps themselves and the light switch.
3 - K1 - lamp health control relay.
4 - non-conductive tweezers for removing fuses.
5 - power window relay. If your power windows stop working, check this relay. It could also be in fuse F5, or in the window lift drive system itself. To get to the mechanism, you need to remove the door trim. Check the electric motor, the appearance of the gears and the absence of binding of the mechanism.
Replacing the VAZ 2106 starter
The most common reason why a six starter becomes faulty is the failure of the retractor relay with which it is equipped. That is why, when turning the key, the driver will hear a characteristic click. Consequently, the engine will not start in this case.
True, sometimes it is necessary to completely replace the starter. But first you need to dismantle the old starter. To do this, use the key to “thirteen”.
Replacing the starter consists of the following steps:
- We remove the battery.
- Then you need to find the fasteners.
- Then you need to unscrew the 2 bolts. Unscrew the bolts
Then you should pull the starter and move it towards the right. So it will move away from its previous position and shift to the right side.
Next, you need to lift the left side of the starter and turn it upside down. It is pulled up all the way. This element of the vehicle should be lifted until the wiring located at the rear of the starter becomes accessible and the wires can be removed. There are 2 wires at the back. One of them is fixed using a standard nut, which initially needs to be unscrewed.
Unscrew the power cable nut
A simple plug serves as the second nut. It needs to be moved to the side. It can be dismantled without much effort. Once the starter is free, it can be easily removed.
As for installing a new starter, it is carried out in the reverse order. This procedure will not take much time. It is recommended that you perform these steps in a specific sequence.
In other words, you first need to connect the wires to the starter, and only then install it in its original place. At the same time, the price of a new starter for a six ranges from 2 to 4 thousand rubles. It all depends on the manufacturer and modification of the device itself.
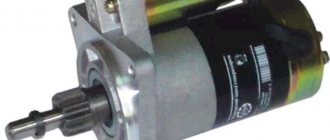
Which starter to buy for the “six”: selection of components
The stock version of the VAZ 2106 is equipped with a gear-type electric motor, the minimum power of which is 1.4 kW/h. The design of the “six” involves the installation of higher power models up to 1.6 kW/h to make it easier to start the engine in cold weather, but in this case it will be necessary to replace the power wiring.
| Manufacturer | vendor code | Part type | Device power, kW/h | Approximate cost, rub. |
| ZiT | 425.3708000 | Geared | 01.04.2019 | 3600 |
| ZiT | 425.3708023 | Geared | 01.05.2019 | 3990 |
| BATE | 2101-3708000 | Geared | 01.04.2019 | 3700 |
| BATE | 2101-3708023 | Geared | 01.06.2019 | 4500 |
| PRAMO-ELECTRO | 21214.3708010-81 | Geared | 01.04.2019 | 4100 |
| PRAMO-ELECTRO | 21214.3708010-34 | Geared | 01.05.2019 | 4700 |
| BULSTART | 2101-3701010 | Geared | 01.05.2019 | 4600 |
| BULSTART | 2101-3701023 | Geared | 01.06.2019 | 4900 |
Note! Before installing the starter, it is recommended to check the part for compatibility - the ideal option would be to check the part number indicated on the product packaging with the vehicle VIN code. Remember, installing an electric motor with increased power can negatively affect the operational life of the power unit or cause a short circuit and output of the vehicle’s electrical systems.
Dismantling
There should be no problems with the dismantling process. The main thing here is to remove the starter, since the required relay is held on it. Therefore, dismantling is carried out as an assembly.
- Turn on the handbrake, disconnect the battery by removing the negative terminal from it.
- A wire with a large cross-section goes from the battery to the contact of the relay. It can be turned off by unscrewing it using a 13 key.
- Remove the thin winding power wire from the solenoid relay.
- Using the same 13mm wrench, unscrew the three mounting nuts holding the starter to the clutch block.
- You can remove the device through the bottom or top. If you chose the top, then you need to slightly rotate the starter around its axis and remove it.
- The lower output is more difficult, since here you need to remove the crankcase protection. But if parallel work is carried out that requires similar manipulations, problems will not arise.
Repair
Only a relay that has a collapsible design can be fully repaired. It is not uncommon for cars to have a relay with a non-separable body. Repairs there are also possible, but only partial.
- Unscrew the pair of bolts that hold the relay on the starter, disconnect the core shackle from the upper end of the drive lever;
- Install a new solenoid relay in its place, thereby completing the replacement.
But if you want to save money or just like to tinker with your car, you can try to bring a damaged relay back to life. To do this, we offer you detailed instructions.
The most vulnerable spot of this unit is the contacts where the wires are soldered to the terminal. It may have oxidized or was simply of poor quality to begin with. Therefore, before disassembling the relay, solder the contacts with a soldering iron. In most cases, the operation of the relay returns and there is no need to disassemble the case.
If this measure does not help, we will disassemble the case and repair it.
- The relay consists of a housing with a winding inside, a core with a return spring and contacts.
- The spring disconnects the starter rotor gears from the Bendix ring when the power to the relay winding is turned off.
- The back cover of the relay is fixed with screws to the body. Therefore, the first thing we do is remove this cover by unscrewing the corresponding fasteners.
- Both contact bolts have a nut, which you also unscrew.
- You will see washers under the nuts. Do not lose them so that you can return them to their place during reassembly.
- Unsolder both terminals of the winding using a soldering iron. Then remove the cover.
- If you find traces of carbon on the contacts, they can be removed with a small file.
- There is a rubber O-ring under the cover. Check it for elasticity and integrity. If the ring is damaged or worn, replace it with a new one.
- Remove the contact plate along with the rod.
- Use a flathead screwdriver to remove the return spring.
- If the spring is deformed or stretched too much, it will need to be replaced. Otherwise, a worn spring will not be able to guarantee the desired contact. As a result, the relay does not work properly.
- Disassemble the contact plate. To do this, you need to remove the retaining ring that insulates the washer. After this, the plate will fall out on its own due to the pressure created by the spring.
- Remove the contact bolts from the cover. Clean the surfaces of their contacts. Often, due to burning of the contact surfaces, the solenoid relay stops working normally.
- If the carbon deposits are too strong and cannot be removed with simple sandpaper, do not rush to buy new bolts. Just rotate them 180 degrees. So they will touch on the other side, where there is no carbon deposits.
- The relay windings are located in a non-separable housing. If they are damaged, you will have no choice but to completely change the relay.
- Replace all damaged and worn elements of the switching relay, and then put everything back into the housing. Reinstall the solenoid relay and check if the ignition returns to normal.
If the relay has a non-separable housing, many recommend replacing it. But if you wish, you can even repair such a unit. To do this, you need to flare the housing with pliers, then unsolder the contacts and remove the cover. Next, follow the instructions given above.
The last stage of replacement or repair is checking the winding resistance.
If the unit is working properly, the multimeter in ohmmeter mode will show you the following data.
How to repair a starter yourself
I'll tell you how to sort out and restore the starter using a specific example. I came across a sample with the following breakdown: the starter turns the crankshaft slowly, even with a high battery charge.
Having dismantled and disassembled the device with the connected starting wires, when it starts, it rotates quite confidently. After some time, the device stopped and smoke appeared.
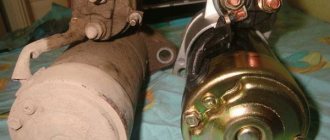
When the back cover of the starter was removed, black dust fell out of it. This means that the brushes are worn out. After removing the brush mechanism, remove the housing with magnets and rotor.
In order to better examine the cause of the problems, you need to sort out the starter, blow out all the mechanisms with a compressed air cylinder and wash them in gasoline. After these manipulations, it becomes clear that the brushes have practically worn out, the springs that pressed them have weakened, the brush holders have turned blue due to overheating, and the coils have melted.
How to resuscitate and repair the starter in this case? You need to take the brush mechanism (assembly) and bring it to a company that repairs automotive electrical equipment. Ask for an analogue. Approximately this will cost you 450-500 rubles. And if you compare it with the price of a starter (5,000 rubles on average, it all depends on the brand), it turns out to be quite cheap.
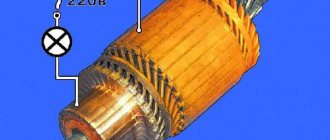
Then we thoroughly clean the rotor and inspect the commutator, which is in constant communication with the brushes. It turns out that the collector is also worn out (marked with arrows in the picture), but it will be able to work for some time without re-grooving it. Therefore, we simply clean the collector using fine sandpaper. As a rule, a commutator can easily work through a couple of sets of brushes. But if the collector fails, then most likely the entire starter will have to be replaced.
Go ahead. Let's carefully examine the Bendix (overrunning clutch). Let's try to rotate its gear manually. It should spin one way, but not the other. Also, the bendix should move easily along the shaft axis. In my case, everything is fine with him. If there were problems with the overrunning clutch, it would also be quite difficult to find it on the market. Most often, the rollers and springs wear out in the Bendix, which is why the gear does not lock but slips during reverse rotation. As a result, the starter works, but the engine does not. In this case, it is best to replace the bendix or the entire device.
Then he inspects the condition of the gearbox itself. We remove the gears, then wash them with gasoline. If everything is fine, then we apply just a little CV joint or high-quality bearing grease to the bearings and gears.
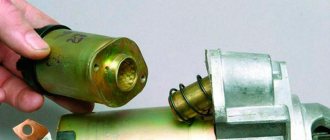
Additionally, let's inspect the contacts of the retractor relay. To open it you will need a soldering iron. You need to unscrew two screws and solder solder on two contacts (indicated by arrows).
The contacts were in perfect order. Clean them with a piece of sandpaper. Then you need to heat up the pistons that go on the lid and slam the lid on the table with a sharp movement. Extra pieces of solder will come out of the pistons and the holes will become free. Then the cover can be put on the wires without any problems and soldered everything in place.
Under no circumstances should the core of the solenoid relay be lubricated with anything, because in the cold this will cause it to jam. To calm your soul, you can lightly apply motor oil and wipe everything dry.
Then we assemble the starter device in the reverse order. Be sure to apply some grease to the rear rotor hub.
Some people ask how to rewind the starter? If there is a problem with the winding of the device, then re-winding is not entirely effective. Here it is better to replace the entire part or device.
Before installing the repaired starter on the car, grind the brushes to the commutator. To do this, connect the starter using battery cables. Let him work for a couple of minutes intermittently. Everything is ready, the starter can be installed on the engine and enjoy a confident start.
Video: How to make a starter with your own hands?
The author shows how you can make an UNREALLY COOL DIY product from a broken starter with your own hands. This is an impact screwdriver. Make yourself such a necessary tool!
If the starter does not click and does not turn, what should the owner of a VAZ-2106 do in such a situation?
There can be many reasons for this problem. The simplest and most common is a battery that is grounded to zero. Recognizing the source of the problem in this case is not difficult. You just need to turn on the headlights. If they do not light up, it means the battery is completely discharged. In this case, you can start it “from the pusher” or ask your neighbors in the garage for a “light.” By the way, the headlights can shine at full intensity. That is, the battery is not completely dead, but the starter does not have enough energy. In this case, the retractor, if everything is in order with it, will make itself felt with a click.
If the battery is charged normally, then you need to continue searching for the source of the problem. We check the integrity of the fuses. If everything is in order here, we look further. By the way, the fault may well be in the ignition switch itself. To check this version, you should carry out a simple manipulation. In particular, you need to try to start the car directly by connecting the necessary wires to each other. If after such manipulation the starter comes to life, it means that the problem is really in the lock, and it should be replaced.
Next, carefully inspect the wiring for breaks. If everything is in order here, then we continue the search. The absence of clicks from the solenoid relay may indicate:
- contact between the rotor “mass” and the positive charge of the stator;
- jammed bushing or shaft of the electric motor.
Without removing the starter, it will not be possible to determine the exact cause. It is quite possible that the absence of clicks is due to the short circuit of the rotor or stator winding. To understand the reason, in any case, you will need to remove the starter and disassemble it.
After this, carefully inspect the retractor terminals. It is likely that they need cleaning (or replacement) after which the problem disappears. If this procedure does not help, check the relay winding. The presence of a malfunction will be indicated to you by a characteristic burning smell. The problem can also be caused by a loose fit between the brushes and the commutator, or too much wear on the commutator. It is quite possible that you just need to replace the retractor.
One point is worth noting - if you have already disassembled the starter, found a specific malfunction, and fixed it, then still conduct a visual inspection of the entire device. This kind of preventive maintenance is extremely useful in preventing future malfunctions. If you see that a part is clearly reaching the end of its service life, replace it immediately. This will eliminate the need to disassemble the starter again after some time. That is, in this case you are doing a kind of prevention.
In conclusion, I would like to note one more point. There are often situations when the retractor clicks, but the starter still does not start the engine. There are many more possible reasons here. However, it also happens that after turning the key there is no reaction at all. Let us list once again all the most typical causes of this problem, both with and without retractor clicks:
- discharged battery;
- loosening the tightening of the tips;
- mass short circuit;
- oxidation of terminals or terminals on the battery;
- brushes worn out or stuck;
- burnt out collector;
- slipping of the freewheel;
- damage to gear teeth;
- bushings that have exhausted their service life;
- egnition lock;
- relay malfunction.
https://youtube.com/watch?v=_JcRf4xWs_E
Starter malfunctions
What is the approximate service life of a starter? The average value is 5 years or 120 thousand km. How long the starter lasts directly depends on the operating conditions. For example, if you drive short distances in urban areas and constantly start the engine, the starter will quickly fail.
I’ll tell you about the signs that accurately indicate a device malfunction. These are symptoms such as:
- A specific crackling sound is heard.
- There is a delay in starting the engine after the driver turns the ignition key.
- The starter motor can be heard starting, but there is no sound of the engine running.
- There is no action after turning the ignition key.
- The starter operates after the engine starts.
What possible malfunctions can occur with the starter?
- Poor contact. This is a common breakdown, and the driver can notice it when starting the engine. In this case, you should check the device's mounting and contacts.
- Magnets may fall off. This applies to modern devices. Here it is better to entrust repairs to experienced auto repairmen.
- Wear of support bushings. In this case, the armature will seem to “dangle” and there will be no full contact of the brushes with the commutator. In this case, there will be sparks, the brushes will burn and wear out. In this case, you need to replace the brushes and support bushings, and groove the commutator.
- Wear of rollers in bendix. In this case, it is towed. The bendix needs to be completely replaced.
- Solenoid relay malfunction. Most often, nickels burn. The copper melts in them, and the nickels are soldered to the contacts. In this case, even after starting the engine, the starter will continue to work. All this drains the battery a lot. Therefore, here you should disconnect the wire from the battery as soon as possible, remove the device and replace the solenoid relay.
If the crankshaft rotates slowly, the reasons for this are:
- High viscosity motor oil.
- Low battery charge.
- The wire contacts have oxidized.
If the starter runs too long, it is due to a stuck ignition switch or problems with the contacts.
If the starter does not start when you turn the key, the reasons for this may be the following:
- The battery is discharged or broken.
- There is no contact of the ground wire with the battery or between the winding and the collector.
- The anchor is worn out.
- The brushes do not adhere to the commutator.
- Solenoid relay is faulty.
- The device control connector is disconnected.
- In automatic transmission, the selector is not in position N or P.
- The gearbox switch is faulty.
If the starter rotates very slowly, this is indicated by the following faults:
- The battery does not work or is low.
- Bushings are worn.
- The wire between the battery and the starter is faulty.
- Damage to the solenoid relay.
- The stator or armature winding is faulty. The mechanisms must be replaced.
- Poor contact of the armature or stator winding with ground.
- The brushes have poor contact with the commutator due to wear or incorrect position.
- Commutator burning.
The starter works, but the engine does not:
- Overrunning clutch worn.
- Parts in the gearbox are broken.
The starter rotates together with the flywheel:
- Solenoid relay is broken.
- Failure in the contact group of the ignition switch.
There is no click of the solenoid relay:
- Low battery charge.
- Contacts or coil of the solenoid relay are burnt out.
- The contact on the positive terminal of the battery or starter has oxidized.
- There is a malfunction in the ignition switch component.
- Short circuit to ground in the coils of the solenoid relay. Here it is better to replace all the parts.
- The relay armature mechanism is stuck.
If the crankshaft does not rotate the starter armature, then the probable causes of the breakdown are:
- Towing the freewheel.
- Jamming when moving parts along the screw thread of the shaft.
- Broken clutch release lever.
- Malfunction of the clutch spring or drive ring.
If loud noises appear when starting the engine, you should check the fastening in the starter parts.
If a gear grinding noise occurs in the starter, you should check the switch contacts, the gear travel adjustment, the drive device spring, and the flywheel ring teeth. If the ring gear is damaged (it is often made of plastic), then it is better to replace it with a metal one. There is also a possibility that the solenoid relay is stuck.
Video: Checking a car starter, all methods and breakdowns
This video is suitable for beginners; an experienced mechanic talks very interestingly.
Car starter main purpose
Sooner or later, every car owner, regardless of its make and model, has to face the problem that his vehicle refuses to start. The first thing, naturally, is to check the fuel level, battery charge, and electronics. If all this does not cause any complaints and doubts about serviceability, then most likely the problem is in the starter. After all, successful engine starting depends on it.
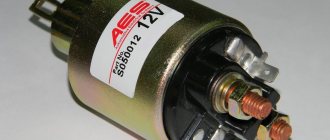
Currently, as a rule, relays 35.3708 with an end-mounted collector are installed on cars of this model.
At an earlier time, approximately in the 70-80s, the ST-221 starter was also installed.
Set 1 Starter Relay Magnetic Starter Relay Part Number: 68N 81940 00 00 | |
Description:
Replaces Yamaha Part Number: 68N-81940-00-00 100% Brand new, good working condition High quality material, efficient and durable, competitively priced Reliable replacement electrical parts Easy to install, directly replaces the old one
Specification:
Fits many 2002-2017 Yamaha FX and WaveRunner models: FX140, FX140 Cruiser, GP800R, GP1200, GP1300R, Superjet, SUV1200 Many, XL700, XLT800 and XLT1200 2002-0007 Fits 2005 Yamaha Jet Boat Models: AR210, AR23 0, LS2000, LX210, LX2000, SR230 and SX230
The kit includes:
1 set starter relay
How it works
Plus, when the contacts on the traction winding are closed, the starter motor is supplied with power from the battery. The contacts are washed out, the blocking is activated, due to which the retractor winding is “cut out”.
The retractor is controlled directly from the ignition switch. Plus it plays the role of starter protection. The fact that the relay will require an impressive amount of current leads to gradual wear of the contacts in the contact group.
This can be noticed by the unclear start of the power unit; periodically the starter may not operate or may rotate the engine slowly. You can solve this problem on your own.
Troubleshooting relays
The faulty part is identified quite simply. It is not at all necessary to remove the spare part from the car. If the car does not start, then you need to perform the following steps.
First, check the wires going to the starter for breaks. If the cable is in order and current is supplied, then we proceed to checking the solenoid relay. Turn the ignition key and listen for a characteristic click. Its absence indicates one of the following relay malfunctions:
- anchor jamming;
- winding break;
- lack of food.
If there is still a click, but the starter does not turn or turns very slowly, most likely the contact plates are burnt.
If there is a clicking sound, try to start the starter. This is done using a screwdriver or a metal wrench. First, remove the wire from the relay connecting it to the ignition switch. Then we close the terminals: battery and starter.
In such a situation, current flows directly from the power source. If the electric motor starts working, then you should repair the starter solenoid relay with your own hands.
It happens that the starter brushes through which the relay is connected fail. Then we dismantle them and install new ones. In the worst case, it happens that the commutator wears out the brushes. Such a malfunction will cause the car owner much more problems.
When the starter is turned on, all devices are turned off.
If, when the starter is turned on, all devices turn off, this cannot be attributed to a starter malfunction. In this case, it is necessary to check the state of charge of the battery and the reliability of the terminals on it. The easiest way to do this is with a voltmeter, measuring the voltage when the starter is turned on. If the voltage drops below 9V, the battery may not be charged enough or the starter may be faulty. To check the charge, just turn on the high beam headlights and if the voltage begins to drop sharply, then the battery is discharged. If the voltage does not drop sharply, then the starter is faulty.
To check the contact in the terminals, it is necessary to measure the voltage on them. If necessary, remove and clean the terminals.
Starter repair on a VAZ 2106 - causes and possible malfunctions
Hello, dear motorists! It would seem like just yesterday you were enjoying the smooth sound of the engine, obediently appearing from under the hood of the “six” after turning the key, and the short buzz of the starter. And today, bam!: the starter of the VAZ 2106 does not turn well - it is no longer even able to turn the crankshaft a couple of times.
The first thing you will, of course, check is the battery charge. Sometimes it is a weak battery charge that is the cause of all the troubles and misfortunes associated with electrical systems.
But what to do if the battery is charged, the headlights are shining, and the signal is deafeningly roaring? Get ready for the fact that you will have to remove, disassemble, check and possibly repair the VAZ 2106 starter.
Typical VAZ 2106 starter malfunctions and their causes
The “six” starter is, in principle, no different from the starters of classic models. Therefore, their faults are the same. More often than others, malfunctions of the VAZ 2106 starter occur, such as:
1. The starter turns on, but the VAZ 2106 starter solenoid relay does not work. The anchor does not work. Possible reasons for this situation:
- the battery is low;
- oxidation of battery terminals and (or) wire tips;
- the tightening of the tips is loose;
- break in the wire of the VAZ 2106 starter solenoid relay;
- short circuit in the windings of the solenoid relay;
- there is a short circuit to ground;
- the retractor relay armature is stuck;
2. When turned on, the solenoid relay is activated, the armature rotates very slowly or does not operate.
Causes of malfunction:
- low battery charge;
- oxidation of battery terminals and (or) wire tips;
- loosening the bolts securing the solenoid relay;
- freezing or excessive wear of brushes;
- break in the windings;
- a short circuit has occurred between the collector plates;
- commutator burning.
3. When turned on, the starter armature rotates, but does not rotate the crankshaft. Causes:
- slipping of the freewheel;
- malfunction or slipping out of the axis of the clutch engagement lever;
- Buffer spring malfunction;
4. The starter continues to operate after the engine has started. Reasons leading to this:
- the drive lever gets stuck;
- sticking of the retractor relay contacts;
- faulty return spring on the ignition switch;
- the solenoid relay is stuck;
- starter misalignment;
5. Increased starter noise during operation. The reasons for the abnormal sound when turning on the starter may well be:
- bushing wear;
- loosening of the starter fastenings;
- breakage of gear teeth;
How is the VAZ 2106 starter checked and repaired?
To check the functionality of the starter solenoid relay, insert a voltmeter or ammeter into the winding power circuit. Install a gasket between the drive gear and the stop ring.
When the starter is turned on, the ammeter reading should not exceed 23A, the voltmeter reading should not exceed 9V. Large values indicate possible short circuits in the wiring.
Check the windings using a tester. You can talk about a short circuit in the circuit if the light comes on.
Having cleared the starter of dirt, you can begin to disassemble it, successively washing and drying the parts. After this, you can begin the necessary measurements and visual inspection.
Scratches and nicks on the moving parts of the starter can be removed using sandpaper. Wear of parts can be corrected either by installing gaskets and knurling. Although this hardly makes sense. It's easier to replace the part.
If wear of parts exceeds the values allowed by technical specifications, replace them with new ones. Replace damaged insulation. Also, collectors with worn or loose plates cannot be repaired.
Thread breaks and damage can be repaired by cutting a new thread or installing a screw driver.
To eliminate a malfunction of the field windings, disassemble the starter housing by removing the terminals and screws securing the tips. Dry the coils and soak them with insulating varnish. Replace damaged insulation in the windings with new one. Clean oxidized contacts, replace welded ones.
Replacement of VAZ 2106 starter bushings is carried out when scuffing or significant wear is detected. To determine bushing wear, measure the shaft clearance. It should not exceed 0.2 mm. After inspecting and repairing the starter, reassemble it in the reverse order of disassembly.
Principle of operation
It all works like this: when the engine is not running, the armature of the retractor relay is pulled out of the housing due to the action of the spring on it. The same spring holds the Bendix and gear through the fork in a position where there is no engagement.
When the ignition key is turned to the start position, the solenoid relay is first activated.
The electrical energy supplied to the coils of the solenoid relay ensures the appearance of a magnetic field inside the housing.
This field acts on the armature, and it, overcoming the force of the spring, enters the body, after which the retracting coil is turned off and ceases to create a magnetic field, but in the retracted position the armature is held by the holding coil with its magnetic field.
In this case, the armature pulls the fork, which in turn moves the bendix forward along the rotor shaft, and its gear engages with the flywheel ring.
The armature, entering the housing, pushes the starter relay rod, and, moving, closes the contact plates of the positive terminals with each other.
Electricity from the battery is supplied to the brushes of the starter motor, and its rotor begins to rotate. And since the gear has already engaged, the rotor begins to rotate the flywheel.
After starting the power plant and turning the ignition key back, the power to the holding coil stops, its magnetic field disappears and the armature comes out of the housing under the influence of a spring.
At the same time, it disengages the bendix through the fork and stops acting on the relay rod. He, in turn, moving away, opens the contact plates, and the starter is completely turned off.
Starter repair VAZ 2101, 2102, 2103, 2104, 2105, 2106, 2107
Repairing such a vehicle element as the VAZ 2101, 2102, 2103, 2104, 2105, 2106, 2107 starter is a rather painstaking process. The driver must have good self-control and strictly follow certain instructions. Then repairing the starter yourself will go smoothly.
So, it is necessary to repair the starter in the following sequence:
- Remove the old starter from the engine.
- Using a key set to “thirteen”, loosen the nut securing the wiring, which contains the traction relay.
- Disconnect the cable end.
- Apply a voltage equivalent to twelve volts to the relay output. We supply 12 volts to the starter
- Change the housing pole to a negative value. As for the ohmmeter, this device should be connected to contact-type bolts. At the same time, if the solenoid relay is repaired, the armature pulls the so-called “overrunning clutch” into the window of a special cover, which is located in front. But the contact type bolts must be closed.
- Taking a Phillips screwdriver, you need to unscrew the 3 screws.
Unscrew the bolts of the retractor relay - We dismantle the traction relay.
- We free the relay body from the rod, which is equipped with a spring.
- We install a new traction type relay using the reverse sequence.
- To continue further disassembly of the starter using a Phillips screwdriver, unscrew 2 screws.
- It's time to remove the cover.
- In order to check the current condition of the brushes, we use a slotted screwdriver. It unscrews the fastening screw that secures the contact wire.
- When the spring is released, you need to remove the brush. The same method is used to remove the 3 remaining brushes. If the latter have wear of up to 12 mm or less, then they need to be replaced.
- Next, you need to connect the ohmmeter one by one to the terminals of the stator windings. They are checked for short circuits. You should also make sure that the separately located winding terminals do not come into contact with the housing.
Checking the short to body - Use a screwdriver to pry up the retaining ring and remove it.
- We remove the washer from the axle.
- Using a ten key, remove the 2 coupling nuts.
- Then we remove them.
- We disconnect the starter body and remove it from the insulating tubes of the tension type bolts.
- We take a quick look at the commutator and windings. You should never leave charred windings. If the collector has been slightly burned, it is necessary to clean the existing plates with abrasive sandpaper. When severe burning has occurred and serious wear has occurred, it is recommended that the anchors be replaced. As for scuffing and enveloping of bronze relating to the bearings on the special neck of the armature shaft, they are removed using fine-grained sandpaper and are subsequently polished.
- Next, we take the ohmmeter again and check the armature winding to ensure there is no short circuit. A damaged anchor must be replaced.
Checking the armature windings - We release the drive cover from the rubber seal.
- Remove the adjustment washer from the armature axis. During the assembly process it must be returned to its original place.
- The lever axis is being uncoiled.
- You need to use a special bit to select the axis.
- We remove both the anchor and the drive.
- We pry it up with a screwdriver and remove the overrunning clutch drive lever.
- As for the gear, it must make rapid rotational movements in one direction and not move in the opposite direction. Also, it should not be accompanied by chips or nicks that may appear in the leading area of the teeth. When the gears are worn out or the clutch is faulty, the assembly requires replacement.
- Having placed the anchor axis, using a block of wood for these purposes, using a key set to “thirteen” we knock the limiter off the locking type ring.
- We pry it up with a screwdriver and remove the retaining ring.
- We free the axle from the limiter and the overrunning clutch assembly. The drive gear is also dismantled.
- Having replaced the coupling assembly, we return the locking ring to its original place and attach the limiter with part of the conical groove to the winding part of the armature.
- The limiter must be pressed onto a locking ring. To do this, use a hammer to strike. We also use the key for “thirteen”.
- Using compressed air, we remove the coal dust that has accumulated in the body and brush holder. As for the wiring ring and the plastic surfaces in contact with it, they must be treated with Litol-24. Lubricant number 158 is also suitable. In this case, we use engine oil, which is necessary for processing the rotor bushing, screw splines of the armature shaft and hubs touching the overrunning clutch.
- Further assembly is carried out in the opposite order to disassembly.
Removal and installation
- Loosen the bottom mounting bolt and remove it.
- We unscrew the hose from the air intake, unscrew the nut that secures the shield on top and the nut that is located under the air intake.
- We remove the shield.
- We unscrew the two upper mounting bolts that connect the starter to the crankcase.
- We also unscrew the lower mounting bolt.
- We move the device forward and disconnect the relay output from the block.
- We unscrew the nut that secures the wire between the battery and the relay.
- The starter is removed upwards.
Installing a new device is carried out in the reverse order.
Repairing a VAZ 2106 starter is a long and thankless task. Moreover, you can buy a brand new device in the store for a small fee. Therefore, we advise you not to waste your precious time and, in case of a breakdown, simply install a new one. But if you still want to tinker, we suggest watching the video tutorial.
VESKO-TRANS.RU
AutoNews / Reviews / Tests
Where is the Starter Relay on the VAZ 2106
Checking and repairing the starter electromagnetic relay
Many people have apparently had to find themselves in a situation where their car, for unknown reasons, did not want to start. If the electronics are fine and the battery is working and charging, then it looks like the problem is with the starter. If the next attempt to start the engine fails, then it’s time to prepare for repairs.
The bottom line is that the starter is not complex in design, and if there is an abstract, then at least some motorist will be able to disassemble and reassemble it. But even with this conventional design, removing and reinstalling the electromagnetic relay turns out to be very problematic for many.
First you need to diagnose the part and determine the location of the failure. The mechanic's eyes were the first to catch the ignition switch and relay under the hood of the car.
If the starter is silent when you start the engine, there is probably a breakdown in these places. If at the moment of starting the starter roars, clicks, noises, then the center of the breakdown is located in a different place.
So, just in case, check the battery and replace it if necessary. If the problem persists after replacement, a more complex repair will be required.
RELAY VAZ 2106. DESIGN
View all Vasel relay 2106
, where it
is
and appropriate. necessary information for vase owners. Let's.
check electromagnetic relay
The starter electromagnetic relay operates on the principle of an electromagnet. When pulled, voltage is applied to the relay windings and attracts a part, which, in turn, extends the bendix to engage the flywheel. At the same time, the contacts that supply voltage to the windings are closed. If any link in this chain fails or malfunctions, the pusher can only be started
You can check the relay either with the starter removed or directly on the car by blocking it with a screwdriver or other metal object. When the circuit is closed, voltage is applied directly to the windings, bypassing the relay. If the starter then the relay is indeed faulty.
If, when you turn the key, the relay is retracted, but the starter does not rotate, then the source of the malfunction must be found directly upon startup.
Here are the reasons why a breakdown may occur:
- Old age and destruction of materials
- Combustion winding
- Burning heel inside the relay
Traction repair of starter relay
If, after all the testing, you come to the conclusion that the problem is actually centered on the starter solenoid relay, it will need to be repaired (although in many cases it is easier to buy a new one).
The fact is that many manufacturers, trying to make the relay as reliable as possible, make it inseparable, in which case, of course, you need to buy a new one. If the relay can be disassembled, then its operation can be restored with your own hands. Here are some breakdowns you may encounter:
You can see any of the breakdowns when disassembling the relay. After repairing or purchasing a new part, install in the reverse order of removal. Finally, we invite you to watch the video at: