Any car existing in the world is necessarily equipped with a special system designed to measure the speed of the vehicle and transmit this information to the ECU. Carbureted vehicles use a cable (mechanical) speedometer system, so a speed sensor is not required. Therefore, on VAZ 2110, 2111 and 2112 it is mounted only on injection vehicles - this system is electronic and is responsible for controlling the operation of the power unit. Replacing a speed sensor is a rather labor-intensive task, but not at all difficult. More on this later in the article.
Repair and replacement
We carry out dismantling according to the following scheme:
- We de-energize the car by removing the “-” connector from the battery;
- We disconnect the wire connector from the sensor and remember what their pinout is;
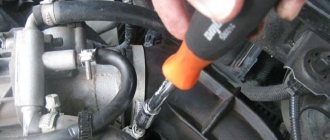
- We unscrew the sensor itself by hand. If this doesn’t work, use key 21 or 22 (there may be design differences);
- At the same time, we check how the drive feels. After removing the sensor, you need to unscrew the nut with which the drive is attached to the gearbox. You need to remove it very carefully, since if you drop the rod into the gearbox, you will have to disassemble it too. The new drive has a rubber ring, which is lubricated with transmission oil before installation.
We install new devices in the reverse order. Again, the pinout of the wires is of particular importance.
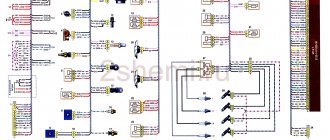
Inside the block we look at how the pinout is marked. And using a multimeter with the ignition on, we determine which connector goes to which wire.
If the multimeter shows “minus”, and you connected this wire to the plus connector, then you urgently need to change the polarity. In this regard, it is better to take the block that we recommend.
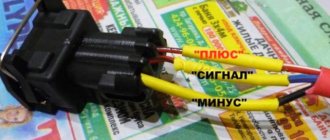
But if there isn’t one, you can use the regular one. In this case, the pinout is as follows: 1 – “+”, 2 – signal output, 3 – “-”.
The drive is checked, as well as the operation in general while the car is moving, or with the front wheels hanging.
Replacement
Now to the question of how to make replacements. To do this, we dismantle the old device and connect a new one in its place. Your steps look like this step by step:
Remove the negative cable from the battery, which will allow you to turn off the power to the car; Now disconnect the wires from the sensor and be sure to remember what form the pinout was in; The device can be dismantled by simply twisting it by hand. There is usually no need to use any tools. But if the device fits tightly, then use 22 or 21 millimeter keys. Depending on the modification of your “ten”, the design of the sensor may differ slightly; At the same time, we recommend checking the wiring; After removing the meter, unscrew the fixing nut that holds the wire going to the gearbox; Remove carefully so as not to drop the rod into the box. If this happens, you will have to completely disassemble the gearbox.
This is clearly not in your best interest; A new device with a rubber ring must be lubricated with transmission fluid so that the fixation in the new place is as reliable as possible; Assembly is performed in reverse order; Pay special attention to the pinout. Connect the multimeter with the ignition on
If the device showed “minus”, then you connected the wire to positive, which is absolutely not allowed. This is why we initially advised using a sensor that is not labeled 1, 2, or 3.
If you couldn’t avoid using a new device with inconvenient markings 1, 2 and 3, then remember an important pinout detail:
- 1 corresponds to “+”;
- 2 denotes signal output;
- 3 is “-“.
>
Symptoms of problems, checking the speed sensor
If the odometer is not working, and the speedometer is “jerky”, transmitting false speed or mileage readings, we can conclude that the speed sensor is faulty.
There is also the possibility that these are signs of electrical circuit problems, especially if the car has ever been tampered with. There may be a break or oxidation of the connectors, rubbing of the wiring insulation, which causes a short circuit.
Also, a sign of breakdowns are cases in which the car may stall at idle. Perhaps the most obvious symptom of a speed sensor failure will be incorrect speedometer readings and the “ChekEngine” light on the panel.
These devices have three contacts: ground, pulse signal, voltage. First, you should check the functionality of the grounding and the presence of voltage.
To check the speed sensor you need:
- Remove this sensor;
- Using a multimeter, calculate the contact that produces a pulse signal. “We install a plus to it, and attach the minus to the body of the car.
- Carefully rotate its rod. At the same time, you should monitor the output signal. If the sensor rod starts to rotate faster, the voltage will be higher.
Replacement or repair methods
Disassembly and removal is carried out as follows:
1. Remove the negative connector from the battery, having previously de-energized the car;
2. The wire connector is separated from the sensor;
3. The sensor is sometimes unscrewed by hand, but if it is difficult, you can unscrew it using twenty-one-twenty-two keys (sensors may vary in design);
4. We diagnose the drive condition
When removing, be careful, because when the drive rod breaks, there is a danger of dropping it into the gearbox; it can only be retrieved by disassembling the gearbox
The old sensor cannot be repaired. The new sensor should be installed using the reverse sequence shown. Don't forget to put the connector block on the sensor. Good luck on the roads and of course no breakdowns.
How to diagnose a problem
There are only 3 ways to check the tens speed sensor. One of them involves the use of a control lamp, the other two are based on a circuit.
But before moving on to any of them, make sure that there is grounding and voltage on the contacts; to do this, disconnect the electrical connector from the sensor by simply squeezing the “antennae” and removing the chip, and ring each of them. One of the contacts should show a voltage of 12V.
If everything is fine with the power supply, proceed directly to the diagnosis itself.
Method No. 1 - carried out according to the above scheme without removing the sensor from the car. Jack up the front wheels. Using regular wires (if you have an assistant) or with alligator clips (if you don’t have an assistant), connect the voltmeter to the speed sensor, not forgetting to supply current to it. Place the gearbox in 5th gear and rotate the wheel. If everything is in order with the sensor, in response to these actions you will see changes in the voltage of the pulse contact - between the output and ground - the higher the speed, the greater the voltage. The range of changes is 0.5-10V.
Method No. 2 - carried out according to the above diagram on a sensor removed from the car. Remove the speed sensor (how to do this will be described in detail below in the instructions for replacing it). Using wires, again repeat the above diagram. Take a tube, pliers or any other handy item that allows you to rotate the sensor axis (the main thing here is not to forget about safety precautions), and rotate the sensor around its axis. The resulting multimeter readings (from 0.5V to 10V) will indicate that everything is in order with the sensor.
Method number 3 – “light bulb test”. Applies to the speed sensor without removing it from the vehicle. Using a jack, raise the drive wheels on the ground. According to the diagram below, connect a light bulb to the element being diagnosed. Place the gearshift lever in 5th gear and rotate the wheel. The light should blink. If this does not happen (if there is voltage in the network, of course), the sensor should be replaced.
Preparing for replacement
In order for the procedure for replacing the controller on the tenth VAZ model to proceed correctly and to obtain the expected result, namely the normal functioning of the speedometer, you should be properly prepared for this process.
Firstly, on a VAZ 2110, replacing the DS means purchasing a new controller
When purchasing a new regulator, you need to pay attention to the fact that each connector located in the block design has certain symbols. It should contain the symbols “-”, “A” and “+”, not numbers
In principle, in this case there is not much difference between these options; when connecting the connector you will have fewer problems with pinout. If you have never encountered a process like this, this pinout will allow you to complete it correctly.
Controller connector pinout
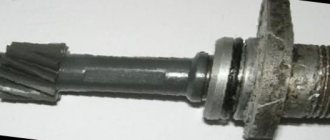
One more, no less important nuance. You need to buy a device that is equipped with a metal rod. This rod will last at least six months, which cannot be said about regulators with plastic rods. In addition, when purchasing, you must check whether the rod rotates or not. It should not rotate, there should be no play on this element, and it should also be equipped with a washer.
Diagnostics of DS on VAZ 2110
How to check the speed sensor on a VAZ 2110 on your own?
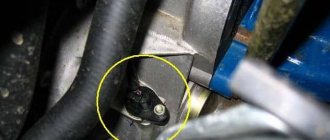
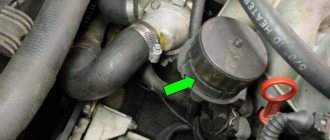
First of all, for this you need to know where the DS should be located, after which its drive is diagnosed. In accordance with the connection diagram, on the tenth VAZ models the regulator is located in the engine compartment, not far from the exhaust manifold. As practice shows, connection wires can rub against a heated collector, causing them to melt. As a result, a short circuit occurs. As a rule, this problem can be solved by insulating the wires and fixing them so that they do not come into contact with the collector. Another diagnostic option would be to check for a broken cable. This reason is one of the most likely. If the cable is in order and no damage was detected during the process, then the problem lies in the controller itself or its drive.
Do I need to change it?
Not only the speedometer and odometer readings, but also the quality of the fuel mixture supplied to the cylinders, the idle speed of the vehicle, engine stability and fuel consumption depend on the information received by the ECU from the sensor.
A failed DS will “confuse” the electronic unit, which simply will not understand whether the car is moving or standing still. As a result, the speed will begin to fluctuate, the engine will stall at idle, and fuel consumption will increase.
Checking a mechanically driven speed sensor is not difficult. On the removed sensor, we find the pin and turn it with pliers, having attached the connector to it in advance. If the speed sensor is working, the arrow on the instrument cluster will jump, if there is no reaction, then there is a problem with the drive or electrical wiring.
Checking the wiring to the instrument cluster is also not difficult, take a paperclip (you can use any other metal object) and insert it into the middle pin on the connector, then touch it to the engine housing, the arrow on the combination should twitch, otherwise you need to look for the cause in a wiring fault or sensor connector (oxidation, breakage, etc.).
How to fix the problem
Once it has been possible to determine the malfunction of the speed sensor, further actions depend on the reasons that caused this situation. The following solutions are possible:
- Dismantling the sensor and checking it using a multimeter using the above method. If the sensor is faulty, it is most often replaced with a new one, since it is quite difficult to repair it. Some “traditional craftsmen” try to solder flying chip elements manually using a soldering iron. However, this does not always work out, so it is up to the car owner to decide whether to do this or not.
- Check sensor contacts. One of the most popular reasons why the speed sensor does not work is contamination and/or oxidation of its contacts. In this case, it is necessary to inspect them, clean them, and also lubricate them with special lubricants in order to prevent the occurrence of corrosion in the future.
- Check the integrity of the sensor circuit. Simply put, “ring” the corresponding wires using a multimeter. There can be two problems - a short circuit and a complete break in the wires. In the first case, this is caused by damage to the insulation. A short circuit can occur either between individual pairs of wires or between one wire and ground. You need to go through all the options in pairs. If the wire breaks, there will be no contact at all. If there is slight damage to the insulation, it is permissible to use heat-resistant insulating tape to repair the damage. However, it is still better to replace the damaged wire (or the entire harness), since the wires often operate at high temperatures, so there is a high risk of repeated damage. If the wire breaks completely, then, naturally, it needs to be replaced with a new one (or the entire harness).
Sensor repair
Some auto repairmen with electronics repair skills are engaged in restoring the speed sensor on their own. In particular, in the case described above, when under the influence of high temperature the capacitor is soldered off and it begins to short-circuit and pass current.
This procedure consists of disassembling the speed sensor housing to check the functionality of the capacitor and, if necessary, replacing it. As a rule, microcircuits contain Japanese or Chinese capacitors, which can easily be replaced with domestic ones. The main thing is to choose the appropriate parameters - the location of the contacts, as well as its capacity. If the sensor housing is dismountable, everything is simple, you just need to remove the cover in order to get to the capacitor. If the case is non-separable, you need to carefully cut it without damaging the internal components
In addition to the requirements listed above for choosing a capacitor, you also need to pay attention to its size, since after soldering to the board, the sensor housing should be closed again without any problems. You can glue the case using heat-resistant glue
According to reviews from craftsmen who have performed a similar operation, you can save several thousand rubles in this way, since a new sensor is quite expensive.
Conclusion
A breakdown of the speed sensor is a non-critical, but quite unpleasant problem. After all, not only the speedometer and odometer readings depend on its normal operation, but also fuel consumption increases, and the engine does not operate at full power. In addition, individual vehicle systems are forcibly switched off, which can, among other things, affect traffic safety, both in city mode and on the highway. Therefore, when identifying problems with the speed sensor, it is advisable not to delay fixing them.
Maybe
Vehicle traffic control
This function is performed by the speed sensor, which takes part in the formation of the fuel mixture by the controller. It replaced the mechanical cable drive previously installed on carburetor VAZ 2112 models. The operating diagram of the element is as follows:
- The speed sensor is driven from a shaft located inside the gearbox.
- From the controller side, the device receives a reference voltage of 12 V.
- In response, the sensor produces a signal in the form of a pulse of a certain frequency. The frequency varies depending on the speed of the car.
- Based on these pulses, the controller controls the speed indicator and odometer on the dashboard, and also creates a rich or lean fuel mixture for the engine.
A malfunction of the speed meter is indicated by such signs as failure of the speedometer, unstable operation of the power unit and loss of idle speed when coasting. An indirect sign may also be the short-term display of the “Check Engine” sign on the instrument panel.
If you pay closer attention, increased gasoline consumption will become noticeable. If the sensor fails, you can continue driving, but you should replace it as soon as possible
The product cannot be repaired.
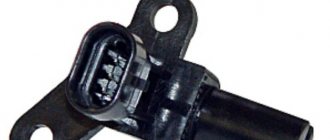
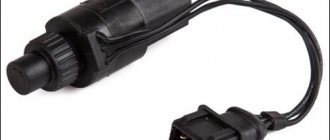
The device itself is a plastic box with a drive, from which wires come out in a bundle with a connection block. The block can be round or rectangular depending on the manufacturer of the product. The block from the Bosch brand is rectangular, from General Motors it is round.
A few words about how to check the speed sensor. The ideal option is to connect a laptop with the installed program for the VAZ 2110-2112 to the controller via the appropriate connector. But at home, the average motorist may only have a multimeter, and with its help he will have to test the operation of the element.
To do this, one front wheel of the car is suspended with a jack, and the wires leading to the controller are disconnected from the sensor. Instead, you should connect a multimeter and, by manually rotating the wheel, make sure that the readings change along with the rotation speed. If there are no changes, then it is better to change the product, otherwise, with such driving, more serious repairs will occur with the replacement of engine parts.
Lada 2111 8 valves rule the world › Logbook › Speed sensor VAZ2110-VAZ2111
I decided to share with the audience some thoughts and personal experience in diagnosing and repairing vehicles (by the way, if anyone needs to diagnose the internal combustion engine and its systems, or wash the injector nozzles, then you are welcome to Moscow, tel. 8-968-933-79 -07)
The speed sensor (Fig. 1), used instead of the cable used on the classic, is installed on the output shaft of the speedometer drive located in the gearbox. The speed sensors of VAZ 2110-2111 cars differ in the connecting connectors to the harness block. The square connector is used in Bosh systems. The sensor with a round connector is used in the January 4 and GM systems. The operating principle of the sensor is based on the Hall effect. The speed sensor is six-pulse, that is, it produces six pulses per revolution of its axis. The controller sends a 12V reference voltage to the speed sensor. When the car is moving, the speed sensor produces rectangular pulse signals, the lower level of which should be no more than 1V, and the upper level no less than 5V. These pulses are converted by the speedometer electronic circuit into an electric current measured by a magnetoelectric device. In addition, the electronic circuit, by “counting” incoming pulses, ensures the operation of the trip counters: total and daily (the sensor generates 6000 pulses per 1 km of travel). It should also be noted that the speed sensor signal is used by the controller to determine the fuel supply cut-off thresholds (i.e., the speed sensor is involved in controlling the operation of the injection system).
The speedometer, odometer does not work, the speedometer jerks or shows incorrect values (for example, the actual speed is 60-80 km/h - on the speedometer 140-160 km/h) - all this indicates a malfunction of the speed sensor, its drive or its electrical circuit. Failure of the sensor leads to a slight deterioration in the driving characteristics of the car (except for the GM controller, here, if the sensor is faulty, the engine stalls when idling).
When choosing a new sensor, preference should be given to sensors with contact designations “-”, “A”, “+” (see the designation inside the sensor block) instead of “1”, “2”, “3” (this may be useful when connecting a new sensor), as well as sensors with a metal rod (since the service life of a sensor with a plastic rod is no more than 6 months). When purchasing, check the sensor by visual inspection, check the rotation of the sensor rod and its play (it should be minimal), as well as the presence of a washer on the rod (Fig. 2).
Dismantling the old sensor is carried out according to the following scheme: disconnect the negative connector from the battery, disconnect the wire connector from the sensor, unscrew it by hand or with a 22 key (depending on the design, it may be a 21 key). We install the new speed sensor in reverse order with a tightening torque of 8…10 N∙m. One of the problems when installing a new sensor may be a break in its electrical circuit. The way out of this problem is simple: we measure three wires from the controller in pairs with a multimeter at constant voltage with the car ignition on - using the readings and probes of the multimeter, we determine the positive and negative wires (if the readings on the multimeter with a “-” sign means the polarity is reversed, we now switch the probes over without the values sign), then we twist the wires and insulate them (now it’s clear the better the sensor with the designations “-”, “A”, “+”) or use special clamps (for example, from WAG, can be bought at the Obi hypermarket). We check the operation of the speed sensor while driving or by hanging the front wheels of the car. When writing the note I used V.V.’s book. Litvinenko, A.P. Mystruk Automotive sensors, relays and switches. Quick reference. – M.: CJSC “KZHI “Za Rulem”, 2004
When is diagnostics needed?
Due to the limited number of pulses and for many other reasons (motor oil, dirt has gotten on the sensor, contacts or wires located near the speed sensor have oxidized, there is mechanical damage to the part, etc.) in the “tens” it is often possible to observe flaws in the operation speedometer or its complete inoperability. At the same time, most often, problems arise when coasting at idle and the “CHECK” system lamp turns on (error code “24”). Be that as it may, any of the mentioned signs requires the car owner to mandatory diagnose the speed sensor, because the causes of malfunctions may lie in it, or they may lie in a completely different place.
How to check the speed sensor for functionality
Symptoms of defects in this device are as follows:
- suspension of engine operation during translational movement in idle mode and incorrect speedometer values being presented at the same time;
- When defects are detected in the electrical circuit of the speed sensor, the price of which is quite reasonable, the light banner “CHECK” is displayed with parallel recording of the error code “24” in RAM.
Important: such a recording is possible even if there are defects in the operation of the mass air flow sensor, but since the “CHECK” banner in this version is not constantly displayed, it is possible that this difference will indirectly indicate which device failed in operation.
How much does it cost to replace a speed sensor on a VAZ 2110?
If the breakdown is not due to dirty contacts or broken wiring, it is better to replace the sensor. Moreover, it costs 170-400 rubles, depending on the type and manufacturer. The cost of replacing it at a service station is 100-150 rubles.
Sensor part numbers:
- with mechanical drive - 2110-3843010F;
- electronic (new) - 2170-3843010.
When choosing a DS, pay attention to where it was manufactured. If a mechanically driven sensor requires replacement, under no circumstances buy Asian analogues - the drive gear is made of very low quality plastic
It happens that it breaks on the third day of use. In this case, you will have to disassemble the entire box to remove its fragments. It is better to purchase a sensor with an all-metal drive.
Troubleshooting
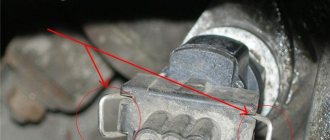
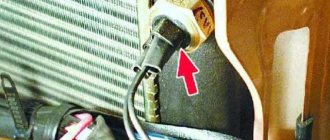
To begin troubleshooting the problem, you first need to find the device. From the photo you can determine how the speed sensor on the VAZ 2110 looks externally.
Ears for fastening
As for its location, look in the engine compartment in close proximity to the exhaust manifold. They say frankly that the place where it is installed cannot be called ideal. It's all about the collector. While the car is running, the manifold heats up. The sensor wires rub against it, which over time leads to malfunctions and short circuits.
Therefore, experts recommend that the first step is to properly insulate the wiring, and also use some kind of clamps so that the wires do not come into contact with the collector. This significantly extends its service life.
Having checked the device visually and not determining the presence of breakdowns, this tells us that the element itself is faulty. This problem can be solved by replacing it.
Signs of a malfunctioning speed sensor
You can recognize a malfunction of the speed sensor by the following symptoms:
- No speedometer readings while driving and odometer not working.
- Distortion of speed readings. You can check it using a GPS navigator or ask a friend with a working sensor to drive parallel to you at a given speed.
- Involuntary engine shutdown at idle speed (these symptoms also appear during other malfunctions).
- Periodic “triple” of the motor when moving at one speed.
To isolate speed sensor faults from other electronic failures, you can conduct an express test. You need to do a test drive and remember how the car feels. Then disconnect the sensor connector and immediately perform a similar trip. If the behavior of the machine has not changed, the device is faulty.
Causes of malfunction of the speed sensor
The absence of speedometer readings does not mean failure of the device. Although, to buy a speed sensor for a “ten”, it is enough to spend a small amount, but it will be very disappointing that the fact of replacing the speed sensor will not give the desired effect. And the reasons may be the following:
- The presence of dirt, dust and oil smudges on the speed sensor, a video on replacing which can be found on the Internet. They form on the body of the product during vehicle operation. To prevent the product in this case, you just need to clean the device.
- Unstable contact of the product connector and broken wiring.
- Sometimes the defect is of a purely mechanical nature, which consists of banal defects in the cable of the instrument speed indicator - speedometer.
The following options are possible here:
1. Complicated uneven movement of a braided cable, which is caused by cable defects - burrs or ruptures of the metal strands of the cable. They can significantly affect the functionality of the sensor drive. 2. Increased cable speed.
The principle of operation of the speed meter for the VAZ 2110 injection engine
So, why is the device in question located vertically if the axis of rotation of the manual transmission drive shaft is precisely horizontal? The fact is that the rotating element of the device is connected to the gearbox shaft not directly, but through a transition rotation transformer. Using a worm gear, horizontal rotation with a certain gear ratio is transformed to the mechanical part of the speed sensor.
The shaft end of the electronic part of the sensor, which we can see from the outside of the gearbox, is inserted into the adapter receiving sleeve.
The system operates according to the Hall principle. The moving parts of the Hall elements are located on the shaft inside the housing. When rotating, the counter part (in the form of an inductor) generates pulses synchronous with the rotation of the wheel. Since the circumference of the tire is known, the electronic module converts each revolution into a distance traveled. This is how mileage is calculated. It remains to divide this figure by a unit of time, and we get the speed of the car at any time.
Important! Information for those who like to change their shoes to non-standard tires. By installing tuning wheels and tires with a dimension difference of more than 3%, you do not just create additional load on the suspension elements
The algorithm for calculating the speed of movement is disrupted: the crankshaft, camshaft and speed sensors become desynchronized. As a result, the ECU incorrectly forms the composition of the fuel mixture and makes errors in setting the ignition timing. That is, the sensor does not operate normally (but there is no damage).
DIY repair and replacement
If you decide to replace the device yourself, familiarize yourself with the removal and replacement procedure.
The controller is dismantled as follows:
First you need to de-energize the vehicle's on-board network; to do this, disconnect the negative cable from the battery. Next, disconnect the connector with wiring from the controller itself. At this stage, it is important to remember what pinout these elements have. The controller itself can be unscrewed by hand. If you can’t do this on your own, try using a 21 or 22 wrench. In this case, the regulator may have certain differences in design. Also immediately check how well the drive functions. After the regulator is removed, it is necessary to unscrew the nut that secures the drive to the gearbox
The dismantling procedure must be done very carefully, because if you accidentally drop the rod into the transmission, the box will need to be removed and disassembled. As for the new drive, it is equipped with a rubber seal
Before installation, it must be lubricated with transmission fluid. Below is a video that will allow you to more clearly understand the procedure for replacing the controller (the author of the video is Auto News).
All new components must be installed in reverse order. Again, in this case the wiring pinout plays a big role. Inside the block itself you can see how the pinout is indicated. Using a tester with the ignition activated, it is necessary to determine which connector the drive should be connected to.
If the multimeter shows “-” and the drive was connected to the positive connector, this indicates that the polarity needs to be changed. Next, the drive is diagnosed, and you should also check the operation of the speedometer while driving or with the front of the vehicle raised (so that the wheels are suspended).
If you doubt that you can carry out the entire procedure yourself and change the controller correctly, we advise you to seek help from specialists. In principle, this process is not particularly complicated, so the cost of the replacement service will not be particularly high. For installation, it is better to use a higher-quality regulator so that in the future you do not face the need to repair and replace it.
Signs of trouble
If the odometer suddenly refuses to work, and the speedometer works jerkily, or “lies” regarding speed and mileage, these are direct indications that the speed sensor or its drive is failing. It is also possible that there is a problem in the electrical circuit, the connector is failing, the pinout is mixed up, if the operation of this system has been interfered with, etc.
In addition, an indirect indication of a malfunction may be that the car stalls at idle (although there may be other reasons for this).
Naturally, if the speedometer begins to give deliberately false readings, and the “CHECK ENGINE” light is on on the dashboard, then the reason is the speed sensor.
Some recommendations
- The search for the cause of the speedometer's inoperability should begin with an external inspection of the DS and the wires going to it. Wires often break in close proximity to the plug.
- If the speed sensor is covered with a layer of dirt or oily, you need to remove it, wipe it, reinstall it and check the speedometer readings again. Perhaps after this the instrument needle will again begin to show speed normally.
- If you cannot figure out the problem yourself, you should contact an electrician at a car service center.
Carburetor models use a cable mechanical speedometer system, so there is no speed sensor. It's simply not needed.
Why does the speed sensor fail?
The reasons are mechanical and electrical. Let's list each one separately.
Mechanical reasons include:
- wear of gear teeth both on the manual transmission shaft and on the adapter - speed transformer;
- the appearance of play in the connection between the transformer shaft and the sensor itself;
- displacement or loss of the Hall element on the moving part;
- contamination of a pair of Hall elements inside the housing;
- physical damage to the shaft or housing.
Electrical reasons:
- failure of electronics (cannot be repaired);
- oxidation of connector contacts;
- chafing of device wires due to poor location;
- external interference from the injector control loop or high-voltage spark plug wire;
- interference created by non-standard electrical devices (such as a xenon driver or a security alarm unit).
Symptoms of a problem
The problem may be that the connection diagram is broken, there are disturbances in the electrical circuit, or the connector does not work. In addition, the pinout of the speed sensor, which was mixed up during the assembly process, often becomes a problem.
An indirect sign of a malfunction is that the car stalls when idling.
You, as a driver, will easily notice the presence of incorrect indicators on the speedometer, and also pay attention to the warning light that requires you to check the engine (Check Engine). If such phenomena are detected, there is no doubt - the speed sensor needs to be replaced
Malfunctions
On VAZ 2110 cars, the speed sensor can fail for several reasons:
- Oxidation of contacts. This is the most minor damage. However, it can cause the needle to drop to zero or jump. To eliminate it, you must thoroughly clean all contacts from dirt;
- Wire chafing. The main sign of this breakdown is that the needle falls or jumps after starting the engine. Such a malfunction is not always detected visually, since in some cases the wire may outwardly appear intact, but in fact has a break. To determine the location of the damage, you need to ring it using a special tester. A broken wire is often the cause of failure of the instrument panel, and in particular the speedometer;
- The sensor has stopped working. In order to make sure that the breakdown is correctly identified, you can take a new speed sensor and connect it. If the speedometer starts working after this, then the conclusion is obvious. Failure of the speed sensor may occur due to the housing not being sealed, as a result of which dirt, dust, and moisture can enter;
- Checking the connectors. In VAZ cars they are located in such a place that they are constantly in contact with dirt and quite often this is the main reason that the speedometer needle jumps or refuses to work at all, showing incorrect vehicle speed values;
- Drive unit. Also, the reason why the needle jumps on the speedometer may be wear of the shaft. With such a malfunction, the VAZ 2110 speedometer drive does not effectively transmit torque. It is worth noting that this is one of the most common reasons why the sensor needle jumps.
If the vehicle speed indicator does not work correctly, before purchasing a new device, you need to check all possible breakdowns and only then think about replacing it.
Step-by-step replacement of the VAZ-2110 speed sensor with 8 and 16 valves
In order to change the speed sensor yourself, it is enough to have two or three keys (10, 21, 22) and a Phillips screwdriver on hand.
- The current in the car is turned off; to do this, remove the connector from the battery.
- The wire connector is disconnected from the sensor; it is recommended to remember the pinout.
- The sensor can be unscrewed manually, or using keys 21 or 22 (depending on the design).
- The condition of the drive is studied. After the sensor is removed, using a 10mm wrench, unscrew and remove the nut that secures the sensor drive.
- A drive with mechanical damage must be replaced; if there is none, you can leave it the same.
- Installation of a new device should be done in reverse order.
- The new drive has a rubber attachment that needs to be lubricated with transmission oil.
- After installation, it is recommended to check the polarity of the wires using a multimeter. If the contacts are suddenly mixed up, they are swapped.
- It remains to be checked. This is done either with the car running or with the wheels suspended.
Installing a new element
Before replacing the speed sensor, you should purchase a new element that matches the shape of the connector. It is necessary to take into account an important point: on the connecting block of the factory product, near the contacts, the marking numbers “1”, “2” and “3” are marked. But on sale there are more often sensors where a different marking scheme is adopted; instead of numbers there are symbols “-”, “+” and “A”. There is no tragedy in this, you just need to know that the new speed sensor pinout is combined with the old one as follows:
- the symbol “+” and the number “1” are the same thing;
- the symbol "-" means "3";
- the letter “A” is the output wire, corresponds to the number “2”.
https://www.youtube.com/watch?v=qiDmZLUuTMI.
Replacing the sensor is a simple task, performed in the following sequence:
- Turn off the ignition and remove the negative contact from the battery.
- For ease of access, disconnect and remove the air filter along with the air duct pipe.
- Disconnect the connection block.
- Unscrew the element, grabbing it by the edges with a 22 key.
- Clean and wipe the area from dirt, screw in the new sensor along with the gasket.
https://www.youtube.com/watch?v=x_BfBpNW9zEWhen finished, connect the wires, put the removed parts back in place and check the functionality of the sensor while driving using the speedometer.
Any car is equipped with a system that shows the speed of movement and mileage (distance traveled). It is the speedometer, which is a device for determining instantaneous speed, that makes it possible to find out what the maximum speed of the VAZ 2110 is.
Speed sensors are installed only in fuel-injected cars; where carburetor engines are present, they are not present. This device is responsible for the supply and consumption of fuel, setting the ignition timing, and monitors the quality of the combustible mixture. All data is transmitted to the electronic control unit, which controls the injector.
Before the advent of sensors, mechanical speedometer drives were installed on each carburetor engine. On VAZ 2010 cars produced before 2006, mechanical drives are installed. Newer cars manufactured after 2006 are equipped with electronic sensors.
Where is the speed sensor located and why is it needed?
The purpose of this device is to “set” the ignition timing, control the quality of the fuel mixture and correct fuel supply. The sensor collects a lot of information for the injection engine, such as engine speed, detonation level, speed, etc., and transmits digital signals to the electronic unit. In turn, this data is checked here and appropriate adjustments are made to the operation of the injector. As a rule, the speed sensor is located under the hood, in the engine compartment, near the exhaust manifold.