Hi all! I decided to diagnose the Gazelle (yes, I didn’t diagnose it when I bought it). In general it was 19 (!)
errors, reset them, rolled them up to order and re-diagnosed them. One error came up:
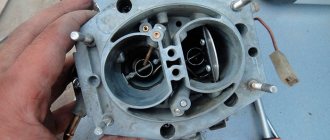
We buy a sensor for 430 rubles and go install it.
The sensor is located in an awkward place behind the cooling fan pulley (I don’t have a belt on it, the fan is electric), I simply loosened the pulley and moved it to the side so as not to remove it.
The sensor sits on one bolt, 10 in my opinion.
The camshaft sensor is used to operate the engine management system. It regulates ignition and injection. Also sometimes the part is called a Hall sensor, since its operation is based on the Hall effect.
There is a protrusion-marker on the camshaft gear; the sensor reacts to its passage. A low level voltage pulse is supplied to the control unit.
If a part fails, the engine management system uses information received from the crankshaft speed sensor. The system switches to unphased gasoline injection mode. It is worth noting that the engine continues to operate correctly.
The problem lies in the fact that the unphased injection mode is less economical and consumes more fuel. That is why, if a breakdown is detected, it is advisable to immediately replace the component.
Speed sensor "Gazelle", device and replacement
Gazelle cars have been produced since 1994 and have undergone many changes during this time. At different times, different methods of determining speed were used on them.
First option
Early cars were equipped with a mechanical speedometer driven by a flexible shaft of the GV 310 model. The flexible shaft was installed at one end on the gearbox housing, and the other was attached to the speedometer housing. The drive was carried out from a helical gear mounted on the secondary shaft in the gearbox. It is located closer to the rear shaft bearing.
The speed sensor of the Gazelle in this case was the speed measuring device itself. The flexible shaft rotated the magnetic disk, creating a magnetic field. Its intensity depended on the shaft rotation speed. This field turned the spring-loaded needle. The Gazelle speedometer drive cable is shown in the photo.
Drive maintenance consisted of timely lubrication of rotating components and control over the route of the cable. The radii of cable bends should not be more than 150 mm.
Restyled version
Since 2003, cars began to be equipped with a new instrument cluster with an electronic speedometer. The new Gazelle speed sensor was designated DS-6 and was installed on the gearbox housing on the left side. The sensor had a mechanical drive similar to a cable. The same device was used at Gazelle Business.
The operation of the sensor is based on the Hall effect principle. Any change in speed is recorded by a sensor and transmitted in the form of voltage pulses to the controller of the electronic control unit. They have a lower limit of about 1 Volt and an upper limit of at least 5 Volts.
There is a proportional relationship between the speed and pulse frequency, so the sensor error is small. As the speed increases, the pulse frequency also increases, but the sensor has a design limitation - the pulse counter readings cannot be higher than 6004 per kilometer. The controller calculates the speed based on the number of pulses and the time intervals between them. The received signal is transmitted to the speedometer located on the dashboard of the car. The photo shows the electronic sensor of the Gazelle.
The design of the sensor is quite simple and, in general, it does not cause problems for car owners. Replacing the Gazelle Business speed sensor is quite simple. Before starting work, it is advisable to disconnect the battery from the vehicle's on-board network. To remove the sensor, it is necessary to remove the hatch located next to the gear shift lever. The sensor can also be accessed from below. To loosen the fastening nut, a wrench with a jaw size of 22 mm is required. After loosening the nut, the sensor can be easily unscrewed by hand and removed from the drive. On the other hand, it is equipped with a regular connector with plastic latches.
Sometimes there is an oil leak through the sensor drive, which oils the contacts and disrupts operation. The drive itself is fixed with a clamping bracket, to remove which you need to unscrew one 10 mm bolt. After this, the drive can be removed from the box housing to replace the ring rubber gasket.
Third option
The Gazelle Next speed sensor is somewhat different from previous models. It is electromagnetic and has four wires going to the controller. Previous sensors only had three wires. A new type of device is shown in the photo.
The sensor has part number A63R42.3843010-01, is equipped with a 22 mm nut on the housing and is screwed into the gearbox housing.
hochyvseznat.ru
Self-diagnosis of faults
It's worth starting with where the position sensor is located. The part is located in the front of the engine, near the cylinder head.
It's time to check the camshaft sensor if you notice any of the following "symptoms":
- The Gazelle Business engine does not work well and often stops. Misfires may occur when the ignition is turned on, dynamism is lost, extraneous sounds appear in the exhaust system, and shocks appear when accelerating the car.
- Power is lost. It becomes difficult to accelerate to speeds above 65-70 kilometers per hour.
- Starting the engine becomes problematic, long or even impossible. In some cases, the ignition spark disappears.
Speed sensor "Gazelle", device and replacement
Gazelle cars have been produced since 1994 and have undergone many changes during this time. At different times, different methods of determining speed were used on them.
First option
Early cars were equipped with a mechanical speedometer driven by a flexible shaft of the GV 310 model. The flexible shaft was installed at one end on the gearbox housing, and the other was attached to the speedometer housing. The drive was carried out from a helical gear mounted on the secondary shaft in the gearbox. It is located closer to the rear shaft bearing.
The speed sensor of the Gazelle in this case was the speed measuring device itself. The flexible shaft rotated the magnetic disk, creating a magnetic field. Its intensity depended on the shaft rotation speed. This field turned the spring-loaded needle. The Gazelle speedometer drive cable is shown in the photo.
Drive maintenance consisted of timely lubrication of rotating components and control over the route of the cable. The radii of cable bends should not be more than 150 mm.
Restyled version
Since 2003, cars began to be equipped with a new instrument cluster with an electronic speedometer. The new Gazelle speed sensor was designated DS-6 and was installed on the gearbox housing on the left side. The sensor had a mechanical drive similar to a cable. The same device was used at Gazelle Business.
The operation of the sensor is based on the Hall effect principle. Any change in speed is recorded by a sensor and transmitted in the form of voltage pulses to the controller of the electronic control unit. They have a lower limit of about 1 Volt and an upper limit of at least 5 Volts.
There is a proportional relationship between the speed and pulse frequency, so the sensor error is small. As the speed increases, the pulse frequency also increases, but the sensor has a design limitation - the pulse counter readings cannot be higher than 6004 per kilometer. The controller calculates the speed based on the number of pulses and the time intervals between them. The received signal is transmitted to the speedometer located on the dashboard of the car. The photo shows the electronic sensor of the Gazelle.
The design of the sensor is quite simple and, in general, it does not cause problems for car owners. Replacing the Gazelle Business speed sensor is quite simple. Before starting work, it is advisable to disconnect the battery from the vehicle's on-board network. To remove the sensor, it is necessary to remove the hatch located next to the gear shift lever. The sensor can also be accessed from below. To loosen the fastening nut, a wrench with a jaw size of 22 mm is required. After loosening the nut, the sensor can be easily unscrewed by hand and removed from the drive. On the other hand, it is equipped with a regular connector with plastic latches.
Sometimes there is an oil leak through the sensor drive, which oils the contacts and disrupts operation. The drive itself is fixed with a clamping bracket, to remove which you need to unscrew one 10 mm bolt. After this, the drive can be removed from the box housing to replace the ring rubber gasket.
Third option
The Gazelle Next speed sensor is somewhat different from previous models. It is electromagnetic and has four wires going to the controller. Previous sensors only had three wires. A new type of device is shown in the photo.
The sensor has part number A63R42.3843010-01, is equipped with a 22 mm nut on the housing and is screwed into the gearbox housing.
aikido-mariel.ru
Consequences of sensor failure
When, for various reasons, the sensor fails or produces incorrect readings, the controller changes the operating algorithm. He begins to prepare the air-fuel mixture, focusing on the throttle position meter and lambda probe. Due to the lack of data previously received from the mass air flow sensor, the electronic unit “does not know” about the real amount of incoming air and cannot mix it with gasoline in optimal proportions.
By switching the controller to emergency operation mode, you can determine the main symptoms of a malfunction of the mass air flow sensor:
- on the driver’s dashboard, the control unit turns on the Check Engine light display, indicating problems in the fuel supply or ignition system;
- idle speed is unstable - it either rises to 1500 rpm, then drops to zero (the engine stalls);
- “When cold” the engine starts with great difficulty;
- incorrect preparation of the combustible mixture causes an increase in fuel consumption, regardless of driving conditions and operating mode;
- There is a decrease in the power of the power unit and frequent unreasonable jerks while driving.
Indirectly, a malfunction of the flow meter is indicated by the appearance of black smoke from the exhaust pipe. If the vehicle does not have an on-board computer and it is impossible to track instantaneous gasoline consumption, it is worth unscrewing 1-2 spark plugs from any cylinders and inspecting the electrodes. A layer of black soot will confirm excessive enrichment of the mixture due to emergency operation of the electronics.
If the car owner does not respond to the above problems and continues to operate the car, then he will have to face larger troubles. Constant over-enrichment of the fuel mixture will quickly render the spark plugs unusable, the quality of combustion will deteriorate, the load on the cylinder-piston group will increase, and wear will significantly accelerate. The prospect is gloomy - repair of the power unit.
Why does the speedometer on the Gazelle not work?
At the moment, Gazelle cars are operated both with the old instrument panel and with a modern, new panel. On the old instrument panels there is a mechanical speedometer with a cable drive from the secondary shaft of the gearbox. The new instrument panels already have an electromechanical drive, and the electronic sensors installed on the gearbox can be six or ten pulse. Their markings are respectively 342.3843 for a 6 pulse sensor, and 344.3843 for a 10 pulse sensor. This is in case they are found as spare parts.
On mechanical speedometers, the main faults will be associated with the flexible cable located in the sheath. Let's say the speedometer doesn't work. Initially, it is necessary to check whether, under the influence of vibrations, the union nuts with which the cable sheath is attached to the speedometer and to the gearbox have not been unscrewed. If this happens, the cable disengages and the transmission of torque stops. A broken or jammed cable in its sheath also leads to a failure of the speedometer.
Another malfunction is a large fluctuation of the speedometer speed indicator needle, as a result of which the driver, based on these readings, cannot accurately determine at what speed his car is moving. The reasons for this malfunction may be the lack of lubrication inside the sheath, which leads to braking of the cable and, as a result, to its uneven rotation. The same thing can happen if the shell fastening nuts are not unscrewed, but only loosened. If the speedometer drive cable, for some reason, was removed and then installed by the driver himself and he allowed it to bend with a radius of less than 150 mm, then this will also make it difficult for the cable to rotate, which will cause the speedometer speed indicator needle to oscillate.
There are cases in which the speedometer needle, when the car starts moving, immediately falls to the maximum speed reading of 180 km/h. The cause of this malfunction will be a breakdown of the spring, which, when the movement stops, returns the speedometer needle to 0. In this case, the entire instrument panel will have to be replaced.
In case of failure of the drive gears located in the gearbox, you need to know that Gazelle cars can be equipped with different engine models (for example: 402, 405, 406), then the drive gears will have a different number of teeth so that the drive cable always gave 624 revolutions per 1 km of run. If the wrong gears are installed, the speedometer readings will not correspond to the actual speed of the car and its mileage.
Gazelles currently produced have a speedometer with an electronic display showing the distance traveled, and the speed indicator also works from a signal supplied by a 10-pulse sensor installed on the gearbox in the place where a flexible cable stood on old cars. You can find out the reason for a non-working speedometer only by replacing the sensor or the instrument panel itself, but first you need to check the condition of the connecting blocks.
On Gazelle cars, troubleshooting on mechanically driven speedometers can be done independently, but if modern speedometers fail, it is better to entrust troubleshooting to a specialist who understands these devices.
Share this article with your friends:
helping-auto.ru
Major breakdowns
As already mentioned, most often in UMZ-4216 engines the manifold breaks or the sensors fail. Another common problem that GAZelle car owners have to deal with is engine overheating. The temperature of the UMZ-4216 engine often increases when the speed decreases. If the car suddenly gets stuck in a traffic jam, its engine will almost completely overheat. Very often, the clutch for turning on the radiator fan starts to work incorrectly on these units.
Experienced drivers, in order to avoid overheating of the UMZ-4216 engine, advise:
- Replace the standard radiator with a copper one. This metal conducts heat very well. And, therefore, the liquid will cool better.
- Instead of antifreeze, pour high-quality imported or domestic antifreeze into the engine.
You can also combat overheating of the UMZ-4216 engine by manually turning on the fan drive from the cab. The “original” fan of the model with a problematic electromagnetic clutch should be replaced with a model with a large number of blades and a thermal switch.
Why does the speedometer on the Gazelle not work?
Despite the fact that Gazelle today uses modern instrument panels, old versions of the dashboards are also popular; a cable drive together with a (mechanical) speedometer is no exception. New models operate on 10-pulse (sometimes 6) electronic gearbox sensors, which implies the presence of an electromechanical drive.
How to check the speedometer on a gazelle. Where to begin?
After some time, the car owner may discover that the speedometer on the gazelle does not work. This means an inevitable inspection, starting with the sheath cable. It is with this part of the car that problems arise more often than with others. The first thing to inspect is the union nuts (fastening the gearbox and the cable sheath built into the mechanical speedometer), since due to constant vibration vibrations they could become unscrewed. Shifted nuts can be seen by frequent jumping of the cable, as a result of which torque will not be supplied. The cable break can then be checked directly in the sheath. A phenomenon such as cycling may well cause the speedometer to fail.
After the reasons have been found and eliminated, it is necessary to adjust the mileage; if with a mechanical speedometer this can be done independently, then in the case of an electronic mechanism you should contact specialists who will correctly adjust the mileage without causing harm to the car and all electronics.
The malfunction in most cases consists of wide fluctuations (strong deviations) of the speed indicator needle, which becomes a reason for the owner/driver of the gazelle to doubt the speed readings of the device. The cause of the problem may well be missing lubrication on the shell (internal). It is because of this that the cable rotates incorrectly (unevenly), as a result of which it begins to slow down. The situation is similar with the loosened nuts with which the shell is attached to the gazelle. It doesn’t matter what the reason was for removing and reinstalling the cable, if the owner performed this procedure, exceeding the permissible bend (radius more than 15 cm), the rotation of the cable will become difficult, and the indicator arrow will begin to fluctuate, preventing an accurate determination of the speed of the vehicle.
How to fix the speedometer on a gazelle? Additional method.
Another fairly simple way to check the speedometer sensor is to monitor the operation of the needle at the moment the gazelle starts. If the needle rises to the maximum possible speed mark (180 km/h) immediately after the start, then the malfunction can only be eliminated by completely replacing the shield. Simply replacing a faulty spring (which caused this arrow behavior), which returns the pointer to the minimum value (0 km/h) immediately after the car stops moving, will not work.
The driver will not be able to find out the real speed of the gazelle if inappropriate drive gears are installed in the gearbox. You should not forget the fact that there can be 3 engine models in a gazelle (402, 405, and also 406). This should remind you of the different number of teeth, due to which the cable will operate within 625 rpm.
Today, the Gazelle is equipped with a built-in speedometer with an electronic (not, as before, a mechanical) display that displays the distance traveled by the car. In this case, the operation of the speed indicator on the straight line depends on the signals supplied by the 10-pulse sensor (which replaced the flexible cable). To find out the possible reasons for the speedometer not working correctly, the sensor (or the entire panel) will need to be replaced. But before that, it’s worth checking the connecting blocks, the condition of which also determines the operation of the device and how serviceable it is.
Of course, specialists will be able to quickly and better determine the causes of problems, since they have a better understanding of devices such as the speedometer. But independent repairs are possible, however, with one condition - your car is equipped with an exclusively mechanical drive. Be that as it may, the best way out of such a situation would be to have the gazelle checked by a service station master.
Press release prepared by Odometr.rf website
Might be interesting
swaper.info
Application of electric speedometer
The Gas 3310 electric speedometer is designed according to a standard design, which appeared in large quantities on foreign cars back in the mid-70s. It was used before, but on inexpensive models a classic cable drive was more often installed. A mechanical drive is quite accurate, but it depends on too many factors. More precisely, the accuracy of his testimony. Accuracy is affected by:
- outer diameter of the wheel;
- degree of tire wear;
- degree of wear of the speedometer gearbox;
- the level of error of the speedometer itself;
- gear ratio of the main pair.
As you can see, there are more than enough reasons for the mechanics to display speed incorrectly, and we have not named all of them. The use of an electric speedometer also does not provide any guarantee that the speed indicated on the scale is the reference speed. All the same factors intervene, only purely electrical troubles are added - missing or bad contacts, different-sized radio components and similar nuances.
Speed sensor malfunctions: how to check and fix
When the car stalls at idle, it is necessary to check the condition of several sensors - DS, MAF, TPS. You can always check the speed sensor yourself; there are three simple ways to do this. At the same time, the sensor and its erroneous data threaten not only the condition of the engine, but also other components of the car. Therefore, it is so important to understand the principle of operation of the DS and its main malfunctions.
What is the working principle of the speed sensor
Modern cars are equipped with a DS that operates based on the Hall effect. Photo: mtsznrb.ru
During operation, the DS transmits frequency-pulse signals, which determine the speed. On average, one kilometer of road contains 6,000 signals.
The electronic unit has a pre-installed program that calculates the speed of the machine. The frequency of impulse transmission is directly proportional to the speed of movement.
When a conductor is placed in a magnetic field, an electric voltage is generated - this phenomenon is called the Hall effect. The sensor is located in the speedometer drive mechanism, although the location largely depends on the make of the car.
DS directly affects traffic safety and machine stability. Knowing all these nuances, it is impossible to neglect the situation; it is necessary to restore the operation of the DS or replace it with a new one.
What are the types of DS malfunctions?
If this element malfunctions, it is difficult to determine the speed of the vehicle. Photo: avtomarket.ru
In order to promptly fix a breakdown before it develops into a more expensive repair, every owner must listen to the behavior of the car. At the slightest deviation, it is recommended to replace the DS. The main symptoms of malfunctions include:
- Incorrect speedometer readings;
- Fuel consumption increases;
- The engine does not develop full power;
- At idle, unstable operation can be observed.
At idle, the engine stops working or when changing gears or squeezing the clutch.
In this case, each driver will see a Check engine indicator; if there is an on-board computer, error “24” is displayed.
The first thing you need to do is check the condition of the wires and contacts that could simply break. Most often this happens near the connector, where the wires bend and can fray. If the contacts have oxidized or become dirty, they need to be properly cared for. In the area of the exhaust manifold, the integrity of the wire insulation is monitored. In addition, a malfunction of the DS may be associated with a failure of the speedometer cable, which has simply worn out over the years.
It is better to eliminate car air conditioner malfunctions before they lead to negative consequences. Details are in our material.
Find out how to quickly repair a puncture on a tubeless tire here.
How can you test the DS?
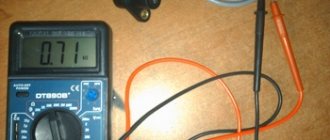
Each car owner should know three possible ways to determine the serviceability of the DC; it is necessary to determine whether it produces 12 V. Since the operating principle is based on the Hall effect, the state of the contacts can only be carried out during rotation, and the voltage readings should be within 0.5 V - 10 V.
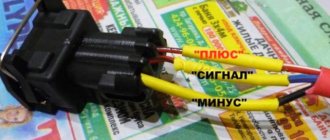
- Check with a voltmeter. The speed sensor is removed, it is necessary to determine which terminal is responsible for what. One contact of the voltmeter is connected to the terminal that outputs pulse signals, the second is connected to the ground wire. Rotating the sensor, we look at the voltage readings. The faster it rotates, the higher the indicators should be.
- It is not necessary to remove the DS from the car to determine its operation. To do this, you need to lift it with a jack so that the wheel does not touch the ground. Then connect the sensor contacts to a voltmeter, which will give voltage readings when the wheel rotates. If there is a frequency in Hz and voltage, we diagnose that the DS is working.
- It is necessary to disconnect the impulse wire, which is determined by a special controller. As in the previous version, we lift the wheel to rotate it. The “Signal” wire is connected to the control; if the indicator is “-“, then the DS is working. A wire with a light bulb can replace the control in this procedure.
Troubleshooting
Faults are not always related to the part, i.e. The DS may turn out to be quite functional; only some procedures need to be carried out to restore the previous functionality. Photo: drive2.ru
Dirt, dust deposits and oil smudges may form on the DS during the operation of the car. By cleaning this device, you will ensure preventive maintenance of the product and possibly prevent future breakdowns.
The problem may be in the contacts, their fracture, abrasion, and it is necessary to replace the damaged area.
The problem may turn out to be elementary and be hidden in mechanical damage or defects in the cable, which is easier to replace. Having diagnosed the sensor, everyone is convinced that it is not working properly, then it is worth testing and eliminating the above-mentioned malfunctions.
You can learn about some features of speed sensor repair from this video:
In what cases is replacement required?
DS is a part that does not change very often, this is due to the reliability of the device, which lies in its simple design. Before changing it, you need to make sure that there is a malfunction, because the signs may indicate completely different problems.
By choosing one of the above methods, you can diagnose the condition of the part. If, however, this is the reason, then it is worth buying a high-quality element so that it will work for a long time.
The procedure for replacing the speed sensor does not take much time and does not require so much effort, so many people try to carry out this procedure on their own. Follow the order of procedure:
- The battery must be disconnected from the on-board grid, only then disconnect the speed sensor. In this case, two keys are used - “10” and “21”. Although a lot depends on the make of the car.
- The sensor itself is unscrewed, but this must be done carefully, because the rod may be damaged, and then the procedure will become more complicated. It is necessary to purchase the same part with an equal number of teeth on the gear.
- The process of installing a new element is carried out in reverse order. A rod is installed in the sensor sleeve, then an o-ring, which is pre-treated with oil, and finally the device is fixed in its place.
After installing a new DS, it is necessary to reset the ECU errors, otherwise the car will not consider the replacement effective. How to do this - see the example of VW Passat:
Purpose and operating principle of DPKV
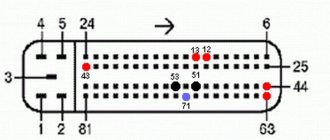
The function of the device is to determine the position of the engine cardan at a certain time for computer control of actuators and coordination of the functioning of the gas distribution system. It serves to ensure the formation of impulses from the (60-2) teeth of the disk, that is, it marks the rotation of the cardan on sector marks. The angular stroke of one tooth, together with the gap to the next, is equal to 6 o of rotation of the cranked spindle. It functions in conjunction with a toothed circle located on the cardan pulley. The circle has 60 notches with 2 whole protrusions missing. The cutout on the circle serves as the starting point for the location of the crankshaft. The beginning of the 20th (behind the cutout) tooth (teeth numbering starts from the cutout clockwise) corresponds to TDC of the first or fourth cylinder.
The specificity of the action of the crankshaft sensor is the formation of an alternating current emf of a sinusoidal type in its coil when passing a metal tooth of a circle with protrusions near its end. In the middle of the protrusion (its rear cut) there is zero pulse amplitude. When passing the cutout of the gear circle, the device is silent. From this point the car computer starts counting. When the 20th notch of the ECU synchronization circle approaches, it marks the location of the pistons of the first or fourth pots at TDC. Thus, the car computer knows what is located where in the engine.
Failure of the DPKV leads to the engine stopping.
Attention! The crankshaft sensor is the most important sensor among all engine sensors. You need to have a intact, working, spare DPKV in your car.
Crankshaft sensor 4216 where is it located?
Now it's time to change the DPKV. In theory, there is no particular point in making such an entry, but the Internet is replete with a lot of “symptoms”, at the same time, for some reason I have never seen the symptoms that manifested themselves in me anywhere. Everything described below will be based on simple facts about the operation of the machine, the maximum that will be used from the equipment is the BC (On-Board Computer). Inside I will insert simple little things in italics, they are needed for reference in order to avoid unnecessary questions.
Brief information
. DPKV is the most important sensor in the system. You simply won't eat without it. When it finally fails, you will have no spark at all. It is thanks to this sensor that the ECU “knows” what position the engine crankshaft is in. Based on this, injection and ignition are calculated. For example. Without a mass air flow sensor, the car will barely drive, it will stall, the idle will disappear, but the car will drive. No temperature sensor either. The motor stalls, not really working. Etc. and so on. But without DPKV it will not work at all. That's why I always have this sensor with me.
Over the entire life of the car, which is almost 11 years and almost 56,000 km. I changed the DPKV 2 times. So I came 3 times. All these replacements were combined with common symptoms. And like a carbon copy. I will try to describe them in as much detail as possible. I will describe them in the order of their appearance, i.e. in the beginning the one that appeared first.
Symptom No. 1
Occasionally, error No. 53 is stored in the ECU memory, the status is accumulated. Visible only by entry in BC.
Symptom No. 2
The error appears more and more often. After starting the engine, the error lamp may light up, but this does not affect the operation of the car in any way. Error 53 is still present and has accumulated status.
Symptom No. 3
The car takes a little longer to start. Those. You have to turn the starter longer, literally 1-2 turns. After startup, error No. 53 is consistently recorded in the ECU. Over time, the symptom progresses.
Symptom No. 4
The car may not start at some point. After an unsuccessful start, error No. 53 is still accumulated in the ECU memory. The symptom also progresses over time.
Symptom No. 5
During operation, the engine may begin to shake, rare “misunderstandings” occur, and the engine loses speed. At this moment, CHEK lights up and goes out (the ECU again indicates error No. 53).
To sum it up. DPKV simply starts to work unstable. And during startup, when the speed is low and the voltage on the DPKV magnet is minimal, its malfunction more often manifests itself. No matter how you look at the DPKV magnet, its characteristics deteriorate over time, the readings have a large error, and the DPKV mark, like the rest of the teeth, has instability (clearly visible on an oscilloscope).
I didn't want to wait. And because I noticed that starting the car was accompanied by the inclusion of CHEK and the appearance of a DPKV error, I immediately decided to replace it.
Basically, I had a new DPKV in the trunk. I bought it a relatively long time ago. I don’t remember where and how, I remember that the manufacturer and the DPKV itself arranged for me. But still, I thought that I needed to buy a new one, put it in the trunk, and put the one that was riding with me. But while going shopping I saw the following. DPKV made with a sledgehammer. A lot of sloppy smelting, the wire going into the DPKV is not filled in and moisture can get into the DPKV itself. There is nothing really indicated on the packaging. The magnet is roughly processed and weakly magnetizes. In fact, it should hold the metal very tightly. The pull-out force should be noticeable. In the end, due to lack of time, I decided to install the one that was in the trunk. Here he is.
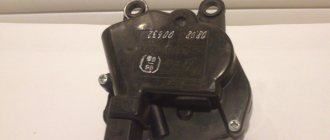
DMRV Gazelle. Euro-3
DMRV Gazelle Euro-3
The Siemens mass air flow sensor is available in two versions. Euro-2 and Euro-3. They differ from each other in the reversal of the wire connection chips. In the Gazelle mass air flow sensor of Euro-2 standard, the chip is rotated 180 degrees relative to the axis backwards. In Gazelle mass air flow sensor, the chip is turned transversely by 90 degrees and looks as if to the side relative to the sensor axis.
Price 2200 rub.
crankshaft sensor UMZ 4216 — search on DRIVE2
Hello guys, I'm boiling, I'm tired of changing sensors
phases... In short, due to the low cost, I always bought
sensors
, to be honest, a rare g...o. Over the past 3 months I have changed 5 pieces.
Crankshaft position sensor GAZelle Business
Yesterday evening I started having problems starting. The warmed up engine started on the second or third attempt. There were no longer any options for repairs at 17:00 outside the city, so there was nothing left to do but finish the work and, if possible, move towards the house.
Sensor
The crankshaft
position is flooded again! It's like a curse! Once even after washing
The ECU reports " sensor
crankshaft
position » And how many times did I get up in the spring or
I once went to Umz
so. So there, as if a drop gets on the spark plug caps, that’s it.
P0336 Crankshaft Position Sensor Error
Symptom of a faulty crankshaft sensor
Repair of UMP – 4216…
Sigurdja › Blog › Repair of UMP
–
4216
… Sigurdja last online 2 weeks ago.
the sensor was installed in the upper radiator hose
turn on the fan and set
the sensor
to a temperature of 97°-82°. Connected.
Injecting 417th. (Part 2) - GAZ 21, 2.4 l., 1967
Overhaul of UMZ 4216
Hooray! STARTED... and less than a year has passed! — KIA Sportage, 2.0 l., 2001.
Sensor
synchronization 35.3847 is designed to generate an electrical signal when the angular position of a special toothed disk mounted on the
engine
crankshaft .
The sensor
is used as part of a comprehensive engine control system.
How to check the Crankshaft Position Sensor (CPS)
Sensor
crankshaft position
- all about
the crankshaft
sensor It is very difficult to imagine a modern miracle of engineering - a car without an abundance of electronic systems.
Camshaft and crankshaft sensors ZMZ 406. - Community.
Good day everyone! If with sensors
temperatures and their manufacturers, everything is clear (except for the recommended 405226, there is nothing special to take), then with the above
sensors
I don’t know what to choose, the topic is not discussed, so I turn to the community.
Gazelle error 053. crankshaft position sensor malfunction
Good afternoon everyone. Tell me who is in the subject. Such an incident happened for two days in a row, I drove a gazelle 406 engine and had no complaints about the work. But on the third it didn’t start. When you turn the engine it catches periodically but refuses to work.
Report after updating the UMZ 4216 - GAZ software.
DPKV from Gazelle - Great Wall Hover, 2.0 l., 2014
Measure seven times (crankshaft position sensor) - UAZ 3160.
Ignition system UMZ 4216
The electronic control unit receives reference signals from sensors
crankshaft position and
phases.
The UMZ
4216
ignition system is part of the engine control system and consists of an ignition coil, high-voltage wires, etc.
GAZ Gazelle UMZ 4216
Colleague! Health to you and everything connected with you. I recently rode a Gazelle 3302 farmer 4x4 with a UMZ
4216
injector Euro 3 2012.
Question about the sensor on UMZ 4213; 4216 - Community "UAZ drivers".
I didn’t like UMZ
4216
or
UMZ
motor on
sensor
When will I get married ZMZ-40200M and ZMZ- 4216
and they will install it on the Volga to scribble over this problem.
In the 402, the crankshaft
do not fall out below the belly and therefore the block is more rigid.