The design of the gearbox of VAZ passenger cars is shown in Diagram 1. The gearbox is mechanical , three-way, with constant meshing of gears , with synchronizers and non-automatic (with manual control).
The box has four gears for forward movement and one gear for reverse movement. The gears of all gears (except reverse gear) are helical, which reduces noise during operation of the gearbox, and have constant meshing. The reverse gears are spur gears. Gears for forward movement are engaged using synchronizers , and for reverse movement - by moving the reverse intermediate gear. Gears are changed using a lever that has three strokes forward and backward to change gears.
Box design
Diagram 1 – Gearbox of VAZ passenger cars
a – general view; b, d – diagrams of the box and synchronizer; c – synchronizer; 1 – input shaft; 2, 12, 14, 19 – covers; 3, 5, 6, 9, 10, 16, 17, 23 – gears; 4, 7 – synchronizers; 8 – secondary shaft; 11, 29 – springs; 13 – lever; 15 – fork; 18 – axis; 20 – plug; 21 – intermediate shaft; 22 – crankcase; 24, 26, 28 – sliders; 25 – retainer; 27 – lock; 30 – ring; 31 – hub; 32 – coupling; I – IV – gears
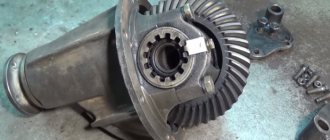
In the gearbox housing 22 cast aluminum alloy, the primary (drive) 1, secondary (driven) 8 and intermediate 21 shafts . The input shaft is made as one piece with gear 3, which is in constant mesh with gear 23 of the intermediate shaft, which is a gear block.
Gears 5, 6 and 9, respectively, of 3rd, 2nd and 1st gears are freely mounted on the secondary shaft The hubs of synchronizers 4 and 7 and the reverse gear 10 are also rigidly fixed to the secondary shaft. The reverse intermediate gear 16 is freely mounted on the axis 18.
When engaging 1st and 2nd gears, synchronizer 7 connects gears 6 and 9, respectively, to the secondary shaft of the gearbox. When engaging III and IV gears, synchronizer 4 connects gear 5 and input shaft 1, respectively, with the secondary shaft. Reverse gear is activated by fork 15 by engaging gear 16 with gears 17 and 10.
The gearbox housing is closed with covers 19, 2 and 14. Gaskets are installed under the lower 19 and rear 14 covers.
Synchronizer device
The synchronizer consists of a hub 31, a sliding clutch 32, locking rings 30 and springs 29. The synchronizer hub is fixed to the secondary shaft of the gearbox. It has external splines on which a sliding coupling 32 with internal conical surfaces is installed. The locking rings 30 have external conical surfaces and internal teeth with bevels. The locking rings are constantly pressed by springs 29 towards the sliding clutch 32.
The operation of the synchronizer is based on the use of friction forces. Engaging the gear is possible only after preliminary equalization of the angular velocities of the secondary shaft and the gear of the gear being engaged. After equalizing the angular velocities due to friction between the conical surfaces of the sliding clutch 32 and the locking ring 30, the teeth of the clutch engage with the synchronizer ring gear made on the gear. In this case, the freely rotating gear on the secondary shaft is connected to the secondary shaft using a synchronizer, and the transmission is engaged.
Gear shift mechanism
The lock consists of two locking pins and a pin between them. When the middle slider 26 moves, both nuts come out of its recesses and lock the outer sliders 24 and 28, preventing their displacement. When one of the outer sliders moves, the block comes out of its recess, blocks the middle slider and, acting through a pin on the other block, also locks the other outer slider, which prevents the inclusion of two gears at the same time .
The gearbox is attached to the rear end of the clutch housing. Transmission oil is poured into it through a threaded hole with plug 20. The internal cavity of the gearbox communicates with the atmosphere through the breather. The oil from the gearbox is drained through a threaded hole with a plug located in the bottom cover 19.
Changing the oil in different types of Lada Granta gearboxes
This operation is performed for various reasons. Basically, the procedure is performed in accordance with the technical work regulations or after repairing the gearbox. At the same time, for any transmission it is important to follow some replacement rules.
- Before draining the gearbox oil, it must be thoroughly warmed up. The best replacement option is after a long trip.
- It is not recommended to lift the front of the car. It must be in a horizontal plane. This is the only way to drain as much oil as possible.
To change the lubricant yourself, you should prepare the following tools and devices:
- socket wrench or socket 17;
- some container for draining old oil;
- a funnel with a pipe and a canister of suitable gear oil;
- clean rags.
The replacement procedure is as follows.
- Wipe the drain hole with a rag and unscrew the drain plug, first placing an empty container under it (in this case, remove the dipstick to check the level. This way, the oil will begin to flow faster into the container under atmospheric pressure. Heated oil may be hot, you should be careful).
- Tighten the drain bolt after all the oil has flowed into the container.
- Insert the funnel pipe into the hole for the level check dipstick and slowly begin to fill in fresh oil (the volume will average from three to 3.5 liters).
- After filling approximately three liters, wait and insert the dipstick to control the level. Remove the dipstick, wipe it and insert it back, then pull it out and check the level.
- If the level is insufficient, add oil and measure again.
If the oil level is insufficient, the gearbox will begin to overheat, and an excess will lead to leakage due to volume expansion when heated. Having achieved the optimal level, insert the dipstick tightly and wipe the remaining oil around the filler hole.
Features of changing oil in automatic transmission
The process for the automatic transmission of the Lada Grant is identical in principle to changing the oil in a manual and robotic gearbox. The main difference is the volume of filling; for a machine it is about one liter. In addition, to replace you will need a 17 mm wrench or socket and a set of hex keys. Due to the fact that this type of gearbox is much more airtight, to drain the used lubricant you will need to unscrew not only the lower drain plug, but also the upper nut.
There is an opinion among car owners that before changing the oil, the machine must be flushed. Typically, kerosene or diesel fuel is used for these purposes. The essence of this method is simple. The fact is that there is a much smaller volume of oil inside; during operation, natural wear of parts occurs, and the lubricant quickly fills with various types of contaminants, including metal particles. When draining, it is impossible to wash out all these particles, and if you immediately fill in new oil, it will certainly receive some of these contaminants and will not be able to work 100%.
Automatic transmission flushing
Whether to rinse or not is a purely individual decision; the manufacturer does not regulate such work. The process is simple. First, the oil is drained, the drain plug is tightened and kerosene or diesel fuel is poured into the gearbox. Next, the engine starts and the speeds are switched. After a short period of operation, turn off the engine and drain the flushing fluid by unscrewing the drain plug. For better effect, the process is repeated several times.
At the final stage, you need to drain the liquid as much as possible and do not tighten the drain plug, allowing the machine to dry thoroughly for several hours. Then the drain bolt is screwed into the hole and fresh oil is poured in according to a similar principle with a manual transmission. The lubricant level should be checked periodically until it reaches the optimum level. For a control measurement, start the engine and let the gearbox run for a while without load. If, upon subsequent inspection, the level is at the recommended level, then the procedure was carried out correctly.
On an automatic transmission, you should check the oil level every five thousand kilometers.
Ideally, it would be good to check with a dipstick before the next trip. This way you can extend the service life of the automatic transmission on the Lada Granta. Changing the oil for both automatic and manual transmissions is not the most difficult procedure and can be done independently even by beginners with no experience. The main thing: follow the instructions.
A short summary
General structure of manual gearboxes on VAZ
VAZ manual gearboxes are very reliable, unpretentious gearboxes, their gearshift scheme is the most standard, no exotic ones. And this is a huge plus, since their maintenance and repair are just as simple and straightforward. They have to be repaired relatively rarely, since they perfectly hold the torque from the ring shaft of VAZ engines, even forced ones. For comparison, many manual gearboxes have difficulty maintaining the torque of stock engines, comparable in power to VAZ ones, and very quickly fail at the slightest increase in engine power. What makes VAZ manual transmissions so durable? Let's look at the diagram of their design and understand why they are good and what their shortcomings are.
Owner reviews
There are many opinions on the Internet about this or that Lada Granta checkpoint. Here are just a few of them.
Vasily, Samara: “Compared to the gearbox from Priora, the new cable gearbox does not hum, does not vibrate, gears are engaged easily and clearly. They say that Granta’s robot leaves much to be desired, but I’m more used to mechanics. At least you know what to expect from her and what problems may arise.”
Georgy, Tambov: “I got this miracle from AMT. In other words, a robot. In combination with the electronic gas pedal, I got a complete “vegetable” that accelerates poorly and thinks slowly. Sometimes it seems that the box thinks for about 6 seconds, and only then switches. Very inconvenient compared to mechanics. Although for lovers of leisurely trips it’s perfect. If you don’t want aggressive driving, a robot is an ideal option.”
Dmitry, city of Izhevsk: “Granta on the machine, who would you have thought that this would happen. What I want to say is that this is an ancient box from Nissan, although not the most advanced, but time-tested. Moderately thoughtful, which is not surprising, given the technology of the last century. For our automobile industry, this can be considered a breakthrough. If only they didn’t think of putting this ancient mammoth on Vesta.”
Lada Granta is one of the most inexpensive cars in Russia, and budgeting manifests itself in many ways. A slightly modernized gearbox from Priora, an old robot from the Japanese, not the most advanced automatic. However, one cannot blame a cheap car for the lack of high-quality equipment. For such a small amount this is more than enough. The developers are introducing something new, and this is good news.
VAZ 2110 gearbox diagram:
| 1 – clutch release bearing; | 18 – driven gear of the second gear of the secondary shaft; |
| 2 – guide sleeve of the clutch release bearing; | 19 – driven gear of the third gear of the secondary shaft; |
| 3 – main gear drive gear; | 20 – synchronizer for 3rd and 4th gears; |
| 4 – roller bearing of the secondary shaft; | 21 – driven gear of the fourth gear of the secondary shaft; |
| 5 – oil sump; | 22 – ball bearing of the secondary shaft; |
| 6 – satellite axis; | 23 – driven gear V of the secondary shaft transmission; |
| 7 – speedometer drive drive gear; | 24 – 5th gear synchronizer; |
| 8 – axle gear; | 25 – secondary shaft; |
| 9 – differential box; | 26 – rear cover of the gearbox housing; |
| 10 – satellite; | 27 – drive gear of 5th gear; |
| 11 – clutch housing; | 28 – ball bearing of the input shaft; |
| 12 – driven gear of the main gear; | 29 – input shaft; |
| 13 – adjusting ring; | 30 – gearbox housing; |
| 14 – tapered roller bearing of the differential; | 31 – roller bearing of the input shaft; |
| 15 – axle shaft seal; | 32 – input shaft oil seal; |
| 16 – driven gear of the 1st gear of the secondary shaft; | 33 – breather. |
| 17 – synchronizer of 1st and 2nd gears; |
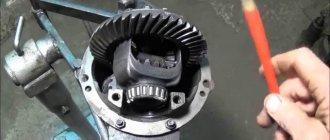
The operating scheme is as follows: the input shaft (29) is made in the form of a block of drive gears, which are in constant engagement with the driven gears of all forward gears. The secondary shaft (25) is hollow, with a removable drive gear (3) of the main gear. On the secondary shaft there are driven gears (16, 18, 19, 21, 23) and synchronizers (17, 20, 24) for forward gears. The front bearings (4, 31) of the shafts are roller, the rear bearings (22, 28) are ball. An oil sump (5) is located under the front bearing of the secondary shaft, directing the flow of oil into the secondary shaft and further under the driven gears.
The differential is two-satellite. The preload in the differential bearings is adjusted by selecting the thickness of the ring (13). The driven gear (12) of the main gear is attached to the differential box flange.
What is a short-stroke link?
The standard rocker on the VAZ 2114 is a very reliable device, and even in the event of any malfunctions, it is easily repaired, is unpretentious to donor parts and creates a general impression of an analogue of a Kalashnikov assault rifle from the world of automobile rockers.
But what is really not pleasing about it is the attitude of the designers towards the comfort of the car enthusiast; perhaps some of them think that clogging the gears with a sweeping click is stylish, but in reality it only distracts from the road. It was to resolve this situation that the short-stroke slide was created.
This engineering idea is not something innovative; this idea came to civil vehicles from the world of sports competitions, where fractions of seconds decide everything. Initially, to reduce switching time and increase its accuracy in sports, boxes with a lever mounted in the gearbox housing were used, but it transmitted vibrations and did not allow the creation of more convenient control methods.
Therefore, a mechanism called a rocker was developed, the task of which was to convey the motorist’s decision to shift the gear forks into the gearbox through racks located outside the gearbox housing. This gearbox control inherited the sweeping switching of the forks from its older brother - the “lever in the body”.
Therefore, this engineering solution was further improved, as a result of which a short-stroke rocker appeared on the VAZ 2114 and other cars.
Gear shift drive diagram:
| 1 – gear selection rod lever; | 10 – hinge bushing; |
| 2 – gear selection lever; | 11 – hinge tip; |
| 3 – gearbox housing; | 12 – clamp; |
| 4 – clutch housing; | 13 – protective cover of traction; |
| 5 – gear selection rod; | 14 – gearbox control drive rod; |
| 6 – rod bushing; | 15 – gear shift lever; |
| 7 – rod seal; | 16 – ball joint cage; |
| 8 – protective cover; | 17 – ball joint of the gear shift lever; |
| 9 – hinge body; | 18 – jet thrust. |
The gearbox control drive consists of a gear shift lever (15), a ball joint (17), a rod (14), a gear selection rod (5) and gear selection and shift mechanisms (crumpled “P”).
To prevent spontaneous switching off of the P due to the axial movement of the power unit on its supports when the vehicle is moving, a reaction rod (18) is introduced into the gearbox control drive, one end of which is connected to the power unit, and a clip (16) of the ball joint of the lever (15) is attached to the other end ) switching P.
A lever (1) is attached to the inner end of the rod (5), which acts on the three-year lever (2) of the P selection mechanism. This mechanism is made as a separate unit and is attached to the plane of the clutch housing.
Maintenance and repair
Regardless of what kind of drive the car is made with, changing gears, as some drivers say, is a rather complicated operation during a trip. Driving skills are acquired over time. And the more often a person gets behind the wheel, the faster he gains confidence when driving. However, it should be noted that the gearbox experiences the greatest load during the adaptation period. This primarily concerns the mechanical design. A driver who is not confident enough either abruptly releases the clutch pedal or forgets to press it when changing gear.
The first signs that the box is not working properly are:
- Loud noise in the box;
- It takes effort to engage the gear;
- Spontaneous transmission shutdown;
- Oil leakage.
In this case, there is no need to wait for further developments. If you don’t have the skills to repair a vehicle, then you shouldn’t gain this experience by taking the opportunity to dig into the gearbox. Therefore, you should not postpone an extraordinary visit to the service station. When a cable box is installed on the machine, the likelihood of a breakdown is very low.
At the same time, we must remember that there is no such mechanism that cannot be rendered unusable by incorrect actions. Very often, the cause of breakdown is improper operation of the car in general, and the gearbox in particular. Poor quality oil and a faulty clutch play a negative role. The use of spare parts of dubious manufacture also makes a negative contribution. Just like the extreme wear of parts. It is necessary to mention the low quality of technical maintenance of mechanisms on the part of service station personnel. All these features must be taken into account when operating and repairing your machine.
Gear selection mechanism:
| 1 – gear selection lever (forward); | 6 – reverse fork axis; |
| 2 – guide axis of locking brackets; | 7 – locking bracket; |
| 3 – axis of the gear selection lever; | 8 – reverse fork; |
| 4 – spring; | 9 – gear selection lever (reverse); |
| 5 – retaining ring; | 10 – housing of the gear selection mechanism. |
Two axles are mounted in the housing (10) of the gear selection mechanism. A three-year-old gear selector lever and two locking brackets (7 and 12) are installed on the axis (3). The other axis (2) passes through the holes of the locking brackets, securing them from turning. The gear selector lever arm (1) is used to engage P forward gear, the lever arm (9) is used to engage reverse gear, and the third arm is used by the gear selector rod lever. A fork (8) for engaging reverse gear is installed on the axle (6).
Oil is poured into the gearbox of a VAZ 2110, the level of which should be between the control marks of the oil level indicator.
Oil groups
Spectrol-Forward
For domestic VAZ 2115 cars, different groups of transmission oils are suitable, namely:
- GL-4
- GL-5
The first is suitable for gearboxes of front-wheel drive VAZs, and the second is universal and suitable for almost all domestic cars. Some people believe that GL-5 oils are better than GL-4, but this is not true.
These classes are simply different from each other, and none of them are better or worse than the other. For example, in some gearboxes, API GL-5 oils can have a detrimental effect on synchronizers, while API GL-4 is perfect for them. Oils for the VAZ 2115 GL-5 gearbox can be divided into three groups:
- SAE 85W90 – mineral lubricants such as Rexol TM-5-18, Norsi and Lukoil TM-5-18;
- SAE 80W90 – less thick mineral oils, including Wells TM, Spectrol-Forward, Texaco Geartex EP-C and others;
- SAE 75W-90 – synthetics and semi-synthetics: Motulgear, Teboil EP, BP Energear SGX.
Pros and cons of a short-throw rocker
The motorist should understand that replacing the VAZ 2114 backstage will bring not only positive aspects to his life, but also some difficulties, which is worth knowing in advance.
So, the clear advantages of such modernization include:
reducing the travel of the gearshift lever by two or more times; eradication of backlashes present in the standard scenes of cars; high switching accuracy; minimal use of the driver's shoulder to change gears (the load is transferred to the hand).
There is only one downside: reducing the force lever leads to an increase in the load on the synchronizers, which increases the rate of their depreciation by two or more times.
Selecting the appropriate viscosity
TM5-18
The TAD-17I transmission oil, well known to many owners of domestic cars, is a thing of the past, and it has been replaced by TM5-18. Selection based on performance properties is not everything. You need to be able to determine the correct oil viscosity, and this is a very important choice.
Oils with a viscosity of less than 24 mm2/s at 100 degrees Celsius, i.e. corresponding to SAE class 140, are only suitable for very hot climatic regions. In areas with moderate temperatures, focus on class 90. It is more rational to fill the box with all-season oil, namely:
- 75W-90
- 80W-90
- 85W-90
The latter are poorly suited for Russian winters, 80W-90 can be considered universal, and with 75W-90 liquid you will not have problems even in the most severe frosts. The use of domestic oils, many of which are classified according to API GL-5, causes rapid wear of synchronizers. In this regard, it is better to fill the transmission of front-wheel drive VAZ 2115 with API GL-4 or universal API GL-4/5 transmission fluids.
Do not fill the VAZ 2115 gearbox with high viscosity oil of the 85W-90 type. The higher the value, the stronger the oil film, but it is more difficult for the oil to reach the gearbox parts. A very high value makes it difficult for the synchronizers to function, since they constantly squeeze out excess oil.