I'll try to explain why this is so.
When assembling and adjusting the gearbox, initially the shank nut is tightened with a decent force of up to 25 - 30 kg/m. It is necessary to compress the spacer sleeve of the shank bearings in order to create preload in the bearings to a certain resistance to the beginning of rotation of the shank. In the future, such force when tightening the shank nut is not required, and is even unacceptable. Because the spacer sleeve can be deformed (compressed). And then complete disassembly of the gearbox, replacement of the spacer sleeve, and complete adjustment.
Therefore, we tighten the nut to a force of 4 - 6 kg/m (with a torque wrench). The nut must be replaced with a new one, since on the old one the plastic seat ring is already compressed and the nut will certainly loosen again.
Most VAZ 2107 owners believe that replacing the rear axle gearbox seal is a very complicated procedure and you need to take the car to a car service center. In this article we will try to convince you that such repairs on the “seven” can be done independently, following the detailed instructions of experienced craftsmen. First of all, you should familiarize yourself with the design of the unit:
Causes and signs of failure
As a rule, the oil seal in the VAZ 2107 gearbox is replaced because it begins to leak. Over years of use, the sealing lip may dry out or tear. A leak can also be caused by improper installation of the oil seal.
You can definitely identify a malfunction by the following signs:
- After parking for a long time, an oil stain remained on the road.
- Droplets of oil appeared on the bridge body.
- Near the gearbox shank, characteristic traces of leaking oil are visible.
Step-by-step replacement process
- We drive the car into the pit and unscrew the propeller shaft mounting bolts, having previously made a mark on the flank of the cardan and gearbox. After unscrewing the cardan, we tie it with a wire so that it does not interfere.
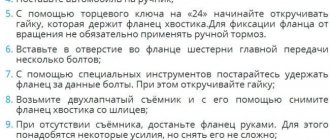
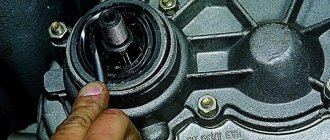
Using a special wrench, we secure the flange from turning and, using a wrench or a twenty-seven socket, unscrew the nut. The key for fixing the flange is shown in the photo below. You can also screw two universal joint mounting bolts into the flange and insert a powerful screwdriver between the bolts.
Unscrew the plug and drain the oil from the rear axle.
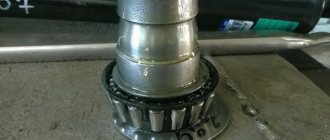
We remove the flange from the slots and take out the thin ring behind it using two screwdrivers.
- Using two screwdrivers, remove the inner race of the bearing.
- We take out the spacer sleeve. This bushing is needed to create the correct tension in the bearings. Please note that the belt of the bushing you removed is barrel-shaped, but on the new bushing it is straight. At the moment of tightening, the belt is wrinkled and the correct tension is achieved. The photo below shows a new bushing and one that was already working.
- We install a new bushing, with the narrow side facing the trunk. We also install the ring.
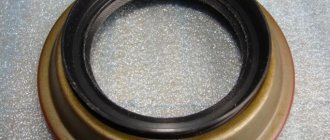
- We hammer the oil seal into place using a mandrel. The mandrel can be made from a piece of pipe of suitable diameter or from an old oil seal. As a last resort, the oil seal can be carefully seated with a hammer.
Functions of the rear axle VAZ 2107
The seventh VAZ model completes the line of rear-wheel drive cars produced by the Volga Automobile Plant: all subsequent models, starting with the VAZ 2108, were equipped with front-wheel drive or all-wheel drive. Thus, the torque from the “seven” engine is transmitted to the rear wheels through other transmission elements. The rear axle is one of the components of the transmission, including the differential and final drive . The differential serves to distribute torque between the axle shafts of the rear wheels when the car turns or moves on an uneven road. The main gear amplifies the torque, which is transmitted to the axle axle shafts through the clutch, gearbox and cardan shafts. If the resulting torque is taken as 1, then the differential can distribute it between the axle shafts in a ratio of 0.5 to 0.5 or in any other ratio, for example, 0.6 to 0.4 or 0.7 to 0.3. When this ratio is 1 to 0, one wheel does not rotate (for example, it fell into a hole), and the second one slips (on ice or wet grass).
Nut tightening
Now the most important point is tightening the nut. To properly tighten the nut, you need to do the following preparatory work:
- hang up the rear of the car;
- Remove the rear wheels and brake drums.
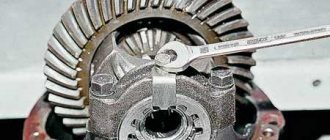
Tighten the nut until you feel a slight stop. Thus, we brought the bearings to the new spacer, but we had some play in the flange. He must be. This is normal with a new spacer. We tighten the nut 10-20 degrees and check the play. Tighten the nut until there is no play. Next, we check the force to break the flange using a digital scale. We insert the “ear” of the scale into the hole on the flange and pull it at a right angle. The breaking force should be within 1.5 kg. If the force is less than 1.5 kg, tighten the nut literally by degree and control the force.
The tightening torque of the nut should be from 12 to 26 kg/m when the required force is achieved. If, after eliminating the flange play, the force is significantly more than 1.5 kg, then you have received a defective spacer sleeve.
Next we reassemble:
- We fasten the cardan according to the marks;
- Fill in new oil (you need to pour oil with API GL-4/GL-5 approvals, volume 1.5 liters);
- We install brake drums and wheels.
The process of replacing the rear axle gearbox seal of a VAZ 2107 is clearly shown in this video:
Replacing the gearbox seal (help)
- Answer
- Go to first unread message
#61 Vitaliy2008
- Protection against spam bots: 730
- City of Gatchina Len. region
- Car: BMW 730 i burned out after a crooked repair, sold VAZ 21043 sold, BMW X3 E83 2005 I'm driving now
American forum question = answer Jewish forum question = question Russian forum question = you listen for two days what a moron you are and then maybe they will answer Ancient Chinese wisdom says: “NI SY!”, which means: “Be serene, like a lotus flower at the foot of the temple of truth »
- Top
- Answer
- Quote
- Insert nickname or quote
#62 Andrew
- Yekaterinburg city
- Car: VAZ
If it suddenly became dark. don't be scared. you just overtook the light.
- Top
- Answer
- Quote
- Insert nickname or quote
#63 angel4130-2
- City VA3 21043, Rzhev,
Andrejj (10 February 2012 — 12:38) wrote:
I tightened it according to the book with a torque of 120 Nm, if you exceed the tightening torque, the mono gearbox will be damaged
https://remont-vaz210. -mosta-vaz-2107 As you tighten the nut, check for axial play in the shank bearing; it is not allowed. Eliminate the presence of play by tightening the nut to a torque of 20-30 Nm, but do not exceed a tightening torque of 225 Nm. If the play still remains, then repair of the rear axle gearbox is required, namely bearing replacement.
- Top
- Answer
- Quote
- Insert nickname or quote
#64 sergo68
- City VAZ 21053, Tambov region,
The new camshaft must be lubricated with engine oil before installation.
- Check the lever springs. If they are broken or bent, replace them.
- Screw the adjustment bolts into place.
- Install the springs, then attach the rocker to them.
- Now you can insert the camshaft with housing. Lubricate the levers, cams and journals of the camshaft with oil. Fit them on and tighten them with a torque wrench. The procedure is performed from the center to the edge. Tightening torque – 2 kgf*m.
Important nuances in work
- When driving the oil seal using a mandrel, do not overdo it. Apply gentle blows and control the depth of the oil seal. If you hit it hard, you can easily damage the oil seal;
- Before installing the oil seal, lubricate the rim and sealing edge with fresh oil;
- Before installation, inspect the flange for wear in the area where the sealing lip of the oil seal meets. If there is a “groove,” the flange must be replaced.
As you can see, the process of replacing the VAZ 2107 gearbox seal is quite simple and does not take much time. The most important thing in this job is to properly tighten the rear axle flange nut.
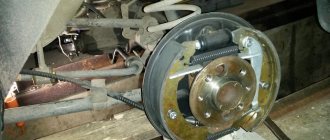
Rear axle repair
Any repair of the rear axle, as a rule, is quite complex and expensive, so before starting it, you should conduct a thorough diagnosis and make sure that the reason for the malfunction of the car lies here. If, when driving a vehicle, extraneous noises appear that were not there before, you need to try to determine at what moment they appear . If the rear axle makes a hum both under load (when driving with the gearbox engaged) and without it (at neutral speed), then most likely this is not the problem. But when the noise is heard only under load, you need to deal with the rear axle.
Checking the tightening of the drive gear nut of the VAZ and Lada Niva gearbox
First of all, we clean the gearbox neck, drive gear flanges and cardan joint from dirt. To get to the nut (S24 M16x1.5), you need to disconnect the flanges and move the propeller shaft to the side. It is balanced separately from the drive gear with a flange and still mark the relative position of the flanges with paint or a punch.
The nuts (S13, M8) of flange bolts with special heads that are to be unscrewed require very careful attention. Do not use a spanner or socket here. A regular open-end wrench “13” (S13) must be new or, in any case, tightly cover the edges of the nut. You can make a “dense” S13 key from an S12 key.
The fact is that the nuts of the flange bolts can be tightened to a torque of up to 3.5 kgf (with a wrench arm of 150 mm - a force of 21 kgf). If we take into account that the coefficient of static friction is always greater than the coefficient of sliding friction, the force on the key will be considerable. At the slightest “slack” in the key, the hexagon of the nut will quickly be crushed (“licked”). When rounding the corners of the nut faces, as a rule, a hammer and chisel are used. If there is nothing to replace the nut after this, you have to machine its edges for an S12 hexagon.
We begin to unscrew the nut that is in a comfortable position (then we turn the driveshaft), not forgetting about the bolt. The fact is that the conical head of the bolt has a flat, while the bolt rests against a special milling of the flange and is kept from turning. There is no point in rotating the nut and rotating the bolt along with it, thereby crushing the edges. It is better to jam the bolt head with a screwdriver in a timely manner.
When all the nuts are unscrewed, the bolts are removed, and when removing the propeller shaft flange, oil is found between the flanges - this is the first sign that the shank nut has been unscrewed and hot oil has easily penetrated into the interflange space through the unclamped ends of the parts and the spline joint.
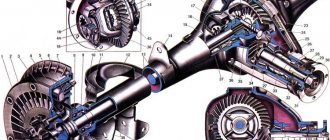
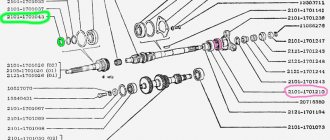
What is the rear axle made of?
The design of the rear axle of the “seven” includes a fairly large number of elements, including:
- Brake drum mounting bolts.
- Guide pins.
- Axle bearing oil deflector.
- Brake drum.
- Drum ring.
- Rear brake cylinder.
- Brake bleeding fitting.
- Axle bearing.
- Bearing lock ring.
- Bridge beam flange.
- Stuffing box.
- Spring support cup.
- Bridge beam.
- Suspension bracket.
- Axle guide.
- Differential bearing nut.
- Differential bearing.
- Differential bearing cover.
- Breather.
- Satellite.
- Driven gear of the main gear.
- Left axle shaft.
- Axle gear.
- Gearbox housing.
- Drive gear adjusting ring.
- Spacer sleeve.
- Drive gear bearing.
- Stuffing box.
- Mud deflector.
- Flange-fork of the cardan joint.
- Screw.
- Oil deflector.
- Main gear drive gear.
- Axle of satellites.
- Axle gear support washer.
- Differential box.
- Right axle shaft.
- Axle shaft brackets.
- Axle bearing thrust plate.
- Rear brake shield.
- Rear brake pad.
- Friction lining.
- Axle shaft flange.
- Locking plate.
- Bearing cover mounting bolts.
Frame
All working mechanisms of the rear axle are located in the beam, as well as in the gearbox housing. The beam is made of two casings connected by longitudinal welding. The bearings and seals of the axle shafts are located in flanges at the ends of the beam. In addition, the suspension fastening elements are welded to the beam body. In the middle the beam is widened and has an opening in which the gearbox housing is fixed. A breather is installed in its upper part, through which the connection between the bridge cavity and the atmosphere is maintained, so that the pressure in the cavity does not rise above the permissible level and dirt does not get inside the part.
Gearbox
The main gear consists of drive and driven gears that have hypoid gearing, i.e. the axes of the gears do not intersect, but intersect. Thanks to the specific shape of the teeth, simultaneous engagement of several of them is ensured and, as a result, the load on the teeth is reduced and their durability increases . A two-satellite bevel differential, in addition to the satellites located on a common axis, includes a box and two gears, while the satellites are in constant mesh with the gears.
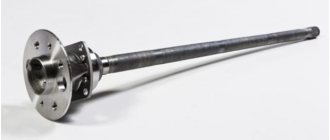
Half shafts
The “Seven” is equipped with so-called semi-balanced axle shafts of the rear axle, which take on bending forces in both the horizontal and vertical planes. The axle shaft, in essence, is a shaft made of 40X steel, with splines on the inner end and a flange on the outer end. The inner end of the axle shaft is connected to the differential gear, the outer end is located in the flange of the beam, to which the brake drum and wheel are attached. The axle shaft is held in place by a thrust plate of the bearing, which is also fixed to the beam.
Installation of the drive gear of the VAZ and Lada Niva gearbox.
The second sign of a loose nut is the presence of axial play in the drive gear. Grasp the flange with both hands and move it back and forth (the car is on a stand, with stops under the wheels). The drive gear nut may be unscrewed a full turn or more (1 turn - axial movement - is equal to the thread pitch, i.e. 1.5 mm). Here we are no longer talking about preload and you are lucky that the gearbox is still working.
Symptoms of a problem
As soon as the driver notices any changes in the operation of the rear axle (for example, extraneous sounds appear that were not there before), he must respond to these changes as quickly as possible so as not to aggravate the possible malfunction. The most typical sign of such problems may be increased noise levels:
- coming from the rear wheels;
- during operation of the rear axle;
- when accelerating the car;
- when braking with the engine;
- during engine acceleration and braking;
- while the vehicle is turning.
In addition, a knocking sound when the car starts moving and an oil leak may indicate a malfunction of the rear axle.
Grinding noise when moving
The causes of a grinding noise from the rear axle when the vehicle is moving can be:
- wear or destruction of axle or differential bearings;
- deformation of the beam or axle shafts;
- incorrect adjustment, damage or wear of gears or bearings of the gearbox and differential;
- wear of the spline connection with the semi-axial gears;
- incorrect adjustment of the gear teeth of the main gear;
- insufficient amount of oil.
The cardan spins, but the car does not move
If the driveshaft rotates while the vehicle is stationary, the cause may be a failed axle spline or wear on the teeth of the differential or final drive gears. In any case, if the cardan spins, but the car does not move, this indicates a fairly serious breakdown and, most likely, replacement of the axle shafts, bearings or gears will be required.
Oil leakage from the housing and from the shank side
The most likely causes of oil leakage from the rear axle housing:
- wear or damage to the drive gear seal;
- wear of the axle shaft seal, determined by oiling of the brake shields, drums and pads;
- loosening the bolts securing the rear axle gearbox housing;
- damage to sealing gaskets;
- axial play of the shank;
- breather jamming.
Wheels are stuck and won't rotate
If the rear wheels are jammed, but the drum and pads are in order, the cause of this malfunction may be failure of the bearings or the axle shaft itself. Most likely, in this case, the bearings have crumbled or the axle shaft has become deformed (for example, due to an impact) and the parts need to be replaced.
A little leaked oil from the axle through the axle seal + dust from the pads = good “glue”. Bottom line: remove the drum and look. If all the springs are in place and the block is not torn, then take sandpaper and clean the drum and shoes. Pre-wash them with carburetor cleaner or similar liquid. Sold in cylinders.
underwater snake
https://auto.mail.ru/forum/topic/klassika_zaklinilo_zadnee_koleso_odno/
Universal wrench for flanges and hubs
If tightening the nut is a “one-time event” and there is no special wrench, you can get by with two M8 bolts and a wrench (metal rod). The bolts are inserted into the flange holes, and the knob is placed between the bolts in front of the flange. If the knob is placed behind the flange, you may accidentally press on the dirt deflector, after which it will need to be secured to the flange.
After unscrewing the nut, it is necessary to remove oil from the threads of the nut and the gear shank, which will significantly increase the coefficient of friction and, consequently, the moment of resistance to unscrewing the nut. It is better to install a new nut, since the thread of the gear shank is imprinted in the nylon of the insert, which reduces the resistance to self-loosening of the nut.