I'll try to explain why this is so.
When assembling and adjusting the gearbox, initially the shank nut is tightened with a decent force of up to 25 - 30 kg/m. It is necessary to compress the spacer sleeve of the shank bearings in order to create preload in the bearings to a certain resistance to the beginning of rotation of the shank. In the future, such force when tightening the shank nut is not required, and is even unacceptable. Because the spacer sleeve can be deformed (compressed). And then complete disassembly of the gearbox, replacement of the spacer sleeve, and complete adjustment.
Therefore, we tighten the nut to a force of 4 - 6 kg/m (with a torque wrench). The nut must be replaced with a new one, since on the old one the plastic seat ring is already compressed and the nut will certainly loosen again.
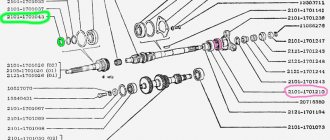
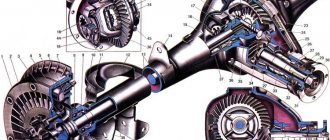
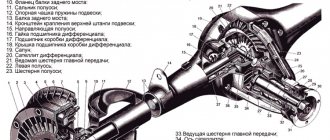
Most VAZ 2107 owners believe that replacing the rear axle gearbox seal is a very complicated procedure and you need to take the car to a car service center. In this article we will try to convince you that such repairs on the “seven” can be done independently, following the detailed instructions of experienced craftsmen. First of all, you should familiarize yourself with the design of the unit:
Causes and signs of failure
As a rule, the oil seal in the VAZ 2107 gearbox is replaced because it begins to leak. Over years of use, the sealing lip may dry out or tear. A leak can also be caused by improper installation of the oil seal.
You can definitely identify a malfunction by the following signs:
- After parking for a long time, an oil stain remained on the road.
- Droplets of oil appeared on the bridge body.
- Near the gearbox shank, characteristic traces of leaking oil are visible.
Advantages:
- Easy to install. The bushing is very easy to install and extremely precisely adjusted using the adjusting washers included in the kit;
- The bearing spacer is a ready-made solution; no turning work is required. Everything you need is included, no additional costs are required for installation;
- The bearing sleeve greatly facilitates the maintenance of the gearbox; torque adjustment is carried out only once and for all;
- When repairing or diagnosing the gearbox, the standard bushing should be replaced; reuse of the removed bushing is not provided. The IZH-TECHNO bushing does not require replacement when dismantling, and can be installed several times; you simply put it back and save time and money;
- When installing a spacer sleeve from IZH-TECHNO, adjustment of the bearings is very accurate and simple;
Step-by-step replacement process
- We drive the car into the pit and unscrew the propeller shaft mounting bolts, having previously made a mark on the flank of the cardan and gearbox. After unscrewing the cardan, we tie it with a wire so that it does not interfere.
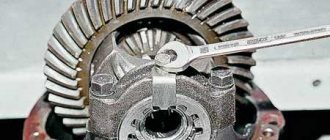
Using a special wrench, we secure the flange from turning and, using a wrench or a twenty-seven socket, unscrew the nut. The key for fixing the flange is shown in the photo below. You can also screw two universal joint mounting bolts into the flange and insert a powerful screwdriver between the bolts.
Unscrew the plug and drain the oil from the rear axle.
We remove the flange from the slots and take out the thin ring behind it using two screwdrivers.
- Using two screwdrivers, remove the inner race of the bearing.
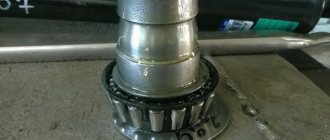
- We take out the spacer sleeve. This bushing is needed to create the correct tension in the bearings. Please note that the belt of the bushing you removed is barrel-shaped, but on the new bushing it is straight. At the moment of tightening, the belt is wrinkled and the correct tension is achieved. The photo below shows a new bushing and one that was already working.
- We install a new bushing, with the narrow side facing the trunk. We also install the ring.
- We hammer the oil seal into place using a mandrel. The mandrel can be made from a piece of pipe of suitable diameter or from an old oil seal. As a last resort, the oil seal can be carefully seated with a hammer.
Adjusting the MAZ gearbox
Make adjustments with the gearbox removed in the following sequence:
— adjust the tension of the tapered bearings of the drive bevel gear;
— adjust the differential bearings;
— adjust the engagement of the bevel gears according to the contact patch and lateral clearance, and then adjust the differential bearings.
At the same time, in order to avoid disruption of the initial adjustment of the bearings, nut 17 Fig. 1 turn and turn at the same angle.
To adjust the bearings of the drive bevel gear, remove the drive bevel gear with the bearing housing assembly. To do this, in the rear axle gear housing, unscrew the bolts securing the bearing housing 12 (see Fig. 1) and using the dismantling bolts, remove the housing 12 with the gear.
In the middle axle gearbox, unscrew the bolts securing the gear housing and, using dismantling bolts, remove the gear housing assembled with the input shaft, bend the locking plates, unscrew the nuts securing the bearing housing and remove the bearing housing assembly with the drive bevel gear;
— use an indicator to determine the axial clearance in the bearings;
— secure the drive gear in a vice, protecting it from damage with soft metal spacers;
— remove flange 6 (see Fig. 1), cover 9 with oil seals 4, 5 or gear 10 (see Fig. 2), the inner ring of the bearing closest to the shank and adjusting gasket 2 (see Fig. 1);
— measure the thickness of the adjusting shim and calculate its required thickness to eliminate axial play and obtain preload of the bearings (the reduction in the thickness of the shim should be equal to the sum of the axial play measured by the indicator and the bearing preload value equal to 0.03-0.05 mm);
— grind the adjusting shim to the required size and assemble the drive gear without securing the cover with cuffs;
— when tightening the flange nut, rotate the bearing cup to correctly place the rollers in their cages;
— check the bearing tension by the rotation torque of the bearing cup, which should be equal to 1–3 Nm (0.1–0.3 kgf-m) (Fig. 3).
With normal preload in the bearings, remove flange 6 (Fig. 1), replace cover 9 with oil seal and finally assemble the unit.
Adjust the tension of the differential bearings with the drive gear removed using nuts 17 (see Fig. 1) and 50 (see Fig. 2).
Screw the nuts to the same depth until the required preload is obtained, without disturbing the position of the driven gear using a special wrench (Fig. 4).
The bearing preload is determined by the amount of torque required to rotate the differential, which should be in the range of 2–5 Nm (0.2–0.5 kg/cm with the drive gear removed).
This moment is determined by a special torque wrench or by measuring the force applied at the radius of the differential cups and equal to 23-57 N (2.4-5.8 kgf).
The procedure for checking and adjusting the engagement of bevel gears is as follows:
— before installing the bearing housing with the drive gear into the gear housing, wipe the teeth of both bevel gears and apply a thin layer of paint to the side surfaces of three or four teeth;
— using the table, adjust the engagement of the bevel gears. The movement of the drive gear is ensured by changing the number of shims under the flange of the drive gear bearing housing.
To move the driven gear, use nuts 17 (see Fig. 1) or 50 (see Fig. 2), so as not to disturb the tension adjustment in the differential bearings, screw (unscrew) the indicated nuts to the same angle.
Adjust bearings 13 in the following sequence:
— disconnect the cardan shaft from flange 17;
— remove the differential lock mechanism;
— unscrew the bolts securing the gear housing and remove the housing assembly with the center differential;
— disassemble the center differential, remove the drive gear and remove the bearings from the gear;
— wash the parts in diesel fuel and lubricate them before assembly;
— install the internal bearing into the gear socket 26;
— install the spacer ring 25 and the outer race of the outer bearing;
—- to ensure preload in the bearings, reduce the thickness of the set of washers 22 by the amount of the axial clearance plus 0.02-0.03 mm and install them in place;
— install the inner race of the bearing assembled with the separator.
To check the preload in the bearings, install gear 26 with bearings on the press table through a mandrel (supported by the end of the inner race of the inner bearing) and compress the bearings with a slight force.
As a mandrel, you can use the crosspiece 28 and the spacer sleeve 27 assembled with the gear. By rocking, check for the presence of axial play and the ease of turning the gear.
Nut tightening
Now the most important point is tightening the nut. To properly tighten the nut, you need to do the following preparatory work:
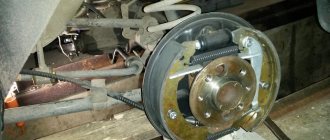
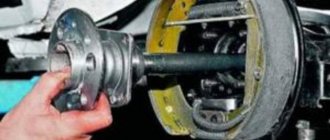
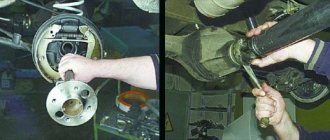
- hang up the rear of the car;
- Remove the rear wheels and brake drums.
Tighten the nut until you feel a slight stop. Thus, we brought the bearings to the new spacer, but we had some play in the flange. He must be. This is normal with a new spacer. We tighten the nut 10-20 degrees and check the play. Tighten the nut until there is no play. Next, we check the force to break the flange using a digital scale. We insert the “ear” of the scale into the hole on the flange and pull it at a right angle. The breaking force should be within 1.5 kg. If the force is less than 1.5 kg, tighten the nut literally by degree and control the force.
The tightening torque of the nut should be from 12 to 26 kg/m when the required force is achieved. If, after eliminating the flange play, the force is significantly more than 1.5 kg, then you have received a defective spacer sleeve.
Next we reassemble:
- We fasten the cardan according to the marks;
- Fill in new oil (you need to pour oil with API GL-4/GL-5 approvals, volume 1.5 liters);
- We install brake drums and wheels.
The process of replacing the rear axle gearbox seal of a VAZ 2107 is clearly shown in this video:
Spacer sleeve for rear axle gearbox VAZ 2107
How to replace the spacer bushing in the rear axle gearbox shank? Are they repairable? Do you mean enlarged?
- The rear axle gearbox mounting bolts are unscrewed, VAZ 2107 - 3 answers
- Eats rubber on the rear axle of VAZ 21074 – 3 answers
- Leaking oil, shank oil seal, rear axle gearbox - 2 answers
- The axle shaft does not fit into the gearbox on the VAZ 2107 - 2 answers
- The axle shaft on 2107 flew out - 2 answers
Install the new bushing and assemble everything in reverse order. You need to tighten the flange nut to a torque of 117–255 N m (12–26 kgf m), periodically checking to ensure that there is no play in the flange.
These spacer bushings are neither repaired nor enlarged. It's all about adjustment when installing this bushing; it wrinkles more on a new gearbox, and on a “used” gearbox when installing a new bushing, accordingly it will wrinkle less.
Subscribe
to our channel in
Index.Zen
Even more useful tips in a convenient format
The axle shaft does not fit into the gearbox on the VAZ 2107
Why does the axle shaft not fit into the VAZ 2107 gearbox?
Eats rubber on the rear axle of a VAZ 21074
The bolts securing the rear axle gearbox, VAZ 2107, are unscrewed
Good day, dear reader. Once you’ve entered the boat, it means you want to see the rear axle of your classic dry again, without fogging or oil leaks. This article tells you how to replace the rear gear oil seal (at the place where the crankshaft shank enters) on your own. First, let’s look at all the reasons why the VAZ rear gear oil seal stops holding oil.
Why does oil leak from the rear axle gearbox of VAZ 2107, 2106?
It is important to understand when the seal is leaking and when there is simple fogging. If after using the machine no drops of oil are visible near the oil seal, we can assume that the oil seal is simply sweating. In a situation where drops of oil or a trail followed by a drop are visible, we can assume that the oil seal is leaking.
Causes of leakage of the rear gear axle seal of VAZ 2107, 2106:
- Wear of oil scraper elements of the oil seal.
- Rupture of the compression spring of the oil seal.
- Oil seal defect.
- Development on the flange.
- Faulty or clogged gearbox breather.
When the oil seal is just sweating on a VAZ gearbox, you don’t have to change it, but if it leaks, then it definitely needs to be changed! But before changing the oil seal, check whether the gearbox breather is working by simply pressing on its head, and it should move a little. If it is motionless, then the breather is most likely for the leak, because. it does not allow gases to escape from the gearbox, which creates excess pressure and presses the oil out of the oil seal. Also try unscrewing and blowing out the breather before deciding to replace the gearbox seal. Let's now talk about replacing it.
Replacing the rear axle oil seal on a VAZ 2107 with your own hands.
First, let's prepare spare parts and tools. Of the new parts we will need:
- The seal itself.
- Spacer sleeve.
- Oil deflector washer.
- New gear oil.
You will need 1.35 liters of oil. According to Murzilka, it is recommended to change it together with the oil seal. Ideally you need:
- Head 24
- The key is 17 (you can have a head) .
- A dynamometer (can be replaced with spring scales up to 15 kg) or a torque wrench of at least 150 N*cm.
- Open-end wrench 13.
- A good, thick flathead screwdriver.
- Mandrel for oil seal.
- Hammer or mallet.
- Container for old oil.
- Rags.
- Marker.
- Jack.
We've prepared everything and are starting the replacement!
Preparing and dismantling the gearbox oil seal.
We drive the car into a pit or overpass and drain the oil from the bridge (do not forget to immediately screw the drain plug back). We make a mark with a marker at the junction of the cardan with the gearbox (so as not to throw off the balancing during installation). We take a 13 mm wrench and a strong screwdriver or some kind of mounting tool and unscrew the nuts securing the cardan to the gearbox.
Important nuances in work
- When driving the oil seal using a mandrel, do not overdo it. Apply gentle blows and control the depth of the oil seal. If you hit it hard, you can easily damage the oil seal;
- Before installing the oil seal, lubricate the rim and sealing edge with fresh oil;
- Before installation, inspect the flange for wear in the area where the sealing lip of the oil seal meets. If there is a “groove,” the flange must be replaced.
As you can see, the process of replacing the VAZ 2107 gearbox seal is quite simple and does not take much time. The most important thing in this job is to properly tighten the rear axle flange nut.
Defects in the gearbox
Increased play in the RZM can be formed due to wear of the differential pinion pin - if you grab the driveshaft and rotate it clockwise and counterclockwise, this play can be felt. Also, increased clearance can be formed due to wear of the splines inside the differential housing itself.
If the gaps in the main pair of gearboxes are not adjusted, a characteristic noise occurs when the car moves:
- when the load increases (sharp acceleration), a characteristic howl is heard in the bridge;
- When I let off the gas the noise goes away.
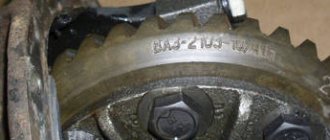
The engine can hum in a different way, but the characteristic feature described above can most often be heard on VAZ classic cars. Worn teeth of the main pair are clearly visible on the planetary gear - they become rounded, and they often show traces of rust.
Checking the tightening of the drive gear nut of the VAZ and Lada Niva gearbox
First of all, we clean the gearbox neck, drive gear flanges and cardan joint from dirt. To get to the nut (S24 M16x1.5), you need to disconnect the flanges and move the propeller shaft to the side. It is balanced separately from the drive gear with a flange and still mark the relative position of the flanges with paint or a punch.
The nuts (S13, M8) of flange bolts with special heads that are to be unscrewed require very careful attention. Do not use a spanner or socket here. A regular open-end wrench “13” (S13) must be new or, in any case, tightly cover the edges of the nut. You can make a “dense” S13 key from an S12 key.
The fact is that the nuts of the flange bolts can be tightened to a torque of up to 3.5 kgf (with a wrench arm of 150 mm - a force of 21 kgf). If we take into account that the coefficient of static friction is always greater than the coefficient of sliding friction, the force on the key will be considerable. At the slightest “slack” in the key, the hexagon of the nut will quickly be crushed (“licked”). When rounding the corners of the nut faces, as a rule, a hammer and chisel are used. If there is nothing to replace the nut after this, you have to machine its edges for an S12 hexagon.
We begin to unscrew the nut that is in a comfortable position (then we turn the driveshaft), not forgetting about the bolt. The fact is that the conical head of the bolt has a flat, while the bolt rests against a special milling of the flange and is kept from turning. There is no point in rotating the nut and rotating the bolt along with it, thereby crushing the edges. It is better to jam the bolt head with a screwdriver in a timely manner.
When all the nuts are unscrewed, the bolts are removed, and when removing the propeller shaft flange, oil is found between the flanges - this is the first sign that the shank nut has been unscrewed and hot oil has easily penetrated into the interflange space through the unclamped ends of the parts and the spline joint.
Repair or replacement, which is better?
Car owners of VAZ classics often cannot decide what is best to do - buy a complete ready-made REM assembled or purchase individual parts and repair the gearbox. It’s really difficult to decide here - the price of a new gearbox, of course, is higher, but the owner of the car is freed from the headache of adjustment. The thing is that it’s not so easy to find a good specialist in VAZ gearboxes, and there is no guarantee that the new main pair will not hum.
If a car owner buys a new gearbox, but it hums, the part can be exchanged under warranty, but the car owner loses money on removing and installing the gearbox. If you purchase a defective main pair, the repair itself will be more expensive - you will have to pay a technician for a secondary overhaul of the gearbox.
Installation of the drive gear of the VAZ and Lada Niva gearbox.
The second sign of a loose nut is the presence of axial play in the drive gear. Grasp the flange with both hands and move it back and forth (the car is on a stand, with stops under the wheels). The drive gear nut may be unscrewed a full turn or more (1 turn - axial movement - is equal to the thread pitch, i.e. 1.5 mm). Here we are no longer talking about preload and you are lucky that the gearbox is still working.
Universal wrench for flanges and hubs
If tightening the nut is a “one-time event” and there is no special wrench, you can get by with two M8 bolts and a wrench (metal rod). The bolts are inserted into the flange holes, and the knob is placed between the bolts in front of the flange. If the knob is placed behind the flange, you may accidentally press on the dirt deflector, after which it will need to be secured to the flange.
After unscrewing the nut, it is necessary to remove oil from the threads of the nut and the gear shank, which will significantly increase the coefficient of friction and, consequently, the moment of resistance to unscrewing the nut. It is better to install a new nut, since the thread of the gear shank is imprinted in the nylon of the insert, which reduces the resistance to self-loosening of the nut.