If you begin to notice that the outside air temperature readings on your car’s on-board computer differ from the actual values, then the outside air temperature sensor is to blame. Of course, if you are stuck in a traffic jam in the summer heat, and at this time you notice that the readings have increased sharply, there is nothing strange here, since at low speed or while parked with the engine running, the heat affects the sensor, it is not ventilated and starts slightly overstate the data.
The air temperature sensor is located at the bottom of the front bumper, but you won’t be able to remove it right away; you’ll have to do some more work. More on everything below in order.
First you will need to unscrew the lower grille of the front bumper, which is attached to 2 screws:
Shown below with magnification for a better understanding:
After both bolts are unscrewed, you can begin to remove the grille, first using a flat-head screwdriver to pry the grille from above and remove it from the latches:
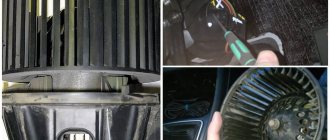
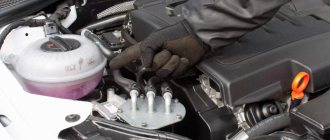
After that, on the right side inside we find this part, which will be the sensor. You need to pull it a little to the right and remove it from its seat:
And then pull it out along with the wire, as shown in the photo below:
To replace the air temperature sensor, you need to disconnect it from the plug with the power wires, for which you need to press the latch and pull the plug to the side:
Now everything is ready, you can safely make a replacement by first purchasing a new part:
We perform the installation in reverse order, after which we check the functionality of the new part.
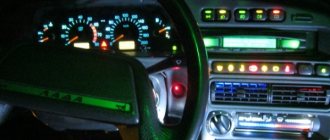
Hi all! My Standard configuration does not include an outdoor temperature sensor; in theory, and unlike the Standard, there should be no wires. But today, by chance, I saw this picture for the first time? What is this, a tidy glitch? Or are the wires still laid there and they are shorted? Who can tell me what? PS This is not the coolant temperature, it is shown separately there further in a circle.
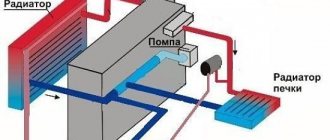
General information
As noted above, various sensors are installed on cars for a reason. They are necessary for the efficient operation of the system as a whole. As for the outside air temperature controller, it is mostly informational in nature and shows the temperature outside. But this does not apply to all systems. Sometimes the coolant temperature sensor is connected to the engine electronic systems. This is necessary to start the engine in the cold season and is a very convenient addition to the “autostart” function.
Unfortunately, not all cars have a temperature sensor built in at the factory. Many VAZ models do not provide this. But it doesn’t matter, let’s look at how to install it and what is remarkable about this process.
A couple of useful tips
Have you noticed that the heater on the Lada Kalina blows cold? Proceed according to the scheme “from simple to complex”, first check the simplest elements of the heating and ventilation system, for example, the air filter and the presence of coolant. Then gradually move on to more complex design details.
Another good way to find out which part has failed is to replace it with a known working part and check the operation of the system. And you don’t have to buy a new spare part if you borrow it from a friend. You can also try to negotiate with the seller in the store, take a new part for testing, leaving a deposit.
Where is the ambient temperature sensor located?
On different brands of cars, the controller has a different location. This is due in most cases to the design differences of the machines. For example, on a BMW you can install a temperature sensor directly behind the bumper, but not on a VAZ.
However, understanding where the ambient temperature sensor is located is quite simple. You need to find its number in the electrical diagram, and that's all. In most cases, it is installed near the radiator, usually in front or behind it. But it happens that it is mounted on the side. The main requirement is the absence of temperature effects from the engine. The motor gets hot and affects the controller. He, in turn, will give incorrect testimony.
A couple of useful tips
Have you noticed that the heater on the Lada Kalina blows cold? Proceed according to the scheme “from simple to complex”, first check the simplest elements of the heating and ventilation system, for example, the air filter and the presence of coolant. Then gradually move on to more complex design details.
Another good way to find out which part has failed is to replace it with a known working part and check the operation of the system. And you don’t have to buy a new spare part if you borrow it from a friend. You can also try to negotiate with the seller in the store, take a new part for testing, leaving a deposit.
"Lada Granta": sensor installation
This car is equipped with a controller only in the maximum configuration. In other cases, there is preparation, that is, there are all the necessary connectors and wires for connection. This is done so that the driver has the opportunity to carry out the installation himself.
However, before installation, it is advisable to check whether the dashboard will display controller readings. To do this, press the daily mileage button and turn on the ignition. This is how we run self-diagnosis, as a result all indicators are displayed. During diagnostics, press the daily mileage button again, which should bring up version 090 or higher on the display. This will indicate the possibility of installing a sensor
Connection
Procedure:
- We insert one wire into the black block of the dashboard between the pink and black and white wires.
- We connect the other wire to ground using a screw under the panel.
We check the presence of outside temperature readings on the display when switching modes. We perform assembly in reverse order. In the comments, leave the versions of your panels on which you managed to install a temperature sensor.
The installation of DTNV is also shown in the video:
Do you know how easy it is to change the interior of your car using vinyl film?
Share on social networks:
Found an error? Select it and press Ctrl+Enter..
Source
Direct installation
As noted above, the VAZ ambient temperature sensor is not difficult to install. Especially if all connectors are provided by the manufacturer. The next step is purchasing a sensor. There is nothing complicated, we go to the car store and buy the thing we need. The most optimal location for the sensor is near the radiator. The mass can be thrown over the welded pin. The wires need to be pulled into the interior. How this will be done is up to you. The most convenient and shortest way is through the clutch plug. Of course, you can’t do without disassembling the instrument panel. We dismantle it and look for the 25th contact. It is precisely intended for the ambient temperature controller. Readings on the on-board computer usually appear automatically. If this does not happen, reset the battery terminal for 10-15 minutes. After this everything should work. The VAZ ambient temperature sensor costs a penny. Its installation does not take much time.
How to install an ambient temperature sensor on a Priora
The standard configuration includes this controller. But there are times when for one reason or another it is absent. For example, you bought a used car, but there is no sensor or there is one, but it doesn’t work.
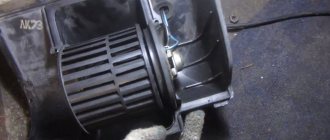
However, this is not a big problem. True, for installation or replacement you will need to remove the bumper, since it is not always possible to get under it. It is located directly behind the front bumper and mounted on the front of the body. If there is an air conditioner, then there will be two such sensors. First of all, you need to check the functionality of the old one. The best option is to take a household thermometer and compare the readings. Deviations may be caused by excessive voltage on the contacts.
If the sensor is missing, then install it in the appropriate socket. There should be a wiring harness, so all that remains is to connect and enjoy the result. If the old sensor is acting up, then take it out, turn on the ignition and check the voltage on the connecting block (wire harness). It should be in the 3.5 V range. If there is no voltage, then the problem is somewhere in the circuit. We call and eliminate.
FakeHeader
Comments 15
Can you tell me what thermal resistance rating is included in this sensor? For some reason the previous owner tore it out of the board
I don’t remember, I didn’t even pay attention. I changed the car a long time ago, I can’t tell you.
Can you tell me what thermal resistance rating is included in this sensor? For some reason the previous owner tore it out of the board
Although I might have an old one lying around at work, I’ll look for it
If possible, measure the resistance or at least take a photo of it)))
Unfortunately, I couldn't find the sensor at work. Apparently he threw it away
Thank you :) basically I did this: I soldered in a variable resistor and selected a resistance of 2.2k ohms at 25 degrees nominal. At work, the repairmen found old thermistors from 1981))) soldered them in and worked perfectly. (I am writing if anyone encounters this problem)
How can I check such a sensor? I wonder if he’s lying according to his readings, my situation is this: if I turn the temperature knob from the coldest one by one click, very warm air comes out of the stove, it seems to me that this should not be the case. I've owned the car for a week so I haven't learned the details yet)
We're sorry, but the requests coming from your IP address appear to be automated. For this reason, we are forced to temporarily block access to the site.
To continue, please enter the characters from the image in the input field and click "Submit".
Cookies are disabled in your browser
. We will not be able to remember you and correctly identify you in the future. To enable cookies, follow the tips on this page.
About installing the controller on Kalina
Let's figure out how to install an ambient temperature sensor on this car. "Kalina", unfortunately, often does not even have the necessary wires, so you will have to pull them into the cabin yourself.
To install, you need to remove the bumper and install the sensor, preferably in front of the radiator. There are only two wires - ground and signal. We hook the mass to the nearest bolt, for example from a horn. We tape the signal wire to the harness with tape, although it is more preferable to use plastic clamps. The most convenient way to bring it into the cabin is through a plug installed near the battery. We remove the tidy and connect the sensor. Usually it shows the temperature right away, you don’t even have to remove the terminals. Now you know where the ambient temperature sensor is located on VAZ cars.
Why did it happen so?
Perhaps the automatic requests do not belong to you, but to another user accessing the network from the same IP address as you. You need to enter the characters into the form once, after which we will remember you and be able to distinguish you from other users exiting from this IP. In this case, the page with the captcha will not bother you for quite a long time.
You may have add-ons installed in your browser that can make automatic search requests. In this case, we recommend that you disable them.
External temperature sensor on Kalina
This device is used, as a rule, to optimize the operation of climate control and, together with a temperature sensor in the cabin, help maintain an optimal microclimate inside the car, thanks to which the trip becomes comfortable.
The outside temperature sensor is located behind the bumper radiator grille, which will need to be removed if there is a need to replace the device.
You should not lose sight of the entire system in which the device operates - these signs may also indicate that the wiring connecting the detector to the computer is damaged, or the contacts have oxidized.
For what reason can the Kalina ambient temperature sensor break down?
Due to its rather open location, this device can be damaged by a variety of factors:
- mechanical reasons - a stone hitting the detector body can easily damage it;
- low ambient temperatures;
- the third reason, already mentioned above, can lead to the device breaking down - malfunctioning wiring or oxidation of contacts.
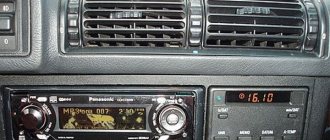
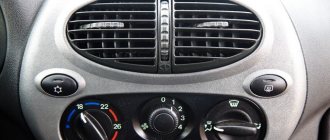
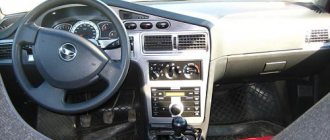
CONTROL UNIT FOR VENTILATION AND HEATING SYSTEM LADA KALINA
Ventilation and heating system control unit: i — air temperature regulator; 2 — fan operating mode switch; 3 — air flow distribution regulator; 4— air recirculation control lever; 5 - rear window heating switch
The intensity of the air supply into the cabin is regulated by turning the handle of the fan operating mode switch. This turns on one of four fan speeds.
By turning the switch handle clockwise, we increase the fan rotation speed.
The position of the flow distribution control handle sets the following directions of air flow in the cabin:
By turning the handle of the air temperature regulator, we change the temperature of the air entering the cabin. To increase the air temperature, turn the regulator handle to the left, to the red sector of the scale, and to decrease the air temperature, turn to the right, to the blue sector.
The air recirculation mode (stopping the flow of outside air into the cabin) is recommended to be used when you need to quickly lower or increase the air temperature in the cabin, as well as when driving in a dusty area or in dense traffic to prevent exhaust gases from entering the cabin. The recirculation mode can only be turned on for a short time, since this does not allow fresh air to enter the cabin and the windows may fog up. To turn on the air recirculation mode, move the air recirculation control lever to the extreme right position. To allow outside air to enter the cabin, move the lever to the extreme left position.
The directions and intensity of air flows through the side and central deflectors of the ventilation and heating system are regulated by corresponding rotation of the guide vanes and changing the position of the deflector flaps until they are completely closed.
Central deflectors of the ventilation and heating system:
1 — handwheel for adjusting the direction of air flow left and right; 2 handwheel for adjusting the flow intensity through the deflectors (when rotating up, the damper opens, down, it closes)
The direction of air flow through the deflector up and down is adjusted by pressing on the top or bottom of the deflector.
The directions and intensity of the air flow through the side deflectors of the ventilation and heating system are regulated in almost the same way (the flow intensity adjustment handwheel turns left and right).
Video on the topic “Lada Kalina. VENTILATION AND HEATING SYSTEM CONTROL UNIT"
Quick repair of the heater regulator on the Lada Kalina
Lada Kalina - Replacing the heater control unit.
Repair of the Lada Kalina 1 stove (replacement of the cable, heater lever block)