01/25/2022 1,749 Alarms
Author: Victor
Do-it-yourself Tomahawk TW 9010 alarm installation begins with disconnecting all energy consumers and batteries. The terminal clamp with a negative signal must be disconnected from the latter to prevent a possible short circuit during the installation process.
[Hide]
Basic System Functions, Tomahawk tw-901, User Manual
Page 2
- Image
- Text
TOMAHAWK TW-901 o
USER GUIDE
1. Main functions of the system
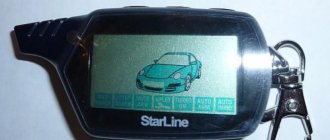
5-button programmable 2-way key fob LCD.
LCD backlight. Vibration mode.
Anti-scanner. Anti-grabber.
Programmable key fobs (up to 4 pcs.) Visual and audio confirmation of the functions performed. Arming with siren turned off.
Protected remote engine start/stop.
Possibility of installation on vehicles with automatic or manual transmission
transmission
Possibility of installation on vehicles with gasoline or diesel engines. Countertemperatures in cabin/m.
Additional temperature sensor. Automatic engine warming up at a given temperature.
Daily (1,2,4,12 hour) automatic engine start.
Bypass the faulty zone with visual and audio confirmation.
Dual zone shock sensor. Remote shutdown of the shock sensor.
Protection against false positives. Self-diagnosis.
3 additional channels.
“Anti-hijack” mode. Panic mode. “Valet” mode.
Security of doors, hood, trunk.
Indication of the battery charge of the key fob pager. Energy saving mode for the key fob pager battery.
Driver call function.
Vehicle search. Built-in clock, alarm clock, timer in the pager keychain. Indication of system status by LED indicator. Built-in central locking relay. State memory.
Two-step disarming. Two-step opening of the central lock.
Engine blocking.
Automatic control of the pager coverage area. Turbo timer.
INSTALLATION INSTRUCTIONS
Installation Basics
The TOMAHAWK TW-9010 security system has a classic connection diagram. First of all, before starting the installation, turn off the on-board power supply to the vehicle (disconnect the “-” battery terminal). To select installation locations for security system units, be guided by the following principles:
- Installation secrecy
- Absence of heat and moisture sources near the blocks
- Provide for minimal influence on each other of the vehicle’s standard electronics and alarm units
ATTENTION!
The radiating antenna must be installed away from the alarm and vehicle control units. When installing, try to minimize the length of the wires.
Selecting the location of the main blocks
- The electronic alarm control unit is installed inside the vehicle's interior. To obtain maximum range, the transmitting and receiving “RF” antenna of the system unit must be positioned as high as possible and not come into contact with metal objects or electrical wiring harnesses.
- The siren is installed in the engine compartment, in an inaccessible place. If you are using a stand-alone siren, provide access to the service key hole. The siren should be installed with the horn facing down, this will prevent moisture from entering. It is better to plan the wire connections inside the cabin for less oxidation.
- All high current circuits (power supply, parking lights, central locking, etc.) must be protected by fuses of the appropriate rating.
- The hood and trunk triggers cut into places protected from moisture that are inaccessible when the hood and trunk are closed. Triggers need to be lubricated periodically to prevent seizing and corrosion.
- The shock sensor is installed in the passenger compartment, the center of the car can be considered ideal, it is attached to the metal of the body with self-tapping screws or glued.
- Contacts in places where ignition, starter, etc. circuits are broken. It is recommended to solder.
……..
Connecting wires
6 PIN remote start power connector
1. Black and yellow wire - starter activation wire (+12V). +12V output signal to the starter solenoid relay.
It is connected to the wire on the ignition switch, where +12V appears in the “Starter” ignition key position. This signal is intended 4 to start the engine. Connect this wire after the locking relay.
2. Blue wire - +12V ACC output signal - auxiliary equipment.
It is connected to the wire on the ignition switch, where +12V appears in the “ACC” and “Ignition on” ignition key positions.
3. Thin red wire - system power wire (+12V).
Connects via a 10A fuse to the “+” of the battery.
4. The thick red wire is the power supply wire for the remote start power circuits (+12V).
Connects via a 40A fuse to the “+” of the battery.
5. Yellow wire - IGN 1 wire, +12V output signal.
It is connected to the wire on the ignition switch, where +12V appears in the “Ignition on” ignition key position, and does not disappear in the “Starter” ignition key position.
6. Green wire - IGN 2 wire, +12V output signal.
It is connected to the wire on the ignition switch, where +12V appears in the “Ignition On” ignition key position, and disappears in the “Starter” ignition key position, if this wire is present in the vehicle on which the system is installed.
Central locking connector 6 PIN
1. Blue wire - central contact of the central locking opening relay
2. Blue-gray wire - normally open contact of the central locking opening relay
3. Blue-black wire - normally closed contact of the central locking opening relay
4. Green wire - central contact of the central locking relay
5. Green-gray wire - normally open contact of the central locking relay
6. Green-black wire - normally closed contact of the central locking relay
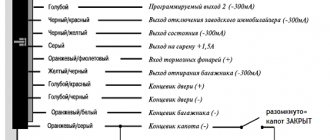
Main connector 18 PIN
1. Black wire - “-” system.
(Ensure strong, confident contact)
2. Blue wire - wire for turning on interior lighting
-300mA when disarming the system (duration is programmable)
3. Black-red - IGN3 output.
-300mA during the remote start procedure, to organize additional ignition circuits. This wire may be needed if the ignition switch of a vehicle on which a system of more than two ignition circuits is installed or to activate immobilizer bypass modules.
4. Black and yellow wire - starter interlock relay wire.
-300mA after setting the system to security mode and/or remote start procedure and/or in “Anti-hijack” mode.
ATTENTION!
The blocking relay should only be used to block the starter, which will prevent the engine from stopping while driving.
5. Yellow-red wire - wire of the 2nd additional channel. (-300mA)
6. Gray-black wire - tachometer wire input.
Connect to the “-” wire of the ignition coil or tachometer signal wire.
7. Blue-red wire - “+” door sensor input.
8. Orange-white wire - “-” trunk sensor input.
9. Purple wire – wire for enabling the “Anti-hijack” function.
When “-” appears on this wire, the “Anti-hijack” function is activated.
10. Green-black wire - power wire for parking lights. Connects via a 7.5A fuse.
11. Green-yellow wire - power wire for parking lights. Connects via a 7.5A fuse.
12. Black and white wire - bypass wire for the standard immobilizer. -300mA for 1.5 sec during the remote start procedure.
13. Gray wire - siren output. (1.5A)
14. Yellow-blue wire - wire of the 3rd additional channel or two-step door opening (programmable).
- 3rd additional channel - “-” 300mA, pulse duration is programmable.
- Two-step door opening - “-” 300mA.
15. Yellow-black wire - wire for remote trunk opening. (-300mA, 1 sec)
16. Orange-violet wire - handbrake wire.
It is connected to the “-” handbrake switch (for a manual transmission) or to the brake lights (for an automatic transmission) (see diagrams 8, 9) depending on the vehicle’s configuration.
17. Blue-black wire - “-” door sensor input.
18. Orange-gray wire - “-” hood sensor input.
Shock sensor connector 4 PIN
Override button connector 2 PIN
LED Indicator Connector 2 PIN
5 PIN transmit/receive antenna connector
Selecting a manual or automatic transmission
The choice of manual or automatic transmission on the TOMAHAWK TW-9010 is carried out using jumper 1 (see connection diagram).
Jumper closed - automatic transmission. Jumper open - manual transmission.
Connecting the central lock
TOMAHAWK TW-9010 has built-in power relays for central locking control. The wiring for connecting the central locking is routed to a separate six-PIN connector. Wire colors and connection diagrams are shown in diagrams 1-4.
ATTENTION!
Remember that the pulse duration of the central locking control is a programmable function.
Setting up the shock sensor
The last stage of installation of the TOMAHAWK TW-9010 security complex is to set the sensitivity of the shock sensor to a minimum. Smoothly increase the sensitivity of the sensor, checking the response threshold with periodic impacts, and tap the body with your palm.
ATTENTION!
Excessive sensitivity can lead to a large number of false alarms, and you will be forced to coarse the sensor settings.
Auto-arming and auto-re-arming, Immobilizer mode, Disarming
Auto-arming and auto-re-arming, Immobilizer function, Tomahawk tw-901 o
- Image
- Text
button ((¡к 1 time. The parking lights will flash 1 time, confirming entry into the security mode, the doors will close. On the display of the key fob pager
and ^ icons will be displayed.
You can also turn this mode on and off at a time when
the vehicle is in security mode.
6. Auto-arrangement and auto-rearrangement
into security mode
If the auto-arming function is activated, then: when turned off
ignition, after closing all the doors of the vehicle, the system will notify
owner 1 with a long “CHIRP”, and after 10 seconds. will turn on the security mode (see programming table).
The auto-rearrange function is always activated if
the vehicle, after disarming, none of the doors opened for 30 seconds. the system will automatically turn on the security mode.
7. Immobilizer mode
TOMAHAWK TW-901 o
The immobilizer mode is activated automatically after 30 seconds.
after turning off the ignition (see programming table).
The LED indicator is constantly on in this mode. In this mode, starting the engine using the ignition key is impossible.
To exit the immobilizer mode, press the button. g 1 time or
turn off the ignition and press the button. OVERRIDE 1 time.
8. Disarming
In order to disarm the vehicle, you must press the Q button
1 time. The parking lights will flash 2 times, the siren will emit 2 “CHIRPS” (if
the system is not in security mode with the siren turned off),
confirming the disarming of the vehicle, the doors will open, the interior
the lighting will turn on (if connected). On the key fob display -
pager icon will be displayed
9. Opening/closing doors when
running engine
If the vehicle's engine is started using the ignition key, then with the Q button you
basic settings
For the temperature sensor, set threshold values at which it will send signals to the remote control or automatically adjust the autorun operation.
Adjust the sensitivity of the shock sensor based on its response. To do this, lightly knock on the car body to provoke it into operation. Apply blows serially, giving a noticeable push.
The system allows you to configure the following parameters:
- remote engine start;
- daily autostart of the car;
- turbo timer for turbine cooling;
- automatic engine start based on temperature and time;
- calling the vehicle owner.
All settings of the anti-theft system are installed, and it has been working properly for a long time. But it happens that the sp error is displayed on the key fob (on VAZ 2112 coupe, Audi, Ford, etc.). This is an autorun glitch. Something happens in the car that violates the autostart conditions. In this case, check whether you fulfill the autostart conditions correctly and whether this function is programmed correctly on the remote control. The second reason may be a breakdown of the security system control unit. Contact the service src=»https://daciaclubmd.ru/wp-content/uploads/2019/03/poread-5.jpg» class=»aligncenter» width=»600″ height=»375″[/img]
Attention, Remote engine shutdown, Warming up the engine at the set temperature
Warming up the engine at a given temperature, Tomahawk tw-901 o
- Image
- Text
increased by simultaneously pressing the 'H) and fì buttons, 5 minutes each
after each press for up to 20 minutes maximum. The display of the key fob pager shows the time remaining until the engine is turned off.
ATTENTION!
Remote engine starting cannot be performed in
case if:
1. The gear lever is not in the neutral position.
2. Ignition is on. 3. The hood is open.
4. The car does not have the hand brake on.
In any of these cases, when attempting to remotely start
the siren will sound 4 “CHIRPS”.
13. Remote engine shutdown
TOMAHAWK TW-901 o
in case the car was started using remote start
engine. You can mute it by pressing the ■ button
The parking lights will flash 4 times and the siren will sound 4 “CHIRPS”. On display
key fob pager icon will disappear and a melody will sound.
14. Warming up the engine at the set temperature
the Tomahawk TW-9010 system has an additional
temperature sensor for installation under the hood of the car (see diagram No. 10).
If this sensor is installed, the vehicle is started and warmed up according to
according to the readings of this sensor, otherwise, according to the readings of the sensor
temperature inside the cabin.
In order to activate this function you must
press and hold the buttons simultaneously
and 1|B . Parking
the lights will flash 1 time, the siren will emit 1 “CHIRP”, confirming the activation of the function. The display of the key fob pager will display an icon and the set temperature to turn on the heating (programmable, see the programming table), accompanied by a melody. When
the temperature reaches the set temperature to turn on the automatic
warming up, the engine will start at the previously programmed time
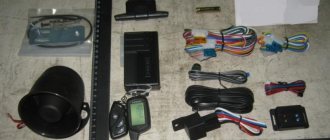
Car alarm system Tomahawk 9010
The anti-theft system kit consists of:
- remote control with liquid crystal display;
- one-sided keychain;
- shock sensor;
- one relay;
- receiving and transmitting module;
- Anti-Hi-Jack buttons;
- mode switching keys;
- LED indicator;
- ten wires;
- one limit switch;
- car stickers;
- installation tools;
- temperature sensor;
- instructions for installing a car alarm;
- central control unit.
An important component of the kit is the connection manual, without which it is impossible to correctly connect and configure the anti-theft system.
Note, Daily (1,2,4,12 hour) autostart, Remote status polling
Page 10
- Image
- Text
(see programming table).
To disable this function, press the and buttons.
The parking lights will flash 2 times, the system will emit 2 “CHIRPS”,
confirming that the function is disabled. The ^ icon will disappear on the display of the key fob pager and a melody will sound.
Note:
Automatic engine warming up at a given temperature
performed no more than 6 times in 2 hours.
The temperature for automatic engine warm-up can be
set to -5°С, -10°С, -20°С, -30°С (see programming table).
15. Daily (1,2,4,12-hour) autostart
To activate this function, you must simultaneously press and
hold down the and buttons. The siren will emit 1 “CHIRP” to confirm
activation of the function. The icon ^ will appear on the display of the key fob pager
a melody will sound.
After activating this function, starting from the next day, the system
will automatically start the engine daily at the time this function has been activated.
To disable the daily autorun function, you must
press buttons
and Shch. The parking lights will flash 2 times, the system
will emit 2 “CHIRPS” confirming that the function is disabled. On display
key fob pager, the ^ icon will disappear and a melody will sound.
To activate 1, 2, 4, 12 hour start you need
activate the daily autorun function, and then within 5 seconds. After activating it, press the corresponding button on the key fob:
in - for hourly start,
M) - to start the engine at intervals of 2 hours,
16 - to start the engine at intervals of 4 hours,
- to start the engine at intervals of 12 hours.
16. Remote status polling
To perform remote polling of the vehicle status, you must
press the button
||B
. The parking lights will flash 3 times to confirm
transmitting data to the key fob pager receiver: internal temperatures
interior, security status, etc.
TOMAHAWK TW-901 o
10
Comments
Hello, I have a problem with the signaling, not a single button on the remote control works and the turn signals flash three times with a pause
Alexander 02/24/2021 08:19 GMT
Why do you need valet mode?
Bair 04/05/2021 21:16 GMT
I can't arm the alarm sound
Bakhytzhan 04/17/2021 19:06 GMT
Select → I found instructions for my car alarm here! #manualza
- Click →
From the instructions for a Chinese fire extinguisher: - Do not spray near an open fire!
Manualza!manualza.ru
Still not with us?
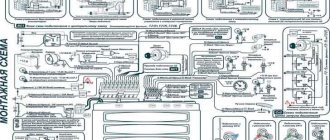
Connecting autostart Tomahawk TV 9010
The Tomahawk 9010 alarm system uses non-standard starter current switching. When autostarting, voltage comes out from the 6-pin power connector. The rest of the time, the wire going to the starter transmits electric current, even if the alarm system is not working correctly or completely. Install a blocking relay into the gap in the standard wiring.
The anti-theft system can control the immobilizer bypass. Connect the negative wire to the black-red wire, on which electric current appears before the starter turns on. This condition is necessary for the immobilizer crawler.
The additional engine temperature sensor is connected according to the following diagram:
We have complete instructions for Tomahawk 9010.
What do car enthusiasts say about the alarm?
Vasily, 35 years old:
Normal alarm for your money. I have been using it successfully and without any complaints for 5 years. During this time, the only inconvenience was changing the batteries. At the very beginning of the purchase, out of ignorance, I pressed the wrong buttons and launched functions I didn’t need. The service center helped me and set the average sensitivity so that I wouldn’t have to run to the key fob for every cat. I liked the function - turning on the car signal by pressing a button on the remote control. You can scare animals and curious people near the car.
Konstantin, 50 years old:
I like that all the buttons on the remote control are clear without instructions. Managing the entire system is simple. The key fob failed a couple of times for unknown reasons, you can stand there for 20-30 minutes and press the buttons and it won’t do any good. The alarm let me down when I hit the license plate at night in a parking lot. It just didn’t work, of course, it was largely my fault, I should have checked and adjusted the sensitivity more carefully.
Vladimir, 25 years old:
I installed the Sinhala according to all the rules, nothing complicated, everything is clear. But the signal only worked for shocks 5 times! I don’t recommend it, it’s better to pay a little more and buy a reliable alarm system.
Ivan, 34 years old:
This alarm suits me quite well. It’s nice that for such money there are such functions as warming up and feedback.
Valery, 61 years old:
An alarm system will not save you from professional car thieves. But for that kind of money it’s not worth expecting something supernatural. For my inexpensive and budget car, which is not in demand among thieves, such a security system will do just fine.
Where to buy an alarm and how much does it cost?
You can buy the Tomahawk TV 9010 alarm system without any special financial sacrifices. The price for such a model is relatively low and amounts to about 2800-4000 rubles, depending on the region of Russia. A new keychain costs from 800 rubles. You can find this alarm in any popular online stores, for example, Ali Express. It is recommended to buy such devices in branded stores with a guarantee and the possibility of return.
Linking an additional key fob
If it was not possible to bind an additional device using a similar method, perform the following actions:
- The ignition system in the car turns on, but the power unit does not start. When turning the key in the lock, the user must simultaneously hold down the button to enter the service mode.
- The siren will play four sound pulses.
- The service mode button is released.
- On the communicator, you simultaneously press controls with indicators in the form of an open trunk and silent car protection. In confirmation, the siren will play several sound signals, their appearance indicates successful programming.
- To exit the binding menu, you must take no action for 6 seconds.
To find out how many remote controls are registered in the Tomahawk memory, you need to press the button in the form of an open trunk with the ignition off. The remote control will blink its LED indicator several times. The number of flashes corresponds to the number of recorded key fobs.