The complete instructions for the Tomahawk TZ 9030 with autostart contain comprehensive information about the functionality of the product. Here is information about the main systems:
- remote start of the power plant;
- protective modes and their description;
- possibility of linking additional key fobs;
- protection against accidental activation of the complex.
Among competitors' analogues, the system stands out due to the presence of unique options:
- non-volatile circuit - when the power is turned off, the engine remains blocked;
- automatic re-arming after the voltage is removed;
- anti-grabber device;
- increased range of key fob feedback (up to 1200 meters).
See everything about autostart by temperature Tomahawk 9030.
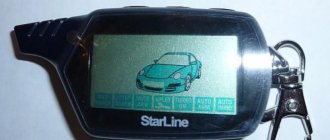
Tomahawk TZ 9030: keychain
The Tomahawk TZ 9030 security system comes complete with two key fobs.
- The main remote control is equipped with a liquid crystal display and 5 control keys. Information about the system status is displayed here in the form of icons. The icons on the screen contain encrypted data about the enabled mode and reflect the actual state of the OS.
- The spare key fob uses a light diode as an indication. Depending on the state of the device, a red or green light is reflected on the module.
The range of both elements is limited to 1200 meters. This distance is relevant for fields or open areas. In an urban environment, the radius can be reduced to 30 m.
The main difference is that the main pager Tomahawk TZ 9030 is equipped with the “F” key, which allows you to perform more functions and program some options. The spare remote control is intended only for use of already calibrated options.
The visual difference between the transmitters can be seen in the photo.
Specifications
Equipment technical parameters:
- power supply voltage - 12 V;
- current consumption (in security mode) - up to 16 mA;
- control channel frequency - 434 MHz;
- remote control range (in open space) - up to 1200 m;
- signal encoding type - FM frequency modulation.
Equipment
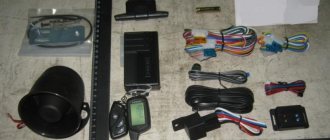
The TW9030 car security system includes the following components:
- central block;
- set of key rings;
- shock sensor;
- control diode;
- antenna module;
- additional limit switch;
- set of harnesses;
- installation and operating instructions.
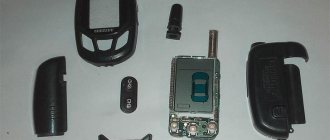
Key fob doesn't work after falling
Due to the small size of pagers, users often drop them. The devices are sensitive to mechanical damage due to their delicate body.
After an unsuccessful fall, the remote control may be damaged or fail completely. The most common consequences are.
- Screen failure. If the display is damaged, the functionality of the device remains intact. The key fob continues to work properly. Eliminated by resoldering the module.
- The antenna is faulty. In such a situation, the car may say that there is no feedback from the key fob. As a minor repair, you can replace or repair a broken antenna spring.
If damage concerns the electrical circuit of the remote control, the device cannot be restored; the pager must be completely replaced.
Find out how to turn off the Tomahawk 9030 alarm system without a key fob.
Pros and cons of the Tomahawk TZ-9020 model
According to owner reviews, the Tomahawk 9020 alarm system has positive aspects:
- presence of standard autostart;
- no failures during operation;
- built-in status polling system;
- Ease of use.
Negative aspects of the complex:
- decrease in the quality of products manufactured after 2004-2005;
- Autostart does not always work correctly, especially at low temperatures;
- the code is intercepted and decrypted by grabbers;
- short range of the remote control (in dense buildings);
- malfunctions of the remote control (can only be corrected by turning off the power to the key fob);
- a large number of false positives;
- at low temperatures, the complex goes into alarm mode, which can only be turned off by removing the terminal from the battery;
- fragile plastic of the key fob body.
Alarm Tomahawk TZ 9030: instruction manual
The security system manual is supplied with the alarm and contains a complete list of information. Some buyers receive the device with the car and in 90% of cases there is no manual.
The points are detailed here:
- factory equipment;
- function programming;
- how to use keychains;
- possible malfunctions and methods for eliminating them;
- available options and how to activate them.
You can view detailed instructions for use with pictures by following the link.
Tomahawk TZ 9030: jammer
The Tomahawk TZ-9030 system has the ability to remotely start and shut down the power plant. Typically, stopping the engine is used when the owner has forgotten to remove the car from automatic warm-up mode and the option is not needed at the moment.
To turn off the engine remotely, you need to perform a sequence of actions.
- Press the “key” key until the pager sounds an audible alert. In the case of a spare key fob, the color on the indicator will change.
- After receiving the notification, quickly click the indicated button again.
If everything is done correctly, the car will stall, and the alarm will blink with the emergency lights and make a characteristic chirp.
We also have instructions for installing Tomahawk 9030.
Setting up autorun
Setting up autostart involves programming the neutral position of the gear selector handle (for a manual transmission). As soon as the parking brake is set, the security button is pressed for a long time. After the signal is given, the key is released and then pressed down again (briefly). When the key is removed from the lock, the motor continues to run; the stop occurs after activation of the security mode or after the turbo timer has expired. Recommendations for setting parameters are given in the instructions for use.
By command
The Tomahawk TW 9030 alarm system allows you to start the engine from a distance. To start, you will need to perform a long and short press on the key marked with the unlocked lock symbol. The power unit operates within a time limit pre-programmed in the central module of the complex. The owner can stop the engine early by pressing the keys again.
By time
To set a timed auto-warming, you need to pre-program the repeat frequency in the central unit. Then, successive presses are made on the key fob buttons, marked with a lock label with an open bracket and a locked lock icon (long and short). A text icon is activated on the display, the engine starts and warms up within the programmed time range.
How to adjust by temperature
Car alarm Tomahawk 9030 supports temperature warming; the threshold value is preset via adjustment of the processing unit.
To start the function, you need to hold down the button with a mark in the form of a locked pad for a long time, and then briefly press the key with the symbol of a lock with the shackle folded back.
An explanatory text appears on the display and the set temperature is displayed.
Tomahawk TZ 9030: programming functions
Installation of the Tomahawk TZ 9030 requires proper configuration before operation. The factory initially sets stock parameters, but for some users they may be unacceptable.
In order to enter the service mode, you must follow a simple sequence of actions:
- turn off the engine ignition;
- Press the Override button 5 times in a row;
- Turn the key in the cylinder to position No. 1.
If the procedure is not violated, the car will emit 5 abrupt beeps and the user will open the setup mode. From here, the remote engine start and security options of the unit are calibrated.
The Tomahawk TZ 9030 alarm programming table looks like this.
Tomahawk TZ-9030: installation instructions, connection diagram
The user manual contains drawings on the last pages to allow you to do the installation yourself. The simple manual is made in the most understandable format, which ensures the possibility of correct installation even without experience in such work.
For example, the instructions contain tips and recommendations on general issues:
- where is it most convenient to place the head control unit;
- wire connection sequence;
- how to install the blocking relay correctly;
- frequency of module checks (diagnostics);
- optimal location of the Override button;
- how to connect the antenna module.
Complete installation instructions can be downloaded for free from our website.
How to install?
Installation and connection of the security complex does not require special configuration equipment or knowledge of the intricacies of alarm programming. The Tomahawk TZ 9020 manual contains a section devoted to installation and configuration. The owner can install the complex independently, guided by the recommendations in the documentation.
Installation Requirements
Description of general installation requirements:
- Work is carried out with the battery disconnected. If the car has a standard audio system or airbags, then you should clarify the specifics of disconnecting the battery. Similar information is available in the vehicle's operating instructions.
- The blocks of the security complex are located secretly (except for the antenna and control diode).
- There should be no sources of moisture or heat near the elements of the security complex.
- It is advisable to install electronic alarm components at a distance from the electronic components of the car. This will help avoid the possible negative impact of devices on each other.
- The transceiver antenna is installed at a distance from the central alarm unit and electronic components of the car.
Sequencing
Approximate installation sequence:
- The central device is located inside the car. The standard location is the dashboard or the interior of the center console. The installed block should not interfere with the movement of rods and control levers.
- The antenna is mounted on the windshield at the top. The antenna unit should not come into contact with metal parts of the body and standard wiring harnesses. The cable is laid behind the plastic interior elements. When laying, you must ensure that there are no kinks or pinches in the wires.
- The siren is usually mounted in the engine compartment, with the horn facing down. When using an active device, you must have access to the power switch keyhole. Wires are inserted into the cabin through standard holes in the engine panel.
- The limit switches are located on the steel body elements inside the perimeter of the sealing edge. It is prohibited to install limit switches on the surface of gutters and at points where water accumulates. During operation, it is recommended to clean the devices from dirt and corrosion and apply a protective layer of lubricant.
- The impact sensor is located along the axis of the car as close as possible to the center of the cabin. The sensor is attached with self-tapping screws or double-sided tape. The user should have easy access to the sensor to adjust sensitivity.
- If an additional sensor is used, it is located in the cabin. The installation location must guarantee quick access to the product for configuration.
- The diode is installed on the visible part of the instrument panel or the trim of the front roof pillars.
- The Override button is mounted relatively discreetly. The owner must have access to it. When pressing the key, the user must clearly see the diode, as this is necessary for configuration.
Device connection diagram
Connecting an alarm system consists of several steps:
- installation of the power connector harness;
- connecting the main connector;
- connecting the central locking block;
- installation of additional device wires.
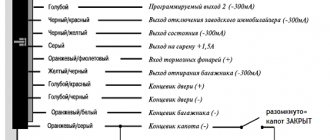
Purpose of power connector wires.
| Insulation color | Purpose |
| Red | Positive power supply, equipped with a 30A fuse |
| Black-yellow (large section) | Positive output to starter relay |
| Yellow | Connects to the ignition switch, provides a positive pulse when the ignition is on and when the starter is operating |
| Blue | Used to launch from a distance |
| Green | It is connected to the ignition switch, provides a positive pulse when the ignition is on and disappears when the starter is operating |
| Black-yellow (small section) | Positive input of the starter control unit with a key, used for automatic starting |
Purpose of the wires included in the main harness.
| Insulation color | Purpose |
| Gray-black | Engine control circuit, connected to the oil pressure sensor or to the tachometer |
| Green-black | External light alarm control output, 7.5 A fuse included |
| Black | Negative nutrition |
| Green-yellow | Second light control output |
| Blue | Control output for courtesy lights or power window module |
| Black-red | Standard alarm bypass circuit |
| Black and yellow | Negative output to blocking relay |
| Grey | Supplying a positive power pulse to the siren, current no more than 1.5 A |
| Orange-violet | Signal from the parking brake lever limit switch |
| Yellow-black | Negative additional channel output, activated from the remote control |
| Blue-red | Positive input from door switches |
| Blue-black | Negative input from door limit switches |
| Orange-white | Negative input intended for connecting the trunk limit switch |
| Orange-gray | Negative input signal from hood switch |
When connecting the power wires (red and black), it is necessary to ensure the most reliable contact. The red cable is tightly twisted with the standard wires of the system, the junction is connected by soldering and insulated. The cross-section of the standard wiring must ensure the supply of rated operating current, i.e., at least 10 A. The negative wire is attached to the standard bolts or ground nuts. To ensure reliable contact, it is recommended to install a terminal clamp on the cable.
When connecting Tomahawk TZ 9020 wires, the installation of additional diodes may be required. For example, many Hyundai models, when the parking brake is applied, supply a positive pulse to the wire to the limit switch. In this case, the alarm is connected directly to the limit switch or to the instrument panel, but through diode isolation.
The purpose of the lock control harness wires is indicated in the table.
| Insulation color | Purpose |
| Blue | Common wire for the lock unlocking relay, equipped with a 10 A fuse link |
| Green | Common wire for lock closing relay, equipped with a 10 A fuse |
| Black-red No. 1 | Wire intended for normally disconnected contacts of the unlocking relay |
| Black-red No. 2 | Similarly, on the closing relay |
| Blue-black | Wire of closed contacts of the lock opening relay |
| Green-black | Likewise, on the locking relay |
Connecting other wires:
- The shock detection sensor is equipped with a wire that supplies power and transmits signals from two sensitivity zones.
- The antenna module is connected with a separate five-pin wire.
- Install the two-pin wire of the setting button.
- If it is planned to use an additional sensor as part of the system, then it is connected to a separate four-pin block. The wiring layout is similar to the shock sensor.
The general layout of the connectors on the Tomahawk 9020 central device is shown below.
Harness connection points
Pinout of power harness and lock control wires
Main harness pinout
Connecting the trunk lock
Positive pulse lock control option
Negative impulse control of locks
The alarm allows you to implement the possibility of polite lighting on cars that are not standardly equipped with this function. Connection options are shown below. Instead of a siren, it is allowed to use a standard horn. The connection is made through an additional relay, since the current in the circuit exceeds the permissible limit of 1.5 A.
Options for organizing polite lighting
Connecting a standard car horn
Setting up the shock sensor
After completing the connection, you need to adjust the sensitivity of the shock sensor:
- Set the potentiometer controls to the minimum sensitivity value.
- Gradually increase the sensitivity of the warning zone, while simultaneously patting the body with your palm (with security on).
- After setting the warning threshold, set the value of the main sensitivity zone. When adjusting, you must remember that increased sensitivity of the sensor leads to an increase in the number of false alarms.
Programming Guidelines
The head unit is configured using a key fob and a service button.
Work algorithm:
- Turn off the ignition.
- Press the service button to select the required menu (five presses – system setup, six – autorun).
- Turn on the ignition. The siren will emit five or six beeps, indicating it is ready to set up.
- Press the service button to select a function (according to the tables). The option number is confirmed by a siren, every fifth signal will be long.
- Select a value by pressing the key fob buttons.
Settings table
Autorun table
If the owner made errors during programming, then it is possible to reset the settings to factory settings:
- Press the service button nine times (with the ignition off).
- Turn on the ignition, listen to nine short signals from the siren.
- Press the settings button again.
- After a single siren signal, press button A1 on any registered key fob. The settings will be reset.
Where is the Override button?
Overide's service key looks like a small barrel with a wire coming out of one side and a button on the top. Typically the key is orange or red. If the element was replaced with a third-party analogue, the shape and color may be unpredictable.
The location of the part is also difficult to pinpoint. During installation, the service key is hidden in a secret place known exclusively to the owner of the car. This is necessary due to the importance of the organ - if there is access to it, thieves can quickly steal the car.
The most common installation locations:
- glove box;
- behind the dashboard;
- handbrake or gearbox niche;
- in the lower part of the dashboard (near the pedals or at the passenger’s feet).
Version Tomahawk TZ 9030 24v
To increase device sales, the company produces Tomahawk TZ 9030 security systems in two types of designs - 12 and 24 V. Fundamentally, the device circuits differ only in the voltage of the on-board network. The functionality, number and principle of operation of the functions are completely identical.
The only difference is that the 24 volt version is used on trucks.
Tomahawk TZ 9030: standard settings
The manufacturer provides the ability to reset the settings to the factory state. This is necessary during system failures or firmware glitches, when the complex behaves incorrectly or there is no connection with a working key fob.
The user manual contains information about the sequence of actions when rolling back security or remote options:
- turn off the ignition;
- press the Override key 9 or 10 times to enter the security or remote menu;
- turn on the car ignition;
- the machine will produce the appropriate number of chirps;
- click the above button again to confirm the action;
- the system will respond with 1 squeak;
- press the Zz button on the key fob.
If the actions are performed correctly, the alarm will return to its factory state, and all functions will have to be programmed again.
Key Features
The car alarm has the following capabilities:
- feedback between the car and the key fob;
- protection of the perimeter of moving body parts;
- double blocking of engine circuits;
- additional immobilizer;
- emergency shutdown by entering a secret code;
- automatic staging and re-staging;
- ability to work with the siren turned off;
- customizable sensor;
- adjustable operation of the central locking module;
- ability to control door locks when the ignition is on;
- measuring the temperature in the cabin;
- comfortable lighting;
- non-volatile memory;
- additional panic and anti-robbery services;
- searching for a vehicle in the parking lot;
- automatic repeatable start;
- remote engine start;
- turbo timer.
Shiga Tomahawk TZ 9030 low voltage
The Tomahawk TZ 9030 device drains the battery during automatic engine start for a standard reason. To operate under such conditions, the machine requires more voltage than with a normal key start. This is justified by the need to power the security complex itself.
Replacing or charging the battery will help eliminate the breakdown.
Doesn't close the door
Failure to close the car is caused by a system failure. If, before the malfunction occurred, the vehicle was hit or hit by serious bumps, mechanical damage to the locking device is possible.
To diagnose, it is necessary to find out the cause. Initially, the physical part of the wiring and locks is checked - the elements must be in decent condition. Next, you need to check that the settings in the programming table are correct. If no external signs are detected, it is recommended to reset the settings.
Troubleshooting common problems
The remote control uses batteries to operate the transmitting unit and receiver. When the element is discharged or the contacts are oxidized, the range of the device is reduced. To replace the battery, you need to open the cover; the new part is mounted taking into account the polarity. If the key fob falls into water, you must turn off the power and then disassemble the case to remove traces of moisture. Using the device without drying it will lead to corrosion of the printed circuit boards and loss of functionality.
Incorrect operation of the components of the security system occurs when the insulating layer on the switching harnesses is damaged or condensation gets inside the electronic units. It is recommended to check the cables for short circuits using a test device; The central block is removed and dried. Detected traces of corrosion are removed with a soft cloth. If you cannot repair the damage yourself, you must contact a service center to diagnose the Tomahawk complex.
- Binding keychain Tomahawk 9010
- Where is the Override button on the Tomahawk 9010?
- What is exposure in DVR setting
- Rear view camera Lada Vesta
Tomahawk TZ-9030: autostart does not work
If the car is not set to autostart, the user is required to check the main points that serve as possible reasons.
- Correct preparation for activation of the mode.
- Serviceability of all relays and blocks. The alarm may fail due to the failure of one of the modules.
- Presence of contact on the handbrake (for manual transmission).
If there are no external reasons, you will need to roll back the calibrations to the factory state.