Recently, security systems with automatic start have become widespread. One of them was the Leopard car alarm, which belongs to the “LS-90/10” model range. There are reviews that say that the systems of this brand are very easy to connect. But not everyone succeeds in starting the engine with autostart: nuances are not taken into account, about which the basic instructions say little. For example, in some cars you need to turn on ignition support, and Leopard systems provide this option. This and other possibilities are described in more detail below. Enjoy reading.
EC USER MANUAL. Car security system...
Page 2
- Image
- Text
LS 90/10 EC
USER GUIDE.
Car security system with two-way communication LEOPARD LS 90/10 EU
designed to protect doors, hood, trunk and interior
vehicle travel, sound, visual and radio notification of the owner about the current state of the security system and the protected vehicle. In addition, LEOPARD LS 90/10 EC prevents unauthorized engine starting.
The LEOPARD LS 90/10 EC includes an engine start control system,
capable of working on vehicles with any type of engine and gearbox.
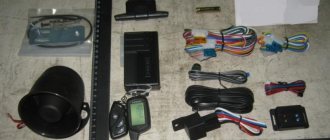
The standard LEOPARD LS 90/10 EU kit includes:
• Central control unit with complete installation kit. • Communication module. • Built-in software-configurable two-level shock sensor with low
dimensional remote detector.
• Remote control with built-in pager and LCD display
eat.
• Unidirectional remote control. • Indicator LED. • Emergency shutdown button. • Temperature sensor. • Instructions for installation and control of all modes of LEOPARD LS 90/10 EC.
Alarm remote controls
Bidirectional remote control with pager function.
It is a miniature reception-
transmitting device powered by 1.5 volts
a commercial battery (type LR03 AAA), which lasts for approximately six months of operation. On
The remote control contains four control buttons and an LCD display to indicate the system status, confirm the execution of commands and the reason for triggering the alarm. When you press any of the remote control buttons, the transmitter generates and transmits an encoded radio command, which changes with each new press.
buttons, thereby preventing the possibility of interception of your alarm code code-grab-
take.
In the case of reception built into the remote control, the pad-
When the alarm signal appears, you will hear a sound
signal and the corresponding icon will be displayed on the LCD display.
1
Prepared by AutoSet. Car alarms and car electronics.
www.AutoSet.ru
Main connector and connection features
If you equip the system with autostart, be sure to connect not only the power, but also the low-current connector, or rather, the following three wires: gray-black, black-red, orange-violet.
Leopard alarm main connector
The ground wire must also be connected. There are no gearbox selection loops in the connector - the setting is done by software. There is also no “handbrake” control input, usually used in cars with a manual transmission. Simply, the Leopard car alarm has features not only in its design, but also in its operating methods. For example, in preparation for autostart, they press the pedal, and not just use the handbrake. That is, the orange-violet wire is connected to the brake micro button, regardless of the type of gearbox.
After studying the reviews, you can understand that the temperature sensor in some cases does not work correctly. However, the instructions clearly state that you cannot connect the sensor to a cord that receives a potential of “+12”. Usually in the wiring the standard limit switch is connected to the backlight. Be aware that when the hood is closed, the lamp filament transmits voltage.
The immobilizer bypass must be controlled by the corresponding wire (black and red). Well, the engine control input is connected in one of three ways:
- To the oil pressure lamp;
- To the battery charge lamp;
- To the output of the tachometer.
In the latter case, the system works reliably. The first two options are used as needed; by the way, there are no differences in the settings between them - each corresponds to the same value.
On the orange-violet cord, voltage “+12” should appear when the brake pedal is pressed. Other connection options are not acceptable. And if autostart is not used, you can skip the connection: the brake control does not affect the security functions.
EC Necessary information. Emergency shutdown of the alarm…
Page 6
- Image
- Text
LS 90/10 EC
Necessary information.
Emergency alarm shutdown.
Your security system provides simple and coded emergency modes
shutdowns that you can select through programming.
If the alarm control panel is missing or faulty for
disarming the alarm: open the door and leave it open, turn on the ignition, press the emergency shutdown button 3 times or enter the PIN code (if the code mode is enabled by software), then turn off the ignition.
To enter a PIN code:
1. Open the door and leave it open.
2. Turn on the ignition. 3. Press the emergency shutdown button a number of times equal to the first digit of the
specified PIN code.
4. Turn the ignition off and on again.
5. Press the emergency shutdown button a number of times equal to the second digit of the PIN
code.
6. Turn off the ignition. If the PIN code is entered correctly, the system will be disabled.
security
Read about setting a PIN code and enabling code mode in the program section.
mation.
Emergency arming.
If there is a need to arm the alarm in the absence of
control panel, press the emergency shutdown button 3 times with the door open and the ignition on and turn off the ignition. You will hear 1 beep and the lights will flash
1
1 time. After 20 seconds, the lights will flash 1 time,
the system will arm without locking the doors.
When opening a door or turning on the ignition after emergency arming
security lights will blink 4 times, the 20 second delay function
alarm to give you the opportunity to turn off the alarm without using the control panel (see Emergency alarm shutdown). If within 20 seconds
the system is not disarmed, the alarm will sound.
5
Prepared by AutoSet. Car alarms and car electronics.
www.AutoSet.ru
Model range to suit every taste
A rich model range of car alarms is presented to customers in two broad groups. They differ in their functional arsenal and, accordingly, in cost.
The first group is economy. In this segment, two of the most prominent representatives can be distinguished: Leopard 433 and nr 300. The first option is used by most car owners, and the second belongs to the category of the most budget alarms.
However, all models are equipped with a set of security properties and service functions. All economy class security systems cope well with their responsibilities. The cost of such models is no more than 3000 rubles.
The second group is business. A typical representative is ls 60 10. In addition to basic functions, the alarm system also has additional options:
- Turbo timer - responsible for preventing early wear of the internal combustion engine;
- Anti-theft function - if an unauthorized movement is attempted, the motor will be blocked;
- Remote control – doors, hood and trunk lid;
- Automatic start – starts the engine according to preset parameters.
EU Security. In security mode, the alarm monitors the status…
Page 8
- Image
- Text
LS 9 O / 1 0 EC
Security.
In security mode, the alarm monitors the state of the limit switches
ley doors, hood, trunk, brake pedal, ignition on, and status
shock sensor. In addition, in security mode, engine starting is blocked.
Anxiety.
If any of the security zones is violated, the siren will turn on for 30 seconds and
signal lights. By pressing the button. You can turn off the alarm at any time without disarming the system.
Remote control for sound and vibration signals, as well as flashing corresponding
The corresponding icon on the LCD display will inform you about the alarm and the reason that caused it. If the zone that triggered the alarm is returned to its normal state (for example, an open door is closed), the icon on the display will go out along with the alarm being turned off; if not, the icon will continue to flash.
Please remember that pressing the button again after the alarm has been turned off will clear
alarm system, but will not turn off the flashing icon of the zone that triggered the alarm if it is not returned to normal. If the zone that triggered the alarm returns to its normal state after the alarm is turned off, but before the system is disarmed, the control panel will emit a short beep and the icon will automatically turn off.
Disarming.
To disarm the alarm, press the button. The light will flash twice
headlights, door locks will open (if the vehicle is equipped with
locks), the engine blocking will be disabled.
2 short beeps will appear on the remote control display and sound.
Turning off and on the mode of sound confirmation of arming and disarming
To enable arming and disarming mode without sound confirmation,
button, press the button on the remote control. If the button is pressed when the
guard, the system will arm, confirming this with just one flash
lanterns The control panel display will show
. After this, any arming or disarming of the system will be confirmed only by the corresponding flashes of the signal lights, the siren will be silent. To disable the silent arm/disarm mode, press the button when the system is in silent arm/disarm mode.
security The control panel display will show
In security mode, by pressing the button, you can disable and
turn on sound signals to confirm disarming/arming. Turn off
The system will confirm the activation of the signals with one flash of the lights, and the activation will be confirmed by one
with a sudden flash of lights and one siren signal. Turning on or off the silent mode will be confirmed by the control panel with audible signals.
personal tone.
7
Prepared by AutoSet. Car alarms and car electronics.
www.AutoSet.ru
Wiring the power connector
The wires connected to the 6-pin connector are always connected to the ignition switch terminals. The system receives power via the red wire, and the yellow cord must be connected too. Even if you do not use autostart, this cord is connected to terminal “15” (15/1). What exactly to connect next depends on the characteristics of the car.
Autostart connector diagram, Leopard
Note that the accessory cord (ACC) will not receive voltage while the starter is operating. This property is what distinguishes it from the wire connected to the 15th terminal. In most cars where there are two ignition lines, the green sheathed cord is connected to the “15/2” terminal.
Now let's look at what to do with a programmable output. When the engine is started by autostart, the voltage at this output appears after a minute, if you count the time from the command. It is unlikely that this option will be used by anyone. But according to the instructions, there are three more options:
- Impulse before starting the starter;
- Duplication of the “ignition 1” output;
- Duplicate output to the starter.
If one of the above items is appropriate, make a selection when setting “option 1”. Signal programming will be discussed further.
USER MANUAL Remote power off and on…
Page 9
- Image
- Text
USER GUIDE
Remote shutdown and activation of the shock sensor.
In security mode, you can completely or partially disable the sensors when
Yes, for example, passengers or animals must be left in the car. For
disabling the sensor's pre-zone: when security is on, twice per
Press the button for one second, the signal lights will flash twice, a melodic sound signal from the remote control will confirm the shutdown and the symbol will appear on the display
.
If you need to completely turn off the sensors, do this again twice within one
second, press the button. Three flashes of flashlights will confirm that the sensors
completely disabled. The control panel will beep three times and the symbol will appear on the display
By pressing the button again twice within one second, you will turn on the sensor.
ki into security mode, which the system will indicate with one light signal.
The control panel will beep once and the symbol will disappear.
Security with the engine running
To arm the alarm when the engine is running, for example,
When stopping for a short time or to warm up, do the following:
1. With the engine running and the door open, press the remote control button,
2. The ignition support function will turn on. 3. Turn off the ignition and remove the key from the lock. The engine will continue
work.
4. Get out of the car and close the door.
5. Press the remote control button. 6. The system will arm and lock the car door. Security mode from the beginning
the engine can be turned on for a programmed operating time
you engine after remote start. If the system is not disarmed
Before this time expires, it goes into full security mode.
7. If the system is armed with the engine running, the shock sensor and
Engine blocking (except starter blocking) will not be activated.
8. When the alarm is activated, the lock will be activated and the engine will stall.
To disarm the system, press the remote control button. Insert the key into the lock
and turn on the ignition. If you want to turn off the engine, press the brake pedal without turning on the ignition.
Passive immobilizer mode
To turn on the immobilizer mode, press and hold until you hear a sound.
signal button on the control panel, immediately after the sound signal press the button. Turning the mode on and off will be confirmed by the control panel with sound signals.
nalami of various tones. When the mode is turned on, the following message will appear on the display:
Once the mode is turned on, the engine will be locked 30 seconds after the ignition is turned off. No other security zones will be activated.
To disable engine blocking, press the control panel button
or an emergency shutdown button when the ignition is off.
8
Prepared by AutoSet. Car alarms and car electronics.
www.AutoSet.ru
Setting up the shock sensor
At first, the sensitivity of the sensor is in the “average” value. You can change it:
- Press button 4 for two seconds and, releasing it, press briefly again;
- Use keys 1 and 2 to select a value;
- Carry out the steps of “step 1”.
You can configure it in another way. It will be necessary to strike.
So, let's look at the basic sequence:
- Carry out “step 1” as indicated above;
- Briefly press key 3 twice;
- The inscription SF will appear - strike with light force;
- The inscription Hd will appear - strike with medium force, wait for two siren signals;
- If the inscription 00 appears, repeat “step 2”, then “dashes” appear - repeat “step 2” again.
Let's say the system moves to “step 5”. This means that the sensor needs to be configured from scratch. Then any of the methods is used. Good luck.
EC To completely disable the mode, press the and buttons in the same...
Page 10
- Image
- Text
LS 9 0 / 1 0 EC
To completely disable the mode, press the and buttons in the same sequence.
the same as when turned on.
Protection against robbery Anti Hi-jack
Your security system has 2 options for activating the anti-burglary function -
tions:
Option A.
With the ignition on, simultaneously press and hold
until the button and control panel beep, the lights will blink once,
confirming that Anti hi-jack is enabled.
The symbol on the control panel will flash
Option B.
With the ignition on, press the emergency shutdown button.
nia. The anti-burglary procedure will then be activated as soon as a door is opened with the ignition on. If you turn off the ignition before
opening the door, the Anti Hi-jack activation will be cancelled.
After pressing the and buttons or opening the door:
1. There will be a 30 second pause, during which Anti Hi-jack can be turned off.
read by pressing the button on the control panel.
2. Then a 30 second warning mode will turn on, during which
The warning lights will flash and the siren will sound.
3. After the warning mode, a full alarm will be activated and the movement will be blocked.
Gatel. The alarm will last 30 seconds. If the ignition remains on or is turned on again, the alarm cycles will repeat.
To disable Anti Hi-jack
after a 30 second pause (1) press while closed
doors and
with the ignition on for 3 seconds, the emergency shutdown button and
after the sound signal, turn off the ignition, Anti Hi-jack will turn off, or enter
Enter the PIN code in the same way as during an emergency shutdown. After disabling Anti Hi-
jack the system will go into disarmed mode.
State memory.
It is impossible to disarm an alarm system that is armed by simply removing and putting on the terminal
mu car battery. In this case, the system will return to security mode and the engine will remain locked.
When power is interrupted and restored in a disarmed state,
this state will be maintained so as not to create difficulties, for example, during repairs.
When power is applied to the alarm unit, the signal lights will flash three times,
and the control panel will beep.
9
Prepared by AutoSet. Car alarms and car electronics.
www.AutoSet.ru
Comments
How to remove the handset on the alarm and what it means
01/16/2021 00:05 GMT
Nezavoditsa with brika reasons
Oleg 01/22/2021 08:57 GMT
Select → I found instructions for my car alarm here! #manualza
- Click →
I'm not stupid, I strictly follow the instructions.
Manualza!manualza.ru
Still not with us?
Instructions
This Leopard alarm has much fewer control keys. Despite this, there are quite a lot of functions and capabilities, here are the main ones:
- Arming is the first key. To activate you need to press once. If you do this twice, the sensors will turn off.
- To disable the warning zone and activate security, press key number 2 once.
- To silently arm, first press two and then one. If you want to turn off the sensors, you need to press key 1 twice. The same can be done with the warning zone, you just need to press the second button a third time.
- To disarm the system, press number one again. In this case, the lock will only unlock on the driver's door. To open all doors, press twice.
These commands will allow you to carry out basic manipulations with the Leopard alarm according to the instructions. With their help, you can lock your car or open the locks. Moreover, each of your commands will be accompanied by LED illumination.
Alarm Leopard instructions for data transfer
To perform its functions, the system is flashed with the KeeLoq software package
. This is a modern encryption system with the so-called “jumping code”. Even for an experienced radio signal encoder, it is very difficult to detect and read.
The operating algorithm of the device is difficult to scan, intercept and recode. The chipset generates dynamic code. Feedback support occurs according to nonlinear laws.
In the absence of a mobile transceiver, it will not be possible to quickly approach the car and manipulate the battery terminals. The siren will immediately sound and the ability to start the internal combustion engine will be blocked.
Functions
Functions of the budget alarm LS 90/10:
- alarm by siren and external lighting devices;
- control the complex without providing sound confirmation;
- protection of a car with a running engine;
- passive immobilizer mode;
- protection from robbery;
- remote shutdown of the shock sensor;
- non-volatile state memory;
- automatic switching on;
- re-arranging;
- control of door locks based on signals from the ignition switch;
- remote and automatic engine start;
- emergency activation and disabling of security.
Advantages and disadvantages
Advantages of the security complex:
Disadvantages of equipment noted by the owners:
- false positives;
- malfunctions during operation (due to low quality components);
- fast battery discharge;
- decrease in the operating range of remote controls due to interference;
- lack of protection of the communication channel from scanning.
Tools for work
Now we stock up on patience, the necessary set of items for work and begin to act. To do this you will need the following auxiliary tools:
- container for draining used oil;
- optional rubber gloves to protect your hands from getting grease on them;
- gate - used if the drain plug is too tight;
- replaceable socket head (the size of the head must match the size of the drain plug);
- if access to a full-flow oil filter is limited, use a strap wrench;
- puller for such a filter.
After all the tools are at hand, it is necessary to provide free access to the vehicle; for this, it is best to drive the car onto an overpass, but if this is not possible, you can jack up the car and place it on supports. Be sure to make sure that the vehicle is installed securely in a raised position, only then can you start working!
Video about changing oil and oil filter:
Operation: Frequently Asked Questions
It would seem that everything is fine, install, connect, use, but during operation the car enthusiast may encounter some difficulties that raise a number of questions, in particular:
- How to use the keychain? Typically, Leopard alarm systems include two key fobs (the first main one, equipped with an LCD display, designed for full access to system options, the second, additional, programmed to perform only basic control functions). Both send commands to the system by pressing a button or a combination of buttons (you can find out about the specific correspondence of a button or their combination to the called option in the operating instructions).
- How to find out the model by keychain? What if the alarm model is unknown, but it is already installed on the car, and it also needs to be controlled somehow. The World Wide Web will decide everything. You just need to compare your keychain with those that the Internet offers for viewing, and find yours among the great variety.
- How to enable autorun? After the control panel has been mastered, and the unknown alarm system has “found its name,” it’s time to think about comfort. Almost all systems in the Leopard line are alarm systems with auto start. This option can be activated by selecting the desired parameters in the programming table (start time, interval between turning on the engine, critical temperature threshold at which the engine will start) and pressing the buttons in sequence:
- button 1 (hold it until 1 short beep appears);
- button 1 (press and hold again until the corresponding icon appears on the key fob screen, indicating temperature start);
- button 2 (until the icon indicating timer start appears);
- button 3 (until the icon appears indicating the alarm starts).
That's all autorun is turned on (pressing it again in the same sequence will turn off the mode).
It is worth noting that, despite the reasonable cost (which in itself is already attractive), the Leopard alarm system deserves only positive reviews. Is it possible to refuse such profitable and effective protection against theft?
Specifications
Technical parameters of the Leopard LS 90/10 EC alarm system:
- operating temperature - within -40…+80°С;
- permissible current - up to 30 A (blocking and autostart circuits);
- shock sensor - piezoelectric;
- signal coding - AM modulation;
- frequency - 433.92 MHz;
- command transmission distance by communicator - up to 600 m;
- distance for receiving feedback signals is up to 1000 m.
Equipment
The LS 90 New car alarm kit includes the following components:
- central block (with a set of parts for installation);
- wireless communication module with antenna;
- shock and temperature sensors;
- keychain communicator;
- spare remote control with 1-way channel;
- control diode and programming button;
- documentation for setup and use.