string(10) “error stat”
If a rotating shaft comes out of the body of a mechanical device, it is necessary to ensure the tightness of the joint, because the moving parts “float” in the liquid lubricant that fills the body. A cuff is used to prevent leakage.
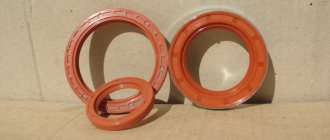
For the manufacture of modern O-rings, special types of rubber, rubber or silicone are used. The outer side of the diameter does not bear friction loads, is intended for fixation in the hole, and can be hermetically attached to a metal mounting ring (glass).
But there are special requirements for the internal side. The rear axle gear oil seal operates under difficult conditions. High temperature, continuous rotation, exposure to reagents from the road surface. All these factors accelerate rubber wear, so replacing the oil seal is a regular routine procedure.
How often is the gearbox seal replaced?
The frequency of standard replacement is indicated in the manual. Over time, rubber loses its elasticity, oil begins to leak, and the cuff cannot be restored. In addition, it makes sense to change the oil seal when repairing and servicing the gearbox itself. Even if it is in good condition, you will definitely damage the material when removing the shank.
If, when the season changes (from summer to winter), the bushing “snotty”, that is, the surface around the shaft axis becomes oily, it’s time to replace the gearbox seal. Soon he will lose weight completely.
And, of course, if there is a rupture and loss of tightness, it is necessary to stop using the vehicle and change the cuff. Otherwise, saving on matches will cost you expensive gearbox repairs.
Causes of malfunction
Any oil seal itself is a consumable item. Any seals sooner or later wear out and begin to lose their sealing properties. The reason for this is most often simple physical wear and tear. However, oil seal leakage can also be caused by the aggressive composition of the transmission oil, for example, when using uncertified or low-quality oil. A leak can also be caused by poor quality, defective oil seal itself or its sealing gasket.
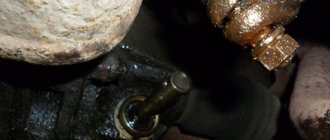
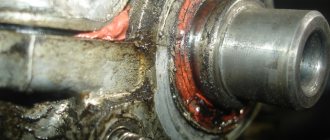
Wear of the oil seal is manifested by the formation of a leak at the point where the gearbox is attached to the driveshaft. If the leak appears as protruding drops of oil at the mounting location, the oil seal must be replaced. Often you have to not only replace the oil seal, but also repair the gearbox itself. This is because oil leaks can also be a sign of bent or broken gears.
If the mounting location is only covered with a thin oil film, then there is no need to rush into replacing the oil seal for now. However, you will have to monitor its condition and possible leaks.
Why does the gearbox seal fail?
- The gearbox breather is clogged. When heated during movement, air pressure squeezes out the oil seal, it becomes deformed, and the internal stiffener wears out;
- Incorrect tightening torque of the propeller shaft flange nut on the gearbox leads to rapid wear of the oil seal;
- A low-quality cuff is installed, its service life is unpredictable;
- Contact with a hard object - a broken tooth from a gear, a piece of a broken retaining ring;
- Aggressive additives in gear oil;
- Chemical effects of reagents on road surfaces;
- Failure to change the oil in a timely manner leads to overheating of the gearbox; the oil seal cannot withstand too high a temperature.
Main functions
The rear axle is a type of automobile suspension that does not pretend to have precise handling, but is characterized by a simple and reliable design. The rear axle is equipped with passenger cars with a somewhat outdated design, for example, VAZ 2107, Niva, UAZ, or utilitarian cars, for example, Gazelle.
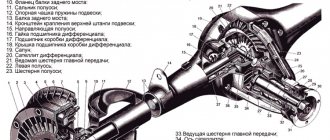
One of the design elements of the rear axle is the gearbox. This unit transmits engine speed to the rear axle wheels, increasing or decreasing their rotation speed. In this way, the operating principle of the driven rear axle is implemented. The gearbox shank is a drive gear that transmits torque from the gearbox to the driven gear. The rotation of the drive and driven gears is ensured, among other things, by transmission oil poured into the gearbox.
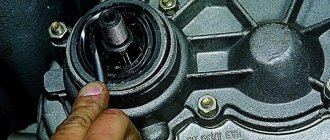
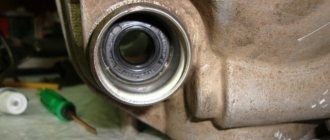
The junction of the drive gear with the propeller shaft is sealed with an oil seal. It is a rubber ring with a sealing gasket inside. With its help, the tightness of the gearbox is achieved at the point of its connection with the driveshaft and the supply of transmission oil to the unit.
Can't you spoil the porridge with oil?
Oil is poured into the axle housing up to the lower edge of the filler hole, in the position when the axle is installed and secured to the vehicle. You should not fill oil above this level, since a larger volume significantly increases power loss when the gears rotate and provokes leaks.
Lubrication of gearbox parts occurs as follows. The lower part of the driven wheel and differential are constantly immersed in an oil bath. When the car moves, they rotate, alternately wetting with oil all the teeth of the main gear and differential gears. The differential bearings and the rear pinion bearing are lubricated in the same way. In addition, the teeth of the driven wheel spray oil abundantly, creating “oil mist” in the crankcase. The least amount of oil when splashed goes to the front, most distant, bearing of the drive gear. To lubricate it, a channel is made in the upper part of the crankcase, where, under the influence of centrifugal force, oil is thrown from the outer circumference of the driven wheel. The higher the rotation speed, the more oil enters the channel. This channel leads into the cavity between the bearings of the drive gear, passes through the bearings and returns to the bridge beam. To drain oil from the flange side of the drive gear, there is an oil drain channel in the crankcase. The bearings, due to the conical shape of the rollers, have a pronounced pumping effect, so the flow of oil that flows from the front bearing directly to the oil seal can be quite significant - more than one liter per minute. It is not easy to withstand such pressure, so an oil-removing washer is installed immediately behind the bearing, in front of the oil seal. It slows down the flow rate, but there is still a gap between it and the crankcase through which the oil flows to the oil seal. Therefore, the tightness of the drive gear oil seal is a constant concern for axle designers and manufacturers.
The amount of oil supplied to the oil seal depends on the speed of rotation of the driven wheel of the final drive
But the lack of oil supplied to the oil seal is no less, and perhaps even more harmful to its “health”, because with dry friction against the surface of the flange, no matter how smooth it may be in appearance, the working edge of the oil seal will wear out very quickly, and a gap will form between it and the shaft, through which not only oil can flow out, but also water can flow in if you need to cross a ford or just a deep puddle in a heavy downpour. And water in oil is a very quick “death” for gears and bearings.
Let's go to the store
So we did everything we could, but the leak didn't stop. This means it's time to change the seal. Actually, according to GOST, these products are called “Reinforced rubber cuffs for shafts.” Or simply - cuffs. If a store offers you a part with that name, don’t be surprised. Factory part designation: 2101–2402052. Further, its variations can be written through a dash: -01, -02 and so on. All of these products are interchangeable and differ in the nuances of their design and manufacturer. Perhaps the most important thing when choosing an oil seal is the manufacturer. Choose products from well-known factories. No name details, in principle, should not attract your attention, because not only according to ours, but also according to Western standards, the cuff must be marked with the manufacturer’s trademark, cuff size, and type of material. Domestic GOST also provides for marking the year of manufacture. As a rule, these are two digits of the year when the mold was made, and next to them are dots, each of which indicates one year of operation of this equipment. You count the points, add their number with the numbers and find out in what year your part was manufactured. The year of manufacture is important because over time, any rubber compound “ages”, losing its shape and elasticity .
The type of mixture from which the oil seal is made is also important. The most expensive and most durable is fluorine rubber. It works well in aggressive environments and at high temperatures. It is usually marked with the Latin letters FBR. Nitrile butadiene rubber (NBR) is considered optimal in terms of price and quality for automobile transmissions. ACM acrylate polymer seals are also available, but they are usually used in components that should not be directly exposed to water. Chemists are constantly improving their products, so the fundamental differences between mixtures are becoming less and less, due to additives introduced into them that improve the weaknesses of certain recipes. Read reviews on the Internet, listen to the seller’s recommendations and make a decision based on your financial capabilities.
When examining externally, first of all pay attention to the quality of the working edge: it should be even and smooth around the entire circumference. You can use a magnifying glass. It will be a big plus for the gearbox seal to have an external boot - like a second edge, but without a spring and with a hole of a slightly larger diameter. The boot, as the name suggests, protects the work area from dust and dirt. The presence of an inclined notch on the boot or near the working edge indicates that the oil seal is designed for shafts rotating in the same direction.
Design and principle of operation of the gearbox
To understand why the gearbox howls and how to “treat” it, you need to understand the device and the principle of its operation. The name of the node comes from the English word meaning “to lower.” In this mechanism, the rapid rotation of the driveshaft shank is transmitted to the wheels with a decrease in speed.
An automobile gearbox transmits torque from the gearbox to the axle shaft through a system of gear mechanisms. The drive gear is mounted on the driveshaft shank and transmits the moment of force to the driven gear of the gearbox. This is the so-called main pair. The reduction occurs due to the fact that the driven gear has more teeth than the driving gear.
The distribution of torque between the axle shafts is carried out through a differential - a system of bevel gears called satellites. This mechanism allows the wheels to move at different speeds as the car makes a turn.
How to replace the gearbox shank oil seal
First of all, you need to buy a replacement part. It is recommended to take the choice of part as seriously as possible, since there is always a risk of purchasing a low-quality oil seal, which will subsequently make itself felt again and an unsuspecting driver can easily face a more serious gearbox failure.
The oil seal must be smooth and without cracks. Any cracks in the rubber indicate that it is unsuitable for use and such a seal will not last long. In addition, always pay attention to the product labeling.
Procedure:
1. Place the car on an inspection pit or a specialized overpass. Avoid any accidental movement to avoid accidents and prepare the necessary set of tools. You will need: a special two-jaw puller, a torque wrench, new transmission oil and a new oil seal. In addition, a standard set of tools will be useful.
2. Drain the oil from the gearbox. To do this, you need to unscrew the drain plug, which is located at the back, and place any empty container.
3. After the oil comes out of the gearbox, you need to turn on the parking brake.
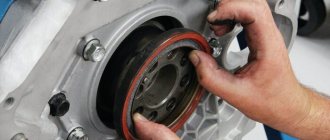
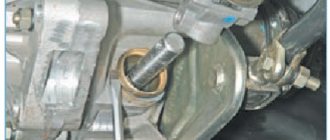
4. Remove the cardan shaft from the gear flange, and use a socket wrench to unscrew the special nut securing the shank. The use of a hand brake is necessary to prevent the shank from spinning during dismantling.
4. Press out the gear flange using a pre-prepared puller. Sometimes this procedure can be done without a puller, by hand. But to be more sure, we recommend using a puller in all cases.
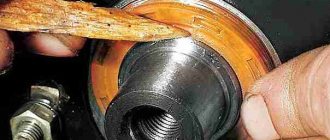
5. Take a screwdriver and pry out the old oil seal. After that, pull it out and start installing the new one. Before installation, do not forget to check the serviceability of the flange. If it is rusty, clean it with a sanding tool. Also, before installing a new oil seal, it is recommended to lubricate the seat with transmission oil.
6. The oil seal is pressed into place using a special bushing (a metal cylinder of the same diameter made of soft metal and not with a sharp circle) with soft blows of a hammer. At the same time, try to avoid possible distortions or damage to the rubber seal.
7. Reassemble the components in reverse order, but do not tighten the shank nut.
8. Lift the rear of the vehicle and remove the axle shafts from the gears. To do this, you will need to remove the wheels, dismantle the rams and unscrew the axle nuts.
9. Tighten the shank nut using a torque wrench. Try turning the flange by hand. The rotation should be uniform, without any resistance or jamming.
10. Assemble all the components, put the car on its wheels and do not forget to fill the gearbox with transmission oil.
What is a gearbox shank
Gearbox shank - element of the gearbox shift drive with manual control (manual gearboxes); a part that directly connects the drive rod to the gear shift lever.
The gearbox shank has several functions:
- Connection between the drive rod and the remote gear shift mechanism;
- Compensation for longitudinal and transverse displacements of drive parts while the vehicle is moving;
- Drive adjustment.
Gearbox shanks are used in gear shift drives based on rigid rods; in cable drives, the role of this part is played by other components (translators). Shanks of various types can be found in gear shift drives of trucks and cars, as well as in tractors and other equipment. The shank, being part of the gear shift drive, plays an important role in controlling the transmission. If it breaks, this part must be replaced, and for the correct selection and successful repair you need to know about the existing types and features of shanks.
This is interesting: Car tachometer - change gears on time
Crankshaft structure
The crankshaft is installed in the lower part of the engine directly above the oil sump and consists of:
- main journal - the supporting part of the part on which the main bearing of the engine crankcase is installed;
- connecting rod journal - stops for connecting rods;
- cheeks - connect all the connecting rod journals with the main ones;
- toe – the output part of the crankshaft on which the timing gear drive pulley is fixed;
- shank - the opposite part of the shaft to which the flywheel is attached, driving the gears of the gearbox, and the starter is also connected to it;
- counterweights - serve to maintain balance during the reciprocating movements of the piston group and relieve the load of centrifugal force.
The axis of the crankshaft is the main journals, and the connecting rod journals are always alternately shifted in the opposite direction from each other. These elements have holes for supplying oil to the bearings.
The crankshaft crank is an assembly consisting of two crankpins and one crankpin.
Previously, prefabricated crank modifications were installed in cars. Today all engines are equipped with solid crankshafts. They are made from high-strength steel by forging and then turning on lathes. Less expensive options are made from cast iron using casting.
Here is an example of creating a steel crankshaft:
Malfunctions and repair work
Common malfunctions of the UAZ front axle and possible repairs:
- Leakage of lubricating fluids. Check the tubes and connecting elements for mechanical damage - the cuffs and flange for functionality, the oil container for the optimal fluid level.
- High wear of fasteners.
- Bearing defects caused by the use of poor quality material by the car plant.
- Broken axle teeth. Adjustment will not help; parts need to be replaced.
- Mechanical defects of the beam.
- Wear of elements. The situation is resolved by replacing it with new spare parts.
- Poor grip of the bearings and main gears indicates the need for tension adjustment.
Bridge repairs begin after diagnosing and searching for the cause of problems in the functioning of the mechanism, which are diverse:
- transmission components of a rear-wheel drive vehicle are faulty due to regular movement over difficult terrain;
- use of consumables and lubricants of unsuitable quality;
- Failure to monitor tire pressure can lead to shaft and bearing failures.
Most often, car owners are faced with a violation of the axial space of the kingpins and are knocked out of the required position. To diagnose, you need to jack up the front of the vehicle and move the wheel in a vertical plane. The presence of axial play indicates the need to adjust the clearance of the pins.
How to adjust bridges
You can adjust the UAZ axles yourself. This will require a number of tools and good knowledge of the mechanism. Access to the necessary parts and assemblies is possible after dismantling the structure and separating the crankcase parts. The first sign of the need to adjust the gearbox is loud noise and malfunctions of the part. Such work is required after diagnosing the condition of bridges. Adjustment includes a number of activities.
At the first stages of repair work, ensure that the nuts of the brake elements can be loosened freely. The tools you will need are a split wrench, brake fluid and a mixture of WD-40. The bridge is dismantled as follows:
- remove the fasteners between the drive gear flange and the propeller shaft;
- secure the shaft to the side;
- place the front part of the vehicle on jacks, raising the wheels above the surface;
- additionally install safety supports;
- remove the nut between the brake pipe and hose and close the hole with a plug to avoid large losses of fluid;
- after removing the lower fasteners and moving the shock absorbers from the axle, the bridge will lower;
- remove the stepladder nuts and roll out the bridge (without wheels it weighs more than 100 kg).
How to find a service to replace worn oil seals on a Gazelle?
Choose car services that specialize specifically in working with this brand of car, since even for such an operation the specifics of the car are important. Our specialists have extensive experience working with Gazelles, and the number of replaced oil seals and repaired gearboxes is very difficult to count due to its size.
Damaged oil seals can be replaced with both domestic originals and imported analogues. Which option to choose is a personal choice of each car owner, however, our car service always has a wide range of oil seals in stock, among which you will definitely find the element you need. This allows you not to waste time searching through car markets, and also minimizes the risk of defects, because we carefully check every detail and work only with trusted suppliers.
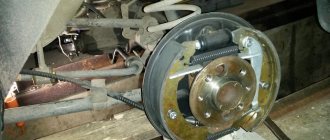
Replacing the Gazelle rear hub oil seal with your own hands
We will show you visual photo and video instructions on how to replace the rear hub oil seal on Gazelle cars with your own hands. A new oil seal was purchased in advance, its order number in the spare parts catalogs is 53A-3103038
Remove the wheels, clean all joints with a wire brush, then soak them in WD-40 penetrating lubricant for a couple of minutes. We also need to remove the drum, apply a few gentle blows to its body with a hammer so that the pads come together and it can be dismantled. Unscrew all the nuts in a circle:
Let's knock on the cover a little and pull the axle shaft out. Unscrew the nut (use a special wrench for Gazelle hubs):
Then comes the intermediate washer, it is easy to pull out:
Replacing the shank seal of the rear axle gazelle
Elements such as the rear axle shank oil seal are inexpensive, but replacing them on a Gazelle requires significantly more labor and, accordingly, will cost slightly more than the part itself.
But saving on this operation is not advisable, since its insufficient quality can lead to much more serious problems. In terms of its functionality, this oil seal, as in other elements of the car, is a seal. It is needed to prevent transmission oil from leaking from the rear axle. When the system depressurizes, the bearing grease is very quickly washed out of it. Accordingly, insufficiently frequent replacement of this part can lead to “oil starvation” and complete failure of the transmission.
Assembly
- Install the drive gear flange and washer.
- Tighten the nut to a torque of 117-254 Nm. It can be determined more accurately by measuring the force of rotation of the gear. It should correspond to the value measured before removing the flange. When tightening the nut, it is necessary to hold the flange using a wrench, which can be made from a pipe with a pair of bolts and nuts attached to it.
- Install axle shafts and wheels.
- Fill the rear axle gearbox with new oil.
Any component of a car can become unusable for a variety of reasons. This can also happen with oil seals in the rear axle gearbox of a VAZ 2107. The vast majority of car enthusiasts consider replacing these oil seals to be extremely difficult and immediately send the car to a service center. In this article we will try to prove to the reader that you can change such an oil seal with your own hands.