Comments: no Published: 12/30/2015
Rating:
Tags:VAZ 2110/2111/2112
If you are one of those drivers who have repeatedly thought about increasing the cargo-carrying capabilities of your vehicle, purchasing a trailer would be a great decision for you. But before you think about purchasing it, you must first install a towbar on the VAZ 2110/2112. You can do this yourself by carefully understanding all the intricacies of choosing and directly installing a traction device.
Types of towbars and their advantages
Conventionally, towbars are divided into several types:
- a model that can be installed in the holes provided by the manufacturer;
- a model that is attached to technological holes;
- A model that requires you to drill holes yourself to install.
Types of towbars
It’s easy to guess that the first model is easiest to install on the VAZ 2110/2112. You will only need to clean the holes from dirt, install the tow bar and tighten the bolts. You should not save money by deciding to make the device yourself. Buy a branded towbar that is designed for your car. Over its service life, it will have time to pay for itself more than once.
If, according to the second technology, you mount the device into technological holes that are already provided in the car, they will only need to be slightly drilled. This method of installing a tow bar is similar to the next one, but it is less laborious.
Indeed, in the third case, you will have to do all the markings and holes yourself. The towbar will serve as a template for you, based on which you can drill the cracks, clean them and install the structure.
When purchasing a high-quality model, instructions will be attached to it. Based on this, the installation will be easy.
Installation work
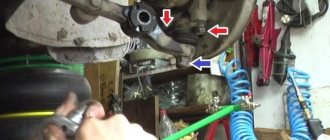
You can install it on a VAZ without removing the bumper. But then you will need to drill holes in the floor to get the wires out. But this can be completely avoided by simply removing the bumper from the car.
After this you can start drilling holes:
- Make two holes for the brackets with your own hands, treat them with anticorrosive;
- Install the towbar, securing it with bolts and nuts;
- Drill four more holes: two in the lower part of the side member and two more in the trunk;
- Attach the device to them using special nuts.
Installation
Installing a towbar yourself should not be too difficult for you. Although it is better to immediately enlist the help of an assistant, and also have a viewing hole at your disposal.
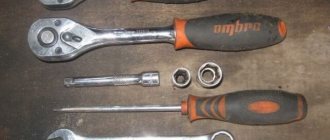
Prepare a set of tools necessary for the job, which includes:
- A drill on which you can adjust the speed;
- Kern;
- Knife;
- Screwdrivers;
- Drills with a diameter of 12.5, 13 and a countersink of 20 millimeters;
- Keys;
- Hammer;
- Insulation tape;
- Lubricant with anti-corrosion properties.
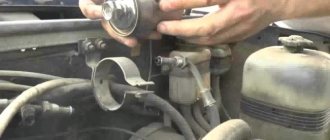
Before starting installation, remove the rear bumper and trim from the sill. This will make it more convenient to carry out work, marking, and installation. Plus, you don’t have to make additional holes in the bottom for wiring.
The installation procedure is as follows.
- Attach the towbar to its future location. Make two holes through the holes in the towbar mounting bracket.
- Using a countersink, all burrs from drilling are removed. Treat the surface with anti-corrosion lubricant so that the surfaces are pressed tightly against each other.
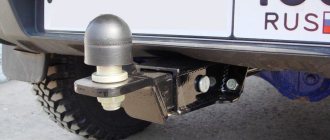
- The towbar amplifier must be secured with two bolts through the plate.
- We go to the next pair of holes in the bracket, through which the spar is drilled from below.
- A hole is drilled from the trunk towards it through the amplifier plate.
- This way the holes made will coincide and the bolts can be installed in them. Be sure to use washers.
- Now we tighten all four bolts that hold our tow bar in place. Remember to control the force, since over-tightening the fasteners will damage the metal of the spar. To improve the effect, take a short sleeve that is passed through the bolt in the spar. This will allow the metal of the body to press tightly against the ends of this bushing, thereby increasing the reliability of the fixation.
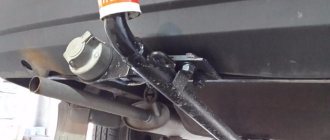
- In the area where you removed the bumper, there are three plugs. We pull out the middle one, and the freed hole is useful for starting the wiring to connect the trailer to the power supply.
- Additionally, make a hole in the inner panel so that the hole comes out to the left of the lock. Through these holes, wiring is carried out from the connector to the rear left light. Be sure to seal the wires.
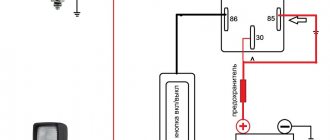
- The connector must be fixed on the platform provided by the tow bar. Before connecting, do not forget to disconnect the negative cable from the battery.
- The connection is made according to the diagram, in accordance with the color of the wiring. The wires must be cut into the desired wiring, insulated and carefully laid in place.
If you correctly install and connect the towbar, you can increase the load-lifting capabilities of your VAZ 2110, use the car to transport your own belongings, or engage in transportation services. This is a completely worthy option for part-time work. Plus, you can always go out into nature with everything you need.
Remember to properly place cargo in the trailer. This should be done evenly, maintaining balance. Do not throw everything to one side so that sudden loads do not act on the towbar while driving. This may cause it to break.
Among drivers who travel long distances out of town, the question of how to make a tow hitch for a car with your own hands is a very pressing question. On sale you can find ready-made options for “classics” and new generation cars, but there is a category of car owners who prefer to make them themselves.
Towing hitch connection
If you removed the bumper during installation yourself, you should have noticed three rubber plugs in the body. You will need to replace the middle one so that you can pass wires through it later. They are laid under the threshold and lead to the left headlight.
The wires are connected by color, that is, they are inserted into the harness with the rear lights. And then the socket is installed, which is mounted on the bracket.
Please remember that wiring connections may differ in each individual case. Therefore, you should read the instructions for your car.
Installing a tow bar on a VAZ
Installation
Installing a towbar yourself should not be too difficult for you. Although it is better to immediately enlist the help of an assistant, and also have a viewing hole at your disposal.
Prepare a set of tools necessary for the job, which includes:
- A drill on which you can adjust the speed;
- Kern;
- Knife;
- Screwdrivers;
- Drills with a diameter of 12.5, 13 and a countersink of 20 millimeters;
- Keys;
- Hammer;
- Insulation tape;
- Lubricant with anti-corrosion properties.
The installation procedure is as follows.
- Attach the towbar to its future location. Make two holes through the holes in the towbar mounting bracket.
- Using a countersink, all burrs from drilling are removed. Treat the surface with anti-corrosion lubricant so that the surfaces are pressed tightly against each other.
- The towbar amplifier must be secured with two bolts through the plate.
- We go to the next pair of holes in the bracket, through which the spar is drilled from below.
- A hole is drilled from the trunk towards it through the amplifier plate.
- This way the holes made will coincide and the bolts can be installed in them. Be sure to use washers.
- Now we tighten all four bolts that hold our tow bar in place. Remember to control the force, since over-tightening the fasteners will damage the metal of the spar. To improve the effect, take a short sleeve that is passed through the bolt in the spar. This will allow the metal of the body to press tightly against the ends of this bushing, thereby increasing the reliability of the fixation.
- In the area where you removed the bumper, there are three plugs. We pull out the middle one, and the freed hole is useful for starting the wiring to connect the trailer to the power supply.
- Additionally, make a hole in the inner panel so that the hole comes out to the left of the lock. Through these holes, wiring is carried out from the connector to the rear left light. Be sure to seal the wires.
- The connector must be fixed on the platform provided by the tow bar. Before connecting, do not forget to disconnect the negative cable from the battery.
- The connection is made according to the diagram, in accordance with the color of the wiring. The wires must be cut into the desired wiring, insulated and carefully laid in place.
If you correctly install and connect the towbar, you can increase the load-lifting capabilities of your VAZ 2110, use the car to transport your own belongings, or engage in transportation services. This is a completely worthy option for part-time work. Plus, you can always go out into nature with everything you need.
Remember to properly place cargo in the trailer. This should be done evenly, maintaining balance. Do not throw everything to one side so that sudden loads do not act on the towbar while driving. This may cause it to break.
Tips for choosing a towbar
Any model of towing device for VAZ 2012 has its own characteristics.
For example, the towbar platform can be connected to each other using bolts or be solid. The latter option is much more convenient, since you will only need to install it once and will not have to constantly ensure that the elements are securely fastened together.
But it also has its drawback. Over time, when the metal “gets old” and the welds become weak, the entire device will have to be thrown away. In the case of a collapsible model, it will be enough to replace the bolts or one of the elements of the device.
After installing the towbar on the VAZ 2110, all you have to do is buy a trailer and fill out the necessary documents for its registration. In general, knowing about all the features of installing a towbar, you will be able to adequately assess your abilities and decide whether you want to install it yourself or whether it’s better to go to a workshop. The choice is yours!
Author: Ekaterina
The best gas struts for VAZ
Their operation is based on high-pressure gas, which ensures optimal rigidity when loading the rods. The peculiarity of such gas struts is their stability on the road, slight sensitivity to ruts and the absence of roll during maneuvers.
Stock car VAZ 2108-2115
A set of front struts from this brand is produced for VAZ 2108, 2109, 21099, 2110, 2111, 2112, 2113, 2114, 2115, it can be purchased immediately assembled. The peculiarity of this model is the possibility of lowering the car by 5 cm. They are based on a two-pipe intake-type scheme. The presence of an original valve system allows the car to better withstand shaking on the road, and Teflon-coated pistons increase the wear resistance of the structure. Thickened chrome rods are resistant to damage and can easily withstand 50 thousand km or more, depending on driving style.
Advantages
- The case is of standard length - you don’t have to redo the fasteners to install them;
- Reducing the working length of the rod made it possible to lower the car by 50 mm;
- The classic cup allows you to install wheels of 15-18 inches;
- Reduced sway when turning;
- Improved handling.
Flaws
Buyers note that the cost could be a little lower.
Demfi comfort front Kalina 1119
This is a telescopic strut for the front suspension, which is installed on cars of the Lada Kalina series. The model belongs to the “comfort” class, which includes gas-filled shock absorbers with maximum durability. Increased rebound force provides a tight, energy-intensive suspension feel. The product is intended for travel both in the city and on highways. A special feature of the model is 10% greater rigidity compared to other serial devices. These front struts are the best for VAZ 1117, 1118, 1119, as they are adapted to domestic roads and provide excellent handling.
Advantages
- One year warranty from the manufacturer;
- Minimum number of rolls;
- Instant response to turning the steering wheel;
- Excellent directional stability;
- Collapsible design.
Flaws
- The model is intended for use in combination with barrel springs;
- Slightly increased rigidity.
Most buyers praise these stands for their durability. Where the original models last for six months, Demfi can work for 2, 3 and even 4 years while maintaining performance characteristics.
Plaza Standard VAZ 2110
These are racks assembled with a single-pipe design, which belong to the “standard” line and are characterized by a soft, comfortable and safe ride on roads with any surface quality. To ensure the stability of the car, they are filled with gas under a pressure of 15 atmospheres. Shock absorbers contribute to good vehicle handling even at high speeds. In terms of reliability, owners note that they can “run” for 2-3 years even when transporting goods in a passenger car and rarely fail, mainly due to the mistakes of auto repairmen or the drivers themselves. The main advantage of this model is its low price, which is half that of imported analogues.
Advantages
- Smooth ride at high speeds;
- Improves car cornering;
- Allows you to comfortably accelerate to 160 km/h and above;
- Due to the rigidity of the struts, the car rises slightly;
- They can walk for a long time without any extraneous sounds or changing earbuds.
Flaws
The oil is susceptible to sub-zero temperatures.
Most of the time the model provides excellent handling, but in winter the oil loses its elasticity, so at first you need to warm it up, moving carefully. Deterioration in the quality of the filler is nothing more than mild discomfort