The main thing is the color of the light flux. Next, the wire is connected to the stove backlight connector, and its second part goes to a separate PTF power button. They should be installed at a distance of no more than 40 cm from the edge of the side marker diffuser and no lower than 25 cm from the level of the road surface. Power to the relay, as a rule, is taken from the ignition switch, and the button is placed either in its standard place or chosen in a convenient location.
It's no secret that all modern vehicles are equipped with a special connector for mounting PTF, so the installation of fog lights is carried out strictly in them. Zotov A. How to connect fog lights (ptf), running lights through a relay But don’t forget about the car’s ground clearance. Connect the positive cable to the button input, extending it from the contact lock on the ignition switch. How does a light filter affect?
Only a fuse will save your vehicle from fire if a short circuit accidentally occurs in the circuit. On both headlights 1, such a contact is connected using a wire into a circuit, after which it is connected to ground or to metal parts of the car body by screwing it to the body with a bolt. We draw attention to the Rules, which state that PTFs should be turned on only after the side lights are turned on. The yellow spectrum, on the contrary, is not reflected from the water suspension, but penetrates it through and through, and although visibility is not ideal, it is significantly different from the driving conditions created by headlights. How to connect a button to fog lights or to a fan
PTF functionality
Any experienced car enthusiast, as well as an inexperienced one, is well aware of the role played by fog lights (FTL). In conditions of a white curtain, standard head lighting does not cope with its task of ensuring good visibility on the road, and all due to the fact that the fog is a suspension of water droplets, through which standard optics cannot penetrate. In addition, almost all of the light from such lanterns is reflected from the curtain. Thus, you get a whole white wall, which significantly complicates the view.
Anti-fog optics have their own emission spectrum that can penetrate such a wall. In addition, the luminous flux spreads horizontally and is directed downwards, which allows for good illumination of the road. Is it possible to install LEDs in fog lights? An interesting question that requires attention.
Methods for installing PTF on VAZ 2113, 2114, 2115
Lada 2110 Relyushka Logbook Installing an alternative sound signal 2013
Installation of fog lights can be done in several ways. Which one to choose, each car owner decides for himself, based on his capabilities and preferences. Let's look at the most common installation options:
- Buying a front bumper with PTF. In this case, the headlights are sold already mounted in the front bumper. As a rule, a part can be purchased without any problems at a car tuning studio and immediately installed and connected. The disadvantages of this option include high financial costs.
- Buying a bumper with holes for PTF. With this installation method, you should purchase a bumper with holes for the lights and the headlights themselves with all the necessary elements (wires, relays, power button, etc.).
- Self-installation of PTF is the most common installation method, since it requires minimal financial investment. The car owner only needs to purchase headlights with the necessary installation kit and facing elements.
PTF location diagram on a car
Before connecting the fog lights, it is important to install the devices correctly on the front of the car. This is done in accordance with certain rules, which clearly stipulate the location of the light source.
On modern cars, the installation locations for fog lights are marked from the factory. Basically, such lighting elements are installed on more expensive car configurations. If the headlights were not installed from the factory, then the places for their installation are closed with plugs.
Fog lights on the front of the vehicle must be installed in accordance with established regulations
Is it possible to install xenon in PTF
Many car owners seek to install xenon in fog lights, arguing their actions by increasing lighting efficiency. Is this really true? Let's figure it out. First of all, when installing xenon in standard PTF housings, focusing is disrupted, which is due to a different operating principle in contrast to conventional lamps. Since standard fog lights are designed to operate with certain lamps, they simply cannot cope with xenon. The result of such changes will be too much reflection in the reflector, the rays are refracted, the light becomes blurred. A well-known situation arises - the blinding of drivers of oncoming vehicles, which increases the risk of an accident. Installing xenon in PTF is far from the most successful solution and the effectiveness of such light is questionable, so it should be abandoned.
When installing xenon light in standard fog lights, focusing is disrupted, which leads to dazzling oncoming drivers
The main mistake of many drivers
With regard to PTF, most drivers make a grave mistake - using optics for purposes other than their intended purpose. In addition, things can simply reach the point of madness: drivers equip their vehicles with such optics in large quantities. It is not uncommon to find sedans with such lights (4 pieces or more) on their roofs at any time.
Meanwhile, the traffic rules clearly state that turning on the PTF is allowed only during the dark period of the day and in conditions of insufficient visibility (fog, smoke). Some drivers turn them on instead of low beams, which is also a gross violation of traffic rules.
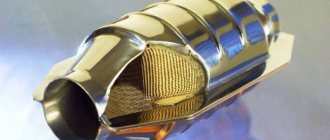
Therefore, we should not forget that PTF is just additional optics, although some owners manage to convert fog lights to LEDs. Of course, it is impossible to completely abandon them, since under some circumstances they are very helpful. Their main advantage from a design point of view is their special reflector and diffuser. There is nothing like this in any other optics yet.
Paradoxically, it is the fog lamps that consume the most energy, producing a powerful luminous flux that is significantly brighter than low beams. Modern traffic regulations do not contain any instructions regarding the color range of the PTF luminous flux. Because of this, various manufacturers are conducting their own experiments.
Installation of fog lights on Lada Priora
1). Disconnect the ground from the battery.
2). We unscrew the bumper fastenings (several screws on the side, bottom and top), and remove it.
3). Using a screwdriver, unscrew the screws holding the plugs.
4). We insert the headlights into the places where the plugs were. We fasten with the same self-tapping screws.
5). We take a long wire from the kit, insert it into the right headlight, then into the left one and pull it into the engine compartment from the battery side.
6). We remove the washer tank, and then the expansion tank.
7). Using the “13” key we eliminate the wipers.
8). We unscrew the protective plastic to gain access to the left edge of the upholstery.
9). Loosen the clamp and remove the hose.
10). We remove the upholstery.
eleven). We stretch the wires along the standard wiring through the plug into the car interior and fasten them with the clamps included in the kit.
12). We assemble all the parts in reverse order. Don't forget to connect the two black wires to the outermost bolts of the crankcase guard.
13). Let's go to the car interior. Remove the protective cover under the steering column. To do this, turn 3 locks 90 degrees.
14). Using a screwdriver, unscrew the self-tapping screw, which is located under the fuse block. We take out the block.
15). From the center console, remove the rear window heating button and the plug. They are located to the left of the clock.
16). From the set we take out the button with wires. We stretch the long blue wire to the fuse block, and connect the remaining three to the heated rear window button using the clips included in the kit. We connect everything according to the color scheme.
17). We insert the relay for the fog lights included in the kit into the fuse box. We connect the wires according to the diagram:
- long blue to A85;
- red and black to 30 and 86;
- yellow wire from 87 with two outputs to F17, F18;
- we take the previously passed wires from under the engine compartment and connect them to F17, F18;
- We insert two fuses from the kit into sockets F17, F18.
18). Collecting elements. We connect the ground to the battery, turn on the ignition and check the serviceability of the fog lights (the fog lamps will only work when the ignition is on).
Installation of fog lights on Lada Vesta
This process includes the following steps:
- removing the bumper;
- preparation of the seat;
- installation of headlights;
- PTF connection.
1). Disconnect and remove the battery.
2). Remove the front bumper. The lower part is secured to the body with 4 bolts to the body and 4 screws to the fender liners. We turn it all out. On each side we unscrew 2 screws securing it to the lockers. Under the hood, unscrew the 6 bolts of the upper fastening to the body.
3). It remains to remove two bolts under the license plates. Here you already need to hold the bumper by the beam. Gently pull it towards you to disengage it from the side brackets.
4). Now you have access to the right place, and it's time to move on to the next step.
Preparing seats and attaching headlights
1). In place of the fog lights there are factory plugs. Using a 76 mm bit, we cut holes in them.
2). You should also take care of the hole for the PTF button in the dashboard of the car. To do this, select a place on the center console or next to the trunk opening button.
Connecting fog lights
1). From the right PTF we lay the wiring inside a metal box. We let the wiring into the cabin from the engine compartment in the area of the pedal assembly through a special hole.
2). We connect according to a universal scheme, as in cases of connecting equipment on previous versions of the Lada car line. Load power is taken from the battery (M6 bolt) and supplied to the contact relay through a fuse.
3). Plus comes from the mounting block from the size fuse. Alternatively, you can use the plus of the cigarette lighter.
4). The relay itself is installed under the hood or directly in the cabin.
5). This method of connecting fog lights can be called the most optimal in terms of savings and minimal interference with the electronic part of the car.
A little history
Returning to the topic of installing H11 LEDs in foglights, it’s worth rewinding a few decades ago and finding out where it all began. 1907 A laboratory in which one of the famous radio engineers, Guglielmo Marconi, spends his working time. It was he who noticed the glow effect of semiconductors, which was later called electroluminescence. Almost immediately, a note on this topic appeared in one of the scientific journals, but went unnoticed.
On the territory of the USSR, 20 years later, another scientist, Oleg Vladimirovich Losev, also discovered something similar. He conducted research on a silicon carbide crystal that glowed when current was passed through it. Subsequently, the effect received the name of a genius - Losev’s glow, and its author acquired a patent. However, the very nature of this glow was never discovered by the discoverer.
The answers came later
Long before drivers began installing H11 LEDs in the foglights of their cars, almost by the middle of the 20th century, the theory of pn junctions in relation to semiconductors was created. Based on this, in 1947 the first transistor was invented, which to this day has remained an unchanged element of radio engineering. The glow occurred when charged particles crossed a boundary consisting of two different semiconductor elements. And it is precisely the place where these two crystals come into contact that glows, which ultimately forms a kind of sandwich.
The whole difficulty lay in the production of semiconductors of the required structure. And this obstacle could not be overcome for a long time. Only since 1955 have research been successful. The first diode was produced by General Electric, although not everything is so simple here, since similar developments were also carried out in different countries of the world. But these are not yet the same H11 LEDs in the foglights of modern cars that are common today.
A revolutionary breakthrough was made by Nichia in 1995, demonstrating an ultra-bright LED, which was a full-fledged light source. From that time on, the development of semiconductor lighting devices began. And as many experts note, new light sources may completely replace traditional analogues in the near future.
How to make a fog lamp with your own hands (14 photos) » Trinixi
Today I want to tell you how to fix the fog light on your car.
So, let's take the broken headlight:
We remove the remains of the old glass and, if possible, the old sealant.
Next, measure the diameter of the headlight and select a glass jar or bottle of suitable diameter. An ordinary three-liter jar was almost perfect for me. I don’t think that problems can arise at this point - store shelves are replete with containers of all sizes, shapes and colors!
Now take a glass cutter and mark a line near the bottom of the jar
Of course, glass cannot be broken off along a drawn line, especially if you draw it with such a shitty glass cutter as I had. Therefore, we do 2 things at the same time: put the kettle on boil and place the jar in the refrigerator (to make it cool faster, I filled it with water from the well)
Take a cold jar, a hot kettle and pour boiling water into the jar
Immediately we hear the cracking of glass. The result is a broken bottom of the jar.
As I already said, my glass cutter was shit, so the bottom didn’t break off along a straight line, but it doesn’t matter - we remove the excess protrusions using the same glass cutter and pliers (unfortunately the process was not filmed).
Next, apply sealant to the groove of the fog lamp housing
Inserting glass
We also apply sealant on the outside
And level it evenly
This is what we got! Leave to dry
When the sealant dries, install the finished fog in place. Guess which side is the non-original glass?
From here
trinixy.ru
Features of lamp selection
The first samples of LEDs were expensive - the price of one such copy in 1968 was $200! The cost decreased gradually, and for some time no one could even imagine that such light sources would become the main competitor to incandescent lamps. And there was no talk about cars at all. Now, many car enthusiasts are faced with a difficult choice of which LED fog lights to buy for their car.
On the market you can find a wide range of automotive optics using diodes that differ in a number of parameters:
- form;
- dimensions;
- material of manufacture;
- shade of light flux.
There are also many manufacturers, but preference should be given only to trusted companies. As for the shape, on the modern market PTFs are presented in the form of a circle, rectangle, oval, square.
There is no useful function here other than aesthetics. Therefore, the choice depends only on the requirements and tastes of car enthusiasts.
How to make protection for foglights (PTF) and headlights with your own hands
Do-it-yourself protection of foglights (PTF) and headlights
How to make protection for foglights (PTF) and headlights with your own hands
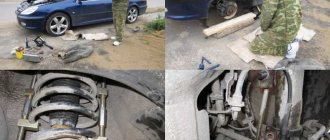
Due to the fact that the fog lights are located close to the ground, stones from the road often break the fragile glass of the headlights. Apart from this, almost everyone is familiar with the quality of Russian fog lamps, which after a while, due to the ingress of water, become like an aquarium. Let's try to protect the PTF from gravel and water.
How to protect your fog lights yourself:
- Protection of headlights from stones
- Protecting headlights from water
- Protection of fog lamps from stones
The first method is to protect the fog lamp with armored film. A popular method of protecting headlights, bodywork and bumpers.
Advantages - the film on the headlight is not noticeable, but disadvantages - cost and protection only from small stones.
The second method is to protect the foglight with transparent plastic or plexiglass.
In the first case, we use PET (which is used to produce removable tinting).
The technology is usual: we cut out a fog light stencil from paper, and then we cut out PET using it.
Now we need to figure out how to secure the purchased templates.
The advantages are serious protection of the fog lights from stones, but the disadvantages are that due to a poor fit to the headlight, dirt may collect between the film and the headlight, or even worse, the headlight light will be distorted.
In the case of plexiglass, which can be taken from Gazelle headlights, the situation is similar.
Using a cardboard template for the fog lights, we cut out the plexiglass with a hacksaw; it is possible to leave the antennae for fastening beforehand. If you need to slightly change the shape of the sheet, this can be done using a technical hair dryer.
All that remains is to secure our protection in front of the foglights to the antennae with tape, or better yet, with small screws.
All advantages and disadvantages are similar with PET.
3rd method - protecting the foglight with an iron mesh.
You can use any mesh, even the one used on top of the state. numbers.
It is possible to attach the mesh to a strip of brass or tin, which must take the shape of the contour of the fog lamp.
Place the mesh on the base and secure the edges with solder or glue. We cut off the excess mesh and process the edges.
You can fix it using any convenient method, but with the possibility of quick removal, so that when washing the headlight you can simply remove the mesh.
Advantages - affordable and excellent headlight protection, in which the headlight light is not distorted. Cons: They look like an amateur.
Protecting fog lamps from water
The weak point of all fog lights of the Auto VAZ 2110 is the rubber cover on the back. At some point it moves and water gets into the headlight. Because of water, fog lights become unusable and you have to repair them or buy new ones.
Measures to protect fog lights from water come down to two points:
Treating the edges and joints of the fog lamp with sealant.
Make visors to prevent water from getting into the fog lamps
I think everything is clear about the first point, but the second point is more detailed:
You will need 2 tin cans with a capacity of 1 liter. You just need to pay attention to the fact that on one side you need to bend it so that the piece of iron does not come out of the fog.
Now water will no longer get into the PTF!
https://xenon-kiev.com.ua
legkoe-delo.ru
Another important point
As mentioned above, the luminous flux can be of different shades:
- white;
- blue;
- red;
- yellow.
Here you should think not only about personal preferences, but also about other road users. For example, H3 LEDs in blue and white fog lights will blind oncoming drivers, which is not good for anyone, since not only personal safety depends on it. Therefore, it is better to purchase optics with a yellow tint.
Undeniable popularity
Despite the variety of PTFs, which are represented by LED, halogen, xenon products, the first one is at the peak of popularity. And all due to some undeniable advantages. And the main advantage is that LEDs emit much more light per watt when compared to standard incandescent bulbs. In addition, there is virtually no heating.
This allows you to consume less energy, and accordingly, the service life is significantly increased. There is an opinion that when using fog lights with LEDs you can save on fuel, even if not as significantly as you would like. In addition, the maximum luminous flux is generated very quickly, since there is no need for ignition, which some lamps lack. And if we compare it with a xenon analogue, then LEDs cannot blind drivers of oncoming cars.
How to make protection for foglights (PTF) and headlights with your own hands
Due to the fact that the fog lights are located close to the ground, stones from the road often break the fragile glass of the headlights. Apart from this, almost everyone is familiar with the quality of Russian fog lamps, which after a while, due to the ingress of water, become like an aquarium. Let's try to protect the PTF from gravel and water.
How to protect your fog lights yourself:
- Protection of headlights from stones
- Protecting headlights from water
- Protection of fog lamps from stones
The first method is to protect the fog lamp with armored film. A popular method of protecting headlights, bodywork and bumpers.
Advantages - the film on the headlight is not noticeable, but disadvantages - cost and protection only from small stones.
The second method is to protect the foglight with transparent plastic or plexiglass.
In the first case, we use PET (which is used to produce removable tinting).
The technology is usual: we cut out a fog light stencil from paper, and then we cut out PET using it.
Now we need to figure out how to secure the purchased templates.
The advantages are serious protection of the fog lights from stones, but the disadvantages are that due to a poor fit to the headlight, dirt may collect between the film and the headlight, or even worse, the headlight light will be distorted.
In the case of plexiglass, which can be taken from Gazelle headlights, the situation is similar.
Using a cardboard template for the fog lights, we cut out the plexiglass with a hacksaw; it is possible to leave the antennae for fastening beforehand. If you need to slightly change the shape of the sheet, this can be done using a technical hair dryer.
All that remains is to secure our protection in front of the foglights to the antennae with tape, or better yet, with small screws.
All advantages and disadvantages are similar with PET.
3rd method - protecting the foglight with an iron mesh.
You can use any mesh, even the one used on top of the state. numbers.
It is possible to attach the mesh to a strip of brass or tin, which must take the shape of the contour of the fog lamp.
Place the mesh on the base and secure the edges with solder or glue. We cut off the excess mesh and process the edges.
You can fix it using any convenient method, but with the possibility of quick removal, so that when washing the headlight you can simply remove the mesh.
Advantages - affordable and excellent headlight protection, in which the headlight light is not distorted. Cons: They look like an amateur.
Protecting fog lamps from water
The weak point of all fog lights of the Auto VAZ 2110 is the rubber cover on the back. At some point it moves and water gets into the headlight. Because of water, fog lights become unusable and you have to repair them or buy new ones.
Measures to protect fog lights from water come down to two points:
Treating the edges and joints of the fog lamp with sealant.
Make visors to prevent water from getting into the fog lamps
I think everything is clear about the first point, but the second point is more detailed:
You will need 2 tin cans with a capacity of 1 liter. You just need to pay attention to the fact that on one side you need to bend it so that the piece of iron does not come out of the fog.
Now water will no longer get into the PTF!
xenon-kiev.com.ua
Another important plus
It is worth highlighting one more important advantage, which strongly distinguishes LEDs and brings them to the fore. Since they do not contain a filament, they are very resistant to various types of vibrations, which simply cannot be avoided when the car is moving.
Due to the wide range of colors, LEDs are an excellent option for giving your car an original appearance. A kind of tuning without significant outside intervention.
The LEDs themselves in foglights are characterized by their small size, which allows them to adapt to the design of any vehicle. But, unfortunately, there is one drawback, which will be discussed below.
Disadvantages of LEDs
The main disadvantage of LED lighting is its high cost. Another drawback is the insufficient brightness - only 700 lm, while the minimum indicator for lamps should be 1000 lm. Only in this case can the necessary visibility of the road surface be ensured in conditions of poor visibility. And as you can see, LED lamps do not satisfy the required condition, and therefore xenon is still in a leading position among other analogues. But overly bright light is not always good for the cause. And it is no coincidence that the use of such lamps is allowed with some reservations from the law.
You should be aware of these disadvantages before deciding to install LEDs in your foglights yourself.
Installation of PTF
There are no fundamental differences regarding the installation of PTF. You can only notice that it is easiest to install LEDs in standard round-shaped optics. If the headlights have an excellent shape, then you will need a lot of patience to find a suitable option that eliminates major alterations.
It is also worth taking into account that PTFs, regardless of design, are used together with the side lights of the car. But connecting them to the ignition using a separate button is highly not recommended.
Some cars do not have fog lights installed at all, which can often be found among domestic vehicles. Therefore, many drivers try to correct this situation by installing LEDs in their foglights on their own.
But at the same time, it is necessary to adhere to certain requirements, otherwise penalties from the traffic police cannot be avoided. That is, the headlights should be located at a height of 250 mm from the ground surface (no less), and the distance to the nearest side lights should be no more than 400 mm.
As for the LED connection diagram, it is completely the same as in the case of standard fog lights.
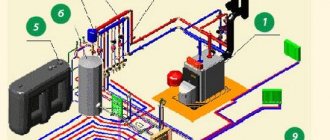
How to choose the right fog lights
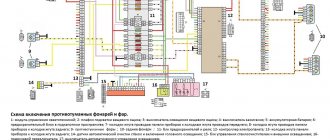
Diagram for parallel connection of fog lights Electrical diagrams for installing fog lights differ only in the number of positive wires stretched to the lamp bases. Dashboard. But such a circuit in its pure form is not suitable for connecting fog lights. The headlights are connected only through a relay. We do not turn on the headlights, thereby saving expensive lamps and saving car energy. Now, when you press the power button, the minus is applied to the relay winding - the relay is activated and thereby closes contacts 30 and 87 of the relay and - our light bulbs light up! That's it! Where to start installation? Most often, yellow filters were installed on fog lights, because only they could give the light beam special characteristics. Otherwise, you will have to install the wiring yourself. They can be perfectly used to illuminate those areas that are not illuminated by standard optics.
We draw attention to the Rules, which state that PTFs should be turned on only after the side lights are turned on. Connection diagram for fog lights Let us immediately note that the simplest PTF connection diagram is to connect the fog lights from the battery through a switch. Connecting additional headlights via relay
More on the topic: Connect the light on the site
Hyundai Solaris
As mentioned above, it is easier to install LEDs in round standard optics, but for owners of a Hyundai Solaris, the situation is exactly the opposite. In this case, you have to dodge. But craftsmen found a good solution - installing LED fog lights on this car.
For this you will need:
- base H27 (2 pcs.);
- regular hexagonal ballpoint pen (2 pcs.);
- LED strip (1 meter).
You also cannot do without solder, soldering acid and the soldering iron itself. The entire procedure for installing LEDs in Solaris fog lights is simple, and can be described in a few words.
To begin with, you need to cut 6 pieces, each 50 mm long, from the common tape. Segments of about 65 mm in length are cut from ballpoint pens. A piece of tape should be glued to each edge, and then soldered together parallel to each other. The resulting structure is then attached to the base using glue and soldered to the base contacts. Before installing the resulting lamp in the headlight, it is better to check its functionality. If everything is in order, you can safely proceed to the direct installation of the LED PTF.
You can, of course, purchase ready-made options and not bother yourself with unnecessary work. However, it all depends on the family budget, since the cost of LED fog lights starts at about 5 thousand rubles. Therefore, for some drivers, DIY is the best option.
There is a choice, a comparison is necessary
There is a choice, but it is better to take a proven kit.
Yes, there really is a choice. The market offers fairly high-quality equipment from various manufacturers, ranging from the Bosch branded line to analog kits made in China.
You can conduct a whole analytical analysis of all products with comparison:
- supply kits;
- price corridor;
- the presence of certain advantages of choice (some manufacturers allow you to buy not a set, but one headlight at a time), but let’s leave this for marketers
As they say, heaven is for the birds, and we have headlights, and a complete set. Take it as you will, but there is no better equipment on the market than Bosch yet (author's opinion).
Purchasing equipment from other manufacturers is fraught with pitfalls that will certainly reveal themselves during installation. Either the valve is missing, or the wire is insufficiently long and needs to be extended, or the button for the panel is non-standard and requires additional effort to install.
Purchase and preparation for work
Photo of the kit before installation.
All contacts must be insulated.
We select directly for work:
- All purchased kits;
- 15A fuse and holder for it;
- Screwdrivers, shaped and flat:
- Rigid wire, preferably steel, 20-25 cm for pulling wires;
- A wrench for 8 and 10 and a hexagon for adjusting the light (we also include a tape measure here);
- Wire cutters and electrical tape, as well as plastic clamps for fixing the wiring into a single bundle.
Bumper work
It's better to remove the bumper.
Moving somewhat away from the specific and coming to the general, I would like to say that all work takes place in three stages:
- Installing headlights directly on the bumper;
- Wiring and assembly of the entire system;
- Checking correct installation and adjusting the light.
That's all the instructions.
And we start with the bumper, where the following actions are carried out:
- To begin with, the black bumper grilles are removed, taking into account the fact that they are fixed with both screw fasteners and latches;
- We remove the bumper directly, unscrewing the mounting bolts, as well as the screws fastening to the fender liners;
- After unscrewing the fasteners, the bumper moves forward and moves out with light movements with slight vibrations;
- Next, remove the plugs for the sockets for the fog lamps; this can be done easily with a flat screwdriver, bending the latches;
- The headlight is inserted together with a ready-made purchased plug, which must be painted or sealed before installation, and is fixed with three self-tapping screws in special sockets.
Working with the kit
It is no coincidence that the wires are multi-colored.
Now let's move on to wires, buttons, fuses.
We produce the following:
- First of all, we remove the rubber seal that secures the wiring harness into the interior (it is located behind the clutch pedal);
- We install the button on the panel, and remove the wires from the passenger compartment using rigid steel wire for pulling (we fix the new wires along the length of the harness with plastic clamps so that there is no sagging of the wires);
- The wiring is carried out directly to the fog lights. In this case, the right wire will be longer; it is better to run it under the radiator grille. At the same stage, the negative terminals are installed to the body bolts (except for the crankcase protection bolts); (see also the article Kalina wiring diagram: new elements of electrical equipment)
- Next, we find the fuse box, where we will be interested in the pink wire that supplies power to the high beams. All connections are made through a 15 amp fuse;
- Then we need 87 and 30 relays and their power contacts, which, after passing through the fuse, go to the fog lights;
- Contacts 85 and 86 provide the negative component of the network, with output to the negative terminal of the battery and the car body, but with a mandatory “mark” in the fuse;
- Next, the installation is checked and reassembled.
And we put everything in place.
Light adjustment
How to install fog lights on Kalina is already clear, all that remains is to adjust the light. To do this, we find the hole under the headlight where the adjustment screw is located, and use it to adjust the light level.
Adjustment is the final touch.
https://youtube.com/watch?v=THTdZcFdVzU
Public opinion
If anyone has doubts about the use of LEDs in PTFs, you can visit several forums on automotive topics.
By studying numerous reviews about LEDs in foglights, you can find out, for example, which lighting sources are best to purchase, since the market is flooded with various fakes that fail almost the next day.
At the same time, as often happens, there are supporters of a good alternative in the form of LEDs and their opponents. Many drivers note that the luminous flux is no worse than from xenon lamps. Others, on the contrary, do not see the difference, since, in their opinion, diodes do not shine much better than the same halogen bulbs.
But this happens all the time: some remain disappointed, while others see all the benefits. Perhaps it’s all about some subtleties of the headlight design or other factors. In any case, most drivers have already appreciated all the delights of LED lighting in foggy conditions. And many car enthusiasts were satisfied.
How to install fog lights in a car
Many car enthusiasts are interested in whether it is possible to install headlights themselves. Of course, it’s possible, it’s not that difficult, it doesn’t require any special skills. It is quite clear that there is no single instruction for installing fog lights, and there cannot be: installing headlights in cars of different brands and different models has its own characteristics, but, nevertheless, general rules for attaching and connecting headlights still exist - we will talk about them We'll tell you now.
First, purchase your own fog lights. Which headlights to buy – xenon or halogen – decide for yourself.
However, when purchasing headlights, be sure to take into account the fact that they are also divided into types according to the principle of their fastening. Depending on it, headlights can be mounted or mortise
If you can install mounted headlights mounted on brackets on almost any car, then you will not be able to install mortise headlights, for example, on the sixth model of the Zhiguli, since such headlights can only be embedded in a plastic bumper.
In addition to the headlights themselves, you will also need:
- wires;
- insulating tape;
- headlight relay and socket for it;
- wire connectors;
- headlight switch button. There is often a free button or toggle switch on your car's dashboard, in which case you can use it. If there is no free button, you will have to embed it yourself.
General operating procedure
- According to traffic regulations, it is allowed to install no more than one pair of fog lights. They should be secured at a level no lower than 25 cm from the road surface. In addition, it is prohibited to move the headlights forward more than forty centimeters from the side dimensions. Select a location for the headlights according to these rules and secure them there. To install mortise headlights (if there are no ready-made holes for them in the bumper), remove the bumper and carefully cut holes in it of the required size and shape
- Read the instructions that came with your headlight kit. It should clearly and in detail describe in what order, where and how the wires from the headlights should be routed and to which contact which wire should be connected. In addition to the verbal description, the instructions contain an electrical diagram for connecting the headlights, which you will also need to refer to during operation.
- Before starting work on connecting the headlights, be sure to remove the negative terminal from the battery!
Next, for clarity, we will describe the process of connecting headlights using the example of their connection in a VAZ 2109 car
Install a power button.
- To the right of the speaker grille, there is already a regular place for the headlight switch button, which is currently covered with a plastic plug. Remove the grille, unscrew the speaker, and you will see two connectors for connecting the button.
- Remove the plug from the panel, put the button in its place, and connect the button to the connectors. Return the speaker to its place and replace the grille.
Connect the relay and headlight power wires.
- Open the hood and find the black box underneath - this is the mounting block. Unscrew it and lift it up and you will have access to the connectors.
- Route the wires from the fog lights under the hood to the mounting block.
- Stretch three wires from the relay to the black box (pre-select a place where it will be convenient to screw it to the car body). The fourth wire coming from the relay is the ground wire; it does not need to be connected to the mounting block.
- Next, use the electrical diagram included with your vehicle's operating instructions. In accordance with it, disconnect the connectors marked in the diagram as Ш 8 and Ш 7 from the black box, and insert into them the terminals of the wires coming from the headlights and the relay (again, follow the electrical diagram).
- Return connectors Ш 7 and Ш 8 to their places.
- Reinstall the black box.
- Screw the relay to the machine body with a bolt, and secure the ground wire coming from the relay under the same bolt.
- Securely secure the ground wires coming from each headlight near the headlights themselves on the car body.
- Connect the terminal to the battery and check how bright your new fog lights are.
You may also find the article Which headlights are better useful.