01/26/2022 3,869 VAZ Kalina
Author: Ivan Baranov
Despite the fact that anti-fog optics illuminate the road for only 10 meters, it still allows for safe movement by car in bad weather. In the absence of this type of headlights, visibility of the road will be limited, which will affect the safety of the driver and passengers of the car. How to install fog lights on Kalina and what headlights can be used for this - read below.
[Hide]
Principles of classification
PTF is characterized by a directional and long-range luminous flux. Taking into account quality and class, experts distinguish the following types of fog lights:
- square;
- round;
- double;
- for external installation.
On the second generation Kalina you can install halogen or xenon lamps. The latter type of optics has the following advantages:
- good brightness;
- long service life.
Experts recommend installing 2 fog lights from the German manufacturer OSRAM on the Lada Kalina. Optics of any color illuminate the road equally. Russian products are marked with the “E22” mark. Fog lights marked “02” meet all international requirements. There is a certain optics marking system:
- “C” - separate low beam device;
- “R” — high beam optics;
- “H” - headlight with halogen lamp;
- “PL” - a lamp with a diffuser made of optical plastic;
- “S” is a glass headlamp.
When choosing a fog lamp, experts recommend giving preference to optics with a sealed and durable housing and thick plastic. Glass headlights can quickly fail. You can install 2 aerodynamic fog lights with reliable fastening on Kalina.
It is better to install dismountable PTFs on the car. In such optics, you can replace glass or a burnt out lamp.
PTF installation
If you bought fully equipped headlights, then integrating them into the front bumper will not be particularly difficult.
You will only need:
- Install PTF in regular places;
- Secure them with self-tapping screws;
- Install incandescent lamps in the headlights;
- Connect the plug and lead the wires into the engine compartment.
Advice! For additional glass protection, order the production of headlight stickers. This transparent film can protect fog lights from stones and plant branches.
Repair work
To install some of the above models on Kalina 2 with your own hands, you will need to redo the fastenings. Otherwise you can choose:
- Fog lights from Bosch - German optics are equipped with high-quality glass. These fog lights are characterized by their range of light;
- optics from "Luch" - low price and quality;
- fogs "ProSport" (Chinese manufacturer);
- products from Kirzhach (lined headlights).
The fog lights come with plugs and covers. To install new LED or fog lights on Lada Kalina 2, you will need:
- optics kit;
- wiring;
- relay;
- button;
- fuse with holder;
- screeds.
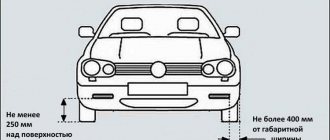
PTF must be installed in standard holes. Otherwise, the headlights are positioned symmetrically with respect to the longitudinal axis (above 25 cm from the asphalt and at a distance of up to 40 cm from the side marker plane). The power of the lighting device should be within 50-60 W. The lamp base must have the following designations: H-3, H-1.
Before connecting the PTF, it is recommended to decide on the method of installing the optics:
- with preliminary removal of the bumper;
- without dismantling work.
The first method is used by beginners. Installation and connection of fog lights using the second method is used by qualified craftsmen.
How to install a set of fog lights with your own hands (diagram)
To save time on dismantling the bumper, we will show you how to replace it without removing it.
- When installing the right headlight, turn the steering wheel as far as possible in this direction - this increases the working space.
- Remove the front mudguard.
Turn the steering wheel to the right and remove the shield
- From the inside, we open the latches that secure the old PTF or plugs.
- We remove the plug.
- We fix the new headlight from the inside with 3 self-tapping screws.
Attach the headlight to 3 self-tapping screws from the inside
- Installing a new frame. To do this, press it firmly against the bumper until it clicks.
- We do the same with the left headlight.
This completes the installation of the optics. Now we connect the headlights using the pre-purchased installation kit.
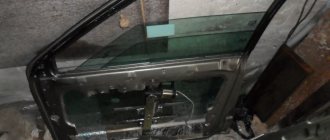
Step-by-step dismantling instructions
To dismantle the front bumper with your own hands, you must first unscrew the fasteners. They are located under the radiator grille. Then unscrew the fasteners (from the wheel arches), with which the bumper is fixed. The side panels of the latest design are brought out from under the wheel arches. The next step is to dismantle the bumper.
To remove the plugs, use a flat-head screwdriver. The foglights are screwed on with self-tapping screws. For 1 headlight you will need 3 fasteners. The seal located under the clutch pedal is pushed out. The wires from the optics are pulled out. For this purpose, metal wire is used. The wiring from the PTF is connected to the main wiring.
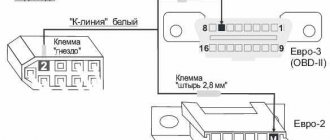
Since PTF consumes 110 W, the connection diagram for such optics requires the installation of a relay. The control button is mounted on the dashboard. Power supply to the optics is made using the pink wire located in the fuse box. The current strength of the fuse used to connect the fog lamp should be 15A.
After drawing up the diagram, it is recommended to independently check the correctness of the connections. Then connect the power supply terminal. The button installed on the dashboard turns on. If the above work is done correctly, then the headlights work normally. To obtain “cold” lighting, xenon is inserted into the PTF. The next step is to install the bumper and re-check the correct operation of the chain.
How can I install
There are 2 ways to install fog lights on a Lada Kalina car:
- Without removing the front bumper;
- With bumper removed.
Advice! If you do not have sufficient skills in working with plastic parts, then it is better to completely remove the bumper. In this way you will protect it from breaking off latches and fasteners due to negligence.
The factory instructions provide detailed information on all mounting points for the front bumper
Light adjustment
When the headlights are installed, you need to adjust their direction and brightness. Lada Kalina of the second generation is installed on a flat surface (5 m from the wall). Then one headlight is covered with cardboard. When rotating the adjustment screw, monitor the boundary of the outgoing light flux (below 0.5 m from the light level of the main headlights).
To make precise adjustments, use a regloscope.
The principle of its operation is that counter optics with a photocell are installed in front of the light source. In this case, its optical axis should be parallel to the longitudinal axis of Kalina. The use of a mirror orientation system allows for precise adjustment of the headlights. In the absence of proper experience in using a regoscope, diagnostics of fog lights should be performed by a specialist.
A photoelectric device is used to measure the luminous intensity of the optics. Multifunctional regloscopes allow for detailed analysis of light distribution. A similar technique is used at service stations.
tweet
back How to choose an armrest for Kalina
Next Advantages and disadvantages of installing a spoiler on Kalina station wagon
Tagschoice, foglight, installation, headlight
Connecting fog lights in the cabin
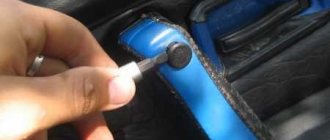
- Remove the ashtray by unscrewing the mounting bolts (4 pcs).
- Next, you need to pull out the panel on which the button covers are located through the resulting opening.
We remove the console for easier routing of wires, you can push them in like that
- Remove temperature controls.
- Instead of the air conditioner on/off button (or plug), there is a button to control the headlights. The short wires must be connected to those of the same color that go to the rear glass heating. Long wires are connected to the mounting block. You should try to push the mounting block itself into the cabin as far as possible.
Separate PTF activation button in the cabin
- Fuses and relays are connected according to the diagram.
Connection to the LCM (light control module). Now the PTF can be turned on only when the dimensions are on, and when the ignition is turned off, the PTF will go out automatically, everything is according to the “law”
- After this, all connections must be insulated.
Next, the parts are assembled in the reverse order of their removal. At this point the work can be considered completed.
New Lada: Replacing a “grenade” on a Kalina with your own hands: features, device and recommendations
Connecting contacts
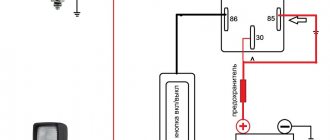
How to properly connect fog lights via a relay? The circuit includes 30, 85, 86 and 87 contacts. According to the drawing, we connect them. We also install a 15-amp fuse here. Moreover, the closer it is to the battery, the better. Next is contact 86. Everything is simple here - we connect it to the body.
Preparations before installation
How to install headlights is one thing, and you need to prepare thoroughly before it. The peculiarity of the light beam of fog lamps is its straightness, which allows you to clearly identify other road users in conditions of poor visibility. In the Lada Kalina, the manufacturer installs “Lux” optics, although today’s market is represented by a variety of offers, among which any owner will be able to choose analog PTFs to suit his taste.
These products are divided into types depending on quality indicators and class.
Replacing fog lights with new analogs does not involve performing auxiliary work related to sawing or drilling the bumper surface. The manufacturer adds specialized plates to the optics kit, the shape of which exactly follows the contours of the cutouts in the bumper. All that is required is the removal of the standard plugs. Now is the time to start installing the headlights.
To quickly and efficiently carry out installation work, the owner will need to know how to install headlights and acquire the following set of materials and tools:
- a set of selected optics;
- relay, wiring and button for connecting new products with the on-board network;
- fuse together with its holder;
- tape measure to adjust the direction of the light beam;
- keys whose size is “8” and “10”;
- a piece of wire for pulling wiring;
- screwdrivers with different profiles;
- nylon clamps for fixing the cable line;
- wire cutters, electrical tape and soldering iron;
- hex wrench to adjust the direction of the light beam.
Armed with instructions and having taken possession of the entire designated list of available tools, we begin the process of installing headlights.