The gearbox is one of the most important components of a car, the smooth operation of which determines the durability and reliability of the car. If it becomes necessary to remove the gearbox to replace it or carry out repair work, you should be sure that in this case it is impossible to do without dismantling the gearbox, since removing the gearbox is a rather complex and time-consuming process, especially if it is performed for the first time. Replacing or repairing a gearbox at a service station is an expensive undertaking, so many owners of VAZ-2107 cars prefer to carry out this work themselves. What should a car owner know who will remove the G7 gearbox for the first time without outside help?
- Fastening the VAZ-2107 gearbox
Video: how to remove and replace the VAZ-2107 gearbox cushions
- What tools will you need?
- Clutch disc alignment
Video: removing and installing the VAZ-2107 gearbox control lever
Removing and installing the gearshift lever on a VAZ 2107
When driving a car, the VAZ 2107 gear shift lever is needed in order to be able to vary the speed using the gearbox.
Like any part of a car, it is susceptible to malfunctions, so this article is about how to remove the gearbox lever of a VAZ 2107 and, if necessary, repair or replace it. The lever itself is a short segment coming out of the switching mechanism (in everyday life a rocker), and its continuation with a knob is called a rod. If it loosens too much, it can lead to difficult gear shifting or it may simply fly off the lever. Such consequences usually result when gear shifting is difficult for some reason, or the damper spacer sleeve has simply become loose over time, or the problem is in the rocker.
Increased noise
After disassembly, you need to troubleshoot the box parts. If severe wear of the gear teeth is noticed, they must be replaced. It is better to replace gears one by one. So as not to confuse the gears.
Many gears have retaining rings. Synchronizers also undergo the same troubleshooting. If they notice even slight wear or damage, they are replaced.
Particular attention should be paid to the condition of the bearings. They should not have any play or the appearance of deep treadmills of balls.
Although, even if the bearing looks good on the outside, it is better to replace it. This eliminates the possibility of noise occurring after the box is assembled.
Spontaneous speed shutdown
If the repair of the VAZ-2107 gearbox is associated with the spontaneous shutdown of any gear, then in this case the sliders and clamps need close attention.
It is necessary to inspect the condition of the fastener seats. If the edges of the seats are heavily worn, then the sliders need to be replaced.
Another method of restoring seats is used by some craftsmen. To do this, a layer of metal is applied to the seats using a welding machine. And then, using a grinder, new seats are cut out in the applied metal.
The method is quite simple, but not very effective, since the applied metal is softer in structure, which means it will wear out much faster.
It is advisable to replace the clamps during repairs, as well as the springs that press them to the slides.
This is done because the springs are constantly pressed and shrink over time, which is why they do not create the required force on the clamps.
Device location and characteristics
The gearshift lever of the VAZ 2107 is located directly in the car's interior. It is used to be able to change gears while moving. The gear lever fails only in rare cases, and the reason for this is negligence towards the product. If the product fails, it must be replaced. But before replacing, it is necessary to remove the product in question. We’ll find out in more detail how to remove it, as well as replace it on the “seven”.
On the “seven” the gear shift knob has a common problem - rattling and chattering. If you fix such a malfunction using improvised means, then replacing the device will not be necessary. Before you begin replacing the device, you will need to find out the exact causes of the malfunction. After all, sometimes not only the part in question can “fail,” but also the gearbox or clutch.
If you are convinced that it is the gearshift lever that is faulty, then only then should you start replacing it.
Replacement features
Before you begin the replacement, you need to stock up on tools such as wrenches and a screwdriver. We start with the following steps:
- Set the lever to neutral position.
- After this, you need to slide the top cover up. There is no need to completely remove the cover.
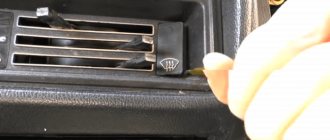
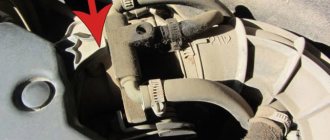
- The next step is to move the cover, which is located below, to the top. This cover is also called a thermal protection valve. In the photo below it is shown with a red arrow.
- Now you need to press the device, pushing it to the bottom. After this, you need to insert a screwdriver into the lower part of the product, where the plastic sleeve is located. The bushing is located at the very bottom of the device, as shown in the photo below.
- It is necessary to move the locking sleeve to the lower part, and then remove the product from the box.
- If the device emits strong vibrations, it needs to be replaced with a new one. In this case, you can exchange the part for a product of shorter length, as on foreign cars. A short device is much more comfortable to operate than a standard product.
Many motorists replace the standard gear shift levers with more modern ones, which allows them to uniquely customize the interior of the Seven.
After the standard product is dismantled, we install a new handle in its place. Let's look at what the installation is.
Installing the device on a VAZ 2107
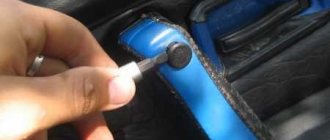
After the standard mechanism has been removed, you will need to remove the rubber bushing from it, if it remains inside. To remove the bushing, you need to use a screwdriver or hook. By prying the sleeve, we remove it from the device, as shown in the photo above.
Independent handle adjustment
Some drivers don't shy away from quality rebuild kits for installation, and they have come up with a unique shift knob setup to reduce shift harshness and vibration on the shift knob, instead of the standard plastic bushings and rubber bands, insert a piece of hose that fits the outside and inside diameters. This update also makes things easier for the future.
In addition, you can make the switching process more convenient along the length of the standard handle. To do this, remove the lever, cut the metal hacksaw to 5-6 cm in length and cut the thread at the end, in the same way as on the cut part (it is also impossible to cut the thread if desired). These updates are advisory in nature and have their pros and cons. Produce them or not every driver.
When choosing products for foreign cars, you must make sure that they can be reliably installed on the VAZ-2107. Otherwise, an incorrectly installed mechanism will lead to an emergency while driving.
How to remove the gear shift lever of a VAZ 2107
Using the lever, the driver gives the necessary commands to the manual gearbox. On rear-wheel drive cars (VAZ 2101-2107), the manual gearbox (MT) is installed directly under the lever, so there is no need for a rocker. After all, the gear shift mechanism directly connects the lever and the fork rods of the corresponding gears.
For front-wheel drive cars (VAZ 2108-2112) it is installed next to the engine, across the body. Therefore, to transmit commands from the lever to the gear shift mechanism, it is done using a backstage made of steel pipe. Because of this, the technology for removing, replacing and repairing the shift lever is different.
How to remove the gear shift lever on a VAZ 2107
First of all, move the lever to the neutral position, then lift the upper protective cover that covers the manual transmission. To remove the lever, you only need a narrow flathead screwdriver. Push the lever in and use a screwdriver to pull the latch out of the lever. Then remove it from the tip of the gear selection mechanism. Then use a steel wire hook to pull the plastic sleeve out of the lever cavity.
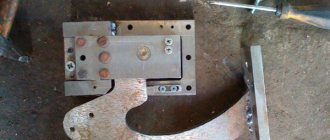
Puller design
In order to press the hinge out of the suspension, serious effort is required. Some car owners simply knock out the shank with a sledgehammer, which risks damaging the threads.
To facilitate dismantling, a ball joint remover has been invented, with which you can create force without shock load. To understand how to make a device with your own hands, consider various options:
The illustration shows a screw-type ball joint remover.
- The hinge pin (1) is tightly installed in the steering knuckle housing (2).
- The puller bracket (3) is placed on the fist.
- Using the screw stop (4), the necessary pressure is created on the finger.
The advantage of the design is that the puller’s uniform and directed pressure on the ball joint avoids distortions and damage to the unit. Disadvantage - the tool can only be used if there is free space above the fastening nut.
Despite the complexity of the design, such a ball joint remover can be made with your own hands. You will need:
- steel sheet with a thickness of at least 4 mm;
- bolt with a strength class of 9.8 and higher;
- a nut, or a threaded bushing turned on a lathe;
- welding machine, grinder.
The design and dimensions of the puller are developed for a specific ball joint; the device is not universal.
If the installation location of the ball joints is quite compact, you can make a puller from a piece of pipe by welding plugs with holes at the ends. A thrust nut is welded to one of them.
This design is more reliable. Most factory pullers are made according to this scheme.
The next option is a ladder type screw puller. It is made of steel ties, with the help of which the spring earrings are attached. To install into the working position, it is necessary to tighten the threaded rods evenly, and the force is generated using a bolt.
With this puller you can press the hinges out of the seats in the levers. The device becomes universal if you add to it a set of bushings of different diameters (cut from steel pipes). But this puller will not be able to squeeze the ball pin out of the fist.
How to change the gearshift lever on a VAZ 2107 with your own hands
The need to replace the VAZ 2107 gearshift knob can be caused by various reasons. Thus, as a result of natural wear, the internal bushings and part of the lever may become unusable, and accordingly, shifting gears will become difficult. Heavy gear shifting, a pronounced crunch and extraneous sounds in the area of the casing are the first signs of a malfunction. Since the bushings and hinges are made of fairly fragile plastic, breakage is only a matter of time. It is quite rare that the lever itself breaks on the side visible from the interior along its length. This phenomenon may occur due to excessive mechanical stress on the handle or an accident, as a result of which the mechanism will be broken.
Most often, removal of the VAZ 2107 gearbox lever is required as a result of wear of the knob or internal parts, as well as the casing, which, with intensive handling, wears out over 60-70 thousand kilometers. At the same time, it is quite possible to change the gear lever of a VAZ 2107 yourself. To do this, you will only need a small set of screwdrivers of various shapes, and also in case of troubleshooting, you will need a repair kit for the VAZ 2107 gearbox lever along with keys for 12, 10 and 14.
Box removal process
To carry out the removal procedure, the car must be placed on an overpass, lift or inspection pit, since the process is labor-intensive and difficult. Removing the box is impossible without help, so you should call a couple of people, preferably with experience in car repair.
Tools
To carry out the gearbox removal procedure, you will need the following tools:
- a set of wrenches, which should contain keys for “10”, “13” and “19”;
- you can use union joints with heads of the same sizes, cardan joints with an extension on which the heads will be put;
A set of keys - pliers;
- flat and Phillips screwdrivers;
- tweezers;
- funnel;
- oil container;
- gearbox support;
- clean rags.
Where is
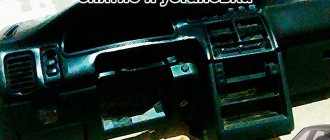
It is located in the car interior, below the dashboard, to the right of the driver (or to the left if the car is right-hand drive). It is used to change gears in the gearbox.
The shift lever is a reliable and stable part. But due to careless and careless use, it also breaks. If you suddenly begin to grab the control lever or press on it, then repairs cannot be avoided. Before you start replacing the VAZ 2107, you need to understand how to remove it from the box.
Gear shift knob
Common illnesses include rattling and loose handles. Let's call this the first stage. If you do not fix the problem immediately, you will have to completely replace the element in the future. This part, like others in the car, must be treated with care and calm. Don’t pull it, hurry up and press it into the “feeder”. If the gears do not shift smoothly and comfortably, then you probably did not press the clutch all the way, or there are problems with the gearbox. And you need to repair it, not the handle.
Disassembly
Having removed the gearbox, you can proceed directly to the main thing - disassembly. This will allow you to change damaged elements as you work, identify existing faults and solve problems on your own.
- Clean and thoroughly wash all external surfaces of the gearbox.
- Place the box in a vertical position and remove the back cover.
- Remove the clutch cable bracket, then use a rubber hammer to knock the rear cover off the gearbox.
- Remove the old gasket. She will be replaced.
- Engage any of the two gears - 3 or 4.
- Unscrew the bolt that holds 5th gear, then turn it on.
- Simultaneously turning on the indicated speeds will allow you to fix the shaft and prevent it from turning.
- Unscrew the nut on the secondary shaft, and then on the primary one.
- Remove the 5th speed synchronizer along with the fork.
- Remove the fork from the coupling. Remove the synchronizer as carefully as possible. If you allow the clutch to move away from the hub, the spring-loaded balls that secure the synchronizer will simply fall apart.
- Remove the 5th speed synchronizer locking ring.
- Remove the 5th speed driven gear from the output shaft.
- Remove the thrust ring located on the needle bearing.
- Remove the needle bearing itself from the 5th speed gear.
- Remove the drive gear from the drive shaft and remove the bearing plate.
- Now the needle bearing bushings should be removed from the secondary shaft, and the thrust washer should also be removed.
- Take out the ring that secures the input shaft bearing, and then a similar ring for the secondary shaft.
- Unscrew the locking plug and remove the ball and locking spring. Next you can get a couple more clamps.
- Remove the rear engine mount.
- Unscrew the reverse gear lock plug, tilt the box and thus remove the lock ball and spring.
- Remove the clutch housing and gearbox housing mounting bolts.
- Acting as carefully as possible, separate the two units. To do this, there are grooves in the crankcases into which the ends of a screwdriver are inserted. By shaking, you can disconnect the elements without any problems.
- Remove the gearbox housing.
- Unscrew the bolt securing the 1st and 2nd speed shift fork.
- Remove the fork and stem.
- Unscrew the bolt securing the 3rd and 4th speed forks.
- Separate the rod head from engagement with the lever, remove it along with the fork from your gearbox.
When disassembling the box into parts, be sure to pay attention to the condition of the elements. If you detect faults in time and replace gearbox components, you can get by with inexpensive but very effective self-repair
What to pay attention to
So, following the instructions, we disassemble the gearbox of your VAZ 2109
Along the way, we pay attention to the following points:
- Bearings. When they wear out, a noise from the box occurs. Plus, worn bearings negatively affect the condition of other gearbox elements;
- Synchronizers and sealing washers. If their condition leaves much to be desired, then the gears shifted poorly precisely because of them. Replace them;
- Clutch system, cotters, coupling hub clamps. All this must be replaced separately if there are signs of wear or defects;
- Blocking rings, synchronizers. If there are chips or nicks, don’t even think about alternative solutions, replace them immediately;
- Bearing tracks. Over time they wear out. If signs of wear are found, perform a complete replacement. In this state, they were only a short time away from breaking;
- Gap between gears and locking rings. Normally it is no less than 0.6 mm. In case of deviations, there is only one solution - replacing the rings;
- Retaining rings. If elasticity is lost, these elements must be changed, since they will no longer be able to perform their functions.
When assembling the gearbox, do not forget to lubricate the new gaskets with a layer of lithol. And when pressing the oil seals, do it with the working edge inward. The metal clip should be located on the outside.
https://youtube.com/watch?v=cgCFhYP17
During the process of reassembling the gearbox, all rubbing components should be treated with oil, and do not forget about the sealant for connecting the clutch housings and gearbox. Doing everything yourself is quite possible.
Lever faults
If the lever vibrates strongly while driving the VAZ 2107, most likely the problem is the severe wear of the plastic bushing that connects the lever and the gear selection device, so it needs to be replaced. Repair kits for the VAZ 2107 gear shift lever can be purchased at most auto stores. When choosing a repair kit or bushing, give preference to parts produced by AvtoVAZ, because they are of higher quality.
Vibration of the VAZ 2110 lever, as well as unclear gear shifting and large free play, arise due to weak fastening of the bowl to the car body, wear of the plastic parts of the bowl, weak tightening of the nut fastening to the rocker, or severe wear of the bushing fastening to the rocker. After replacing the bushing and properly tightening the nut, tightening the bowl mounting bolts (or replacing it), the vibration of the lever disappears.
vote
Article rating
What's the result?
As you can see, there is nothing difficult in removing the gear shift lever and installing a new one in its place. It should be borne in mind that in some cases it will also be necessary to replace plastic bushings and rings. The specified parts in the form of gearbox lever repair kits are sold in car dealerships.
As a result of this integrated approach, the driver receives clear gear engagement, as well as the absence of vibrations, backlash and other defects that affect the quality of the gearbox and reduce comfort during vehicle operation.
What is a gearbox rocker: the design of the gearbox rocker, signs of malfunctions. Adjusting the gear shift link. Recommendations.
How to adjust the gear shift drive of a manual transmission. In what cases is adjustment of the scenes necessary, the main signs. Useful tips and tricks.
Removing the gearbox: dismantling the manual transmission and automatic transmission. The procedure for removing the gearbox, what needs to be taken into account, recommendations.
Why is it necessary to check and adjust the automatic transmission cable when jerking occurs during automatic transmission gear shifting? Adjusting the automatic transmission cable.
Automatic transmission selector: basic functions. Types of automatic transmission selectors: steering column, push-button, floor. Malfunction of the automatic transmission selector.
How to replace an automatic transmission with a manual transmission, as well as replacing a manual transmission with an automatic transmission: nuances. Useful tips and tricks.
Source: krutimotor.ru