Sometimes it happens that a car enthusiast, having overcome some particularly deep puddle, discovers that the car has stopped starting. This can happen with any car, but it happens especially often with the Chevrolet Niva. We will tell the reader how to independently remove the starter from this machine in this article.
Replacing the starter on a Chevrolet Niva
This photo report shows in detail how to replace the starter on a Chevrolet Niva with your own hands. It is worth noting that replacing the starter is quite a rare need.
In 80% of cases the starter can be repaired. In our case, there was a mechanical failure of one of the starter drive gears. This spare part is not sold separately, so I had to replace it with a new starter.
There is nothing complicated in the starter replacement procedure. He can handle it quite well on his own. Tools you will need:
- Ratchet wrench and sockets for 10, 12;
- Phillips and flathead screwdrivers;
- A penetrating lubricant like WD-40 may be needed;
We also recommend that you familiarize yourself with our video about starter malfunctions and the main possible causes.
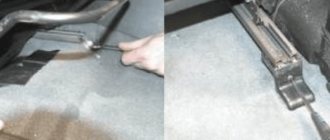
Before I started replacing the starter, I disconnected the battery. First, I removed the entire lower engine protection.
The starter is secured with three bolts; after they are unscrewed, it can be pulled out from below the engine, but a rod will interfere with this. So I immediately unscrewed it.
First the nut from the bottom.
Then the bolt on top.
Now you can unscrew the starter. The bottom bolt is fairly easily accessible from below. I unscrewed it with a small ratchet.
I unscrewed the remaining two bolts from above. This is what the starter looks like from above.
Here I have already used a spanner wrench. The key part of the key is slightly bent, otherwise it would be impossible to get to these bolts. The middle bolt is also more or less accessible.
The top bolt is the most difficult to reach of the three. But in principle, the key was easy to throw onto it, only the key stroke was very small and it took a long time to turn.
When all three bolts were unscrewed, the starter easily came out of its place.
But in order to get it out of there, the protection of the starter from heat interfered. These are sheets of metal around it. On the side of the box, the starter rested against the protection with its protrusions into which bolts were screwed.
At this point I simply bent the protection with my hands. On the other side, the protection at the bottom is secured with a nut. I tried to unscrew it with a large ratchet. She didn't give in. Then I pressed a little harder and it seemed to turn.
And when I looked, I saw that the nut didn’t even think of turning away, but I just twisted the ear
Now the starter easily pulled out of its place. The wires that go to the starter allow you to remove it without disconnecting them.
There are only 2 wires going to the starter. One small red one, which is simply plugged into the connector. We easily disconnect it by pulling the connector. The second one is healthy, screwed on with a nut covered with a rubber nozzle, and by unscrewing it I completely removed the starter.
Having unscrewed two nuts from the back of the starter, I disconnected its two halves and saw this picture.
It turned out that inside it there is a plastic part in the form of a glass with teeth, along which three gears run. So it broke into pieces and these gears therefore did not run in a circle and therefore did not rotate the gear that meshes with the flywheel.
And the gear that turns them also lost one tooth, but most likely this is due to flying plastic fragments.
https://carfrance.ru/snimaem-zashhitu-startera-na-niva-shevrole-svoimi-rukami/https://proteu.ru/chevrolet/niva/%D0%BA%D0%B0%D0%BA-% D1%81%D0%BD%D1%8F%D1%82%D1%8C-%D0%B7%D0%B0%D1%89%D0%B8%D1%82%D1%83-%D1%81% D1%82%D0%B0%D1%80%D1%82%D0%B5%D1%80%D0%B0-%D0%BD%D0%B8%D0%B2%D0%B0-%D1%88% D0%B5%D0%B2%D1%80%D0%BE%D0%BB.htmlhttps://autovizov.ru/chevrolet/%D1%81%D0%BD%D0%B8%D0%BC%D0%B0 %D0%B5%D0%BC-%D0%B7%D0%B0%D1%89%D0%B8%D1%82%D1%83-%D1%81%D1%82%D0%B0%D1%80 %D1%82%D0%B5%D1%80%D0%B0-%D0%BD%D0%B0-%D0%BD%D0%B8%D0%B2%D0%B0-%D1%88%D0% B5%D0%B2%D1%80%D0%BE.htmlhttps://avtoremont13.ru/chevrolet/%D0%BA%D0%B0%D0%BA-%D1%81%D0%BD%D1%8F% D1%82%D1%8C-%D1%81%D1%82%D0%B0%D1%80%D1%82%D0%B5%D1%80-%D0%BD%D0%B8%D0%B2% D0%B0-%D1%88%D0%B5%D0%B2%D1%80%D0%BE%D0%BB%D0%B5.htmlhttps://fizicheskij.okd1.ru/konsultacziya/zashhita-kollektora-niva -chevrole/
Self-dismantling
These diagnostic methods can only be performed if the device is removed. And for this you need to know how to remove the starter. On the Chevrolet Niva it is made as follows:
- Before dismantling, it is necessary to disconnect the negative voltage cable from the battery. Judging by the advice of owners, it is best to disassemble the starter through the lower part of the car. In this case, you need an overpass or a pit. Once the battery is disconnected, the engine protection will be removed.
- The starter itself is secured with three bolts. To turn off the device, you just need to unscrew it. Lower the bolt from the bottom. it's more convenient. The remaining two bolts should be removed from the top. The most problematic is the top bolt.
- By loosening the nuts, the thermal protection is dismantled. On the side of the control point, the tin is bent and bolted so that the tin can be unscrewed from the bottom. The starter can then be carefully pulled out. And it stretched better along with the wires. There are only two of them here.
First of all, the device is cleaned, contacts and fastenings are freed from dirt, and the mechanism is lubricated. Replace faulty parts if necessary. You can install a new Niva Chevrolet starter. The price of new units, depending on the manufacturer, ranges from 4,000 rubles.
Chevrolet Niva LC › Logbook › Replacing the starter (car with air conditioning)
With God's help, I drove a little over 170 thousand km and when I started the car again I heard something like the squeal of Kaspersky of earlier versions (the exclamation of a frightened pig for those who don’t know =)). And this began to happen with enviable regularity. After consulting, they decided on the starter - it does not immediately disengage. The service asked for a kilo-ruble (1000 rubles) for the replacement procedure. ***After the operation I realized that I couldn’t have done it cheaper myself*** I went to buy KZATE (aka KATEK) without any doubt. For some reason I thought that it was he who should have been on the car. What prompted me to do this feat were the comments to this www.drive2.ru/l/464844929995112589/ entry that everything can be unscrewed and screwed in, removed and inserted without any problems with the wheels turned all the way to the right. I don't have a protective screen either! ))
When unscrewing, the 82-piece tool set helped a lot:
The contents of all of these are the same, the difference is in the layout of the suitcase. We used both ratchets and all their extensions and universal joints so that we could reach the bottom bolts and a “13-socket” for the top bolt.
I removed the “-” from the battery. I unscrewed the bolts and lowered them a little to make it easier to unscrew the wires:
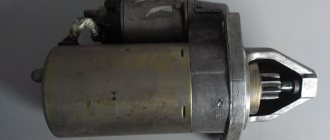
I pulled this miracle down: it really squeezes between the suspension parts)) And now let’s compare...
Not a very good angle: the original starter is closer to the phone, because of this its size is slightly exaggerated. In reality, it is noticeably smaller - both shorter in length and smaller in diameter.
Here he is - dear (closer):
Full sizePramo
For reference, power characteristics: Pramo - 1.4 kW, KZATE - 1.55 kW.
We install a new miracle in the same sequence and... nothing happens. Because the new KZATE is bigger - it doesn’t interfere from any side. I had to lower (unscrew) my pants =)
As a result, the new starter is in place, it seems to turn more powerfully than the old one, but for a longer time. The squeal is gone)) Don't break! All blessings!
Conclusion
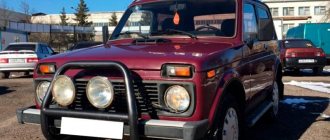
"Chevrolet Niva". This is a domestic SUV. It is bought by those who categorically do not like the quality of internal roads. These are inexpensive and relatively affordable cars. So, for those who decide to buy a Chevrolet Niva SUV, kits and prices start from the base. L, where there are stamped wheels and central locking, for 545 thousand rubles. Maximum version. LE, with air conditioning and electric package, costs 629 thousand rubles.
I'll tell you a little about how the starter was replaced.
After I overcame a deep (as it turned out) puddle, problems with the starter began. Now I’ve already read on the forum about overcoming water obstacles and possible problems, but then I didn’t know anything about it. Therefore, after I jumped out of the puddle and the car stalled in a dry place, I immediately began trying to start it. But it didn't work out. At first the starter seemed to try to turn a little, but then it seemed to jam. True, after some time, when the car had already dried out, the starter began to start, but at the same time there was a crackling or grinding sound (Later, I checked that the air filter was wet and replaced it, but water did not seem to get into the engine. Only there was about a tablespoon in the corrugation water). In general, I thought that it was because the retractable gear did not fully engage with the flywheel, and that’s why it was cracking. Perhaps the lubricant has thickened due to water or something like that, so it’s sticking. With each subsequent start-up, the crackling noise decreased and I decided that everything was being restored. But once again, during the factory, the cracking noise completely disappeared, but engagement with the flywheel disappeared altogether - the starter easily spun at high speeds, but the flywheel did not rotate. The most interesting thing is that this happened just when I was getting ready to go to the overpass to remove it and sort it out. Before that, I read books to get an idea of how to remove it, and read the forum. In general, nothing too complicated, but access to it is inconvenient. When I already looked at the car where it was actually located and what it all looked like, I even doubted whether it was worth doing this myself. But then I decided to try it anyway. In the end, I can say that it is not that difficult. So I decided to make a photo report, maybe it will be useful to someone. It’s true that I didn’t take pictures of how I removed the old starter, I only filmed the process of installing the new one, but I’ll give these photos in reverse order to show how to remove the starter.
Why is starter protection needed on Niva Chevrolet?
Apparently the engineers thought that the thermal protection of the starter should remind of itself, so they made such a short-lived mount. Due to the fact that the protection flies off the eye, a nasty rattling sound appears.
The layout of the attachments under the Niva's hood was clearly adapted to the shape of the wheel arches, so some components remained out of reach. Starter, including. The exhaust manifold hangs above it, from below it is covered with a mudguard and front axle protection and sandwiched between the engine support cushion and the pump.
Ingenuity + spring = Russian know-how!
The shield is attached to two nuts and is a casing stamped to the shape of the starter. Its task is to protect the starter from overheating, since in injection engines with a catalyst the temperature of the exhaust manifold is an order of magnitude higher than in carburetor engines.
Danger of driving without starter protection
The danger of driving without a protective shield is that under high loads and in difficult operating conditions, the starter can critically overheat, which will lead to melting or cracking of plastic parts, insulation on the windings, as well as burnout of the insulation on the wires that power and control the starter.
This is interesting: Selection of Kayaba shock absorbers by car brand
As a result, this can lead not only to failure of the starter, but also to a short circuit in the wires, then you will have to become familiar with the principle of operation of the fire extinguisher. The main problem with the shield is that the mounting lugs are held in place by two spot welds. After a year or two of use, they inevitably fall off due to vibration and the casing begins to rattle and ring, which few people like. Hello engineers, now let’s remove the starter protection on the Chevrolet Niva.
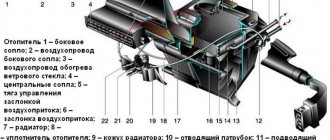
Node location
Starter for Chevrolet Niva
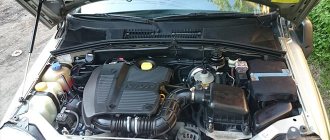
If you open the hood of a Chevrolet Niva, the starter will be located to the left of the engine, immediately under the intake manifold. However, you won’t be able to see it, since it is covered with a heat-protective casing on top. It is also impossible to see it from below, since the crankcase protection covers it there. So the only way to get to it is to remove all these protective devices.
Replacing the starter on a Chevrolet Niva
Before I started replacing the starter, I disconnected the battery. First, I removed the entire lower engine protection.
The starter is secured with three bolts; after they are unscrewed, it can be pulled out from below the engine, but a rod will interfere with this. So I immediately unscrewed it.
First the nut from the bottom.
Then the bolt on top.
Now you can unscrew the starter. The bottom bolt is fairly easily accessible from below. I unscrewed it with a small ratchet.
I unscrewed the remaining two bolts from above. This is what the starter looks like from above.
Here I have already used a spanner wrench. The key part of the key is slightly bent, otherwise it would be impossible to get to these bolts. The middle bolt is also more or less accessible.
The top bolt is the most difficult to reach of the three. But in principle, the key was easy to throw onto it, only the key stroke was very small and it took a long time to turn.
When all three bolts were unscrewed, the starter easily came out of its place.
But in order to get it out of there, the protection of the starter from heat interfered. These are sheets of metal around it. On the side of the box, the starter rested against the protection with its protrusions into which bolts were screwed. At this point I simply bent the protection with my hands. On the other side, the protection at the bottom is secured with a nut. I tried to unscrew it with a large ratchet. She didn't give in. Then I pressed a little harder and it seemed to turn. And when I looked, I saw that the nut did not even think of turning away, but I simply twisted the eye to which it was attached. True, the protection bent back and allowed the starter to be removed, and the mount itself did not break off at all and seemed to be holding tightly and not rattling. I then left it all like that.
(It turns out I was wrong here. The nut shouldn’t have been unscrewed; it is welded to the mount. But you need to unscrew the bolt that goes into this nut on the other side.)
Now the starter easily pulled out of its place. The wires that go to the starter allow you to remove it without disconnecting them.
There are only 2 wires going to the starter. One small red one, which is simply plugged into the connector. We easily disconnect it by pulling the connector. The second one is healthy, screwed on with a nut covered with a rubber nozzle, and by unscrewing it I completely removed the starter.
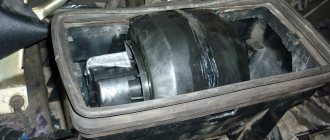
Having unscrewed two nuts from the back of the starter, I disconnected its two halves and saw this picture.
It turned out that inside it there is a plastic part in the form of a glass with teeth, along which three gears run. So it broke into pieces and these gears therefore did not run in a circle and therefore did not rotate the gear that meshes with the flywheel.
And the gear that turns them also lost one tooth, but most likely this is due to flying plastic fragments.
This photo report shows in detail how to replace the starter on a Chevrolet Niva with your own hands. It is worth noting that replacing the starter is quite a rare need. In 80% of cases the starter can be repaired. In our case, there was a mechanical failure of one of the starter drive gears. This spare part is not sold separately, so I had to replace it with a new starter.
There is nothing complicated in the starter replacement procedure. He can handle it quite well on his own. Tools you will need:
- Ratchet wrench and sockets for 10, 12;
- Phillips and flathead screwdrivers;
- A penetrating lubricant like WD-40 may be needed;
We also recommend that you familiarize yourself with our video about starter malfunctions and the main possible causes.
What tools are needed for removal?
To replace, you will need the following sets of tools and accessories::
- medium-sized flat-head screwdriver;
- open-end wrenches;
- socket heads equipped with a ratchet collar;
- special penetrating lubricant WD-40 (may not be useful);
- spanners.
When all the specified tools are prepared, you can begin the process of removing the old starter and replacing it with a new one according to the algorithm below.
Removing and checking the starter of a VAZ-2123 car
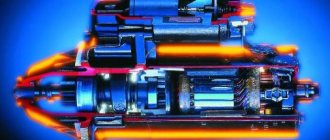
The starter type 5722.3708 is a DC electric motor with excitation from permanent magnets, combined with a planetary gearbox and an electromagnetic two-winding traction relay.
- The covers and stator housing are tightened with two studs.
- The armature shaft rotates in two metal-ceramic liners installed in the cover and support.
- Four permanent magnets are fixed in the stator housing.
- Rotation from the armature shaft is transmitted to the drive shaft through a planetary gearbox, which consists of a central gear, three planetary gears, a carrier and an internal gear.
- Planetary gears rotate on needle bearings.
- The starter connection diagram is shown in the figure.
- When the starter is turned on, the voltage from the battery 2 through the ignition switch 4 is supplied to both windings of the starter traction relay (retractor II and holding I).
- After closing the contacts of the traction relay, the retractor winding is turned off.
Connecting a starter with an ME17.9.71 EURO-5 controller
In this engine control system, power is supplied to the starter solenoid relay winding through the contacts of the additional relay (Fig. 1.10-01).
The controller turns on the starter relay when the ignition is turned on, if the “correct” password is received from the APS control unit, and turns it off after the engine starts (the engine speed has reached 500-1000 rpm depending on the coolant temperature) or after 7-20 seconds (depending on the coolant temperature) after the starter starts cranking.
The controller prohibits the activation of the additional starter relay when the engine is running.
Removing and installing the starter
- To remove the starter, place the car on a viewing hole or a lift.
- Remove the engine screen.
- Disconnect the negative terminal from the battery.
- Remove the rear mudguard of the engine compartment.
- Using a 13mm socket, unscrew the bolt securing the front support bracket to the intake pipe
- Using a 13mm wrench, unscrew the nut securing the front support bracket to the bracket of the right support of the power unit and remove the bracket
- On a car with air conditioning, you need to remove the guide screen, to do this:
- Using a 10mm wrench, unscrew the two nuts securing it
- Removing the screen
- Use a 13mm socket to unscrew the upper starter mounting bolt.
- From the bottom of the car, using a 13 mm socket with an extension, unscrew the bolts of the middle and lower starter mounting
- The middle bolt also secures the control oxygen concentration sensor wiring harness holder bracket.
Preliminary diagnostics
A number of actions need to be taken:
- We check all the existing electrical connections that connect the starter and the battery, since it happens that poor contact between ground and positive leads to poor operation of the device, and the click of the retractor relay is heard, thereby not enough power to crank the crankshaft in the engine. This problem is eliminated by cleaning the contacts of the starter, battery, and various groups of contacts.
- We check the battery itself; it is necessary to replace the load plug itself with a proven one that is working. If there is no result, then it is necessary to remove the unit and replace it.
Starter on Niva Chevrolet
It happens that the car starts intermittently or does not start at all. One of the common reasons for this may be a faulty starter on a Chevrolet Niva. To accurately understand whether there is a problem or not, you need to dismantle it and carry out diagnostics.
This part is a direct current electric motor and is activated by a permanent magnet combined with a planetary gearbox and relay. Before dismantling, it is advisable to understand whether this is the reason why the power unit does not want to start. This can be understood both by its appearance by conducting diagnostics and by replacing the battery with a new one.
Diagnostics
- All connections between the battery and the starter should be checked, as if there is poor contact there may not be enough power to crank the crankshaft. This problem can be solved by cleaning the contacts.
- It is necessary to check the battery, and if it is faulty, replace it
Replacement
If you are wondering how to remove the starter on a Chevrolet Niva, then you will find the answer to this question below:
- First of all, to prevent a short circuit, disconnect the battery
- The crankcase has a protection that needs to be removed
- Unscrew several bolts that secure the starter.
- Removing thermal protection
- Pull the part to be replaced towards you and disconnect the wires from it
- We clean the power wires since they could be the cause of unstable operation
When the part has been removed, you can diagnose it and try to repair it.
If you decide to try to make repairs, first of all pay attention to the planetary mechanism; you can understand the condition of the parts of this unit by disassembling it; just unscrew a few bolts. Most craftsmen claim that this mechanism cannot be repaired and in case of breakdown it is better to immediately replace it with a new one.
Most craftsmen claim that this mechanism cannot be repaired and in case of breakdown it is better to immediately replace it with a new one.
Retractor
To ensure that the starter does not experience additional loads, a special Niva Chevrolet starter relay is installed, it is also called a solenoid relay, consisting of:
- Two windings
- Magnet
- Anchors
- Springs
When power begins to flow, the armature, under the influence of an electromagnetic field, begins to compress the spring, which leads to the rotation of the bendix. When the engine starts, the power is turned off and the spring relaxes.
Malfunctions
- Burnout or oxidation of contacts
- The winding is damaged
- The armature with the spring wears out
- The hull is destroyed
It consists of a solid body, so if it breaks, it is impractical to repair it.
You can understand that replacement is required by the following signs:
- Bendix does not return when starting the engine, and a whirring sound can be heard under the hood
- When the starter is working, the power unit does not work
- When turning the ignition key, clicks are heard, but the element itself does not rotate.
Check and replacement
To check, just take a screwdriver and close its contacts, which are located on the back of the device. When the circuit is closed, the starter should work, but if it remains stationary and only a click is heard, then it should be replaced.
In order to replace the starter relay on a Chevrolet Niva, you need to do the following:
- Unscrew the three bolts that secure the part
- Removing the relay
- Installing a new part
- Checking the work
If everything is done correctly it should start
If you have an idea of how everything works and you are sure that the cause of the malfunction is in the retractor, then you can safely proceed to replacement and repair. If there are any doubts, then you need to check it on a stand under load, since it happens that without load it works perfectly, but under load it stops working.
Starter on Niva Chevrolet Link to main publication
Preliminary diagnosis
Before dismantling the starter, you must make sure that this device is the cause of the malfunction. This can be done visually or by replacing the battery with a working one. It is also worth checking whether current passes from the battery to the starter: if current passes, then the cause of the malfunction is the starter, but if current does not pass, then the starter relay should be checked. If the latter malfunctions, it must be replaced. If everything works, then the next step is to remove the starter.
The starter does not start the crankshaft
If the starter rotates, but the engine does not run, experts recommend checking the condition of the teeth on the flywheel and Bendix gear. When a car is used intensively, these teeth can become critically worn. Check their condition through the special mounting hole. You can replace them by purchasing a recompilation kit for the Niva Chevrolet starter. Its cost is about 500 rubles.
Read
At idle the same symptoms also appear. If the starter gear fits well into the engine flywheel but does not rotate, check the starter for wear and other mechanical damage. The unit may not be installed correctly.
When it comes to starter repair kits for Chevrolet Niva vehicles, they can vary greatly in their equipment and prices. But most often, manufacturers take into account all the parts that are subject to wear and need to be replaced.
Principle of operation
When the driver turns the key in the ignition, the contacts close, passing through the starter relay. The Chevrolet Niva and its engine are turned off. Power is supplied to the holding and traction windings. The magnetic field in them is of a certain strength.
The anchor then pushes the rod and contact plate. He closes the contacts on the repeater. The electric motor starts to rotate. Along with this, the anchor fork pushes the starter bendix (Niva Chevrolet 1600 is also equipped with them). Bendix has the mechanism. It interacts with the flywheel on the car engine.
Read
When the flywheel rotates faster than the starter and bendix gear, the freewheel engages. This prevents the torque from indulging the bandich and then swings back with the help of a lever. And thanks to the return of the spring, the part returns to its original position when the engine starts.
How to remove the Niva Chevrolet starter protection: photos and videos
The starter mount consists of three bolts, by unscrewing which you can remove the Chevrolet Niva starter from the bottom of the engine. The lower fastening bolt is unscrewed from below using a ratchet wrench.
Access to it is simple and does not require much effort.
The remaining two bolts are unscrewed from above using spanners with a bent head or heads with an extension with a cardan. The most problematic is the top bolt, which requires a special approach with a curved key.
The key fits onto it quite easily, but to unscrew it the lever travel is small, so you have to turn it for quite a long time. After unscrewing all three fastening nuts, it is necessary to dismantle or bend its thermal protection.
From the side of the box, it will be enough to simply bend the tin, and from the bottom you will need to unscrew the bolt securing it. It is a bolt, since the protection nut is welded and if you try to turn it, the fastening ear will definitely be broken.
Then the Chevrolet Niva starting unit can be carefully removed from its place along with the wires. The wires are long enough to carefully disconnect them when the device is removed
How to remove the starter on a Chevrolet Niva video two - one is small red, which you can simply remove from the connector by gently pulling it.
This is the wire that comes from the ignition switch. The second, large one, is screwed onto a nut.
Recommendations for use
To prolong the operation of the starter, you should follow simple rules:
- When starting the engine, the starter must be turned on for no more than 10-15 seconds, and again only after 20-30 seconds. If the starter operates continuously for a longer period of time, this may cause overheating of its armature and stator windings. If the engine does not start after three attempts, you should check the ignition system with the power supply system. If any faults are found, fix them.
- After a successful start, it is necessary to immediately turn off the starter, since if the starter drive gear is rotated for a long time by the flywheel, the overrunning clutch may jam.
- Do not use the starter to move the vehicle. This causes a very large load on the trigger mechanism, causing it to overheat and fail.
By following these simple tips, you can significantly extend the life of the Chevrolet Niva starter, avoiding its replacement.