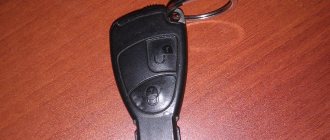
The new Mazda 3 comes with 2 keys and a card. With each of them you can open or close all car doors, including the trunk door; turn on the ignition. In order to lock or unlock the doors you need to press a special button.
If the first time after pressing the button the central locking does not work, and the system only works at a close distance from the car. This indicates that the battery in the Mazda 3 key needs to be replaced.
All generations of Mazda 3 are equipped with remote-controlled central locking. The kit includes 2 keys and a card with codes. It must be saved, using the unique code from the card, you can order a duplicate key for a specific car.
Mazda 3 chip key – device description
Almost all modern cars have some degree of protection against theft, and much better than those cars that were produced in the 90s of the last century. One of these levels of protection is considered to be the presence of a car owner with a chip key.
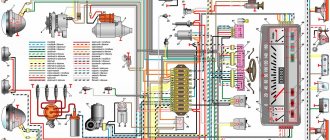
How does the Mazda 3 chip key work? As we know, the car’s ignition switch housing is located in a special frame, which is directly connected to the immobilizer electronic unit. When we turn the key in the lock, the electronic unit of the device transmits certain impulses to the ignition lock frame and the reading mode, invisible to the human eye, is activated.
The information reading mode is the response from a key equipped with a chip. Next, the following happens: thanks to the impulse, the chip key receives the necessary energy and transmits the code embedded in it to the immobilizer frame.
The frame, in turn, receives an encrypted code and, if it matches the factory settings, gives a kind of permission to start the power plant. After which the engine starts and there is no longer a need for the starting circuit.
Replacing the battery in the “Advanced Key” card
The Mazda manufacturer recommends changing the card's battery at a service station. However, it also allows for independent replacement. You can use the tools from the previous list.
Step-by-step instruction
- Slide the latch and remove the auxiliary key from the card.
- In the opened part of the end of the card along the edges there are two slots at the junction of the two halves of the case, where you should insert a screwdriver and, turning the screwdriver handle around the axis, disengage the plastic latches.
- Insert a screwdriver into the gap formed around the perimeter of the case and move it along the case on both sides, releasing the remaining latches.
- Remove the top cover, which contains the battery socket.
- By pressing the edge of the battery you can remove it from the socket.
- Insert the new battery “+” down.
- Connect the two halves of the card and squeeze until the latches lock.
- Insert the auxiliary key into place and close the latch.
- Check the functionality of the card.
Note. In the latest modifications of Mazda, the “Advanced Key” card has a different design. The battery is inserted from the end of the card. There is no need to disassemble the case. It is enough to remove the socket plug and pry off the battery with a sharp awl or needle.
Signs of a Mazda 3 key problem
Reasons for engine start failure related to the immobilizer system and Mazda 3 chip key may be:
- malfunction of the native key chip; a dead battery in the key (if the chip has an autonomous power supply, in most cases the performance of the chip does not depend on the battery, since it is a small autonomous crystal placed in a ceramic case without any leads);
- breakage of the pumping loop or disruption of electrical connections to it;
- malfunction in the power supply circuits of the immobilizer unit;
- failure of communication between the immobilizer unit and the engine control unit; “failure” of the firmware of the engine control unit, immobilizer, which can be associated with a powerful electromagnetic pulse;
- malfunctions in the power supply of the engine control unit; an attempt to start the engine with a non-original key; discharge or disconnection of the battery terminals, especially when the ignition is on.
A large number of reasons why the Mazda 3 immobilizer system leads to failure to start the engine require a strictly defined algorithm (sequence of actions) to identify a specific faulty unit.
Remote control battery
The battery voltage of the remote control is 3 volts. You can use batteries from the following series: CR1620, ECR1620, DL1620, 5009LC, SB-T17. These are lithium cells with a diameter of 16 mm, a thickness of 2 mm, and a capacity of 68 mAh. The self-discharge of the element is no more than 1% per year, so they have a long shelf life - from 5 to 10 years. Remain operational at ambient temperatures from –30 to +85 °C. The battery life directly depends on the frequency of use of the key. Average duration of work: from 1 year to 2 years.
CR1620 battery
Do-it-yourself chip key repair for Mazda 3
One of the most common problems is the destruction of buttons (Mikrikov) on the key board. Buttons can become unusable over time, or a common situation is when the key body is cracked, and when you press the key button, the body itself is pressed through, and when you press the button, you come into direct contact with the button on the board.
In most cases, it is not possible to repair a chip key on a Mazda 3 yourself, since this procedure requires special skills and tools from you. Therefore, the recommendation of our website is that if the key chip breaks down, contact a specialist or purchase a new one.
Signs that the battery needs to be replaced
The remote control provides communication at a distance of up to 1 meter. The range of confident control of the door and trunk locks is within a radius of 80 centimeters from the external receivers located next to the locks. When the battery potential decreases, the driving distance is reduced.
When you have to move the remote control closer to the door handle every time you open the door, this is a sure sign of low battery power.
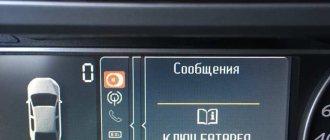
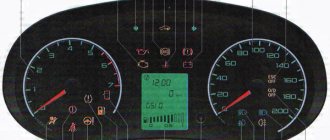
If the Advanced Key card battery is low, the green “KEY” icon will flash for 30 seconds after the starter button is pressed to turn the ignition off. The icon is located in the tachometer area on the vehicle's instrument panel. This signal serves as a warning that the battery needs to be replaced.
1 – indicator; 2 – lock button; 3 – unlock button; 4 – button to disable the interior intrusion sensor
Note. The “KEY” indication can be disabled in the personal settings system. If the card is not detected, the indicator will turn red, one of the reasons is that the card’s battery is completely discharged.
If the car security system does not respond to pressing the remote control buttons. And at the same time, the activation indicator on the remote control itself does not light up. This is direct evidence that the battery is completely discharged.
How to replace the battery on a Mazda 3 chip key - step-by-step instructions
In order to independently replace the battery in the Mazda 3 chip key, follow the following procedure:
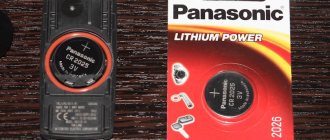
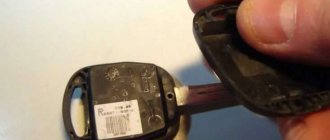
- The battery in the key is of the type CR2025, more or less normal brands like Panasonic, Energizer, Duracell for some reason, all Made in Indonesia. I chose the cheapest Panasonic of these three batteries; as it turned out, the exact same battery was originally inserted inside the key.
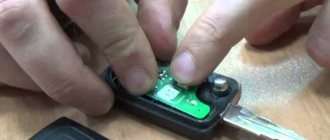
- Using a screwdriver, remove the back cover from the device's key fob.
- We take out the old battery and replace it with a new one.
- Closing the back cover
Well, that's basically all the instructions. I think everyone can handle replacing the battery in a Mazda 3 chip key.
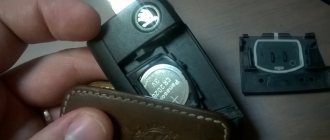
Replacing the battery in the key remote control
To replace the battery, you need to separate the key from the remote control and disassemble the remote control housing. This can be conveniently done using a thin flat-blade screwdriver. You can use a penknife, an awl or a piece of steel wire. You should purchase a new CR1620 battery in advance.
Step-by-step instruction
- Reveal the key, free the niche it occupies.
- Using a thin screwdriver, press the latch located in the niche slot and separate the key from the remote control.
- In the opened end part of the remote control, insert a screwdriver into the gap between the cover and the case and, using it as a lever or turning it along the axis, separate the upper part of the case from the bottom.
- Remember the position of the battery in the slot relative to “+” if the corresponding mark is missing.
- Press out the plastic tab on the battery holder.
- Loosen the battery using a screwdriver and remove it from the case.
- Inspect the condition of the contacts on the board, if necessary, remove oxides and wipe with a soft cloth.
- Place the new battery in the socket and press it with your finger until the holder latch locks.
- Connect the two halves of the housing and squeeze them to secure the latches around the perimeter.
- Connect the remote control to the key and press firmly to secure the key latch.
- Check the functionality of the remote control.
Attention. The latches and latches, as well as the remote control body, are made of plastic. At low temperatures, plastic becomes brittle. To avoid damage to the latches, the remote control should be warmed up.
What kind of battery does it cost?
A CR2025 battery is installed in the key at the factory. To replace this battery, similar products from any manufacturer are suitable, but it is better to give preference to companies such as Maxell, Panasonic, Sony, Energizer, GP, Duracell.
Comparison of two batteries
Experienced Mazda car owners suggest replacing the standard element with CR2032. If the “native” battery has a capacity of 150 mAh, then the proposed replacement has this figure equal to 210 mAh. True, its thickness is 0.7 mm greater. But experts say that this does not interfere with connecting and snapping the two halves of the key fob without any problems.
Instructions for disassembling the key fob and replacing the battery
To replace the battery in a Mazda CX5 car key fob, you do not need any equipment or specific skills. It is enough to prepare a new battery and, for example, a disposable plastic knife. Although the role of the latter can just as well be played by a plastic card or a small flat-head screwdriver.
Everything you need for replacement
On the back of the key fob there is a latch that holds the key.
Key lock
We press it out, hooking it with a fingernail, and take out the mechanical substitute for the electronic key.
Deleting a key
Using a knife, we disengage the two halves of the remote control. This must be done on both sides.
Disengaging the cover latches
The lid will open slightly, but only on one side.
Lid ajar
To completely separate the two halves of the key fob, you need to run a plastic knife along the seam of the connection, turning it slightly as you do so.
Separating the two halves
The result of this action will be the separation of the cover from the body, after which a place for installing the battery will open.
Two halves of one keychain
The battery is covered with a plastic cover, which is simply removed without any turning.
Removing the protective cover
To remove the battery, just tilt the case.
Removing the old battery
After installing a new battery, check that the polarity is correct (+ should be on top), then return the protective cover to its place, making sure that the sealing rubber is positioned correctly. We connect both halves of the key fob by simply pressing them until they click.
To open the door on a Mazda CX, you need to use the mechanical key that we pulled out to replace the battery in the previous description. Now we need to find the place where it is inserted. In our case, it is located under the handle on the driver's door.
Driver's door handle
If you pull it towards you, the door lock hole will open, located at an angle of about forty-five degrees relative to the surface of the door.
Key hole
We insert the key, turn it and open the door.
Insert the key into the keyhole
All that remains is to start the engine:
- Press the clutch or brake pedal (this depends on the installed gearbox).
- The green “key” will start flashing on the dashboard.
- We apply the key fob to the “Start” button. The blinking should stop and the light will turn on steadily.
- All that remains is to press the “Start” button with the same key fob or finger. If before this the engine did not start due to a dead battery, now it should start working.
- If you have completed all of the above steps, but the motor still does not start, then try pressing the “Start” button and not releasing it for ten to fifteen seconds.
If nothing helps, there is only one option left - take a taxi to the nearest store, buy a power supply and replace it according to the scheme described in this article.